To install a bathroom exhaust fan without attic access, you will need to choose a wall-mounted exhaust fan and follow the manufacturer’s installation instructions. The process involves cutting a hole in the wall, installing the fan, connecting the wiring, and sealing any gaps for proper ventilation.
Improving the ventilation in your bathroom is essential for eliminating odors, reducing humidity, and preventing mold and mildew growth. However, if your bathroom doesn’t have attic access, you may think that installing a bathroom exhaust fan is impossible. Fortunately, there is a solution – installing a wall-mounted exhaust fan.
In this guide, we’ll walk you through the necessary steps to install a bathroom exhaust fan without the need for attic access. By following these instructions, you’ll be able to improve the air quality in your bathroom and enjoy a more pleasant and healthier environment. So, let’s get started!
Assessing The Feasibility And Requirements
Assessing the feasibility and requirements is an essential step when it comes to installing a bathroom exhaust fan without attic access. Before embarking on this project, it is crucial to evaluate the existing ventilation system and determine the suitable location for the exhaust fan. By doing so, you can ensure that the installation is successful and the fan functions optimally.
Evaluating the Existing Ventilation System
Evaluating the existing ventilation system is the first step in determining whether installing a bathroom exhaust fan without attic access is feasible. Check if there is already a ventilation system in place and assess its effectiveness. Consider the following aspects:
- Inspect the current exhaust port: Check if there is an existing exhaust port in the bathroom or nearby areas, such as the roof or sidewall. Ensure that the port is properly functioning and not obstructed by any debris.
- Assess the ductwork: Examine the condition of the ductwork, including its layout, size, and material. Determine if it can accommodate a new exhaust fan and if any modifications or repairs are necessary.
- Measure airflow: Use an anemometer or a smoke test to measure the airflow and determine if it is sufficient for the bathroom size. A healthy airflow should ensure effective ventilation and prevent moisture buildup.
Determining the Suitable Location for the Exhaust Fan
Choosing the right location for the exhaust fan is crucial for its efficiency. When determining the suitable location, consider the following factors:
- Bathroom layout: Identify the area in the bathroom where the exhaust fan can be installed without obstructing other fixtures or causing any inconvenience. Avoid placing it too close to the shower or bathtub to prevent water damage.
- Nearby access points: Look for accessible areas where you can vent the exhaust to the outside. This could include an exterior wall, a soffit, or an existing vent line.
- Structural considerations: Ensure that the chosen location is structurally sound and does not interfere with any load-bearing walls or electrical wiring.
By evaluating the existing ventilation system and determining the suitable location for the exhaust fan, you can ensure a successful installation without the need for attic access. Take the time to assess these factors thoroughly before proceeding with the installation process.
Gathering The Necessary Tools And Materials
When it comes to installing a bathroom exhaust fan without attic access, it is essential to gather the necessary tools and materials beforehand. This will ensure a smooth and efficient installation process, saving you time and effort. In this section, we will discuss the essential tools, selecting an appropriate exhaust fan model, and the additional materials required for the installation.
Essential Tools for the Installation Process
Before you begin, make sure you have the following tools at hand:
- Screwdriver (Phillips or flathead)
- Measuring tape
- Drill
- Hacksaw
- Wire cutters/strippers
- Pliers
- Adjustable wrench
- Utility knife
- Dust mask and safety goggles
- Stud finder
- Extension cord
Having these tools readily available will ensure you can complete the installation with ease.
Selecting an Appropriate Exhaust Fan Model
When selecting an exhaust fan for your bathroom without attic access, it is crucial to choose a model that meets your requirements. Consider the following factors:
- Noise level: Look for a fan with a low noise rating for a peaceful bathroom experience.
- Airflow capacity: Ensure that the fan has enough power to adequately ventilate your bathroom.
- Energy efficiency: Opt for an energy-efficient model to reduce electricity consumption.
- Size and style: Choose a fan that fits the dimensions of your bathroom and matches your aesthetic preferences.
By carefully considering these factors, you can select an exhaust fan that will effectively ventilate your bathroom without attic access.
Additional Materials Required for the Installation
In addition to the tools mentioned above, you will need the following materials:
| Materials | Description |
|---|---|
| Exhaust fan | A suitable exhaust fan that meets your requirements |
| Ductwork | Flexible or rigid ductwork to connect the fan to an exterior vent |
| Duct tape or zip ties | To secure the ductwork connections and prevent air leaks |
| Mounting brackets or hangers | To support and secure the exhaust fan in place |
| Screws or nails | To attach the mounting brackets or hangers to the ceiling or wall |
| Electrical wire | To connect the fan to the power supply |
| Wire connectors | To secure the electrical connections |
| Exterior vent cap | To allow for the proper release of exhaust air |
Having these additional materials ready will ensure a hassle-free installation process.
Now that you have gathered all the necessary tools and materials, it’s time to move on to the next step: preparing your bathroom for the installation. Stay tuned for the next section.
Preparing For The Installation
Ensuring Safety Measures
Before you begin the installation process, it is crucial to prioritize safety measures to protect yourself and your property. Safety should always be your primary concern, so make sure to follow these essential steps:
- Wear appropriate safety gear such as gloves and goggles to protect yourself from any potential hazards.
- Ensure that you have a sturdy ladder or platform to access the installation area safely.
- Remove any obstacles or hazards that might hinder your movement during the installation process.
- Keep a fire extinguisher nearby in case of accidental electrical mishaps.
Switching off the Power Supply
Before beginning any electrical work, it is vital to switch off the power supply to ensure your safety. Follow these steps to turn off the power:
- Locate the circuit breaker panel in your home.
- Identify the corresponding switch for the bathroom’s power supply.
- Switch off the circuit breaker to cut off the electrical power to the bathroom.
- Use a voltage tester to double-check that the power is indeed turned off.
Removing the Old Ventilation Unit
Once the power supply is switched off, you can proceed to remove the old ventilation unit. To do so, follow these steps:
- If your old ventilation unit has an access panel, remove it carefully.
- Disconnect the wiring attached to the old unit.
- Carefully remove any screws or fasteners securing the unit to the ceiling or wall.
- Gently pull the old unit away from the installation area.
- Inspect the area for any damages or signs of wear and tear caused by the old unit.
Cleaning the Installation Area
Before installing the new bathroom exhaust fan, it is crucial to clean the installation area thoroughly. Here’s how to prepare the area for the new fan:
- Remove any dust, dirt, or debris from the installation area using a vacuum cleaner or a damp cloth.
- Inspect the area for any mold or mildew growth and clean it using appropriate cleaning agents.
- Check the ductwork for any blockages or obstructions and clean it if necessary.
- Ensure that the installation area is dry and free from any moisture that could affect the new fan’s performance.
By following these preparation steps carefully, you can ensure a smooth and successful installation of your bathroom exhaust fan, even without attic access.
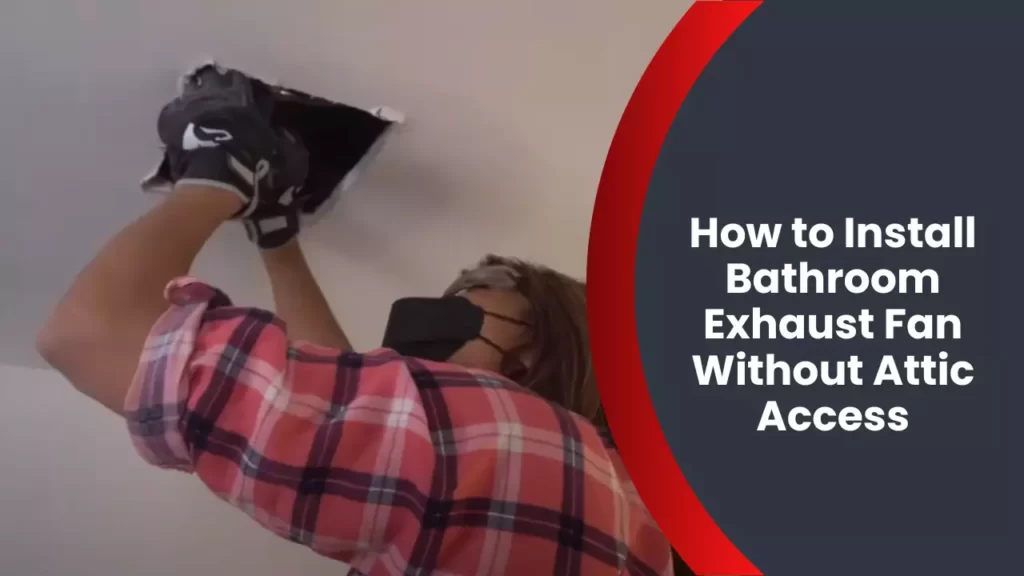
Cutting A Hole In The Bathroom Ceiling
When it comes to installing a bathroom exhaust fan without attic access, one of the essential steps is cutting a hole in the bathroom ceiling. This allows for proper ventilation that eliminates excess moisture and keeps your bathroom fresh and odor-free. In this section, we will guide you through the process of measuring and marking the proper location for the fan, safely cutting the ceiling hole, and preparing the area for the fan installation.
Measuring and Marking the Proper Location
The first step in cutting a hole for your bathroom exhaust fan is to accurately measure and mark the proper location. Follow these steps:
- Start by finding the centerpoint of the bathroom ceiling. Measure the length and width of the ceiling, and divide each measurement by 2 to find the centerpoint.
- Use a stud finder to identify any obstacles, such as ceiling joists or electrical wires, that might interfere with the installation. Mark them on the ceiling.
- Next, refer to the manufacturer’s instructions for the recommended distance between the fan and any nearby obstacles, such as walls or vents. Mark these measurements on the ceiling as well.
- Using a pencil or a marker, draw an outline of the desired hole size on the ceiling, based on the dimensions provided by the exhaust fan manufacturer.
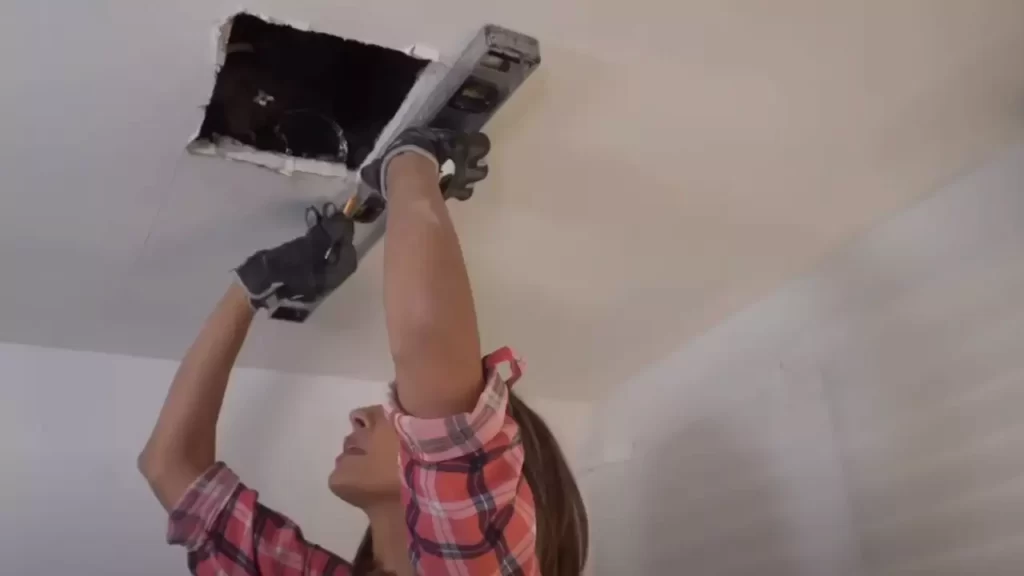
Safely Cutting the Ceiling Hole for the Exhaust Fan
Once you have marked the location and size of the hole, it’s time to cut through the ceiling. Follow these safety guidelines:
- Before starting, ensure you have the necessary safety gear, including safety goggles, a dust mask, and gloves.
- Position a sturdy ladder underneath the marked hole location, ensuring it’s secure and stable.
- Using a drywall saw or a reciprocating saw with a fine-toothed blade, carefully cut along the outline of the marked hole. Apply gentle pressure, letting the saw do the work.
- As you cut, be mindful of any obstacles you marked earlier. Make precise cuts to avoid damaging any electrical wiring or ceiling joists.
- Once the hole is cut, remove any excess drywall or debris, taking care not to create too much dust or mess.
Clearing Debris and Preparing the Area for the Fan
After cutting the ceiling hole, it’s essential to clear the debris and prepare the area for the fan installation. Follow these steps:
- Use a vacuum or a broom to remove any dust and debris from the surrounding area, ensuring a clean workspace.
- If necessary, patch any small holes or uneven edges around the cutout using joint compound. Allow the compound to dry completely before moving forward.
- Check the manufacturer’s instructions for any additional preparation steps, such as attaching mounting brackets or securing a backer plate.
- Ensure the electrical wiring is properly connected and ready for the fan installation.
By following these steps, you can safely cut a hole in your bathroom ceiling without attic access and prepare the area for installing the exhaust fan. Remember to consult the manufacturer’s instructions for specific guidance related to your fan model, and always prioritize safety throughout the process.
Mounting The Exhaust Fan
Properly installing a bathroom exhaust fan without attic access can be a challenging task. However, with the right guidance and tools, you can successfully mount the exhaust fan to improve ventilation in your bathroom. In this section, we will walk you through the step-by-step process of mounting the exhaust fan to ensure effective operation and maximum airflow.
Assembling the Exhaust Fan Components
Before you begin mounting the exhaust fan, make sure you have all the necessary components assembled and ready. These typically include the exhaust fan unit, mounting bracket, ductwork, screws, and a wire cutter/stripper. Refer to the manufacturer’s instructions to ensure you have the correct components and tools specific to your exhaust fan model.
Securing the Mounting Bracket in the Ceiling Hole
The mounting bracket is crucial for securely attaching the exhaust fan to the ceiling. Start by locating the desired position for the fan in your bathroom ceiling. Use a stud finder to check for any obstructions or framing members that may interfere with installation.
Once you have identified a suitable location, mark the outline of the fan on the ceiling, ensuring it aligns with the center of the ceiling hole. Carefully cut out the hole using a keyhole saw or a drywall saw, following the marked outline.
Next, attach the mounting bracket to the ceiling by aligning it with the hole and securing it using appropriate screws or nails. Ensure the bracket is level and firmly secured to provide a stable foundation for the exhaust fan.
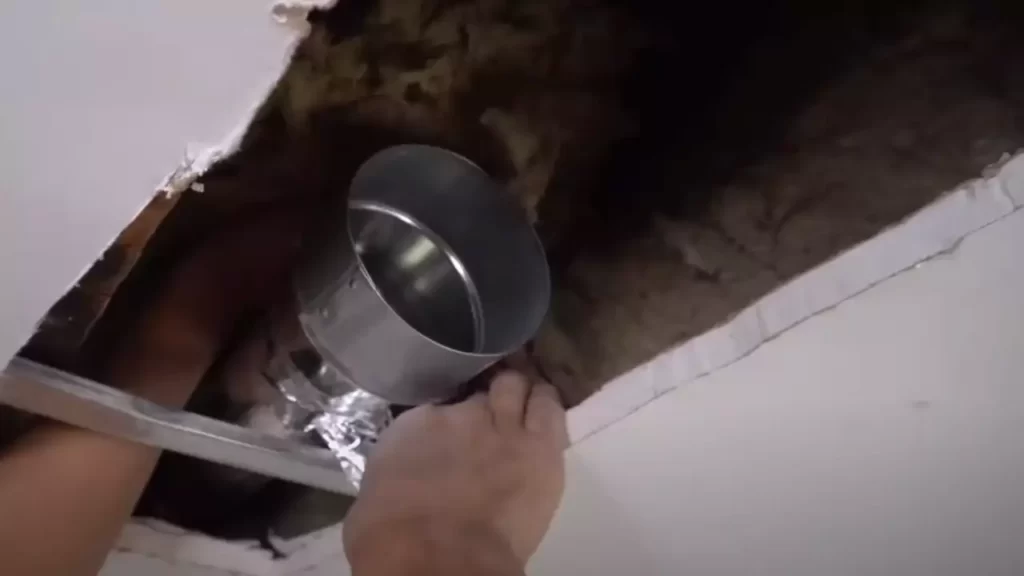
Connecting the Ductwork to the Exhaust Fan
With the mounting bracket in place, it’s time to connect the ductwork to the exhaust fan. The ductwork serves to channel the moist air and odors from your bathroom to the outside. Ensure the ductwork is made of the appropriate material (typically metal or flexible plastic) for maximum efficiency.
Attach one end of the ductwork to the exhaust fan’s opening, following the manufacturer’s guidelines. Use duct tape or zip ties to secure the connection, ensuring it is airtight and leak-free.
Finally, route the other end of the ductwork towards the desired outside vent location, making sure it is properly attached and sealed. It is important to vent the air to the outside to prevent moisture and odors from accumulating in your home.
By following these steps, you can successfully mount a bathroom exhaust fan without attic access. It is important to prioritize safety and accuracy throughout the process, ensuring the fan is securely attached and properly connected to the ductwork. With a well-mounted exhaust fan, you can enjoy improved air quality and ventilation in your bathroom, contributing to a more comfortable and healthy living environment.
Wiring The Exhaust Fan
Installing a bathroom exhaust fan without attic access can be a challenging task, especially when it comes to wiring the electrical connections. However, with some careful planning and the right tools, you can successfully wire your exhaust fan and ensure proper functionality. In this section, we will guide you through the process, step by step, for a seamless installation.
Carefully Wiring the Electrical Connections
Before you begin, it’s important to ensure your safety by turning off the power supply to the bathroom. You can do this by flipping the corresponding circuit breaker or removing the fuse.
Once the power is off, you can proceed with the wiring process. Here’s a step-by-step guide:
- Strip the outer insulation from the electrical wires, using wire strippers, to expose the bare wires.
- Identify the positive and negative wires on both the fan and the electrical supply.
- Twist the corresponding positive wires together and secure them with a wire nut. Repeat this step for the negative wires.
- For added safety, wrap electrical tape around the wire nut to secure the connection.
- If your exhaust fan has a grounding wire, connect it to the grounding wire in the electrical supply using a wire nut.
It’s important to ensure that all the connections are tight and secure. Loose connections can result in malfunctioning or even pose a risk of electrical fires. Take your time, follow the instructions carefully, and double-check your work before proceeding to the next step.
Connecting the Fan to a Switch or Timer
Now that the electrical connections are properly wired, you can move on to connecting the exhaust fan to a switch or timer for convenient operation. Here’s what you need to do:
- If you are connecting the fan to a switch, start by removing the switch plate cover.
- Connect the corresponding wires from the exhaust fan to the switch, following the manufacturer’s instructions.
- Secure the connections with wire nuts and wrap electrical tape around them for added safety.
- If you are connecting the fan to a timer, consult the timer’s user manual for specific instructions. Follow the provided wiring diagram to connect the fan to the timer, ensuring the proper functionality of the timer settings.
Testing the Wiring for Proper Functionality
After completing the wiring process, it’s crucial to test the connections and ensure everything is functioning correctly before closing up the installation. Here’s how you can do it:
- Turn the power supply back on to the bathroom.
- Check if the exhaust fan turns on and operates smoothly.
- If you connected the fan to a switch or timer, test their functionality as well.
- If all is working as expected, turn off the power supply again to proceed with the remaining installation steps.
By carefully wiring the electrical connections, connecting the fan to a switch or timer, and testing the wiring for proper functionality, you can successfully install a bathroom exhaust fan without attic access. Ensure safety measures, follow the manufacturer’s instructions, and double-check your work to enjoy a well-ventilated bathroom without any hassle.
Attaching The Fan Grille And Final Touches
After successfully installing your bathroom exhaust fan without attic access, you are now ready to complete the final steps by attaching the fan grille and conducting some essential tests. These finishing touches will ensure that your exhaust fan operates efficiently and effectively, providing you with improved air circulation and a fresher bathroom environment.
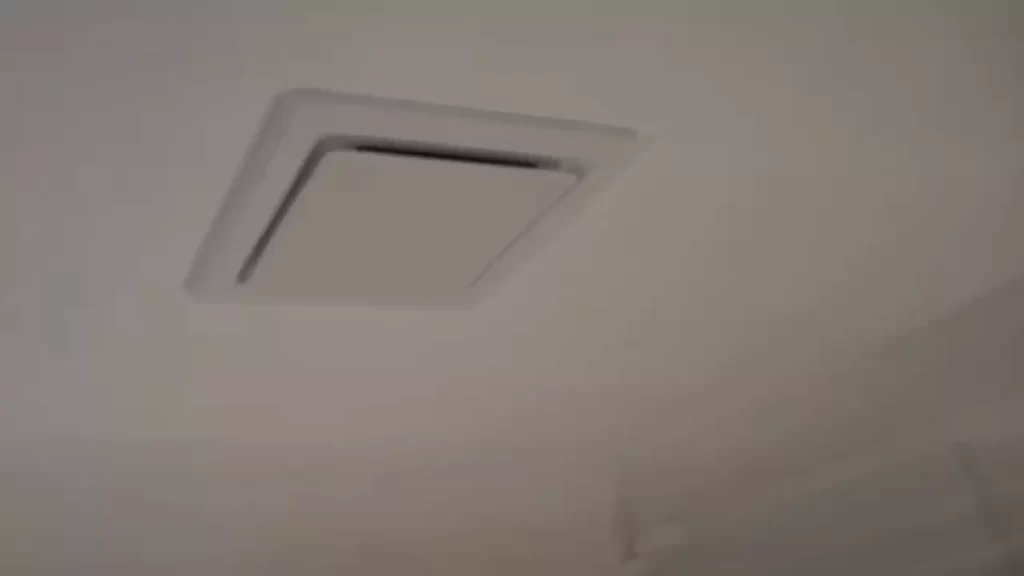
Securing the Fan Grille to the Exhaust Fan
Begin by locating the fan grille in the package provided with your exhaust fan. This protective cover not only enhances the appearance of your exhaust fan but also serves as a safeguard against any debris or objects from entering the fan mechanism.
With the fan and housing in place, carefully align the grille with the designated mounting holes on the exhaust fan. Hold the grille firmly against the housing and proceed to secure it using the provided screws. Ensure that the grille is centered and level for a polished and professional look.
Testing the Fan’s Operation and Airflow
Once the fan grille is securely attached, it is important to test the functionality of your newly installed bathroom exhaust fan. This step ensures that everything is in proper working order and allows you to make any necessary adjustments before permanently completing the installation.
- Turn on the fan switch or activate the fan using the wall-mounted control if applicable.
- Listen for the sound of the fan running smoothly without any unusual noises or vibrations. An efficient exhaust fan should operate quietly while effectively removing moisture and odors from your bathroom.
- Check the airflow by placing your hand near the fan grille. You should feel a noticeable suction as air is drawn into the fan, indicating proper ventilation.
- If there are any issues with noise, vibration, or weak airflow, double-check the fan’s connections and make necessary adjustments to correct the problem before proceeding.
Cleaning up the Work Area and Completing the Installation
With the fan grille attached and the fan tested, it’s time to clean up the work area and put the finishing touches on your installation. Tidy surroundings not only make for a better-looking bathroom but also ensure the longevity of your exhaust fan.
Start by removing any debris or leftover materials from the installation process. A vacuum or broom can be helpful in thoroughly cleaning the area. Also, wipe down the fan grille with a damp cloth to remove any dust or fingerprints.
Finally, take a moment to double-check all connections and tighten any screws if necessary. This extra attention to detail will provide peace of mind knowing that your bathroom exhaust fan is securely installed and ready to deliver its intended function.
With the mounting screws tightened and the cleanup complete, you have now successfully installed a bathroom exhaust fan without attic access. Enjoy the benefits of improved ventilation, reduced humidity, and a more comfortable bathroom environment.
Frequently Asked Questions
Can I Install A Bathroom Fan Without Attic Access?
Yes, you can install a bathroom fan without attic access. It requires some additional steps, such as using a fan kit designed for installation in a ceiling or wall. Hiring a professional is recommended for proper installation.
Can You Install A Bathroom Fan Without Venting To Outside?
Yes, it is possible to install a bathroom fan without venting it to the outside. However, this is not recommended as it can lead to moisture build-up and increased risk of mold and mildew. Venting the fan to the outside helps to remove excess moisture, odors, and improve air quality.
How Do You Vent A Bathroom With No Ceiling Access?
To vent a bathroom with no ceiling access, install a vent fan on the exterior wall. Use a flexible ductwork to connect the fan to the outside. Place the fan near the source of moisture and switch it on during and after showering to remove excess humidity and prevent mold growth.
Do Bathroom Exhaust Fans Have To Be Vented Through The Roof?
Bathroom exhaust fans don’t have to be vented through the roof. They can also be vented through a wall or a soffit. Consider the layout of your bathroom and choose the most suitable venting option.
Conclusion
Installing a bathroom exhaust fan without attic access may seem daunting, but with the right steps and tools, it can be easily accomplished. By following the guidelines mentioned in this blog post, you can ensure proper ventilation in your bathroom, eliminating excess moisture and odors.
Remember, installing a bathroom exhaust fan not only improves air quality but also helps prevent mold and mildew growth. With a little effort and patience, you can successfully install a bathroom exhaust fan without needing access to the attic. Happy ventilating!