To install Armstrong ceiling tile, measure and mark the layout, apply adhesive on the ceiling, and place the tiles accordingly. Transforming the appearance of a room can be as simple as updating the ceiling tiles.
Armstrong ceiling tiles are a popular choice for their aesthetics and ease of installation. Whether you’re a DIY enthusiast or a professional contractor, installing Armstrong ceiling tiles can be a straightforward process. We’ll guide you through the step-by-step instructions to install Armstrong ceiling tile.
By following these simple steps, you’ll be able to achieve a stylish and professional-looking ceiling in no time. So, let’s get started and learn how to install Armstrong ceiling tile with ease and precision.
Planning And Preparation
Before you start installing Armstrong ceiling tiles, it is essential to plan and prepare adequately. This will not only ensure a smooth installation process but also guarantee a beautiful and durable result. In this section, we will discuss the key steps involved in planning and preparing for the installation of Armstrong ceiling tiles.
Choosing the Right Armstrong Ceiling Tile
Choosing the right Armstrong ceiling tile is crucial as it directly impacts the overall aesthetic appeal of your space. Armstrong offers a wide range of ceiling tiles with various designs, patterns, and materials to suit different styles and functionalities. To make the right choice, consider factors such as the style of the room, the intended use, and the acoustic properties you desire.
To help you make an informed decision, here are some popular Armstrong ceiling tile options:
| Tile Type | Features |
|---|---|
| Mineral Fiber Ceiling Tiles | Excellent sound absorption, high fire resistance, and resistance to sagging and mold growth. |
| Metal Ceiling Tiles | Sleek and modern appearance, durability, and easy maintenance. |
| Wood Ceiling Tiles | Natural warmth and beauty, ideal for creating a cozy and inviting atmosphere. |
Measuring the Ceiling Area
Accurate measurement of the ceiling area is fundamental to determine the quantity of Armstrong ceiling tiles you will need. To measure the ceiling area, follow these simple steps:
- Start by drawing a rough sketch of the ceiling layout on a piece of paper.
- Measure the length and width of the room and multiply these dimensions to obtain the total square footage.
- If your ceiling has obstructions such as light fixtures or air vents, measure their dimensions and subtract them from the total square footage.
- Remember to add a little extra to account for any errors or future replacements.
Assessing the Condition of the Ceiling
Before installing Armstrong ceiling tiles, it is essential to assess the condition of the existing ceiling. This step ensures that any necessary repairs or modifications are made before installation, resulting in a smooth and flawless appearance. Here are some aspects to consider when assessing the condition of the ceiling:
- Check for any water damage or visible cracks on the ceiling surface.
- Ensure that the ceiling is structurally stable and can support the weight of the new tiles.
- If there are any existing ceiling tiles, determine whether they need to be removed or can be installed over.
- Inspect the electrical system and make sure it is safe and up to code.
By carefully planning, measuring, and assessing the condition of the ceiling, you will be ready to proceed with the installation of Armstrong ceiling tiles. In the next section, we will guide you through the step-by-step process of installing these tiles for a professional and visually appealing result.
Gathering The Necessary Tools And Materials
Before starting the installation process, it is essential to gather all the necessary tools and materials to ensure a smooth and successful Armstrong Ceiling Tile installation. Having everything ready beforehand will save you time and effort throughout the project. In this section, we will guide you through the tools, materials, and optional accessories needed for a hassle-free installation.
Tools Needed for Armstrong Ceiling Tile Installation
To achieve a professional-looking finish, you will need the following tools:
| Tools | Description |
|---|---|
| Tape measure | To accurately measure the dimensions of your ceiling |
| Level | To ensure that the ceiling tiles are installed evenly |
| Pencil | To mark the cutting lines on the tiles |
| Utility knife | To cut the tiles as per measurement |
| Ladder or scaffold | To reach the ceiling safely |
| Staple gun or adhesive | To secure the tiles in place |
| Safety goggles and gloves | To protect yourself during the installation process |
Materials Needed for Armstrong Ceiling Tile Installation
Once you have the necessary tools, it’s time to gather the materials for the installation. Here are the materials you will need:
- Ceiling tiles: Choose Armstrong ceiling tiles that suit your aesthetic preferences and meet your project’s requirements.
- Grid system: Depending on the type of ceiling tile you choose, you may need a grid system for support.
- Mounting brackets or clips: These will be necessary if you are installing the ceiling tiles in a suspended manner.
- Screws, nails, or adhesive: Depending on the installation method, you will need screws, nails, or adhesive to secure the tiles and grid system in place.
- Finishing touches: Consider getting edge trim or other finishing accessories to enhance the overall appearance of your ceiling.
Optional Accessories for Enhanced Installation
If you want to take your Armstrong Ceiling Tile installation to the next level, here are some optional accessories you can consider:
- Integrated lighting solutions: Explore the option of integrating lighting fixtures directly into your ceiling tiles for a seamless and stylish look.
- Acoustic enhancements: To improve sound quality within the room, you can opt for acoustic ceiling tiles or install additional soundproofing materials.
- Decorative inserts: Add a touch of creativity by incorporating decorative inserts or borders into your ceiling design.
By gathering the necessary tools, materials, and optional accessories, you are now ready to proceed with the installation process. Having everything prepared ensures a smoother workflow and helps achieve the desired final result.
Preparing The Ceiling For Installation
Before you begin the installation process for your Armstrong Ceiling Tile, it’s important to properly prepare the ceiling area. This step is crucial in ensuring a seamless and professional-looking result. In this section, we will guide you through the necessary steps to clear the ceiling area, remove any existing ceiling tiles or panels, and repair any ceiling damage that may be present.
Clearing the Ceiling Area
Clearing the ceiling area is the first step in preparing for the installation of your Armstrong Ceiling Tile. The following steps will guide you through this process:
- Remove all furniture, fixtures, and any other objects from the room to create a clear space to work in.
- Cover the floor with drop cloths or plastic sheets to protect it from any debris that may fall during the installation process.
- Turn off the electricity to the room at the circuit breaker. This will ensure your safety while working on the ceiling.
Removing Existing Ceiling Tiles or Panels
If there are already ceiling tiles or panels in place, you will need to remove them before installing your Armstrong Ceiling Tile. Follow these steps to remove the existing ceiling materials:
- Start by carefully examining the existing ceiling tiles or panels. Look for any signs of damage or wear and tear.
- Using a ladder or step stool, reach up and gently pry the tiles or panels away from the ceiling starting from one corner. Be cautious not to damage the surrounding area.
- Continue removing the tiles or panels in a systematic manner until all of them have been taken down.
- Dispose of the old tiles or panels responsibly, following local regulations and guidelines.
Repairing any Ceiling Damage
Prior to installing your Armstrong Ceiling Tile, it’s important to repair any damage that may be present on the ceiling. Follow these steps to ensure a smooth and even surface for the installation:
- Inspect the ceiling for cracks, holes, or other types of damage.
- If you find any areas that require repair, you can use a suitable filler or patching compound to fill in the gaps.
- Smooth out the repaired areas using a putty knife or sandpaper, ensuring they are level with the rest of the ceiling.
- Once the repairs have been made, clean the entire ceiling surface using a damp cloth to remove any dust or debris.
By following these steps to prepare the ceiling for installation, you will ensure a solid foundation for your Armstrong Ceiling Tile. Now that the area is cleared, any existing materials have been removed, and any damage has been repaired, you are ready to move on to the next step in the installation process.

Installing Armstrong Ceiling Tiles
Installing Armstrong ceiling tiles is a simple and cost-effective way to enhance the look of any room. Whether you are sprucing up your home or giving your office a makeover, Armstrong ceiling tiles offer a wide range of options to suit your style. In this article, we will guide you through the step-by-step process of installing Armstrong ceiling tiles, ensuring a smooth and hassle-free installation.
Starting with the First Row
Before you begin, ensure that you have all the necessary tools and materials to complete the installation. Measure the dimensions of your ceiling and calculate the number of ceiling tiles required. It’s always a good idea to purchase a few extra tiles to allow for mistakes or future replacements.
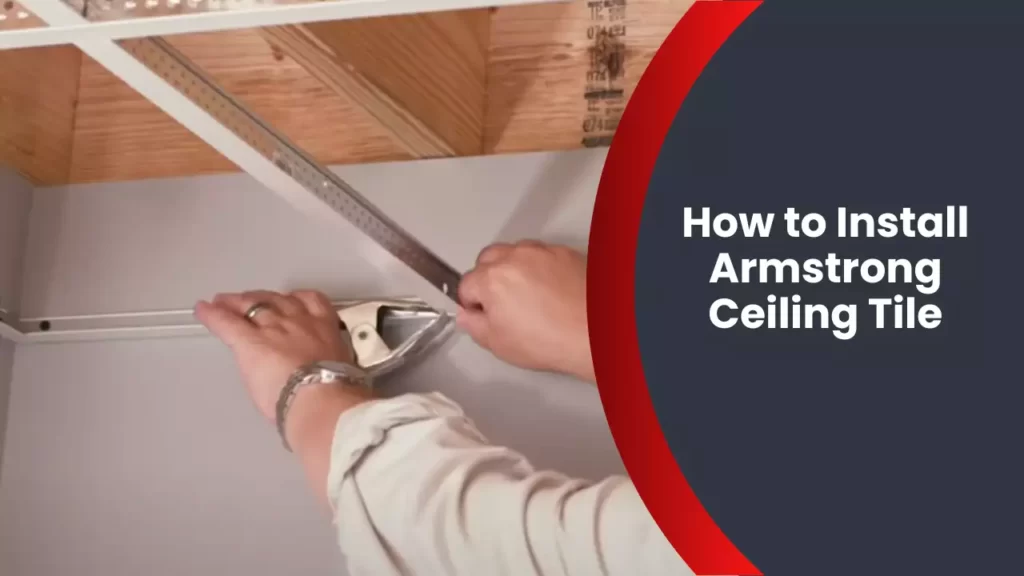
To start, locate the center of your ceiling and mark it with a pencil. This will serve as your reference point for aligning the first row of ceiling tiles. Using a chalk line or a straight edge, create a guideline from one end of the ceiling to the other, passing through the center mark. This guideline will help you maintain a straight row of tiles.
Once the guideline is in place, it’s time to position your first ceiling tile. Apply a small amount of adhesive to the back of the tile, following the manufacturer’s instructions. Press the tile firmly against the ceiling, aligning it with the guideline. Repeat this process for the remaining tiles in the first row, ensuring that each tile is snugly fitted against the previous one.
Cutting Tiles to Fit
Inevitably, you will come across areas where full-sized ceiling tiles will not fit perfectly. This is where cutting tiles to fit comes into play. Measure the area that needs a cutout and transfer the measurements onto the back of the tile. Using a utility knife or a ceiling tile cutter, carefully cut along the marked lines. Remember to wear safety goggles and gloves to protect yourself during this process.
After cutting the tile, fit it into the appropriate spot on the ceiling, ensuring a seamless integration with the surrounding tiles. If the cut tile is too small to cover the entire area, consider using trim or molding strips to cover the exposed edges. These finishing touches will give your ceiling a polished look.
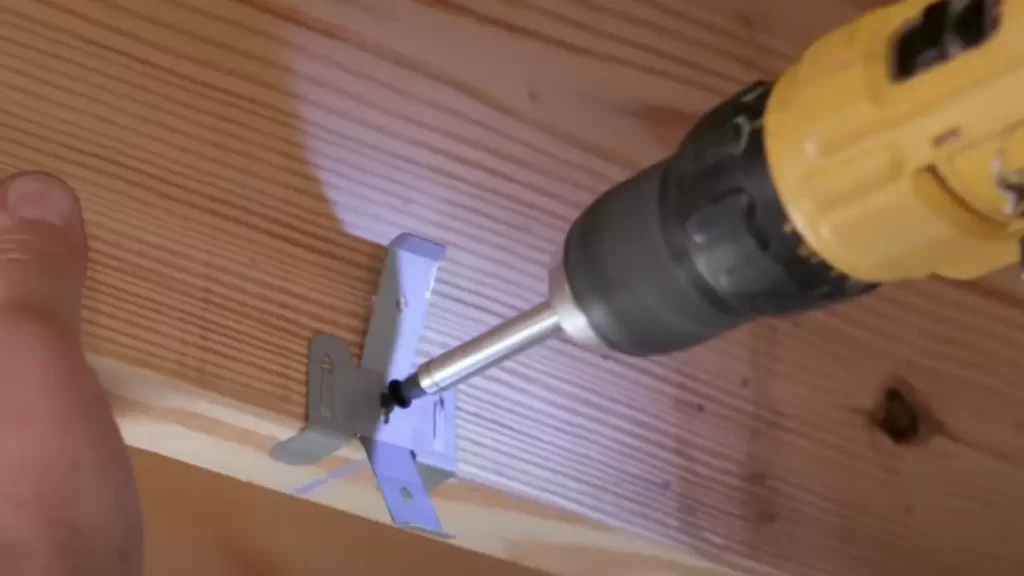
Attaching Tiles to the Ceiling
Once you have completed the first row, continue installing the remaining rows of tiles following the same process. Apply adhesive to the back of each tile and align it with the previous row, ensuring a tight fit. Use a level to check that the tiles are perfectly aligned and adjust if necessary.
For added security and stability, it is recommended to additionally secure the ceiling tiles with screws or staples. Refer to the manufacturer’s instructions for the appropriate fastening method. Remember, it’s essential to handle the tiles with care to avoid damage during installation.
Creating Cutouts for Light Fixtures or Air Vents
Lastly, you may encounter the need to create cutouts for light fixtures or air vents in your ceiling tiles. Double-check the measurements of the fixtures or vents and transfer them onto the tiles. Carefully cut along the marked lines using a utility knife or ceiling tile cutter.
When creating a cutout, ensure that the tile fits snugly around the fixture or vent. Use caution to avoid damaging the surrounding tiles. For safety reasons, it is advisable to consult a licensed electrician to handle any electrical connections during this process.
With the cutout in place, attach the tile to the ceiling, making sure it aligns with the surrounding tiles. Take extra care to support the weight of any fixtures properly.
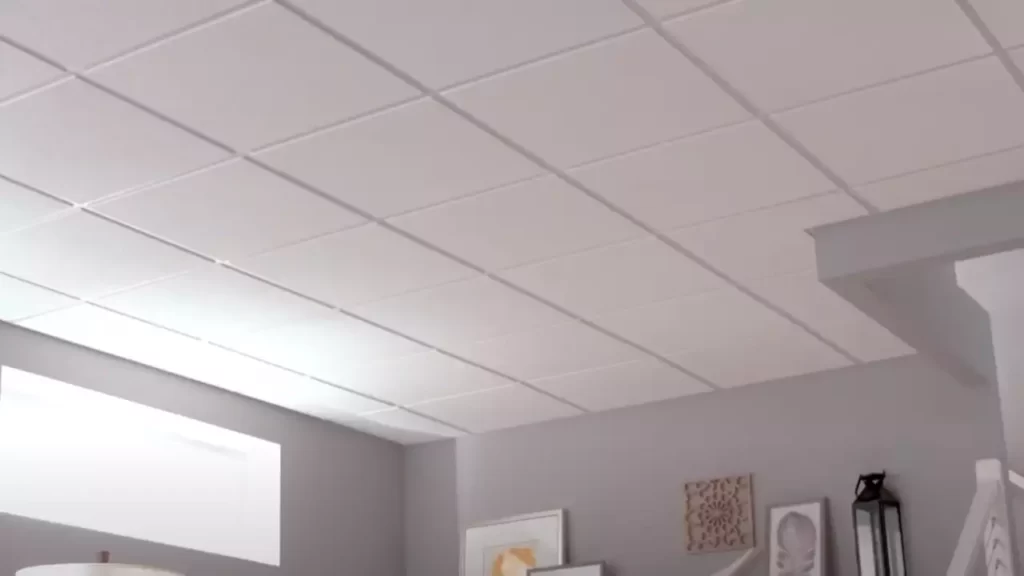
By following these simple steps, you can successfully install Armstrong ceiling tiles and transform the look and feel of your space. Enjoy the satisfaction of a job well done, and relish in your newly updated ceilings.
Finishing Touches And Maintenance
Once you have successfully installed your Armstrong ceiling tiles, it’s time to focus on the finishing touches and maintenance to ensure they stay looking their best for years to come. These final steps will not only enhance the overall aesthetic appeal of your space but also contribute to the longevity of your ceiling tiles. In this section, we will cover crucial aspects such as installing ceiling trim or molding, properly cleaning the ceiling tiles, and troubleshooting common installation issues.
Installing Ceiling Trim or Molding
When it comes to giving your ceiling a polished, professional look, installing ceiling trim or molding is the perfect solution. This decorative addition hides any gaps or imperfections between the tiles and the walls, creating a seamless transition. To install the trim or molding, follow these simple steps:
- Measure the length of each wall where the trim or molding will be installed.
- Cut the trim or molding to the appropriate length using a fine-tooth saw or snips.
- Apply a small amount of construction adhesive to the back of the trim or molding, ensuring even distribution.
- Press the trim or molding firmly against the ceiling tiles, aligning it with the wall edge.
- Secure the trim or molding in place using finishing nails or trim adhesive.
- Repeat the process for each wall, ensuring a consistent and seamless appearance.
By following these steps, you can easily elevate your ceiling installation to the next level and achieve a professional finish that adds elegance to your space.
Properly Cleaning the Ceiling Tiles
Maintaining the cleanliness of your Armstrong ceiling tiles is crucial to preserve their appearance and performance. Here are some essential cleaning tips:
- Regularly dust the tiles using a soft brush or a vacuum cleaner with a brush attachment to remove any loose debris.
- Create a cleaning solution by mixing mild soap and warm water.
- Using a soft sponge or cloth, gently wipe the surface of the tiles with the cleaning solution.
- Avoid using abrasive cleaners or cloths, as they can damage the finish of the ceiling tiles.
- Rinse the tiles with clean water and gently pat them dry with a clean cloth.
By implementing these simple cleaning practices, you can maintain the pristine appearance of your ceiling tiles and extend their lifespan.
Troubleshooting Common Installation Issues
Even with careful installation, occasional challenges may arise. Here are some common installation issues and their troubleshooting techniques:
| Issue | Troubleshooting Technique |
|---|---|
| Gaps between tiles | Apply caulk or a tile adhesive to fill in the gaps and create a seamless look. |
| Visible grid lines | Ensure the grid system is properly aligned and secure any loose or misaligned parts. |
| Sagging tiles | Reinforce the grid system by adjusting or replacing damaged suspension wires. |
Knowing how to troubleshoot these common installation issues will help you address any complications efficiently and maintain the overall integrity of your ceiling.
By considering these finishing touches and following proper maintenance techniques, you can ensure your Armstrong ceiling tiles continue to provide a beautiful and functional overhead solution.
Frequently Asked Questions
How To Install Armstrong Ceiling?
To install Armstrong ceiling, prepare the surface by removing old tiles or panels. Start at one corner and secure the first tile to the wall using adhesive. Continue adding tiles, making sure to align the edges. Trim tiles as needed for a snug fit.
Use molding for a finished look.
What Is The Best Way To Cut Armstrong Ceiling Tiles?
The best way to cut Armstrong ceiling tiles is by using a sharp utility knife or a fine-toothed handsaw. Take measurements, mark the tile, and cut along the line with steady pressure. Be sure to wear safety goggles and a dust mask for protection.
How Do You Install Armstrong Tongue And Groove Ceiling Tiles?
To install Armstrong tongue and groove ceiling tiles: 1. Measure and mark the ceiling grid. 2. Snap chalk lines for alignment. 3. Apply adhesive to the back of each tile. 4. Align tiles with the grid, engaging the tongue and groove edges.
5. Press tiles firmly into place, ensuring a secure fit. Note: Consult the Armstrong installation guide for detailed instructions.
Can You Staple Armstrong Ceiling Tiles?
Yes, you can staple Armstrong ceiling tiles.
Conclusion
Installing Armstrong ceiling tiles is a simple and efficient process that can transform the look and feel of any room. With the right tools and steps outlined in this guide, you can easily create a beautiful and functional ceiling in no time.
By following these instructions and taking the necessary precautions, you will have a professional-looking ceiling that will enhance the aesthetics and acoustics of your space. So, don’t hesitate to embark on this DIY project and enjoy the benefits of Armstrong ceiling tiles.