To install an anchor in plaster, first mark the location, drill a hole with a masonry bit, insert the anchor, and then tighten it using a screwdriver or a drill.
Understanding Anchors In Plaster
When it comes to hanging objects on plaster walls, it’s important to understand the role of anchors. Anchors are essential for providing stability and support, ensuring that your items are securely attached to the wall. In this section, we will delve into what anchors in plaster are, their importance, and how they provide stability and support to objects.
What are Anchors in Plaster?
Anchors in plaster walls are devices specifically designed to distribute the weight of an object evenly across the wall. Plaster is a delicate material that can easily crack or crumble under excessive strain or weight. Therefore, attaching objects directly to plaster can lead to damage or even cause the item to fall off.
Anchors act as a secure base for screws, nails, or hooks. They are typically made of plastic, metal, or a combination of both and are inserted into the plaster, providing a sturdy foundation for hanging different types of objects.
Importance of Using Anchors in Plaster
Using anchors in plaster is crucial for several reasons. Firstly, they help to distribute the weight of the object, preventing concentrated pressure on one particular spot. This reduces the risk of the plaster crumbling or breaking, ensuring the longevity of both the object and the wall.
Secondly, anchors provide a reliable fixing point for screws and other attachment hardware. By securing the anchor properly, you create a stable connection between the object and the plaster wall.
Without anchors, the weight of the object would rely solely on the plaster itself, increasing the chances of it coming loose or causing damage to the wall. Anchors offer a more substantial and dependable support system.
How Anchors Provide Stability and Support to Objects in Plaster Walls
Anchors provide stability and support to objects in plaster walls by creating a strong and secure attachment point. When correctly installed, the anchor expands or grips the surrounding plaster, forming a tight bond.
By distributing the weight across a larger area, anchors reduce the strain placed on the plaster, minimizing the risk of cracks or damage. This is particularly important when hanging heavier items such as mirrors, shelves, or artwork.
Additionally, anchors act as a buffer between the object and the wall, absorbing any vibrations or movement. This added stability helps to ensure that the item remains firmly in place, even in high-traffic areas or if accidentally bumped.
In conclusion, understanding anchors in plaster is essential for properly securing objects to walls. Anchors not only evenly distribute weight, but they also provide stability and support, protecting your walls from damage and ensuring the longevity of your items.

Choosing The Right Anchors
In order to securely install an anchor in plaster, it is crucial to choose the right anchors that are suitable for plaster walls. The type of anchor selected will greatly impact the strength and stability of the installation. Consider the following factors when selecting anchors for your plaster walls:
Factors to Consider When Selecting Anchors
1. Wall Thickness: Plaster walls come in various thicknesses, so it is important to choose anchors that are suitable for your specific wall thickness. Using anchors that are too short may not provide enough holding power, while anchors that are too long can damage the wall.
2. Weight Capacity: Determine the weight of the object you need to hang on the wall and ensure that the anchor you choose has a weight capacity that exceeds the actual weight. This will provide added strength and stability for the object.
3. Type of Object: Consider the type of object you are hanging and its specific requirements. For example, if you are hanging a shelf, you may need anchors that are specifically designed to hold shelves securely.
Different Types of Anchors and Their Uses
When choosing an anchor for plaster walls, there are several different types to choose from, each with their own unique uses:
| Type of Anchor | Uses |
|---|---|
| Expansion Anchors | These anchors are ideal for medium to heavy-duty applications and provide excellent holding power by expanding against the wall as the screw is tightened. |
| Sleeve Anchors | Sleeve anchors are designed for heavy loads and provide the necessary strength and stability for objects that require extra support. |
| Plastic Anchors | Plastic anchors are lightweight and versatile, making them suitable for lighter objects such as picture frames or light fixtures. |
| Toggle Bolts | Toggle bolts are commonly used for hanging heavy items, particularly in hollow walls. They provide effective support by expanding behind the wall. |
Testing the Strength and Suitability of Anchors for Plaster Walls
Before installing anchors in plaster walls, it is important to test their strength and suitability to ensure a secure and reliable installation. Follow these steps:
- Choose a representative section of the plaster wall where you want to install the anchor.
- Insert the anchor into the wall and tighten it as per the manufacturer’s instructions.
- Apply a moderate amount of force to test the anchor’s stability. Ensure it can withstand the weight of the object you intend to hang.
- If the anchor passes the strength test, proceed with the installation. If it fails or feels unstable, try a different anchor type or consult a professional for assistance.
Remember, selecting the right anchors is crucial for a successful installation in plaster walls. By considering factors such as wall thickness, weight capacity, and the type of object you are hanging, you can choose the best anchor for your specific requirements. Additionally, testing the strength and suitability of the anchors before installation will provide peace of mind and ensure a secure attachment to your plaster walls.
Preparing The Plaster Wall For Anchors
Before you can successfully install anchors in plaster walls, it’s crucial to properly prepare the wall surface. This involves assessing the condition of the plaster, patching any cracks or holes, and sanding and cleaning the wall. Taking the time to complete these steps will ensure that the anchors are securely installed, providing a strong foundation for whatever you plan to hang on the wall. Let’s explore each step in detail:
Assessing the condition of the plaster wall
Start by thoroughly examining the plaster wall to check for any areas of weakness or damage. Look out for cracks, holes, or loose plaster that may affect the anchor’s stability. It’s essential to address these issues before proceeding with the anchor installation.
If you notice any hairline cracks, they can be easily fixed using a flexible filler specifically designed for plaster. Lightly sand the cracked area, clean away any dust, and carefully apply the filler. Allow it to dry completely according to the product instructions before proceeding.
For larger cracks or holes, a more comprehensive repair may be necessary. Consider using a patching plaster or a joint compound. Prepare the mixture according to the manufacturer’s instructions and apply it to the damaged area using a putty knife. Smooth and feather out the edges, allowing the patch to dry fully before continuing.
Patching any cracks or holes in the plaster
Once the filler or patching compound is dry and the wall surface is smooth, it’s time to move on to the next step: patching any cracks or holes. This step is crucial as it ensures a strong and even surface for the anchor to be installed.
To patch small holes, start by cleaning the area around the hole with a cloth or sponge to remove any dust or debris. Then, apply a small amount of patching compound to fill the hole, using a putty knife to smooth it out. Allow it to dry fully before continuing.
If you have larger holes, you may need to use a patching material such as a self-adhesive mesh patch. Cut the mesh to size, ensuring it will cover the entire hole with some overlap. Apply a layer of joint compound over the hole, then press the mesh patch firmly into it. Smooth out the edges and allow it to dry before proceeding.
Sanding and cleaning the wall surface
With the cracks and holes patched, it’s time to prepare the wall surface for the anchor installation. Begin by lightly sanding the patched areas and the surrounding plaster to create a smooth, even surface. Use a fine-grit sandpaper (around 120-grit) and be careful not to apply too much pressure, as this can damage the plaster. Wipe away any sanding dust with a clean, damp cloth.
After sanding, it’s essential to thoroughly clean the wall surface to remove any remaining dust or debris. Use a vacuum cleaner or a soft brush to gently remove loose particles. Then, wipe the wall down with a slightly damp cloth to ensure it’s clean and free from any contaminants that could interfere with the anchor’s adhesion.
In conclusion
Preparing the plaster wall for anchor installation is a critical step to ensure the success and stability of your anchoring project. By assessing the condition of the plaster, patching any cracks or holes, and sanding and cleaning the wall surface, you create an optimal environment for the anchors to securely hold your desired objects. Don’t rush through this process – take the time to prepare your plaster wall properly, and you’ll have a solid foundation for all your hanging needs.
Installing Anchors In Plaster
Installing anchors in plaster can be a tricky task if you don’t have the right knowledge and tools. Plaster is a delicate material and requires careful handling to ensure a secure and long-lasting installation. In this guide, we will walk you through the step-by-step process of installing anchors in plaster so that you can confidently hang your artwork or shelves without any worries.
Marking the Desired Location for the Anchor
Before you begin, it’s crucial to mark the exact location where you want to install the anchor. This will help you avoid any unnecessary holes in your plaster and ensure that the anchor is placed in the right spot. Use a pencil or a marker to make a small dot on the wall where you want the anchor to be positioned. Double-check the alignment and make sure it’s level before proceeding to the next step.
Selecting the Appropriate Tool for Drilling into Plaster
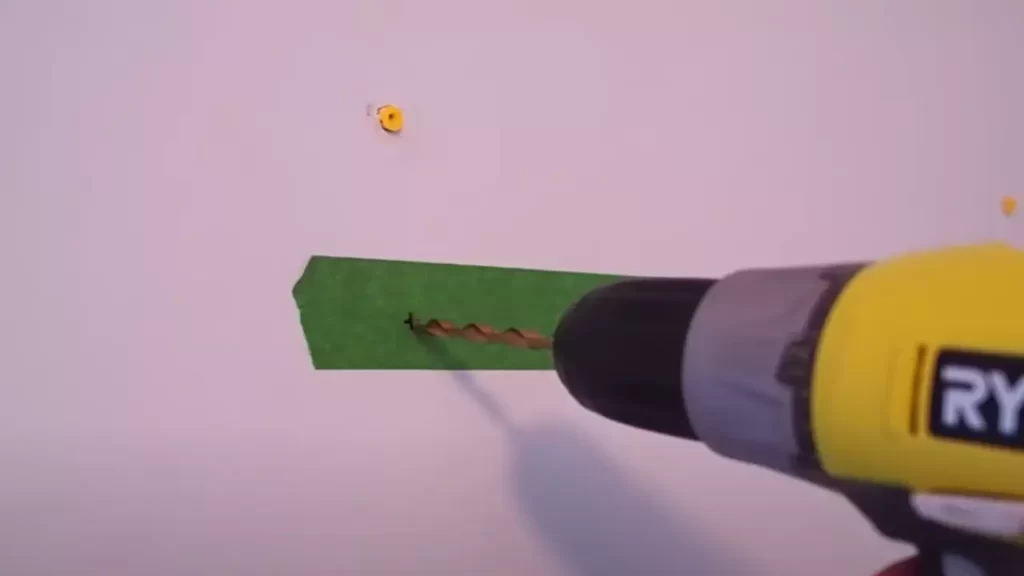
Now that you have marked the desired location, it’s time to select the appropriate tool for drilling into the plaster. A regular drill might cause the plaster to crack or crumble, so it’s best to use a drill with a masonry bit or a rotary hammer drill specially designed for working with plaster. These tools have a slower speed and provide more control, minimizing the risk of damaging the plaster.
Drilling the Hole and Inserting the Anchor
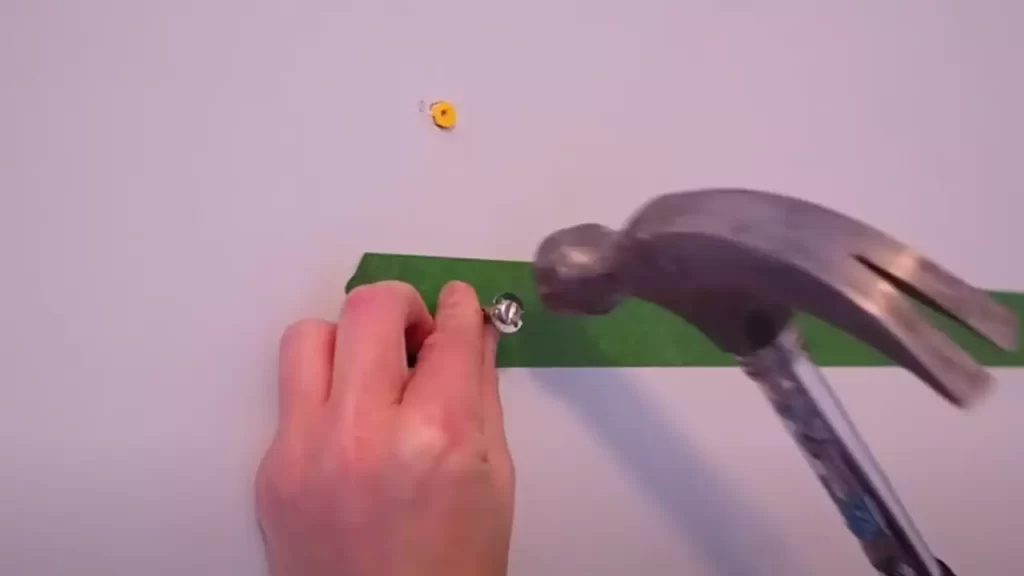
Once you have the right tool, carefully position the drill bit on the marked spot and start drilling slowly. It’s essential to apply gentle pressure and let the drill do the work. Avoid pushing too hard, as it may cause the plaster to chip or break. Keep drilling until you reach the desired depth for your anchor. Once you have drilled the hole, remove any dust or debris from the area.
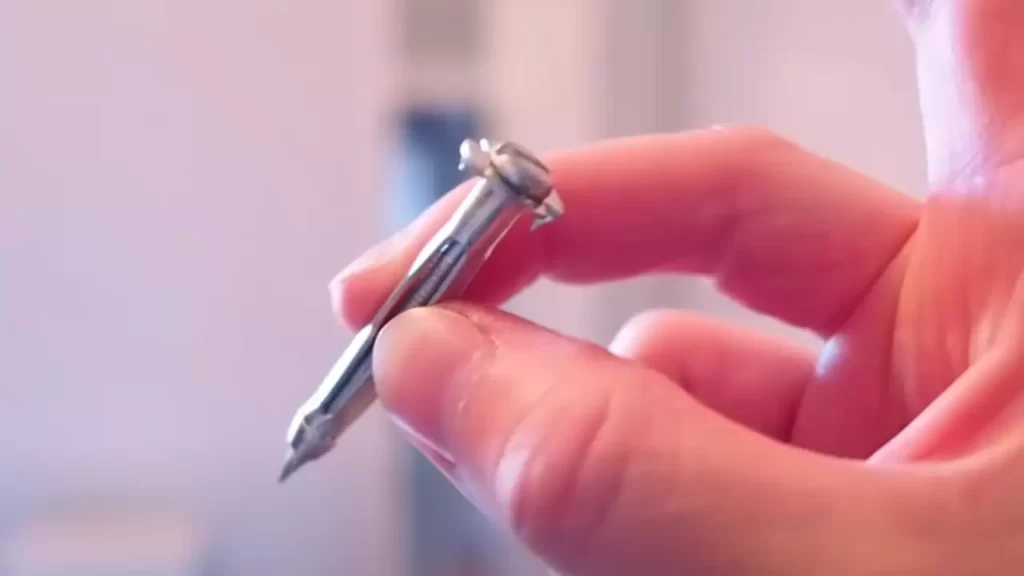
Now it’s time to insert the anchor into the hole. Choose the appropriate anchor type based on the weight of the object you’re planning to hang. Plastic anchors or toggle bolts are commonly used for plaster walls and provide a reliable hold. Gently tap the anchor into the hole using a hammer until it is flush with the wall surface.
Proper Depth and Angle for Anchor Installation
Ensuring the proper depth and angle during anchor installation is crucial for a secure hold. The anchor should be inserted fully into the wall, with no part sticking out. If the anchor doesn’t go in smoothly, you may need to remove it and drill a slightly larger hole. Additionally, make sure the anchor is inserted straight and not at an angle, as this can compromise its strength and stability.
Once you have inserted the anchor correctly, it’s time to secure your item onto the wall. Attach the screw or hook into the anchor, making sure it is tight and secure. Test the installation by gently pulling on the object to ensure it is properly anchored.
By following these steps and carefully handling the plaster, you can confidently install anchors in plaster without damaging the walls. Remember to choose the right tools, mark the desired location accurately, drill the hole with care, and insert the anchor properly. With this knowledge, you’ll be able to hang your favorite items on your plaster walls with ease.
Securing Objects To Plaster Anchors
Securing Objects to Plaster Anchors
When it comes to mounting objects on plaster walls, using anchors is essential for ensuring a secure and sturdy attachment. Plaster walls can be fragile and prone to cracking, so it’s important to use the right techniques and materials to avoid any potential damage. In this section, we will discuss the proper method for attaching objects to plaster anchors, tips for ensuring a secure attachment, and common mistakes to avoid.
Attaching objects to the anchors
To attach an object to plaster anchors, follow these steps:
- Start by selecting the appropriate anchor for your specific needs. There are various types of anchors available, such as plastic anchors, toggle bolts, or expansion anchors. Each anchor type has its own weight capacity and installation requirements, so be sure to choose the right one for your object.
- Before installing the anchor, mark the desired location on the wall using a pencil or a piece of tape. This will help you ensure accurate placement.
- Next, carefully drill a hole into the plaster at the marked location. Use a drill bit that matches the size of the anchor you are using. Take your time and apply gentle pressure to prevent any excessive force that can crack or damage the plaster.
- Once the hole is drilled, remove any excess dust or debris from the hole by blowing into it or using a small brush. This will allow the anchor to fit securely into the hole.
- Insert the anchor into the hole, making sure it is flush with the wall surface. For some anchors, you may need to tap it lightly with a hammer to secure it properly.
- Now, it’s time to attach your object to the anchor. Use the appropriate screws or hooks that came with the anchor kit. Make sure to tighten them securely, but be cautious not to overtighten and risk damaging the plaster.
Tips for ensuring a secure and sturdy attachment
To ensure a secure and sturdy attachment, consider the following tips:
- Choose anchors that are suitable for the weight and size of the object you are mounting. Overloading an anchor can lead to failure and damage.
- Use multiple anchors if needed. If your object is heavy or requires extra support, using multiple anchors will distribute the weight and provide added stability.
- Consider using adhesive anchors for lightweight objects. Adhesive anchors provide a strong bond and eliminate the need for drilling into the plaster.
- Before drilling, locate the stud behind the plaster. If you can anchor your object directly into a stud, it will provide the strongest and most secure attachment.
- When attaching screws or hooks, use a screwdriver or drill set to the appropriate torque. Overtightening can cause damage to the plaster, while undertightening can result in an insecure attachment.
Avoiding common mistakes when securing objects to plaster walls
To avoid common mistakes and ensure a successful attachment, keep the following in mind:
| Mistake | Prevention |
|---|---|
| Relying solely on adhesive hooks or strips | Opt for anchor installation, especially for heavier objects or in areas prone to moisture. |
| Not checking for the presence of electrical wires or plumbing behind the wall | Use a stud finder or consult a professional to avoid potential damage or danger. |
| Using the wrong size or type of anchor | Refer to the manufacturer’s guidelines and choose an appropriate anchor for your object and wall type. |
| Improperly drilling the hole | Take your time, use the correct drill bit, and drill gently to avoid excessive force that may damage the plaster. |
| Overtightening the screws or hooks | Tighten until secure, but be cautious not to overtighten and risk damaging the plaster. |
By following these guidelines and tips, you can ensure a secure and sturdy attachment when installing objects on plaster walls. Taking the time to choose the right anchors, properly install them, and avoid common mistakes will result in a successful and long-lasting mounting solution.
Maintenance And Repair Of Plaster Anchors
Maintaining and repairing plaster anchors is an essential part of ensuring the stability and longevity of your walls. Over time, anchors can become loose or damaged, posing a risk to both the anchor itself and the plaster it is embedded in. Regularly checking for any loose or damaged anchors, replacing or repositioning them if necessary, and repairing any damage caused to the plaster are important steps in maintaining a secure and aesthetically pleasing wall. In this section, we will explore these maintenance and repair tasks and provide you with practical tips on how to execute them effectively.
Checking for any loose or damaged anchors
Regularly checking your plaster anchors for any signs of looseness or damage is crucial in preventing further problems. Loose anchors can cause instability and weaken the plaster, leading to potential wall damage. Here are some steps you can follow to check for loose or damaged anchors:
- Examine the area near the anchor for any visible cracks or signs of crumbling.
- Gently tap the anchor with a small hammer or your finger to check if it feels loose or sounds hollow.
- If you suspect a loose anchor, carefully wiggle it to determine if it moves easily.
- Inspect the surrounding plaster for any signs of plaster dust or crumbling, indicating potential anchor damage.
If you detect any of these signs, it’s important to address them promptly to prevent further damage.
Replacing or repositioning anchors if necessary
If you find any loose or damaged anchors during your inspection, it’s vital to either replace or reposition them. Here are the steps to follow:
- First, carefully remove the damaged or loose anchor from the plaster. Use caution not to cause any additional damage to the surrounding area.
- If you are replacing the anchor, choose a suitable anchor type for the desired weight or object you wish to hang on the wall.
- Position the new anchor in the desired location, following the manufacturer’s instructions for proper installation.
- Ensure the anchor is firmly secured to provide maximum support.
- If you are repositioning an existing anchor, carefully remove it from its current location and follow the same steps for installing a new anchor.
By promptly replacing or repositioning loose or damaged anchors, you can maintain the structural integrity of your plaster walls.
Repairing any damage to the plaster caused by anchors
During the installation or removal of anchors, some damage to the surrounding plaster may occur. To ensure a seamless and visually appealing surface, it’s crucial to repair any plaster damage caused by anchors. Here’s how you can do it:
- Clean the damaged area by removing any loose plaster and dust.
- Using a putty knife, carefully apply a patching compound or plaster mix to the damaged area. Smooth it out to match the surrounding surface, ensuring an even and level finish.
- Allow the repair to dry completely, following the manufacturer’s instructions.
- Once dry, sand the repaired area gently to achieve a smooth finish. Be cautious not to sand excessively, as it can damage the surrounding plaster.
- Finally, touch up the repaired area with paint or a suitable wall finish to blend it seamlessly with the rest of the wall.
By following these steps, you can effectively repair any damage caused by anchors and restore the appearance of your plaster walls.
Maintaining and repairing plaster anchors may require some effort, but it is a worthy investment in preserving the integrity and value of your walls. Regularly checking for loose or damaged anchors, replacing or repositioning them when necessary, and repairing any resulting damage will help keep your plaster walls secure and aesthetically pleasing for years to come.
Final Thoughts On Installing Anchors In Plaster
“`
Final Thoughts on Installing Anchors in Plaster
Benefits of Properly Installed Anchors in Plaster
When it comes to hanging items on plaster walls, using anchors is essential for ensuring stability and preventing damage. Properly installed anchors offer a range of benefits that make them a preferred choice for many homeowners.
|
A strong and secure anchor provides stability, preventing your items from falling and potentially causing injury or damage to your plaster walls. |
|
Properly installed anchors distribute the weight of your item across a larger area of the plaster, reducing the risk of cracks or holes forming. |
|
Anchors can be used for a variety of applications, from hanging pictures and mirrors to installing shelves and hooks. They are a versatile solution for your plaster walls. |
Importance of Following Proper Techniques for Long-Lasting Results
To ensure long-lasting results and prevent damage to your plaster walls, it is crucial to follow proper techniques when installing anchors. Failing to do so can lead to avoidable problems that may necessitate costly repairs down the line.
- Choose the right anchor: Different anchors are designed for specific weights and materials, so make sure to select the most suitable one for your intended application.
- Use the correct tools: Using the right tools, such as a drill and screwdriver, will ensure that the anchor is properly installed and secured.
- Locate studs or wall studs: Identifying the location of studs or wall studs helps determine the ideal spot for anchor placement, ensuring maximum stability.
- Pre-drill holes: Pre-drilling holes in the plaster before inserting the anchor not only makes installation easier but also reduces the risk of cracks or damage to the walls.
By following these techniques, you can achieve professional and long-lasting results when installing anchors in plaster, saving yourself time, money, and a headache in the future.
“`
– Note: The classes applied to the headings and paragraphs can be customized based on the WordPress theme being used.
Frequently Asked Questions
How Do You Anchor Something In Plaster?
To anchor something in plaster, follow these steps: 1. Use a drill with a masonry bit to create a hole in the plaster. 2. Insert a wall anchor into the hole. 3. Apply pressure while twisting the anchor until it is flush with the surface.
4. Insert a screw into the anchor and tighten it until secure. 5. Hang or attach the item to the screw.
Can You Use Anchors In Plaster Walls?
Yes, anchors can be used in plaster walls to securely hang items. They provide stability and prevent damage to the wall. Make sure to choose the right anchor type for your wall and follow proper installation instructions for best results.
How Do You Put A Screw Anchor In Plaster?
To put a screw anchor in plaster, follow these steps: First, mark the desired location on the plaster. Then, use a power drill to create a pilot hole slightly smaller than the screw anchor. Gently tap the anchor into the hole using a hammer.
Finally, insert and tighten the screw into the anchor.
How Do You Install Plastic Anchors In Plaster?
To install plastic anchors in plaster: 1. Use a drill to create a hole in the plaster where you want the anchor to go. 2. Insert the plastic anchor into the hole until it is flush with the wall. 3.
Gently tap the anchor with a hammer to ensure it is secure. 4. Place the screw into the anchor and tighten it with a screwdriver. 5. Test the anchor by applying pressure to ensure it is properly installed.
Conclusion
Learning how to install an anchor in plaster is a valuable skill that can come in handy for various home improvement projects. By following the step-by-step process outlined in this guide, you can ensure the secure and reliable installation of anchors in plaster walls.
With proper tools, techniques, and a little patience, you’ll be able to hang your favorite decorations or support heavy objects with confidence. Start taking on those DIY projects today!