To install anchor bolts, start by marking the desired locations for the bolts. Then, drill a hole into the concrete or masonry using a hammer drill and a drill bit that matches the size of the bolt.
Next, insert the anchor bolt into the hole, making sure it is flush with the surface. Finally, tighten the nut on the bolt until it is secure.
Understanding Anchor Bolts
Anchor bolts play a crucial role in construction projects, providing a reliable method for securing structures to a concrete foundation. Whether you are building a bridge, installing a heavy industrial machine, or constructing a high-rise building, understanding anchor bolts is essential to ensure the stability and longevity of your structure. In this article, we will discuss what anchor bolts are, the different types available, and their various uses and applications.
What are anchor bolts?
Anchor bolts, also known as anchor rods, are mechanical devices designed to connect structural elements to concrete. They are typically made of steel and consist of a threaded end, called the anchor portion, and a non-threaded end, known as the embedded portion. The embedded portion is anchored into the concrete, while the threaded end allows for attachment of various structural components such as columns, walls, and machines.
Different types of anchor bolts
Anchor bolts come in a variety of types, each suited for specific applications and load requirements. Here are some common types of anchor bolts:
| Type | Description |
|---|---|
| Wedge anchors | Designed for heavy-duty applications and offer excellent resistance to vibration and shock loads. |
| Sleeve anchors | Consist of a cylindrical sleeve and a threaded stud, suitable for medium to heavy-duty applications. |
| Drop-in anchors | Perfect for flush mounting applications and are commonly used in precast construction. |
| Expansion anchors | Expand when tightened, providing excellent load-bearing capacity in both concrete and masonry applications. |
| Chemical anchors | Utilize epoxy or adhesive to bond the anchor to the concrete, ideal for high-stress and dynamic load situations. |
Uses and applications of anchor bolts
Anchor bolts find extensive use in construction projects, such as:
- Securing structural steel columns to concrete foundations
- Attaching heavy machinery, equipment, and conveyor systems to the factory floor
- Fastening steel framing joints
- Mounting rooftop equipment and HVAC systems
- Anchoring safety barriers and guardrails
- Installing commercial signs and outdoor street furniture
Preparing For Installation
Assessing the Installation Site
In order to properly install anchor bolts, it is crucial to assess the installation site beforehand. This will help ensure that you choose the right type of anchor bolt and gather the appropriate tools and materials. Start by examining the structure or surface where the anchor bolts will be installed. Consider the material and thickness to determine the strength required for the anchor bolts.
If you are installing anchor bolts in concrete, check the condition and hardness of the concrete. Look for any cracks or signs of damage that could affect the installation. Measure the thickness of the concrete to determine the appropriate length of the anchor bolts. Once you have assessed the installation site, you can move on to selecting the appropriate anchor bolt type.
Selecting the Appropriate Anchor Bolt Type
Not all anchor bolts are created equal, and choosing the right type is essential for a secure installation. There are several factors to consider when selecting the appropriate anchor bolt type, such as the load requirements, the material of the structure or surface, and the environmental conditions.
For heavy-duty applications, such as securing structural steel columns, epoxy anchor bolts are commonly used. These anchor bolts provide exceptional strength and durability. On the other hand, if you are installing anchor bolts in softer materials like wood or lightweight concrete, expansion anchor bolts may be a better choice.
Additionally, consider the environmental conditions that the anchor bolts will be exposed to. For outdoor installations or areas with high moisture, stainless steel anchor bolts are recommended due to their corrosion resistance. Once you have determined the appropriate anchor bolt type, it’s time to gather the necessary tools and materials.
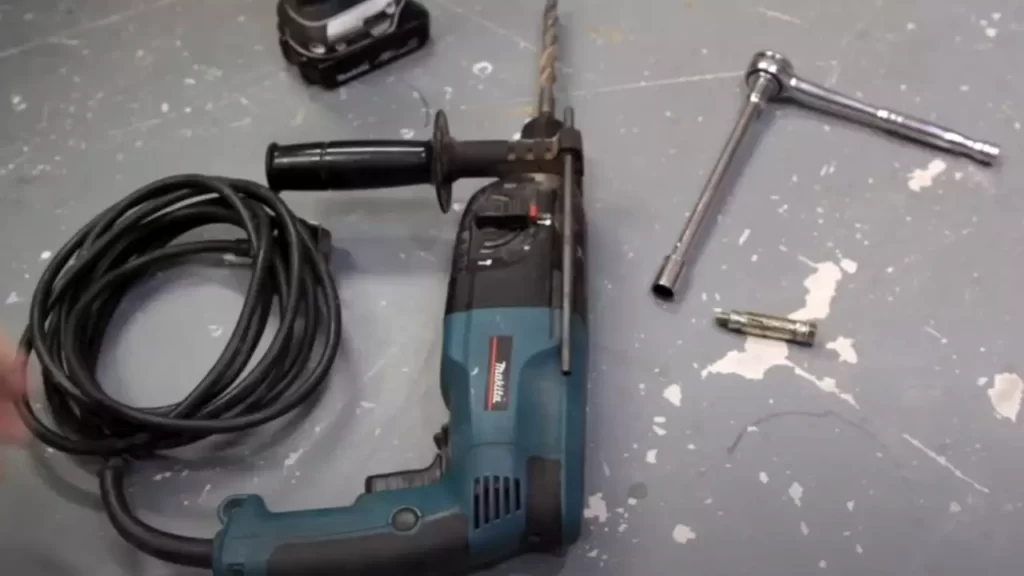
Gathering the Necessary Tools and Materials
Before starting the installation process, make sure you have all the tools and materials required. This will help ensure a smooth and efficient installation. The specific tools and materials needed may vary depending on the anchor bolt type and the installation site, but here are some common items to consider:
| Tools | Materials |
|---|---|
| Hammer drill | Anchor bolts |
| Masonry drill bits | Washers |
| Wrench or socket set | Nuts |
| Level | Epoxy adhesive (if applicable) |
| Dust mask and safety goggles |
It is important to have the right tools for the job to ensure proper installation and avoid any complications. Double-check that you have gathered all the necessary tools and materials before proceeding with the installation process. By properly preparing for installation, assessing the site, selecting the appropriate anchor bolt type, and gathering the necessary tools and materials, you will be well-equipped to install anchor bolts effectively and securely.
Step 1: Marking Drill Points
Determining the bolt hole locations
To install anchor bolts successfully, it is crucial to determine the exact locations where the bolts will be drilled. This step sets the foundation for a strong and secure anchor bolt installation. By accurately marking the drill points, you can ensure the structural integrity of the anchor bolts.
Measuring and marking the drill points on the surface
The second part of this step involves carefully measuring and marking the designated drill points on the surface. Therefore, it is essential to use accurate measurements and precise marking techniques. Here’s a simple guide to marking drill points effectively:
- Start by gathering all the necessary tools and materials, including a measuring tape or ruler, a marker, and a level.
- Clean the surface thoroughly to remove any debris or obstructions that may impede the installation process. A clean surface allows for better accuracy when marking the drill points.
- Measure the required distance between each of the anchor bolts and ensure that the measurements align with the project specifications. Use the measuring tape or ruler to achieve precise measurements.
- Using the marker, make small dots or crosses on the surface at the specified drill point locations. Ensure that the marks are clearly visible and won’t easily fade or smudge.
- For added accuracy, use a level to check if each mark is perfectly vertical or horizontal. This helps in ensuring that the anchor bolts will be drilled straight and level, preventing any potential structural issues.
Using these steps, you can accurately mark the drill points for your anchor bolts, ensuring a stable and secure installation. Proper marking ensures that the anchor bolts will be positioned correctly, providing the necessary strength for your project. Remember to double-check your measurements and markings before proceeding to the next step, as precision is key to a successful anchor bolt installation.
Step 2: Drilling Holes
Drilling holes is a crucial step in the process of installing anchor bolts. Without properly drilled holes, the anchor bolts may not be able to provide the necessary support and stability. In this step, we will discuss two important aspects: choosing the right drill bit size and drilling the holes to the correct depth.
Choosing the right drill bit size
Choosing the correct drill bit size is essential to ensure that the anchor bolts fit snugly in the holes. If the hole is too small, it will be difficult to insert the anchor bolt, while a hole that is too large may compromise the anchoring strength.
One way to determine the right drill bit size is by referring to the diameter of the anchor bolt. For most anchor bolts, the diameter is specified by the manufacturer. It is important to measure the diameter accurately, using a caliper or a ruler if necessary.
When selecting the drill bit size, consider the thickness of the material being drilled into. If the material is too thin, it might require a smaller drill bit size to prevent excessive damage. On the other hand, if the material is thick or of high density, a larger drill bit size may be needed.
It is recommended to consult the manufacturer’s guidelines or engineering specifications for the specific drill bit size required for your anchor bolt. This ensures that you have the precise measurements needed for a successful installation.
Drilling the holes to the correct depth
Drilling the holes to the correct depth is equally important in the installation of anchor bolts. The depth of the hole determines how securely the anchor bolt will be fastened and how much load it can bear.
When drilling the holes, it is crucial to drill straight and perpendicular to the surface. This ensures that the anchor bolts align properly and provide optimal support. Using a drill press or a level can help ensure accuracy.
To determine the correct depth, refer to the anchor bolt manufacturer’s guidelines or engineering specifications. The depth is typically specified as a minimum requirement, and it is recommended to drill the hole slightly deeper to allow for any debris or dust that may accumulate during drilling.
After drilling the holes, it is important to clear away any debris or dust using a brush or compressed air. This ensures that the anchor bolt can be inserted fully and securely.
Remember, accurate drilling is vital to the overall stability and effectiveness of the anchor bolt installation. Taking the time to choose the right drill bit size and drilling the holes to the correct depth ensures a successful installation that will provide long-lasting support.
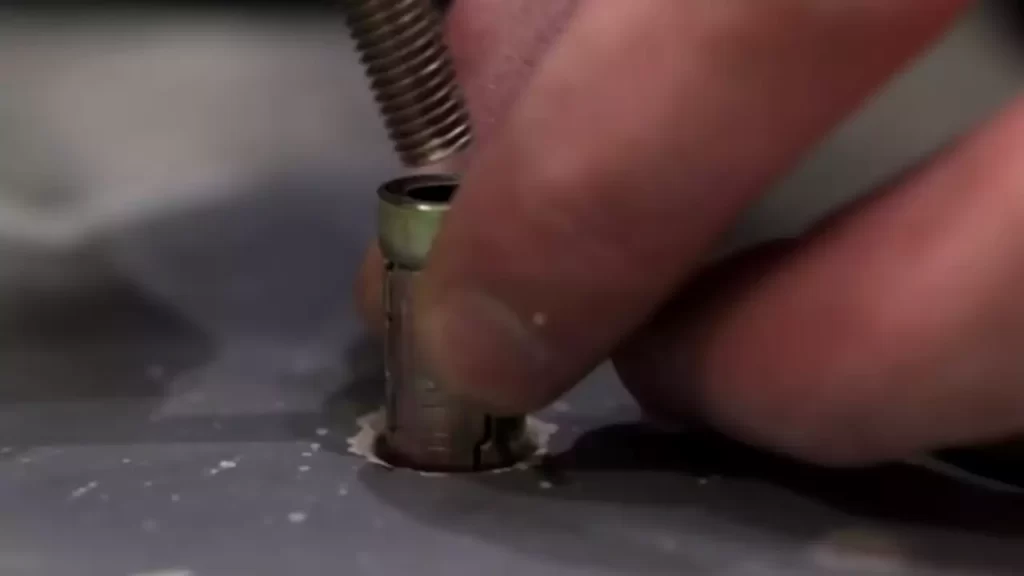
Step 3: Cleaning The Holes
Once the holes have been drilled for your anchor bolts, it’s crucial to thoroughly clean them before proceeding to ensure proper adhesion and stability. This step is essential to ensure that the bolts are securely anchored in place, providing the necessary support for your structure. In this guide, we’ll walk you through the process of removing debris and dust from the drilled holes.
Removing debris and dust from the drilled holes
To ensure a strong bond between the anchor bolts and the surrounding material, it’s vital to remove any debris or dust that may have accumulated in the drilled holes. Even the tiniest particles can impact the effectiveness and stability of the anchoring system, so taking the time to clean the holes thoroughly is well worth it.
Here are the steps to follow:
- Inspect the holes: First, visually inspect the drilled holes to identify any visible debris or dust. Look out for loose particles, concrete chips, or any other foreign material that could hinder the adhesion of the anchor bolts.
- Clear with a brush: Once you’ve identified any debris, use a stiff brush or a wire brush to brush away loose particles from the holes. Make sure to brush along the walls of the holes, removing any dust or debris that may have settled.
- Blow out with compressed air: After brushing, use a compressed air gun to blow air into the holes, removing any remaining dust or loose particles. Keep the nozzle of the air gun close to the holes to ensure maximum effectiveness.
- Vacuum the holes: To further ensure a clean surface, use a vacuum cleaner with a hose attachment to thoroughly clean out the holes. Move the hose around the holes’ perimeters, ensuring all dust and debris are effectively removed.
By following these steps, you’ll be able to remove any debris or dust from the drilled holes, preparing them for the anchor bolts. This thorough cleaning process will help guarantee the stability and effectiveness of the anchor bolts, providing a secure foundation for your structure.
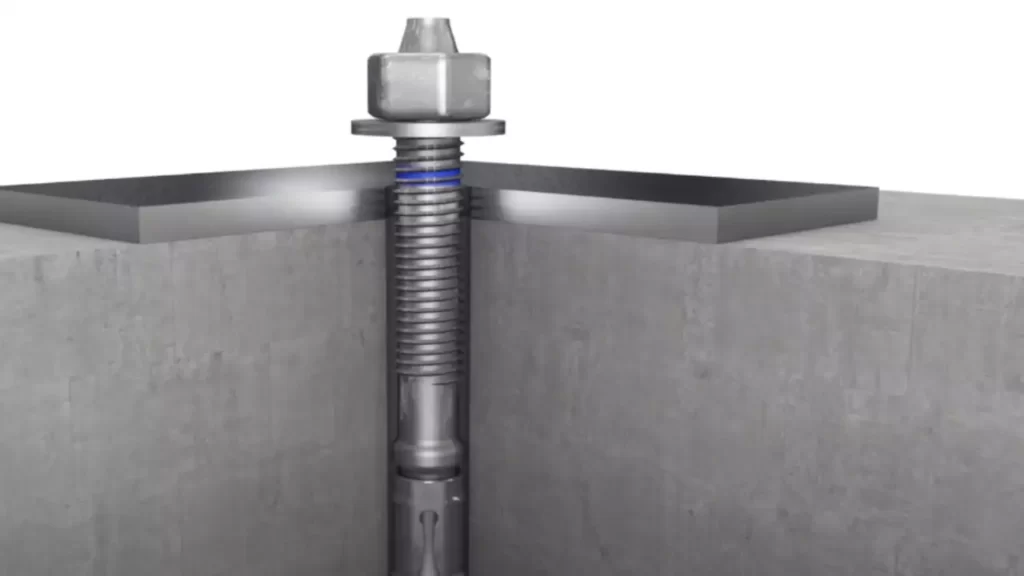
Step 4: Installing Anchor Bolts
Now that you have prepared the holes and set the anchor bolt template, it’s time for the next crucial step: installing the anchor bolts. The proper installation of anchor bolts ensures the stability and strength of your construction project. It is essential to follow the correct procedure to ensure a secure and reliable foundation.
Inserting the anchor bolts into the holes
The first step in installing anchor bolts is to carefully insert them into the pre-drilled holes. Make sure the anchor bolts are properly aligned with the bolt template. This helps to ensure accuracy and proper placement. Using a gentle twisting motion while inserting the bolts into the holes will help them go in smoothly. Be careful not to force or jam the anchor bolts, as it can lead to damage or misalignment.
If you are installing multiple anchor bolts, it is advisable to insert them one at a time. This allows you to make any necessary adjustments or alignments before moving on to the next bolt. Always double-check the alignment and perpendicularity of the anchor bolts as you install them. A slight misalignment at this stage can lead to bigger problems later on.
Tightening the nuts to secure the bolts in place
Once all the anchor bolts are inserted into their respective holes, it’s time to secure them in place by tightening the nuts. Start by placing a washer onto each anchor bolt, followed by the nut. Using a wrench or socket, tighten the nut until it is snug against the washer. Repeat this process for each anchor bolt.
It is important not to overtighten the nuts, as this can create unnecessary stress on the bolts and compromise their integrity. Tightening the nuts just enough to secure the anchor bolts in place is sufficient. However, ensure they are tightened evenly to maintain stability and prevent any tilting or shifting of the anchor bolts.
Remember, the level of torque required for tightening the nuts may vary depending on the specific project and bolt size. Always refer to the manufacturer’s guidelines or consult an engineer for the recommended torque specifications.
Conclusion
Installing anchor bolts is a critical part of any construction project. By carefully inserting the anchor bolts into the prepared holes and tightening the nuts to secure them in place, you ensure the foundation’s stability. Following the proper installation procedure is essential to guarantee the longevity and durability of your structure. With these steps completed, you are one step closer to a solid and secure foundation for your project.
Step 5: Testing And Adjusting
Once you have installed the anchor bolts securely, it is important to test their stability and make any necessary adjustments. This step is crucial to ensure the bolts are properly fastened and capable of withstanding the intended load. By following the below steps, you can ensure that your anchor bolts are correctly installed and ready to serve their purpose.
Checking the stability of the anchor bolts
To begin the testing process, you need to check the stability of the anchor bolts. This will help determine if they have been properly installed and if any adjustments are required. Here’s how you can do it:
1. Start by visually inspecting the anchor bolts to ensure they are properly aligned and not loose or wobbly.
2. Gently apply pressure to the anchor bolts and check for any movement. If they move, it indicates that they are not secure and need to be tightened.
3. Use a torque wrench to test the tightness of the anchor bolts. Refer to the manufacturer’s specifications to determine the recommended torque value. If the bolts are not tightened to the specified torque, adjustments need to be made.
4. Inspect the entire anchor bolt system, including the nut, washer, and the surrounding concrete or structure, to ensure there are no visible signs of damage or defects.
5. If there are multiple anchor bolts, repeat the stability check for each bolt individually.
Making any necessary adjustments or tightening
If you noticed any instability or looseness during the stability check, it is important to make the necessary adjustments or tightening. Follow these steps to ensure the anchor bolts are properly fastened:
1. Loosen the bolt slightly, using the appropriate tool, such as a wrench or pliers.
2. Apply the correct torque to the anchor bolt, based on the manufacturer’s specifications. This will ensure proper fastening without over-tightening.
3. Repeat the stability check after tightening the bolt to ensure it is secure and does not move.
4. If you still notice any instability, consider using additional methods of reinforcement, such as epoxy or grout, as recommended by the manufacturer.
5. Once all necessary adjustments and tightening have been made, perform a final visual inspection to ensure the anchor bolts are securely installed.
By testing and adjusting the anchor bolts as necessary, you can have peace of mind knowing that they will provide the necessary stability and support. This step is essential to ensure the safety and integrity of any structure.
Step 6: Finishing And Sealing
Once the anchor bolts are securely installed and aligned, it’s time to focus on the final steps of finishing and sealing the installation. This ensures the longevity and effectiveness of the anchor bolts, protecting them from corrosion and maintaining their integrity over time. In this step, we will cover cutting off any excess bolt length and applying a sealant.
Cutting off any excess bolt length
Cutting off any excess bolt length is an essential part of the installation process. It not only provides a neat and clean appearance but also eliminates any potential hazards that protruding bolts may cause. Follow these steps to cut off the excess length of anchor bolts:
- Measure the desired length of the anchor bolt that you want to remain exposed.
- Using a hacksaw or reciprocating saw, carefully cut the bolt at the measured length. Make sure to wear appropriate safety gear during this process.
- Once the bolt is cut, use a file or grinder to smooth out any sharp edges.
Applying a sealant to protect the anchor bolts from corrosion
To ensure the long-term durability of anchor bolts, it’s crucial to apply a sealant that protects against corrosion. This step acts as a barrier, preventing moisture and other harmful elements from penetrating the anchor bolts. Here’s how you can apply a sealant effectively:
- Clean the anchor bolts thoroughly using a wire brush to remove any dirt, debris, or loose particles.
- Apply a suitable industrial-grade sealant directly to the exposed threads and the surrounding area of each anchor bolt.
- Ensure complete coverage by moving the sealant applicator in a slow and deliberate manner.
- Allow the sealant to dry as per the manufacturer’s instructions. This may take a few hours, so be patient and avoid disturbing the installation.
By cutting off any excess bolt length and applying a sealant, you are taking important steps towards ensuring the longevity and effectiveness of your anchor bolts. These finishing touches not only enhance the overall appearance but also protect the bolts from corrosion, safeguarding the integrity of your structure for years to come.
Frequently Asked Questions On How To Install Anchor Bolts
How Are Anchor Bolts Placed?
Anchor bolts are placed by following specific steps. Firstly, the position for the bolts is marked on the concrete surface. Then, holes are drilled using a hammer drill and a bit appropriate for the diameter of the bolt. After that, the holes are cleaned out and the bolts are inserted into the holes.
Finally, the bolts are tightened using a wrench.
How Do You Install Concrete Anchor Bolts?
To install concrete anchor bolts, follow these steps: 1. Determine the ideal location for the bolts. 2. Drill holes into the concrete using a hammer drill and appropriate bit. 3. Clean the holes and remove any debris. 4. Insert the anchor bolts into the holes.
5. Tighten the bolts securely using a wrench.
How Do You Install Wall Anchor Fastener?
To install a wall anchor fastener, follow these steps: 1. Choose a suitable anchor for your wall type and weight capacity. 2. Mark the drilling spot and use a drill to create a pilot hole. 3. Insert the anchor into the hole and make sure it is flush with the wall.
4. Drive the screw into the anchor, ensuring it is secure. 5. Test the anchor by gently pulling on it to ensure it holds.
How Deep Should Anchor Bolts Be In Concrete?
Anchor bolts should be embedded in concrete to a depth of at least 12 times their diameter. This ensures proper stability and load-bearing capacity for the bolt. It is crucial to follow this guideline to maintain the structural integrity of the concrete and prevent any potential issues.
Conclusion
Installing anchor bolts is a crucial step in ensuring the stability and strength of structures. With the right tools and techniques, you can secure anchor bolts in concrete effectively. By following the steps outlined in this guide, you can confidently install anchor bolts and ensure the safety of your project.
Remember to prioritize proper measurement, placement, and alignment for optimal results. So, with these simple yet essential guidelines, you are ready to tackle any anchor bolt installation project with ease and efficiency. Your structures will stand strong and secure for years to come.
Let’s get started!