To install an onboard battery charger on a boat, you will need to follow a few simple steps. By connecting the charger to the boat’s electrical system and securing it in a suitable location, you can ensure that your batteries stay charged and ready for use.
Preparing For Installation: Gathering The Necessary Tools And Materials
If you’re planning to install an onboard battery charger on your boat, it’s crucial to start by gathering all the essential tools and materials. Having the right equipment on hand before starting the installation process will not only save you time but also ensure a smooth and hassle-free experience.
Tools and Materials Checklist
Before you begin gathering the necessary tools and materials, it’s important to have a checklist to follow. This will help you stay organized and ensure you don’t miss anything crucial. Here’s a comprehensive list of all the items you’ll need for this installation:
| Tools | Materials |
|---|---|
|
|
Importance of Having the Right Equipment
Having the right tools and materials is paramount when it comes to installing an onboard battery charger on your boat. It ensures that you will be able to complete the installation correctly and efficiently, avoiding any unnecessary complications or delays.
Using the appropriate tools for each task simplifies the installation process and reduces the risk of damaging any components or the boat itself. It’s crucial to use marine-grade materials to withstand the harsh conditions of the marine environment and ensure the longevity of your onboard battery charger.
Moreover, the right equipment will also provide you with peace of mind, knowing that your battery charger is installed securely and will serve its purpose effectively. So, before you embark on this installation project, take the time to gather all the necessary tools and materials to set yourself up for success.
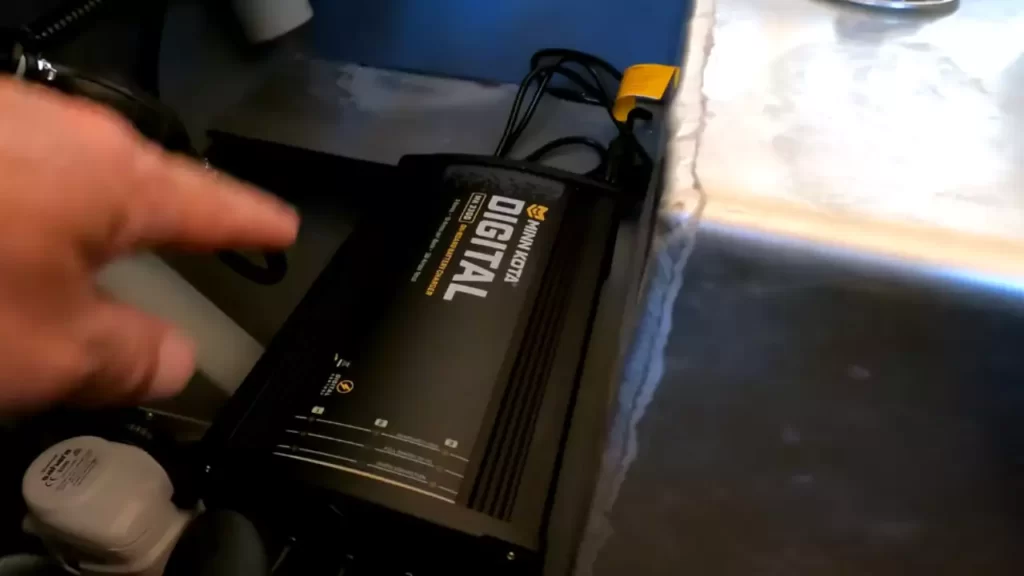
Finding The Ideal Location For The Onboard Battery Charger
Finding the Ideal Location for the Onboard Battery Charger
When it comes to installing an onboard battery charger on a boat, one of the most important considerations is finding the ideal location for it. The location you choose will not only affect the ease of installation but also the charger’s performance and longevity. In this section, we will discuss the factors to consider when choosing a location for your onboard battery charger.
Factors to consider when choosing a location
There are several factors to keep in mind when determining the best location for your onboard battery charger. These factors will help ensure proper functionality and convenience in accessing the charger when needed. Take note of the following:
1. Electrical Connections: First and foremost, consider the proximity of the charger to the boat’s electrical system. Ensure that the location you choose allows for easy connection to the batteries and other electrical components. This will save you from unnecessary complications during installation.
2. Waterproofing: It goes without saying that your onboard battery charger should be well protected from moisture and water. Choose a location that is away from areas prone to splashing or direct contact with water. Additionally, ensure that the charger is adequately sealed and waterproofed to prevent any damage.
3. Temperature and Ventilation: Your charger needs proper ventilation to dissipate heat generated during charging. Look for a location that allows for sufficient airflow and prevents the charger from overheating. Keep in mind that high temperatures can affect the charger’s performance and lifespan.
4. Accessibility: Easy access is crucial when it comes to maintaining and monitoring the charger. Choose a location that allows you to easily reach the charger for routine checks, adjustments, and maintenance. Accessibility is particularly important if you have multiple batteries and need to switch between them.
5. Mounting Options: Consider the available mounting options for the charger. Ideally, you want a location where you can securely mount the charger without it obstructing other important components. Ensure that the chosen location allows for proper mounting hardware to be used.
Ensuring easy access and proper ventilation
To ensure easy access and proper ventilation for your onboard battery charger, follow these tips:
1. Choose a location that is easily accessible and allows you to conveniently reach the charger for routine maintenance and monitoring.
2. Avoid placing the charger in enclosed spaces or areas with limited airflow, as this can cause the charger to overheat. Look for a spot that allows for proper ventilation.
3. Consider installing the charger in a well-ventilated area such as the engine compartment, provided there is sufficient space and the charger can be securely mounted.
4. If the engine compartment is not a suitable option, consider mounting the charger in an open console or compartment, ensuring it is protected from direct water exposure.
Remember, the location you choose for your onboard battery charger will have a significant impact on its performance and durability. Take the time to carefully evaluate the factors discussed and select a location that meets all the necessary considerations. Ensuring easy access, proper ventilation, and protection from water will go a long way in maximizing the lifespan and efficiency of your onboard battery charger.

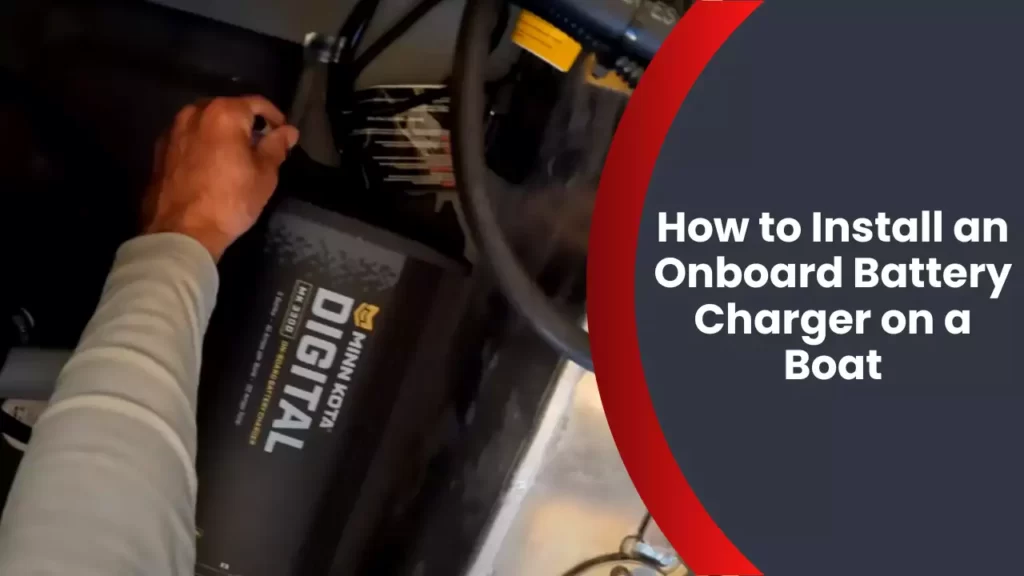
Mounting The Onboard Battery Charger
Mounting the onboard battery charger on your boat is a crucial step in ensuring a reliable power source for all your electrical systems. By securely mounting the charger, you can prevent any unnecessary movement or damage while you’re out on the water. In this section, we will discuss the steps involved in securely mounting the onboard battery charger, as well as determining the best mounting position on your boat.
Steps for securely mounting the charger
Follow these steps to securely mount your onboard battery charger:
- Choose a suitable mounting location: Before mounting the charger, it’s essential to find the best location on your boat. This location should be easily accessible, away from any heat sources or direct sunlight, and in a position that allows for efficient wiring.
- Mark the mounting holes: Once you have identified the ideal location, mark the mounting holes on the surface using a pencil or marker. Ensure that the marks are aligned properly, as they will be used as a guide during the installation process.
- Pre-drill the mounting holes: Using an appropriate drill bit, pre-drill the marked holes on the boat’s surface. The size of the drill bit should match the size of the mounting screws provided with the charger.
- Attach the charger to the boat: Align the screw holes on the charger with the pre-drilled holes on the boat. Insert the mounting screws and tighten them using a screwdriver or drill. Be careful not to over-tighten, as this could cause damage to the charger or boat surface.
- Connect the charger to the boat’s electrical system: Once the charger is securely mounted, it’s time to connect it to your boat’s electrical system. Follow the manufacturer’s instructions to ensure the correct wiring connections are made.
Determining the best mounting position on the boat
Choosing the right mounting position for your onboard battery charger is essential for its efficiency and ease of use. Consider the following factors to determine the best mounting position:
- Proximity to the batteries: Mount the charger as close to the batteries as possible to minimize voltage drop and ensure efficient charging.
- Adequate ventilation: Ensure that the mounting location allows for proper ventilation to prevent overheating of the charger. Avoid enclosed spaces or areas with limited airflow.
- Accessibility: Select a location that is easily accessible for monitoring and maintenance purposes. This will make it easier to check on the charger, perform any necessary repairs, and connect/disconnect the charging cables.
- Protection from water and other elements: Choose a mounting position that offers protection from water, moisture, and other environmental factors. Avoid areas prone to splashes or direct exposure to rain.
- Stability: Aim for a stable mounting location that minimizes vibrations and movement when the boat is in motion. This will help to reduce any potential wear and tear on the charger and ensure its longevity.
By carefully considering these factors, you can determine the best mounting position for your onboard battery charger, ensuring optimal performance and longevity for your boating adventures.
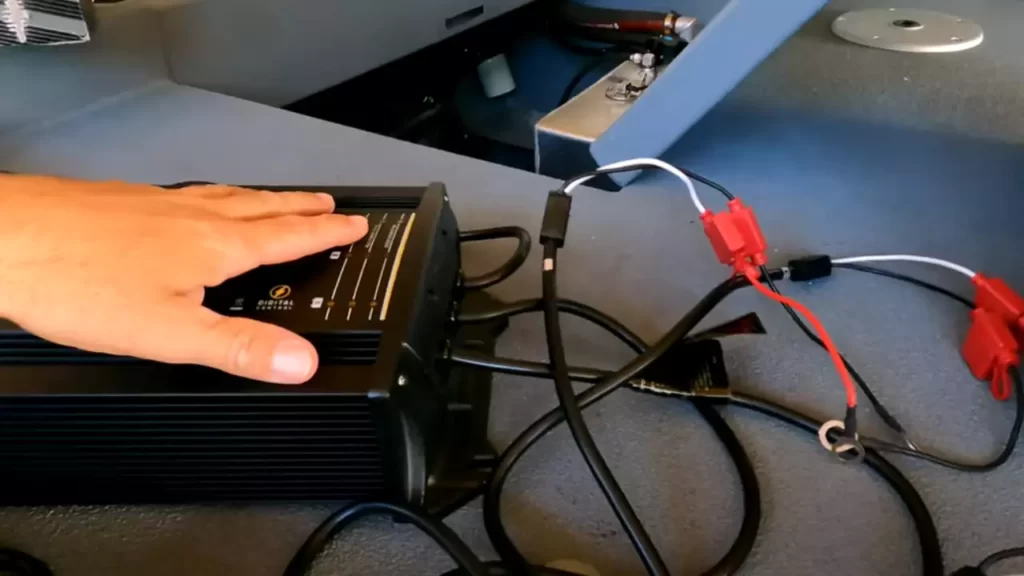
Connecting The Charger To The Boat’S Electrical System
Understanding the Boat’s Electrical System
Before diving into the installation process, it’s important to have a good understanding of your boat’s electrical system. This will help you properly connect the charger to the batteries and ensure everything works smoothly.
In most boats, the electrical system consists of a battery bank, various electrical devices, and a charger. The battery bank is where you store the electrical energy needed to power your boat’s systems. The charger, as the name suggests, replenishes the batteries by converting AC power from shore or generator into DC power.
The charger should be connected to your boat’s electrical system in a way that ensures efficient charging and prevents any damage to the batteries. Here’s how to do it:
Properly Connecting the Charger to the Batteries
- First, identify the positive and negative terminals on the batteries. These are usually marked with a plus (+) and minus (-) sign respectively, or they may be color-coded.
- Next, ensure that the charger is turned off and disconnected from the power source to avoid any electrical shocks.
- Using appropriately sized cables, connect the positive terminal of the charger to the positive terminal of the battery bank. Similarly, connect the negative terminal of the charger to the negative terminal of the battery bank.
- It’s crucial to ensure the connections are secure and tight to prevent any electrical arcing or loose connections that could lead to damage or even a fire hazard.
- Once all the connections are made, double-check to make sure everything is correctly connected and there are no loose wires or signs of damage.
- Now, you can turn on the power source and the charger. Most modern chargers have built-in safety features, such as reverse polarity protection, but it’s always a good idea to monitor the charging process initially to ensure everything is working as expected.
Remember, proper installation and connection of the charger to your boat’s electrical system is essential for efficient charging and extending the lifespan of your batteries. If you’re unsure about any step, it’s always best to consult a professional or refer to the manufacturer’s installation instructions.
Installing The Charger’S Wiring And Cables
Properly installing the wiring and cables for your onboard battery charger is crucial in ensuring a safe and efficient charging system for your boat’s batteries. By following the right steps and utilizing the appropriate materials, you can effectively install the wiring and cables of your charger without any hassle. In this guide, we will walk you through the process, from choosing the right wiring and cables to executing a step-by-step installation.
Choosing the right wiring and cables
Before beginning the installation process, it is important to select the appropriate wiring and cables for your onboard battery charger. This ensures optimal performance and durability. Here are a few factors to consider when making your selection:
- Wire Gauge: The wire gauge determines the thickness and current-carrying capacity of the wiring. Make sure to check the manufacturer’s recommendations for the appropriate wire gauge based on your charger’s specifications.
- Wire Insulation: The wire insulation protects the wiring from external elements and prevents any short circuits. Look for wires with durable insulation that is suitable for marine environments.
- Cable Length: Consider the distance between your charger and battery bank when determining the appropriate cable length. Ensure there is enough slack to accommodate potential movement and vibrations on the boat.
Step-by-step guide for installing the wiring and cables
Now that you have chosen the right wiring and cables, let’s dive into the step-by-step process of installing them:
- Prepare the area: Start by identifying a suitable location for your charger, ensuring it is away from any potential heat sources or water contact. Clear the area of any debris or clutter to provide easy access for the installation.
- Disconnect the power: Before working with any electrical components, ensure the power source is disconnected. This step is essential for your safety and prevents any accidental electrical shocks.
- Mount the charger: Using the appropriate mounting hardware, securely attach the charger to a suitable location. Make sure the charger is positioned in a way that allows easy access to the wiring and cables.
- Connect the wiring: Begin by connecting the positive wire from the battery bank to the positive terminal on the charger. Then, connect the negative wire from the battery bank to the negative terminal on the charger. Use the appropriate connectors to ensure a secure and proper connection.
- Secure the wiring and cables: Use zip ties or clamps to secure the wiring and cables, preventing any accidental movement or damage. This step helps maintain a neat and organized installation.
- Test the connections: Once you have completed the wiring and cable installation, double-check all the connections to ensure they are tight and secure. Use a multimeter to test for voltage and ensure proper functioning.
- Restore power: After confirming all the connections, you can safely restore power to the system. Check the charger’s LED indicators or monitor to ensure the batteries are charging correctly.
Following these steps and adhering to the manufacturer’s instructions will help you successfully install the wiring and cables for your onboard battery charger. Remember, a well-executed installation ensures a reliable and efficient charging system for your boat’s batteries.
Testing And Troubleshooting The Installation
Once you have successfully installed an onboard battery charger on your boat, it is crucial to test its functionality and troubleshoot any potential issues that may arise. This step ensures that the charger is working as intended and that your boat’s batteries are being charged effectively. In this section, we will cover how to test the charger’s functionality and provide common troubleshooting tips and tricks.
Testing the charger’s functionality
To ensure that your onboard battery charger is functioning properly, follow these steps:
- Connect the charger to the boat’s power source.
- Plug the charger into an AC outlet.
- Check if the charger’s LED indicator lights up, indicating that it is receiving power.
- Connect the charger to the boat’s batteries, following the manufacturer’s instructions.
- Observe the charger’s LED indicators to confirm that it is charging the batteries.
- Monitor the charger’s temperature to ensure it does not overheat during the charging process.
- Use a multimeter to measure the voltage output from the charger and compare it to the manufacturer’s specifications.
If everything appears to be functioning correctly and the charger is charging the batteries, then the installation is successful. However, if you encounter any issues, refer to the troubleshooting tips below.
Common troubleshooting tips and tricks
If you are experiencing problems with your onboard battery charger installation, try these troubleshooting tips:
- Check all connections: Ensure that all wires and cables are properly connected and secure.
- Inspect the circuit breaker: Verify that the circuit breaker is in the “ON” position and hasn’t tripped.
- Test the batteries: Use a battery tester to check the voltage levels of the boat’s batteries. Low voltage levels may indicate a battery problem rather than an issue with the charger.
- Reset the charger: Some chargers have a reset button or an internal circuit that can be reset. Follow the manufacturer’s instructions to perform a reset.
- Inspect the cabling: Look for any signs of damage or wear on the charger’s cables. Replace any damaged cables to avoid potential safety hazards or charging issues.
- Consult the user manual: If all else fails, refer to the charger’s user manual for specific troubleshooting steps and recommendations from the manufacturer.
By following these testing and troubleshooting steps, you can ensure that your onboard battery charger is functioning properly and address any issues that may arise during the installation. Take the time to test your charger’s functionality and troubleshoot any problems to ensure your boat’s batteries are being charged efficiently and effectively.
Proper Maintenance And Safety Considerations
Installing an onboard battery charger on your boat allows for convenient and efficient charging of your batteries, ensuring smooth sailing on your future adventures. However, it is important to note that proper maintenance and following safety considerations are paramount to maximizing the lifespan of the charger and ensuring the safety of those on board. In this section, we will explore the regular maintenance practices for the charger and the safety precautions that should be followed during and after installation.
Regular maintenance practices for the charger
Regular maintenance of your onboard battery charger is key to keeping it in optimal condition and extending its lifespan. Here are some important practices to ensure your charger stays in top shape:
- Inspect the charger regularly for any signs of damage, such as frayed wires or loose connections. Address any issues immediately to prevent further damage.
- Keep the charger clean and free from dust or debris that may accumulate over time. Use a soft cloth or brush to gently remove any dirt.
- Check the charger’s cooling vents to ensure they are not obstructed. Proper ventilation is crucial for preventing overheating.
- Monitor the charger’s performance and take note of any deviations from the normal charging process. This can help identify any potential problems early on.
- Follow the manufacturer’s recommendations regarding maintenance schedules and procedures. They have designed the charger to operate optimally under specific conditions and following their guidelines will help maintain its efficiency.
Safety precautions to follow during and after installation
When installing an onboard battery charger on your boat, it is essential to prioritize safety to protect yourself, your passengers, and your vessel. Here are some safety precautions to follow:
- Ensure that the boat’s power source is disconnected before beginning the installation process. This will prevent any electrical accidents or damage to the charger.
- Wear appropriate safety gear, such as gloves and safety glasses, to protect yourself from potential hazards during installation.
- Follow the manufacturer’s instructions carefully during installation, including proper wiring and mounting procedures. Incorrect installation can lead to malfunctions or even electrical fires.
- After installation, double-check all connections are secure and properly insulated. Loose or exposed wires can cause short circuits and potentially harmful accidents.
- If any issues or abnormalities are noticed during the charger’s operation, such as smoke, unusual heat, or sparking, disconnect the charger immediately and seek professional assistance.
- Periodically inspect the charger and its surroundings for any signs of damage or wear. Replace any worn-out components promptly.
Following these regular maintenance practices and safety precautions will help ensure a long-lasting and safe onboard battery charging system for your boat. By taking a proactive approach towards maintenance and safety, you can enjoy worry-free power supply and focus more on the excitement of your boating adventures.
Additional Tips And Recommendations
Best practices for maximizing the lifespan of the battery charger
Proper maintenance and care are essential for maximizing the lifespan of your onboard battery charger. By following these best practices, you can ensure the longevity and optimal performance of your charger:
- Keep the charger clean and dry: Moisture and dirt can negatively affect the charger’s performance. Regularly clean the charger with a damp cloth and ensure it is dry before use.
- Avoid overcharging: Overcharging your batteries can lead to damage and reduce their lifespan. Use a charger with built-in safety features, such as automatic shut-off, to prevent overcharging.
- Monitor battery temperature: High temperatures can cause damage to the charger and the batteries. Place the charger in a well-ventilated area and monitor the temperature to ensure it stays within the recommended range.
- Inspect cables and connections: Regularly check the cables and connections for any signs of wear or damage. Faulty cables can lead to inefficient charging and potential safety hazards.
- Store the charger properly: When not in use, store the charger in a cool and dry location. Avoid exposing it to extreme temperatures or direct sunlight.
Additional features and accessories that can enhance the charger’s performance
To further enhance the performance of your onboard battery charger, consider these additional features and accessories:
| Feature/Accessory | Description |
|---|---|
| Battery temperature compensation: | Some advanced chargers come with temperature sensors that adjust the charging voltage based on the battery’s temperature. This ensures optimal charging regardless of weather conditions. |
| Battery maintenance modes: | Chargers with maintenance modes can keep your batteries charged and ready for use even during long periods of inactivity. These modes provide a low-level maintenance charge to prevent self-discharge and battery degradation. |
| Multi-stage charging: | Multi-stage chargers utilize different charging modes, including bulk charging, absorption charging, and float charging. This not only ensures faster and more efficient charging but also helps extend the battery life. |
| Remote monitoring and control: | Some higher-end chargers offer remote monitoring and control features, allowing you to monitor the charging status and adjust the settings from your smartphone or computer. |
| Battery capacity display: | A charger with a battery capacity display provides real-time information about the battery’s charge level, allowing you to plan your boating trips accordingly. |
| Battery health diagnostics: | Certain chargers include diagnostics features that analyze the health and condition of your batteries. This helps identify potential issues early on and allows for timely maintenance. |
By considering these additional features and accessories, you can maximize the performance and efficiency of your onboard battery charger, ensuring your batteries are always ready for your boating adventures.
Frequently Asked Questions
Where Do You Mount A Marine Battery Charger?
Marine battery chargers can be mounted in various locations on a boat, such as in the engine compartment or near the battery bank. The installation should ensure proper ventilation and protection from water, extreme temperatures, and vibrations. Follow the manufacturer’s guidelines for specific instructions.
Where Does An Onboard Battery Charger Get Its Power?
An onboard battery charger gets its power from the boat’s electrical system when the engine is running.
Can You Charge A Battery While It Is Still Connected To The Boat?
Yes, you can charge a battery while it is connected to the boat. Just be sure to follow safety precautions.
Do Boat Batteries Charge When Plugged Into Shore Power?
Yes, boat batteries do charge when plugged into shore power.
Conclusion
Ensuring a smooth boating experience starts with installing an onboard battery charger. With this essential device, you can easily maintain your boat’s battery power and prolong its life. By following the step-by-step installation guide in this blog post, you can confidently set up your own onboard battery charger.
With a fully charged battery, you’ll be able to embark on countless memorable adventures on the water. So, get ready to enjoy hassle-free boating with this important addition to your boat’s system.