To install an electric dryer, first, ensure you have a dedicated circuit with the correct voltage and amperage. Then, connect the power cord to the dryer, ensuring proper grounding and tightening of the connections.
Understanding The Power Requirements
Understanding the Power Requirements
Installing an electric dryer is a great way to bring convenience to your laundry routine. However, before you begin the installation process, it’s crucial to understand the power requirements of your dryer. This will ensure that you have the proper electrical setup and necessary tools to complete the installation smoothly. In this section, we’ll guide you through the steps of understanding the power requirements, checking the electrical rating of your dryer, determining the proper outlet and cord type, and even upgrading your electrical system if necessary.
Checking the Electrical Rating of Your Dryer
The first step in understanding the power requirements of your electric dryer is to check its electrical rating. This information can usually be found on a label or plate located inside the dryer door or along the back panel. The electrical rating will provide you with essential details such as the voltage, amperage, and wattage required by your dryer.
To ensure that your electrical system can support the dryer’s power needs, you need to know the voltage requirement, expressed in volts (V), and the amperage requirement, expressed in amperes (A). These values are typically 240V and 30A for most electric dryers. However, it’s vital to check the specific rating for your dryer model, as there may be variations.
Determining the Proper Outlet and Cord Type
Once you have determined the electrical rating of your dryer, the next step is to determine the proper outlet and cord type. Electric dryers usually require a dedicated 240V outlet, commonly known as a NEMA 14-30 outlet. This outlet has four prongs, including two hot wires, a neutral wire, and a ground wire. It’s important to note that older homes may have a different outlet type, such as a three-prong NEMA 10-30 outlet, which lacks a dedicated ground wire.
To ensure a safe and proper installation, you’ll need to verify that your home’s electrical system matches the outlet type required by your dryer. If it doesn’t, you may need to consider upgrading your electrical system.
Upgrading Your Electrical System (if necessary)
In some cases, you may need to upgrade your electrical system to accommodate the power requirements of your electric dryer. This typically involves hiring a licensed electrician to install a new circuit breaker and wiring, allowing for proper electrical supply to the dryer.
Before proceeding with any electrical upgrades, it’s crucial to consult with a qualified electrician to assess the feasibility and safety of the installation. Upgrading your electrical system requires expertise and knowledge of local electrical codes and regulations to ensure a successful and compliant installation.
Gathering the Required Tools and Materials
Now that you have a clear understanding of the power requirements of your electric dryer, it’s time to gather the required tools and materials for the installation. Here’s a list of essential items you’ll need:
1. Electrical voltage tester to verify the presence of electrical power
2. Screwdriver set for removing and securing electrical connections
3. Wire strippers for preparing wires for connections
4. Electrical tape for insulating wire connections
5. NEMA 14-30 outlet (if required) and mounting box
6. Cord set compatible with your dryer’s electrical rating
7. Wire nuts for securing wire connections
8. Cable clamp for securing the dryer cord to the appliance
By having these tools and materials ready, you’ll be fully equipped to proceed with the installation of your electric dryer.
Understanding the power requirements of your electric dryer is essential for a safe and successful installation. By checking the electrical rating, determining the proper outlet and cord type, and gathering the necessary tools and materials, you’re on your way to enjoying the convenience of a reliable electric dryer in your home.
Preparing The Installation Area
Before you can install your new electric dryer, it’s important to properly prepare the installation area. This will ensure that your dryer is safe to use and operates efficiently. In this section, we will cover the essential steps to clearing and cleaning the space, ensuring proper ventilation, measuring and leveling the area, and securing the dryer duct.
Clearing and Cleaning the Space
First, you need to clear the area where you plan to install your electric dryer. Make sure to remove any clutter, including old appliances, debris, or storage items. This will create a safe and clean space for your new dryer.
Once the area is clear, take the time to thoroughly clean the floor and walls. Use a broom or vacuum cleaner to remove any dust, dirt, or lint. Wipe down the surfaces with a damp cloth to ensure they are free from any grime or sticky residue. Cleaning the space not only improves the overall appearance but also helps to prevent any potential fire hazards.
Ensuring Proper Ventilation
Proper ventilation is crucial for the efficient operation of your electric dryer. If the hot air cannot escape, it can lead to overheating and potential damage to your dryer. Ensure that the installation area has adequate ventilation by checking for any blockages or restrictions in the vent system.
Inspect the vent duct and ensure it is free from lint buildup or any damage. If you notice any obstructions or clogs, use a vent brush or vacuum cleaner to remove the debris. Additionally, make sure the vent duct is properly connected to the outdoor vent hood to ensure proper airflow.
Measuring and Leveling the Area
Before installing your electric dryer, it’s important to measure and level the area to ensure a secure and stable setup. Use a tape measure to determine the dimensions of the installation area, including the height, width, and depth.
Once you have the measurements, check if the area is level. Uneven surfaces can lead to unstable dryer operation. If necessary, use a leveling tool to adjust the area and ensure a level base for your dryer.
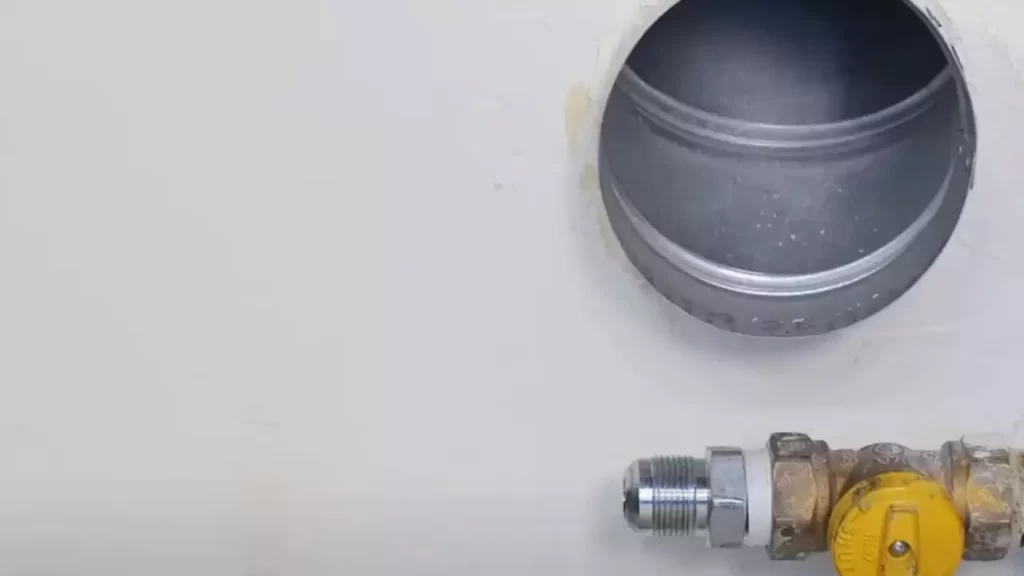
Securing the Dryer Duct
The dryer duct is responsible for carrying hot air out of your home. Properly securing the dryer duct is essential to prevent any leaks or disconnections. Make sure the duct is connected firmly to the dryer and the wall vent.
Using metal foil tape, seal any connections to ensure a tight and secure fit. This will prevent any air leakage and improve the efficiency of your electric dryer. Additionally, check for any kinks or bends in the duct and straighten them out to maintain a smooth airflow.
By following these steps and preparing the installation area properly, you can ensure a safe and efficient installation of your electric dryer. It’s essential to pay attention to the details to prevent any hazards and maximize the performance of your appliance.
Connecting The Electrical Supply
When installing an electric dryer, one of the most important steps is connecting the electrical supply. This ensures that the dryer can safely and efficiently operate. In this section, we will guide you through the process of connecting the electrical supply, from shutting off the power source to wiring the dryer. Follow these steps carefully to ensure a successful installation.
Shutting Off the Power Source
The first step before connecting the electrical supply is to shut off the power source. This is essential for your safety to avoid any electric shocks or accidents. Follow these steps to turn off the power:
- Locate the circuit breaker panel in your home.
- Identify the circuit breaker that controls the power to the area where the dryer is installed.
- Flip the circuit breaker to the “Off” position.
- Double-check that the power is effectively off by testing the outlet with a voltage tester.
Removing the Existing Outlet (if applicable)
If you are replacing an old dryer or need to change the outlet, you will need to remove the existing outlet. Follow these steps carefully:
- Turn off the power supply at the circuit breaker.
- Using a screwdriver, remove the screws holding the outlet cover in place.
- Carefully detach the outlet cover and set it aside.
- Using a screwdriver, unscrew the screws holding the outlet in place.
- Gently pull the outlet out from the wall, exposing the electrical wires.
- Use a wire cutter or stripper to carefully remove the insulation from the wires.
- Disconnect the wires from the outlet.
Installing a New Outlet
If you need to install a new outlet for your electric dryer, follow these steps:
- Turn off the power supply at the circuit breaker.
- Choose a suitable location where you want to install the new outlet.
- Measure and mark the location for the outlet on the wall.
- Use a stud finder to locate any studs behind the wall.
- If there is a stud in the way, use a jigsaw to carefully cut a hole for the outlet box.
- Feed the electrical cable through the hole and into the outlet box.
- Attach the outlet box to the wall using screws.
- Connect the wires to the new outlet using wire nuts, following the manufacturer’s instructions.
- Screw the outlet cover onto the outlet box.
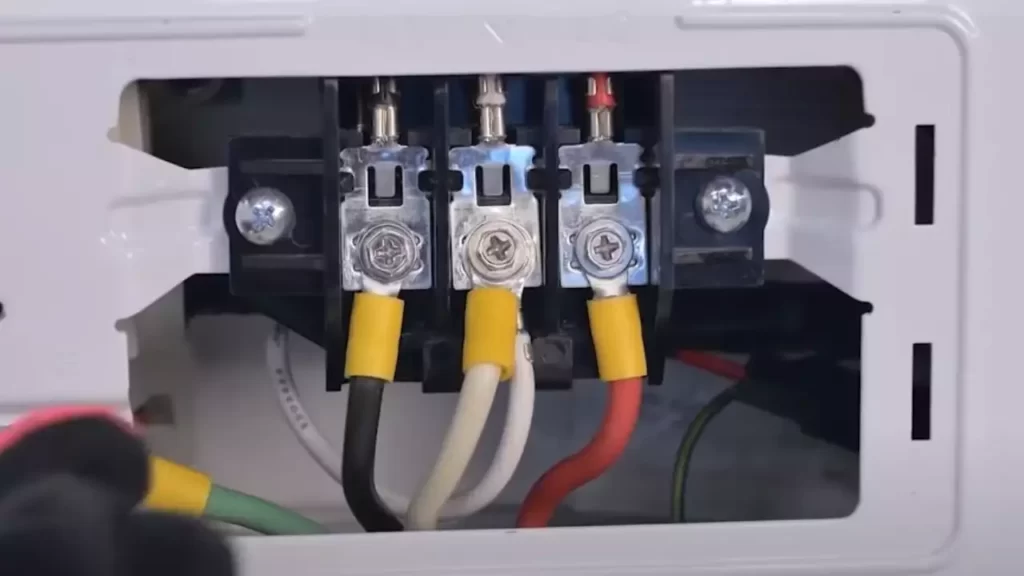
Wiring the Dryer to the Electrical Supply
Once the new outlet is installed or the existing outlet is ready, it’s time to wire the dryer to the electrical supply. Follow these steps to complete the process:
- Make sure the power is still off at the circuit breaker.
- Locate the dryer’s electrical connection panel.
- Remove the access panel covering the connection panel.
- Carefully attach the dryer’s power cord to the labeled terminals, matching the corresponding colors.
- Tighten the screws on each terminal to secure the wires in place.
- Replace the access panel on the dryer.
With the electrical supply now properly connected, you can proceed with the remaining steps of installing your electric dryer. Remember to always prioritize safety and consult a professional if you are unsure about any of the steps.

Proper Ventilation And Ductwork
When it comes to installing an electric dryer, one of the most important considerations is proper ventilation and ductwork. Without a well-designed and correctly installed ventilation system, your dryer may not work efficiently, leading to potential safety hazards and increased energy consumption. In this section, we will guide you through the process of ensuring proper ventilation and ductwork for your electric dryer installation.
Choosing the Right Vent Type
The first step in achieving proper ventilation for your electric dryer is selecting the right vent type. There are a few options available, including:
- Rigid Metal Duct: This is the most common and recommended type for electric dryers. It provides a smooth, unrestricted airflow and is fire-resistant. Ensure that the duct is at least 4 inches in diameter for optimal performance.
- Flexible Metal Duct: While flexible metal ducts are more convenient to install and can be bent to fit in tight spaces, they are not as efficient as rigid metal ducts. If you choose this option, make sure to use a high-quality, UL-approved flexible duct and avoid bending it excessively.
- Plastic Duct: Plastic ducts are not recommended for dryer installations due to their potential for heat buildup and fire hazards. It is crucial to prioritize safety and choose a more suitable vent type.
Installing the Dryer Duct
Once you have chosen the appropriate vent type, it’s time to install the dryer duct. Follow these steps to ensure a proper installation:
- Position the dryer close to the intended vent location. It should be within 4 feet of the wall for rigid metal ducts or 8 feet for flexible metal ducts.
- Attach one end of the duct to the dryer’s exhaust outlet using a clamp. Make sure it is secure and tightly sealed.
- Guide the other end of the duct to the vent opening on the wall or floor. Again, use a clamp to secure it in place and ensure a tight seal.
- Avoid using screws or other fasteners that may obstruct airflow or accumulate lint.
Securing and Sealing the Connections
It is essential to secure and seal all connections in your dryer ductwork to minimize air leakage and prevent lint buildup. Follow these steps for secure and properly sealed connections:
- Use foil tape or approved metal duct connectors to join sections of rigid metal ducts. Avoid using duct tape, as it tends to deteriorate over time and may fail to provide a reliable seal.
- For flexible metal ducts, use metal clamps to secure the connections. Tighten the clamps adequately to prevent any air leakage.
- Inspect all connections and ensure that they are tightly sealed. Any gaps or loose connections can lead to lint accumulation and decrease dryer efficiency.
Inspecting and Testing for Proper Ventilation
Once the installation is complete, it is important to inspect and test your dryer’s ventilation system for proper functioning. Follow these steps:
- Check for any obstructions or blockages in the ductwork. Remove any lint buildup, debris, or other objects that may hinder airflow.
- Inspect the exterior vent cover to ensure it opens and closes freely and is not obstructed by animal nests or debris.
- Turn on the dryer and stand outside to feel for proper airflow. The air should be warm and strong, indicating that the ventilation system is functioning correctly.
- If you notice weak airflow or suspect any issues, consider consulting a professional to inspect and address the problem.
By following these guidelines for proper ventilation and ductwork, you can ensure your electric dryer operates safely and efficiently. Regularly inspecting and maintaining your dryer’s ventilation system is crucial for preventing potential hazards and optimizing performance.
Installing And Aligning The Dryer
Installing and aligning an electric dryer requires a few simple steps to ensure a safe and efficient operation. In this section, we will guide you through the process of removing packaging and accessories, adjusting the dryer legs, connecting the dryer to the vent and power supply, and leveling and securing the dryer.
Removing Packaging and Accessories
To start, carefully remove any packaging material, such as plastic wrap or cardboard, from the dryer. Be mindful of sharp edges and use the appropriate tools, like scissors or a box cutter, if needed. Check for any accessories or parts that may have been included with your dryer, such as a power cord or vent hose. These items are crucial for a proper installation, so make sure they are present and undamaged.
Adjusting the Dryer Legs
Next, take a moment to ensure the dryer is level and stable. Most dryers come with adjustable legs that can be raised or lowered to achieve proper alignment. Using a wrench or pliers, turn each leg clockwise or counterclockwise to adjust the height. Aim for a leveled dryer that doesn’t wobble when gently nudged. This will help prevent any excessive vibration or movement during operation, ensuring a quiet and stable drying experience.
Connecting the Dryer to the Vent and Power Supply
Once the dryer is properly aligned, it’s time to connect it to the vent and power supply. Start by attaching the vent hose to the back of the dryer. Ensure a secure fit by tightening any clamps or fasteners included with the dryer. Next, locate the power cord and plug it into a grounded electrical outlet. Make sure the power supply matches the specifications required by the dryer, as stated in the manufacturer’s instructions. It’s crucial to have both the vent and power supply properly connected to avoid any air or electrical issues that may impact the dryer’s performance.
Leveling and Securing the Dryer
Lastly, double-check the dryer’s level and stability after connecting the vent and power supply. Use a leveling tool, such as a bubble level, and adjust the legs if necessary to ensure a balanced position. Once the dryer is level, secure it in place by tightening any screws or brackets provided by the manufacturer. This will further enhance stability and reduce the risk of the dryer tipping over during use.
By following these steps, you can effectively install and align your electric dryer for optimal performance and longevity. Take the time to carefully go through each step, ensuring that everything is properly connected, leveled, and secured. A well-installed dryer will not only operate more efficiently but also provide peace of mind in knowing that it’s safe and ready to handle your laundry needs.
Testing And Finishing
Reconnecting the Power
Once you have successfully installed your electric dryer and made all the necessary electrical connections, it’s time to reconnect the power. Before plugging in the dryer, it’s crucial to ensure that the power supply is turned off. This will prevent any accidents or electrical mishaps. Once the power supply is turned off, you can plug the dryer into the outlet.
Testing the Dryer Operation
After reconnecting the power, it’s important to test the dryer’s operation to ensure everything is functioning correctly. To do this, follow these simple steps:
- Close the dryer door securely.
- Set the desired drying cycle and temperature.
- Turn the dryer on and listen for any unusual sounds.
- Observe if the drum inside the dryer is spinning smoothly.
- Check if the dryer is producing hot air.
- Monitor the drying time to ensure it is drying clothes efficiently.
If you notice any issues during the testing process, refer to the troubleshooting and maintenance tips below to identify and resolve the problem.
Cleaning up the Installation Area
Now that your electric dryer is up and running smoothly, it’s time to clean up the installation area. First, remove any packaging material or protective coverings from the dryer. Next, use a vacuum cleaner or a damp cloth to clean any dust or debris around the dryer and the surrounding area. This will help maintain optimum performance and prevent any potential fire hazards.
Troubleshooting and Maintenance Tips
While electric dryers are generally reliable, occasional issues may arise. Here are some troubleshooting tips to help you address common problems:
- If the dryer is not producing heat, check if the circuit breaker has tripped or if there is a blown fuse in the electrical panel. Reset the breaker or replace the fuse if necessary.
- If the dryer is taking longer than usual to dry clothes, make sure the lint filter is clean and clear of any lint buildup. A clogged filter can restrict airflow and reduce drying efficiency.
- If the dryer drum is not spinning, check if the belt that rotates the drum is intact. Replace the belt if it is broken or worn out.
- Regularly clean the dryer vent to prevent lint buildup and improve dryer performance. Use a vent cleaning brush or vacuum attachment to remove any accumulated lint.
By following these troubleshooting tips and performing regular maintenance, you can ensure that your electric dryer operates efficiently and lasts for many years to come.
Frequently Asked Questions
Is It Easy To Install An Electric Dryer?
Installing an electric dryer is relatively easy. Just follow the manufacturer’s instructions, connect it to a suitable electrical outlet, and ensure proper ventilation. It is recommended to hire a professional if you are unsure or need assistance.
Can You Just Plug In An Electric Dryer?
Yes, you can plug in an electric dryer. It’s a simple process that requires connecting the dryer’s power cord to a compatible electrical outlet.
Do Electric Dryers Need A Different Outlet?
Yes, electric dryers require a specialized outlet. They typically need a 240-volt outlet with a specific plug configuration. It’s important to have the correct outlet installed to ensure safety and compatibility for your electric dryer.
Can You Run An Electric Dryer Without A Vent?
Yes, you can run an electric dryer without a vent. However, it is not recommended as the vent helps to remove moisture and lint from your home, preventing potential safety hazards and moisture-related issues like mold and mildew.
Conclusion
Installing an electric dryer is a straightforward process that anyone can accomplish with the right guidance. By following the steps outlined in this blog post, you can successfully install your electric dryer and enjoy the convenience it brings to your laundry routine.
From preparing the location to connecting the necessary wires, each step is important to ensure safe and efficient operation. Remember to consult the manufacturer’s instructions and seek professional assistance if needed. Now, you’re ready to start enjoying your freshly dried clothes hassle-free!