To install aluminum fascia and soffit, first, measure and cut the fascia and soffit panels to fit the length of the roof and eaves. Then, secure the fascia panels to the roof edge using screws, making sure they are level.
Finally, attach the soffit panels to the eaves using nails or screws, leaving space for ventilation. Here’s a brief introduction to the topic: Aluminum fascia and soffit play a vital role in protecting the roof and eaves of a building while enhancing its aesthetic appeal.
These components not only provide a finished look but also prevent water damage and deter pests. If you’re considering installing aluminum fascia and soffit, this guide will walk you through the essential steps. Whether you’re a DIY enthusiast or a professional contractor, the installation process is straightforward and can significantly improve the durability and appearance of your property. So, let’s delve into the process of installing aluminum fascia and soffit panels.
Essential Tools For Installation
List of necessary tools
When it comes to installing aluminum fascia and soffit, having the right tools on hand is essential for a successful installation. Whether you are a seasoned DIYer or a professional contractor, having these tools at your disposal will make the process easier and more efficient. Here is a list of the necessary tools you’ll need for installing aluminum fascia and soffit:
- Measuring tape – Accurate measurements are crucial when installing aluminum fascia and soffit. A measuring tape will help you ensure the right fit and dimensions.
- Chalk line – A chalk line will help you create straight and precise guidelines for the installation.
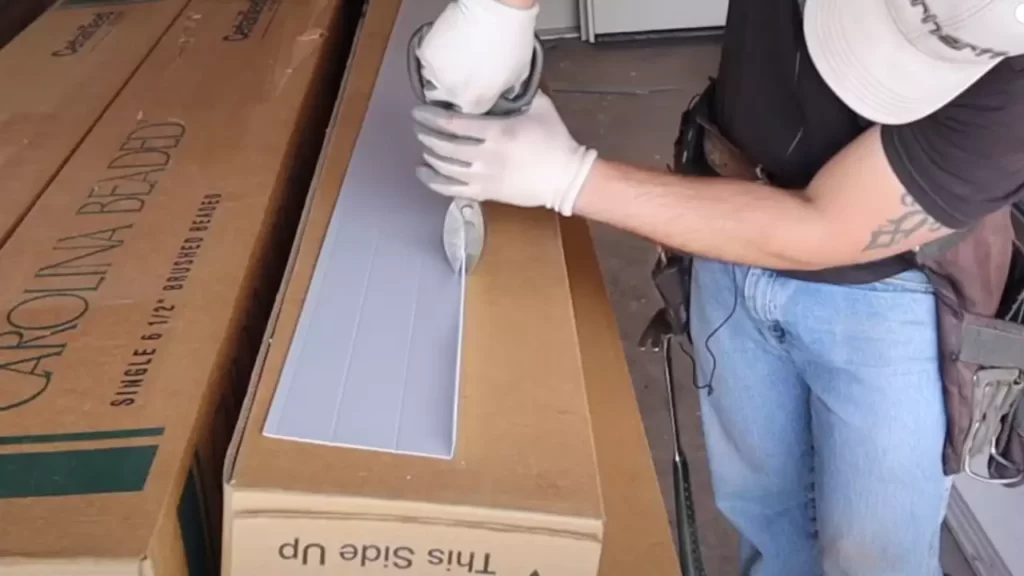
- Hacksaw – A hacksaw with fine-tooth replacement blades is ideal for cutting aluminum fascia and soffit. Make sure to use safety gloves when handling the saw.
- Miter saw – A miter saw will come in handy for making angled cuts, especially if there are corners or sloped areas.
- Power drill – A power drill with screwdriver bits is essential for securing the aluminum fascia and soffit in place.
- Screws – Use corrosion-resistant screws specifically designed for aluminum to ensure stability and longevity.
- Level – A level will help you ensure that the fascia and soffit are installed perfectly horizontal and level.
- Clamps – Clamps are useful for holding the fascia in place while you secure it with screws.
- Aluminum cleaner – Before installation, it’s important to clean the aluminum fascia and soffit to remove any dirt or debris. An aluminum cleaner will help you achieve a clean and smooth surface.
- Paint – If you plan to paint the aluminum fascia and soffit, make sure to have the appropriate paint and brushes ready.
Safety equipment required
Installing aluminum fascia and soffit may involve working at heights and working with sharp tools. It’s crucial to prioritize safety and have the necessary safety equipment to protect yourself throughout the installation process. Here are some safety equipment items you should have:
- Safety goggles – Protect your eyes from debris and dust by wearing safety goggles.
- Dust mask – Prevent inhaling dust particles by wearing a dust mask.
- Gloves – Use heavy-duty gloves to protect your hands when handling sharp tools or rough materials.
- Hard hat – If working at heights or in an area with potential falling debris, wearing a hard hat is essential.
- Safety harness – When working on a roof or other elevated areas, consider using a safety harness to prevent falls.
- Sturdy ladder – Make sure your ladder is stable and in good condition before using it for the installation.
- Non-slip shoes – Wear shoes with good traction to prevent slips and falls.
Taking the time to gather the essential tools and safety equipment beforehand will not only ensure a smooth installation process but also keep you safe throughout the project. Always prioritize safety and wear the appropriate safety gear. With these tools in hand, you’ll be well-prepared to install aluminum fascia and soffit with confidence and precision.
Measuring And Estimating Materials
Before you dive into the installation process of aluminum fascia and soffit, one crucial step is to measure and estimate the materials you will need. This ensures that you have the right amount of materials and helps you avoid any delays or additional costs caused by running out of materials during the installation.
Measuring the dimensions of the fascia and soffit
The first step in measuring the dimensions of the fascia and soffit is to use a measuring tape to determine the length and width of each component. Start by measuring the length of the fascia board, which is the vertical board that runs along the roofline. Write down the measurement in feet.
Next, measure the width of the fascia board. This is usually a standard measurement, but it’s essential to double-check to ensure accuracy. Write down the measurement in inches.
When measuring the soffit, which is the horizontal board beneath the fascia, measure the length and width in the same way as the fascia board. Note that the soffit is often installed in sections, so it’s important to measure each section individually.
Calculating the required amount of materials
Once you have measured the dimensions of the fascia and soffit components, you can now calculate the required amount of materials. Here’s a simple calculation process:
- Start with the total length of the fascia board and divide it by 12 to convert it from feet to inches. This will give you the total linear footage of fascia needed.
- Calculate the total square footage of the soffit by multiplying the length and width of each section and adding them together.
- Consider any additional materials needed for joints, corners, or trim pieces. Consult the manufacturer’s guidelines or your contractor for specific requirements.
It’s always a good idea to add an extra 5-10% to your calculated quantities to account for possible errors, wastage, or future repairs. This ensures that you have enough materials on hand to complete the installation project without any interruptions.
By accurately measuring and estimating the required materials, you can ensure a smooth and efficient installation of aluminum fascia and soffit. Taking the time to get these measurements right from the start will save you time, money, and unnecessary stress down the road.
Surface Preparation
Surface preparation is an essential step when it comes to installing aluminum fascia and soffit. Proper preparation ensures a smooth and long-lasting installation that will protect your home for years to come. In this section, we will cover the necessary steps of cleaning the existing fascia and soffit, as well as removing any old materials or debris.
Cleaning the existing fascia and soffit
Before installing the aluminum fascia and soffit, it is crucial to clean the existing surfaces thoroughly. This step helps to remove any dirt, dust, or grime that may interfere with the adhesive or affect the overall appearance of the installation.
Here are the steps to properly clean the existing fascia and soffit:
- Start by removing any loose debris or vegetation that may have accumulated on the surfaces. Use a stiff brush or broom to sweep away leaves, twigs, or dirt.
- Next, fill a bucket with warm water and add a mild detergent. Dip a soft cloth or sponge into the soapy solution and gently scrub the fascia and soffit to remove any dirt or stains. Be sure to clean both the visible surfaces as well as any hidden areas.
- Rinse the surfaces thoroughly with clean water to remove any soap residue. This can be done using a garden hose or a bucket of clean water.
- Allow the fascia and soffit to dry completely before proceeding with the installation. This will ensure proper adhesion of the aluminum material.
Removing any old materials or debris
In addition to cleaning the surfaces, it is important to remove any old materials or debris that may be present on the fascia and soffit. This step ensures a clean, stable base for the new installation.
Here are the steps to remove old materials or debris:
- Inspect the fascia and soffit for any loose or damaged materials. These may include old paint, rotten wood, or other debris that could affect the installation.
- Using a putty knife or scraper, gently remove any loose paint or other coatings from the surfaces. Be careful not to damage the underlying structure.
- If any wood rot or damage is detected, it may be necessary to replace the affected sections before proceeding with the installation. Consult with a professional if you are unsure about the extent of the damage.
- Once the surfaces are free from loose materials, use a broom or vacuum to remove any remaining debris or dust.
By following these surface preparation steps, you will create a clean and stable foundation for the installation of aluminum fascia and soffit. This will ensure a seamless and long-lasting finish that not only enhances the appearance of your home but also provides protection against the elements.

Choosing The Right Type Of Fascia
Choosing the right type of fascia for your home is an important decision that can impact the overall aesthetic appeal and functionality of your property. With so many options available in the market, it can be overwhelming to know which one is best suited for your needs. In this section, we will discuss the different options available in the market and the factors to consider when selecting the fascia.
Different options available in the market
When it comes to choosing the right type of fascia for your home, there are several options available in the market. Each option has its own unique features and benefits. Let’s take a closer look at some of these options:
| Type | Features | Benefits |
|---|---|---|
| Aluminum Fascia | Highly durable and resistant to rust | Low maintenance and long-lasting |
| Wood Fascia | Natural and traditional appearance | Can be painted or stained to match your home’s exterior |
| Vinyl Fascia | Low maintenance and resistant to rot and insects | Wide range of color options available |
Factors to consider when selecting the fascia
When selecting the fascia for your home, it’s important to consider certain factors to ensure you make the right choice. These factors will help you determine the most suitable fascia for your specific needs. Here are some key factors to consider:
- Climate: Take into account the climate of your area. If you live in a region with extreme weather conditions, such as high humidity or heavy rainfall, you may want to choose a fascia material that is resistant to moisture and can withstand harsh weather elements.
- Style: Consider the architectural style of your home. Choose a fascia that complements the overall design and enhances the visual appeal of your property.
- Maintenance: Determine how much time and effort you are willing to invest in maintenance. Some fascia materials require regular painting or staining, while others are low maintenance and only require occasional cleaning.
- Budget: Set a budget for the fascia installation project. Different materials have different costs associated with them, so it’s essential to choose a fascia option that fits within your budget.
By considering these factors and understanding the different options available in the market, you can make an informed decision when selecting the right type of fascia for your home. Remember, the fascia not only serves as a protective element but also enhances the overall appearance of your property.
Attaching The Fascia To The Eaves
Once you have successfully installed the starter strip, the next crucial step is attaching the fascia to the eaves. The fascia board not only adds a polished finish to your home’s exterior but also serves as a protective barrier against water damage and pests. A proper installation ensures durability and aesthetic appeal. In this section, we will guide you through the process of securing the fascia board to the eaves.
Installing the starter strip
Before you attach the fascia board, it is important to install a starter strip as a foundation for it. This strip helps to keep the bottom edge of the fascia level and provides an extra layer of protection against moisture. To install the starter strip:
- Cut the starter strip to fit the length of the eaves, ensuring it extends slightly beyond the edge.
- Place the starter strip along the bottom edge of the eaves, flush against the sheathing.
- Secure the starter strip using nails or screws, making sure they are spaced evenly along its length.
By installing the starter strip correctly, you create a solid base for attaching the fascia board.
Securing the fascia board
Now that the starter strip is in place, it’s time to secure the fascia board to the eaves. Follow these steps:
- Measure the length of the eaves and cut the fascia board accordingly, ensuring a precise fit.
- Position the fascia board against the eaves, making sure it aligns with the starter strip.
- Use a level to check that the fascia board is straight and adjust if necessary.
- Secure the fascia board to the eaves by driving nails or screws through the board and into the eaves. Ensure the fasteners penetrate the starter strip and sheathing, providing a sturdy attachment.
- Continue attaching the fascia board at regular intervals, spacing the fasteners evenly along its length.
As you secure the fascia board, remember to maintain a consistent gap between each board to allow for expansion and contraction due to changes in temperature. This will prevent warping or buckling over time.
By following these steps to attach the fascia to the eaves, you can ensure a proper and secure installation. Taking the time to do it right will not only enhance your home’s curb appeal but also protect it from potential damage. Now that you have successfully completed this step, you are one step closer to a beautifully finished exterior.
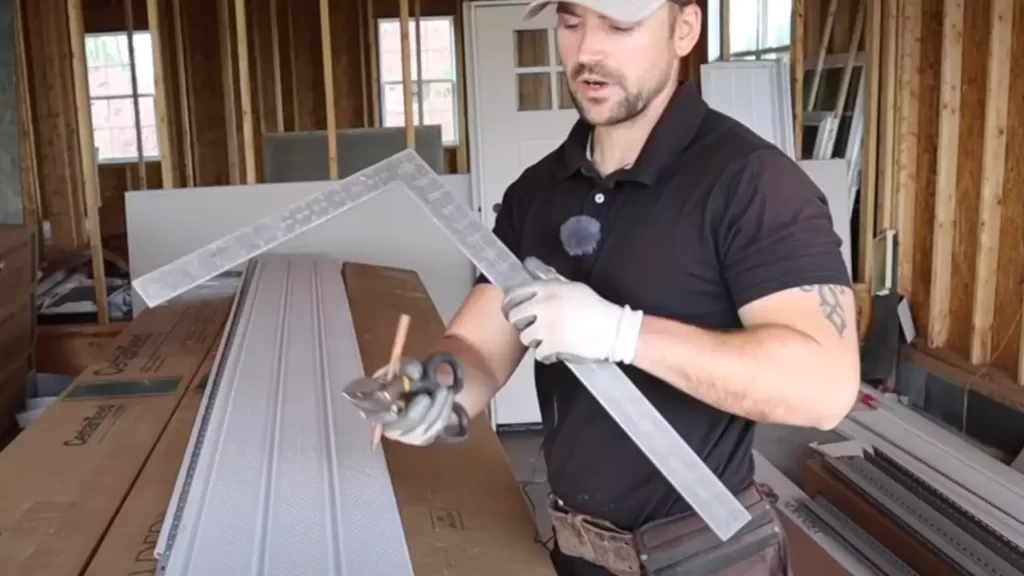
Joining Fascia Sections
Properly joining fascia sections is essential for a secure and seamless installation. There are two primary methods used to join aluminum fascia sections: overlapping or mitered corner joints. Let’s explore each option and discuss the proper sealing techniques to ensure a long-lasting finish.
Overlapping or mitered corner joints
When installing aluminum fascia, you have the choice of using overlapping or mitered corner joints to create a cohesive look. Both methods have their benefits, so let’s take a closer look at each:
- Overlapping joints: This method involves overlapping the end of one fascia section with the adjacent section. It provides a simple yet effective way to connect the pieces while maintaining structural integrity. Use self-tapping screws at regular intervals to secure the overlapping sections, ensuring a tight and secure fit.
- Mitered corner joints: If you’re looking for a more seamless and visually appealing finish, mitered corner joints are the way to go. This technique involves cutting the ends of the fascia sections at a 45-degree angle and then joining them together at the corners. The resulting joint creates a clean, professional look that enhances the overall aesthetic of your home.
Proper sealing techniques
To ensure the longevity and durability of your aluminum fascia and soffit installation, proper sealing techniques are essential. Here are some steps to follow:
- Start by cleaning the surface of the fascia sections thoroughly to remove any dirt, debris, or old sealant.
- Apply a high-quality silicone caulk to the joint area, making sure to fill any gaps or spaces completely.
- Smooth out the caulk using a caulk smoothing tool or your finger, ensuring a neat and uniform seal.
- For overlapping joints, use self-tapping screws to secure the fascia sections together tightly.
- In the case of mitered corner joints, apply a strengthening adhesive or sealant to reinforce the joint and create a watertight barrier.
- Finally, inspect the sealed joints carefully, checking for any imperfections or gaps. Make any necessary adjustments or reapplications to ensure a proper seal.
By following these recommended practices for joining fascia sections and employing proper sealing techniques, you can achieve a professional and flawless aluminum fascia and soffit installation. Remember, a well-installed and sealed system not only enhances the appearance of your home but also protects it from moisture and potential damage. Take your time, use the right tools, and enjoy the satisfaction of a job well done.
Selecting The Appropriate Soffit Material
When it comes to installing aluminum fascia and soffit, selecting the appropriate soffit material is a crucial step. The soffit not only provides an attractive finishing touch to your home’s exterior but also plays a vital role in protecting your roof and eaves from moisture damage and pests. With a variety of soffit materials available in the market, it can be overwhelming to make the right choice for your specific needs. This section will guide you through the different types of soffit materials and the factors to consider when selecting the most suitable one.
Different Types of Soffit Materials
Before diving into the selection process, it’s essential to familiarize yourself with the different types of soffit materials available:
| Soffit Material | Description |
|---|---|
| Aluminum Soffit | Aluminum soffit is a popular choice due to its durability, low maintenance, and resistance to corrosion. It comes in various styles and textures, allowing you to achieve the desired aesthetic for your home. |
| Wood Soffit | Wood soffit offers a classic and natural look. It can be painted or stained to match your home’s exterior. However, wood requires regular maintenance to prevent rotting and insect infestation. |
| Vinyl Soffit | Vinyl soffit is a cost-effective option that is easy to install and maintain. It is available in different colors and styles, providing versatility in design. Additionally, it resists moisture, fading, and pests. |
| Fiber Cement Soffit | Fiber cement soffit is known for its durability and strength. It is resistant to rot, insects, and fire. This material can be painted to match your desired color scheme. |
Factors to Consider When Choosing the Soffit Material
When selecting the right soffit material for your home, consider the following factors:
- Climate: The climate in your area will greatly impact the performance and longevity of the soffit material. For instance, in humid environments, materials that resist moisture, such as aluminum or vinyl, are ideal.
- Budget: Set a budget and consider the cost of the materials, installation, and long-term maintenance. While wood may offer an appealing look, it may require more upkeep and expenses in the long run.
- Aesthetics: Choose a soffit material that complements your overall home design. Consider the style, color, and texture options available to achieve the desired visual appearance.
- Maintenance: Evaluate the required maintenance for each material, including cleaning, repainting, and repairs. Opt for materials that fit your lifestyle and maintenance capabilities.
- Durability: Ensure the selected material is durable and can withstand external elements such as wind, rain, and sun exposure. Look for materials that are resistant to rot, corrosion, pests, and fading.
By considering these factors, you can make an informed decision regarding the soffit material that best suits your home’s needs. Remember, selecting the appropriate soffit material is crucial for both functionality and aesthetic appeal.
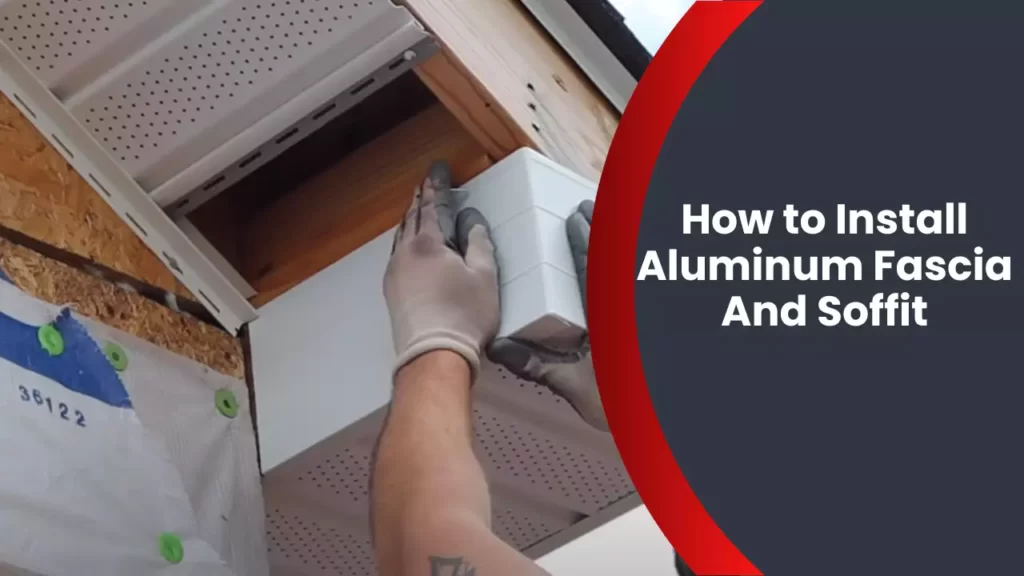
Installing The Soffit Panels
Installing the soffit panels is an essential step in completing the installation of aluminum fascia and soffit. These panels not only enhance the aesthetic appeal of your home’s exterior but also provide protection against moisture and pests. To ensure a smooth and hassle-free installation process, it is crucial to follow the correct steps. In this section, we will guide you through the process of measuring and cutting the panels and attaching them to the eaves.
Measuring and cutting the panels
Before you begin installing the soffit panels, it is important to accurately measure the dimensions of the area where the panels will be installed. This will ensure that you have the correct panel sizes and minimize waste. When measuring, make sure to account for any vents or other obstructions that may require custom cuts.
Once you have taken the measurements, carefully cut the aluminum soffit panels with a saw or specialized cutting tool. Always wear the appropriate protective gear, such as safety glasses and gloves, when handling cutting tools. Measure twice and cut once to ensure precise cuts that fit snugly into the designated area.
Attaching the soffit panels to the eaves
After cutting the panels, it is time to attach them to the eaves. Start by positioning the first panel against the eave, ensuring it is plumb and level. Secure the panel in place using aluminum nails or screws, making sure to leave enough space for expansion and contraction.
Continue installing the remaining panels, aligning them tightly against each other. Use a level to ensure that each panel is straight and the overall installation is even. To create a uniform look, consider installing the panels in the same direction as your house’s roofline.
If you encounter any corners or gables, be mindful of the trim that may be required for a seamless transition. Cut and install the trim pieces accordingly to provide a polished and finished appearance.
Throughout the installation process, take care to handle the aluminum panels gently to avoid any damage. Additionally, remember to follow the manufacturer’s guidelines and recommendations for the specific product you are using.
Installing the aluminum soffit panels requires precision and attention to detail. By following the steps outlined above, you can ensure a professional and durable installation that will protect your home’s eaves and enhance its curb appeal.
Ventilation Considerations
When it comes to installing aluminum fascia and soffit, one crucial aspect that should not be overlooked is proper ventilation. Soffit ventilation plays a vital role in preserving the structural integrity of your home, preventing moisture buildup, and maintaining proper airflow. In this section, we will delve into the significance of soffit ventilation and guide you on how to install vented soffit panels.
Understanding the Importance of Soffit Ventilation
Venting your soffit is essential for various reasons. Proper ventilation helps prevent the accumulation of moisture within your attic and roof. Moisture buildup can lead to a range of problems like mold growth, rotting wood, and even structural damage. Additionally, excessive moisture can compromise the effectiveness of insulation, leading to energy inefficiency and increased utility costs.
Furthermore, adequate ventilation aids in regulating temperature. During hot weather, vented soffit panels allow hot air to escape, preventing the attic from becoming an oven. Conversely, during colder months, proper ventilation prevents condensation and the formation of ice dams that can harm your roof.
Installing Vented Soffit Panels for Airflow
To ensure proper airflow, it is crucial to install vented soffit panels correctly. Here’s a step-by-step guide:
- Measure and mark the dimensions where the vented soffit panels will be installed.
- If there are existing soffit panels, remove them carefully to make way for the new vented panels.
- Install J-channel along the perimeter of the soffit area to receive the vented panels securely.
- Trim the vented soffit panels according to the measurements you previously marked.
- Insert the vented panels into the J-channel, ensuring a snug fit.
- Secure the panels in place using appropriate fasteners, such as screws or nails, following the manufacturer’s recommendations.
- Repeat the process for each section of the soffit, ensuring uniform ventilation throughout.
- Inspect the installed vented soffit panels for any gaps or loose fittings. Seal any openings using caulk or weather-stripping to maintain a tight seal against pests and the elements.
By installing vented soffit panels meticulously, you promote unrestricted airflow into your attic, effectively allowing fresh air to enter while facilitating the exit of stale air and excess moisture.
Remember, proper ventilation is crucial for the longevity and well-being of your home. By adhering to these installation steps and ensuring that vented soffit panels are correctly installed, you can enjoy the numerous benefits of a well-ventilated attic and roof.
Caulking And Sealing
When it comes to installing aluminum fascia and soffit, caulking and sealing are crucial steps to ensure a long-lasting and durable finish. Properly sealing your fascia and soffit not only enhances the appearance of your home but also protects it from water damage and pests. In this section, we will explore the different sealant options available for fascia and soffit installation and provide you with proper application techniques to ensure a seamless and watertight finish.
Sealant Options for Fascia and Soffit Installation
Choosing the right sealant for your fascia and soffit installation is essential. Here are some sealant options you can consider:
| Sealant Type | Features |
|---|---|
| Silicone-Based Sealant | Provides excellent waterproofing properties and remains flexible even in extreme temperatures. It adheres well to a variety of surfaces and offers superior durability. |
| Polyurethane Sealant | Ideal for areas with high movement, as it can expand and contract without losing its bond. It offers excellent adhesion and weather resistance. |
| Acrylic Sealant | Offers good adhesion to various substrates and is easy to smoothen. It is generally more affordable than silicone or polyurethane sealants. |
Consider the specific needs of your project, such as weather conditions and surface compatibility, when selecting a sealant type. Remember to choose a high-quality sealant to ensure a reliable and long-lasting seal.
Proper Application Techniques
Once you have chosen the appropriate sealant, it’s time to apply it correctly. Follow these proper application techniques for a successful installation:
- Clean the surface thoroughly: Before applying the sealant, ensure that the fascia and soffit surfaces are clean and free from debris, dust, or loose materials. Use a mild detergent and water solution to remove any contaminants.
- Prepare the sealant: Follow the manufacturer’s instructions to prepare the sealant. Ensure the sealant is at the correct temperature and consistency for application.
- Apply the sealant: Using a caulking gun, apply the sealant smoothly and evenly along the joints and seams of the fascia and soffit. Be sure to fill any gaps completely for a watertight seal.
- Tool the sealant: After applying the sealant, use a caulking tool or your finger to smooth and shape the sealant. This helps to remove any excess sealant and create a neat finish.
- Allow curing time: Let the sealant cure according to the manufacturer’s instructions before exposing it to moisture or other external factors.
By following these proper application techniques, you can ensure that your fascia and soffit installation is adequately sealed and protected against water intrusion and other potential issues.
Remember, proper caulking and sealing are essential for the longevity and performance of your aluminum fascia and soffit. Take the time to choose the right sealant and apply it correctly to achieve a professional-looking and durable finish.
Painting Or Finishing
When installing aluminum fascia and soffit, one important step that should not be overlooked is the painting or finishing process. Although aluminum is known for its durability and resistance to corrosion, a proper paint or finish can provide an extra layer of protection and enhance the overall appearance of your fascia and soffit. In this section, we will discuss the importance of choosing the right paint or finish, as well as how to apply a protective coating for long-lasting results.
Choosing the Right Paint or Finish
The selection of the appropriate paint or finish for your aluminum fascia and soffit is crucial to ensure optimal performance and durability. When it comes to choosing the right paint or finish, consider the following factors:
- Durability: Look for a paint or finish that is specifically formulated for exterior use and is capable of withstanding the elements, such as UV rays, moisture, and temperature changes.
- Compatibility: Ensure that the chosen paint or finish is compatible with aluminum surfaces. Consult with the manufacturer or a paint specialist to determine the best options.
- Color: Consider the desired color for your fascia and soffit and choose a paint or finish that provides the desired shade and pigment stability.
In addition to these factors, it is recommended to select a paint or finish that offers good adhesion to aluminum and has excellent coverage properties. This will ensure a smooth and even finish while protecting the surface from environmental damage.
Applying a Protective Coating
Once you have selected the appropriate paint or finish, it is time to apply a protective coating to your aluminum fascia and soffit. This coating will further enhance the longevity and appearance of the installed product. Here are the steps to follow:
- Clean the Surface: Ensure the fascia and soffit are clean and free from dust, dirt, and grease. Use a mild detergent and water solution to remove any contaminants.
- Prepare the Surface: If there are any rough areas or imperfections on the aluminum surface, consider sanding them down to create a smooth base for the paint or finish.
- Apply a Primer: Using a primer specifically designed for aluminum surfaces, apply a thin and even coat to promote adhesion and improve the paint’s durability.
- Paint or Finish Application: Follow the manufacturer’s instructions for applying the chosen paint or finish. Use a brush, roller, or spray to achieve an even application, ensuring complete coverage.
- Drying and Curing: Allow the paint or finish to dry thoroughly according to the manufacturer’s recommended drying time. Depending on the product, this may take a few hours to a few days.
Once the protective coating is applied and fully dried, your aluminum fascia and soffit will be ready to withstand the elements and provide an aesthetically pleasing finish to your home’s exterior. Regular maintenance, such as cleaning and touch-ups, will help prolong the lifespan of the paint or finish and keep your fascia and soffit looking great for years to come.
Cleaning And Maintaining Aluminum Fascia And Soffit
Properly cleaning and maintaining your aluminum fascia and soffit is crucial for enhancing the longevity and overall appearance of your home’s exterior. Over time, dirt, dust, and other debris can accumulate on these surfaces, leading to the deterioration of their protective coating and potentially causing structural issues if left unaddressed. In this section, we will discuss the importance of regular cleaning and inspections, as well as provide you with some helpful tips and techniques for maintaining your aluminum fascia and soffit in tip-top condition.
Proper Cleaning Techniques
When it comes to cleaning your aluminum fascia and soffit, employing the right techniques is essential to ensure effective removal of dirt and grime without causing any damage. Here are some proper cleaning techniques to follow:
- Gentle Cleaning Solutions: To avoid scratching or damaging the surface, opt for a mild cleaning solution. Mix warm water with a gentle household detergent to create a solution. Avoid using harsh chemicals or abrasive cleaners that could compromise the protective coating of the aluminum.
- Soft-Bristled Brush: Use a soft-bristled brush or sponge to apply the cleaning solution to the fascia and soffit. Gently scrub the surface in a circular motion, paying close attention to any stained or heavily soiled areas.
- Rinse Thoroughly: After scrubbing, rinse the cleaned areas thoroughly with clean water. Use a garden hose or a bucket of water to remove any soap residue.
- Dry Completely: Allow the aluminum fascia and soffit to dry completely before inspecting for any potential issues or applying any protective coatings. This helps prevent further dirt accumulation and water damage.
Regular Inspections for Potential Issues
Regular inspections of your aluminum fascia and soffit are essential to identify and address any potential issues early on. By detecting problems at their earlier stages, you can prevent costly repairs and ensure the integrity of your home’s exterior. Here’s what you should regularly inspect:
- Cracks or Deterioration: Check for any cracks, splits, or signs of deterioration in the aluminum fascia and soffit. These can be indicative of water damage, pests, or other underlying issues that require immediate attention.
- Loose or Missing Pieces: Examine the fascia and soffit for any loose or missing sections. Secure any loose components and replace missing pieces promptly to prevent further damage.
- Sealants and Caulking: Inspect the sealants and caulk around the edges and joints of the fascia and soffit. Ensure that they are intact and in good condition, as they play a crucial role in preventing moisture infiltration.
By regularly conducting these inspections, you can catch any potential issues early and take the necessary steps to rectify them, maintaining the structural integrity and aesthetic appeal of your aluminum fascia and soffit.
Remember, cleaning and maintaining your aluminum fascia and soffit should be a part of your routine home maintenance. By following proper cleaning techniques and conducting regular inspections, you can keep these essential components in excellent condition, protecting your home from potential damage while preserving its curb appeal.
Common Problems And Solutions
Welcome to our guide on how to install aluminum fascia and soffit. As with any home improvement project, there are sometimes common problems that may arise during the installation process. In this section, we will address some of these issues and provide you with troubleshooting tips and solutions to help you overcome them. By being prepared and armed with the right knowledge, you can ensure a smooth and successful installation of your aluminum fascia and soffit.
Addressing common installation issues
During the installation of aluminum fascia and soffit, you may come across the following common issues:
- Poor fit: One of the most common problems is when the aluminum fascia and soffit do not fit properly. This can occur due to inaccurate measurements or incorrect cutting. To address this, make sure to carefully measure your fascia and soffit before cutting and compare them to your home’s dimensions. Double-check your measurements to ensure a precise fit.
- Uneven surface: Another challenge you may face is dealing with an uneven surface. If your home has imperfections or irregularities, it is crucial to address them before installing the fascia and soffit. You can use a leveling compound or sand down any high spots to create a smooth and even surface for installation.
- Inadequate fastening: Insufficient or improper fastening can cause the aluminum fascia and soffit to become loose or fall off over time. Be sure to use the appropriate fasteners recommended by the manufacturer, such as screws or nails, and follow the recommended spacing guidelines. Additionally, make sure to secure the fascia and soffit tightly to provide stability and prevent any movement.
- Poor sealing: Proper sealing is essential to prevent water infiltration and damage. If you notice gaps or openings between the fascia and soffit and your home, use a high-quality sealant to seal them. This will help keep out moisture, insects, and other unwanted elements.
- Color mismatch: It can be disappointing to find a color mismatch between your newly installed aluminum fascia and soffit and the rest of your home’s exterior. To avoid this issue, ensure that you choose the correct color and finish that matches or complements your existing exterior elements. It may be helpful to request color samples or consult with a professional before making your final decision.
Troubleshooting tips for maintenance problems
Once your aluminum fascia and soffit are installed, it is important to maintain them properly to prevent any potential issues. Here are some troubleshooting tips to help you address common maintenance problems:
- Regular cleaning: To maintain the appearance and longevity of your aluminum fascia and soffit, it is recommended to clean them regularly. Use a mild detergent and water solution to remove dirt, debris, and any stains. Avoid using abrasive cleaners or scrub brushes, as they can scratch the surface.
- Inspection for damage: Periodically inspect your aluminum fascia and soffit for any signs of damage, such as dents, scratches, or corrosion. If you notice any issues, address them promptly to prevent further deterioration. You can use touch-up paint or replace damaged sections as necessary.
- Gutter maintenance: Properly functioning gutters are essential to prevent water damage and ensure the effectiveness of your fascia and soffit. Regularly clean your gutters to remove leaves, twigs, and other debris that can clog them. Additionally, check for any leaks or loose connections and repair them promptly.
- Trimming overgrown vegetation: Overgrown tree branches or vines can cause damage to your aluminum fascia and soffit. Trim back any vegetation that comes into contact with your fascia and soffit to minimize the risk of scratches or other forms of damage.
By adhering to these troubleshooting tips, you can maintain the beauty and functionality of your aluminum fascia and soffit for years to come. Remember, regular maintenance is key to preserving the quality and appearance of your home’s exterior.
Frequently Asked Questions
Do You Nail Or Screw Aluminum Fascia?
Aluminum fascia is typically nailed, not screwed.
How Do You Install Aluminium Soffit And Fascia?
To install aluminium soffit and fascia, follow these steps: 1. Start by measuring and marking the area where the soffit and fascia will be installed. 2. Cut the aluminium panels to fit the measurements using a circular saw or tin snips.
3. Attach the soffit panels to the underside of the eaves using nails or screws. 4. Install the fascia by nailing it to the ends of the rafters. 5. Lastly, secure the corners and joints with aluminium trim and seal any gaps with caulk.
How Do You Fasten Aluminum Fascia?
To fasten aluminum fascia, follow these steps: 1. Measure and cut the fascia to fit. 2. Align the fascia and secure it using aluminum fascia nails or screws. 3. Place fasteners approximately every 16 inches. 4. Ensure the fascia is securely attached to the roof edge.
5. Use a ladder and safety precautions during the installation process.
Do You Use Nails Or Screws For Aluminum Soffit?
For aluminum soffit installation, both nails and screws can be used. Use nails for a traditional look and screws for a more secure and durable hold. Consider the specific requirements of your project and consult with a professional to determine the best option.
Conclusion
Installing aluminum fascia and soffit is a simple and cost-effective way to protect your home’s exterior while enhancing its overall appearance. By following the step-by-step guide outlined in this blog post, you can confidently tackle this DIY project. Remember to measure accurately, take safety precautions, and choose high-quality materials.
With some patience and attention to detail, you’ll have a beautiful and durable fascia and soffit that will withstand the test of time. Happy installing!