To install an AC capacitor, shut off the power, locate the capacitor, discharge the stored electricity, remove the wires, and install the new capacitor. Installing an AC capacitor involves several steps that need to be followed precisely for a successful installation.
By following these steps carefully, you can ensure that your AC unit functions properly and efficiently. In this guide, we will explain the process of installing an AC capacitor in simple and easy-to-understand terms. So, let’s get started and learn how to install an AC capacitor.
Understanding The Ac Capacitor
Understanding the AC Capacitor
An AC capacitor is a small but crucial component of your air conditioning system. It plays a vital role in the cooling process, so understanding what it is and how it works is essential. In this section, we will delve into the basics of an AC capacitor, its role in the cooling system, why it is important to replace a faulty one, and the signs that indicate a failing capacitor.
What is an AC capacitor and its role in the cooling system?
An AC capacitor is an electrical device that stores and releases electrical energy. It is found in the outdoor unit of your air conditioner, alongside the compressor and the fan. The main purpose of the capacitor is to provide an electrical boost to these components, helping them start up and run efficiently. It acts like a battery, storing energy and releasing it when needed, thus aiding in the cooling process.
Why is it important to replace a faulty AC capacitor?
A faulty AC capacitor can cause various issues and lead to system failure if not replaced promptly. Here are a few reasons why replacing a faulty capacitor is crucial:
- Improved Efficiency: A faulty capacitor can cause your AC unit to consume more energy than necessary, resulting in higher electricity bills. By replacing the capacitor, you can restore the efficiency of your cooling system and save on energy costs.
- Prolonged Lifespan: When the capacitor malfunctions, it can put extra strain on other components of the cooling system, such as the compressor and fan. This additional stress can lead to premature wear and tear, potentially shortening the lifespan of your entire air conditioning unit. By replacing the faulty capacitor, you ensure the health and longevity of your system.
- Cost-Effective Solution: While replacing a faulty capacitor may seem like an added expense, it is a much more cost-effective solution than replacing the entire AC unit. By addressing the issue early on, you can prevent further damage and avoid more significant expenses.
- Reliable Cooling: A malfunctioning capacitor can cause intermittent cooling or even a complete system breakdown. By replacing the faulty part, you can ensure a reliable and consistent cooling experience, especially during hot summer months.
Signs of a failing AC capacitor
It is essential to recognize the signs of a failing AC capacitor so that you can address the issue promptly. Here are a few common signs to look out for:
- Weak or No Cool Air: If you notice that the cool air coming out of your vents is weak or nonexistent, it could be a sign of a failing capacitor. The capacitor provides the initial electrical boost needed for the compressor and fan to function optimally, and if it is faulty, the cooling system’s performance will suffer.
- Intermittent Operation: Is your air conditioner turning on and off sporadically? This could be another indication that the capacitor is failing. An inconsistent power supply from a faulty capacitor can cause the system to turn on and off frequently, disrupting your comfort and increasing energy consumption.
- Unusual Sounds: If you hear unusual buzzing, humming, or clicking sounds coming from your outdoor unit, it might be due to a faulty capacitor. These sounds occur when the electrical supply is disrupted or insufficient, indicating an issue with the capacitor.
- Bulging or Leaking Capacitor: A visual inspection can also reveal signs of a failing capacitor. If you notice bulging or leaking on the capacitor’s exterior, it is a clear indication that it needs to be replaced. These physical deformities indicate a potential internal failure that can compromise the overall performance and safety of your AC unit.
By understanding the purpose of an AC capacitor, the importance of replacing a faulty one, and recognizing the signs of capacitor failure, you can ensure the optimal functioning and efficiency of your cooling system. If you encounter any of the signs mentioned, consulting a professional technician will help diagnose the issue and replace the faulty capacitor promptly. Remember, regular maintenance and timely replacements are key to maintaining a comfortable indoor environment.
Safety Precautions And Tools Needed
When it comes to installing an AC capacitor, it is crucial to prioritize safety. By following proper safety precautions and using the necessary tools, you can ensure a successful and safe installation process. In this section, we will discuss the importance of turning off power before starting the installation, the required tools for safely installing an AC capacitor, and the safety gear you should wear during the process.
Importance of turning off power before starting the installation process
Before you begin installing an AC capacitor, it is absolutely essential to turn off the power to your air conditioning unit. This step is crucial to avoid any potential electrical shocks or injuries during the installation process. Here’s why you should never overlook this safety measure:
- Turning off the power ensures that no electricity is flowing to the unit, minimizing the risk of accidental electrocution.
- It prevents the capacitor from charging and discharging electricity while you are working on it, which could lead to dangerous situations.
- By disconnecting the power, you protect yourself and your equipment from potential electrical damage.
Remember, safety should always be your top priority when working with electrical components. Make sure to locate the main power switch or circuit breaker that controls your air conditioning unit and turn it off before proceeding with the installation.
Required tools for safely installing an AC capacitor
Equipping yourself with the right tools is key to safely installing an AC capacitor. Here are the essential tools you will need for the installation:
| Tools | Description |
|---|---|
| Multimeter | Used to measure voltage and ensure the power is off before starting the installation. |
| Insulated Screwdrivers | Used to remove screws and secure the capacitor in place without the risk of electrical accidents. |
| Wire Strippers | Used to strip the insulation from the wires for proper connections. |
| Needlenose Pliers | Used to manipulate and secure wires during the installation process. |
| Electrical Tape | Used to insulate wire connections and prevent any short circuits. |
Having these tools at your disposal will ensure a smoother and safer installation process. It’s important to invest in high-quality tools that are specifically designed for electrical work.
Safety gear to wear during the installation
While working on your AC capacitor, it’s essential to protect yourself by wearing the appropriate safety gear. Here are the pieces of safety equipment you should have:
- Safety Glasses: Protect your eyes from any debris or loose particles that could enter your eyes.
- Gloves: Protect your hands from potential cuts, abrasions, or electrical shocks.
- Insulated Shoes: Minimize the risk of electric shock by wearing shoes with insulation properties.
Wearing safety gear not only ensures your own protection but also reduces the chances of accidents or injuries during the installation process.
In conclusion, by adhering to these safety precautions and equipping yourself with the necessary tools and safety gear, you can confidently install an AC capacitor while prioritizing your well-being and safety.
Step 1: Gathering Necessary Information
Before you begin replacing your AC capacitor, it’s important to gather the necessary information about your specific unit. This will ensure that you choose the right capacitor for your air conditioning system, minimizing the risk of any potential issues. Let’s dive into the details of what you need to know:
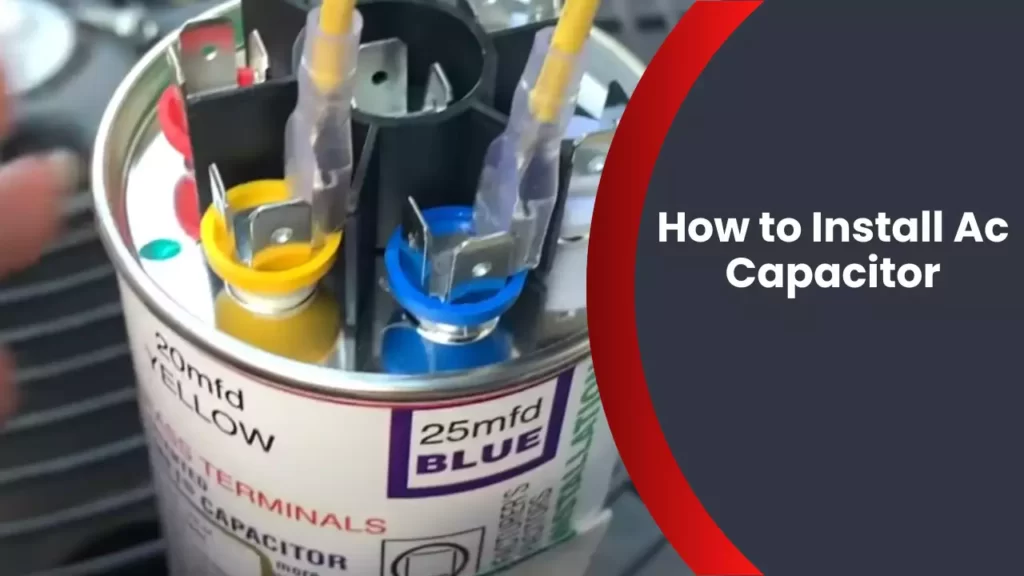
Identifying the type and size of the AC capacitor needed for your specific unit
The first step in the process is to identify the type and size of the AC capacitor needed for your specific air conditioning unit. AC capacitors come in different types, such as start capacitors, run capacitors, and dual-run capacitors. Each type has its own unique function and specifications.
To determine the size of the capacitor, you’ll need to check the label on the old capacitor or refer to the manufacturer’s documentation. The size is typically indicated in microfarads (μF) and voltage rating. Make sure to pay close attention to these specifications as using the wrong size capacitor can lead to performance problems or even damage the unit.
Checking the manufacturer’s guidelines and specifications
Once you have identified the type and size of the capacitor required, it’s essential to consult the manufacturer’s guidelines and specifications. Each air conditioning unit is designed to work optimally with a specific capacitor range, and the manufacturer’s recommendations can provide invaluable insight into the replacement process.
Refer to the unit’s manual or search for the manufacturer’s website for information specifically related to the capacitor replacement. Keep an eye out for any specific instructions, such as recommended brands or models, as following these guidelines will help ensure a smooth installation process.
Determining the voltage and microfarads (μF) rating for the replacement capacitor
Before purchasing a replacement capacitor, take the time to determine the voltage and microfarads (μF) rating required. The voltage rating indicates the maximum voltage that the capacitor can handle, while the microfarads rating determines the capacitance of the unit.
You can find this information on the label of the old capacitor or refer to the manufacturer’s documentation. Double-checking the voltage and microfarads rating is crucial as using a capacitor with incorrect specifications can result in malfunction or premature failure of your air conditioning system.
Once you have gathered all the necessary information, you’re ready to move on to the next step and start the actual installation process. By taking the time to gather this crucial information, you are setting yourself up for a successful capacitor replacement, ensuring that your air conditioning unit operates at its best.
Step 2: Powering Down The Ac System
Before you begin installing an AC capacitor, it is crucial to power down the AC system for your safety. By following a few simple steps, you can ensure that there is no electrical power flowing through the unit, minimizing the risk of accidents or electrocution.
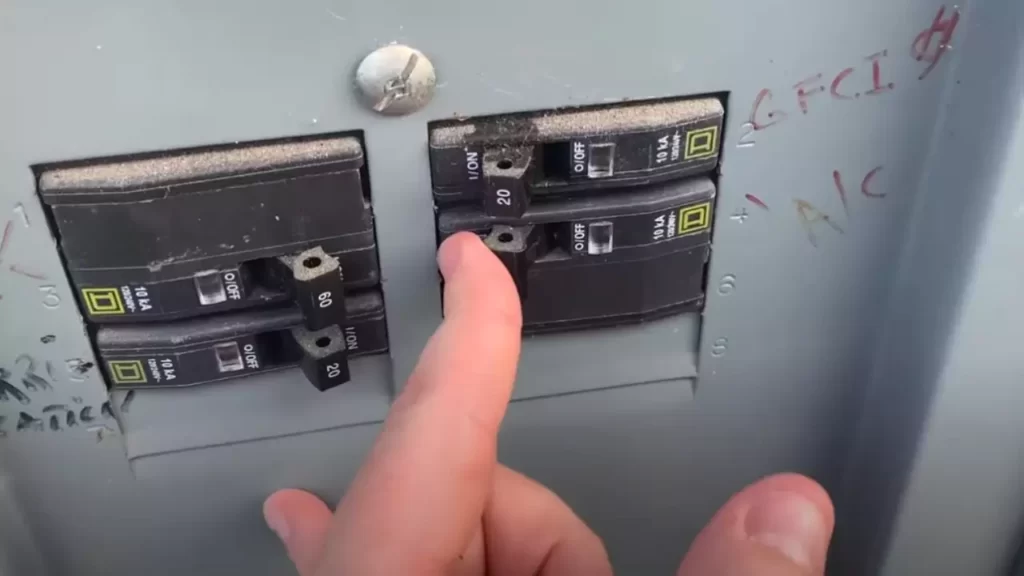
Turning off the main electrical power to the AC unit
The first step in powering down the AC system is to locate the main electrical panel in your home. This panel is usually found in the garage, basement, or a utility room. Open up the panel door to reveal the circuit breakers. Look for the breaker that controls the AC unit and switch it to the “off” position. This will cut off the power supply to the AC unit, ensuring that no electricity is flowing through it.
Additional steps for ensuring the safety of the system before proceeding
While turning off the main electrical power is the most crucial step, there are a few additional precautions you should take to ensure the safety of the system:
- Use a non-contact voltage tester to verify that there is no electricity running through the wires of the AC unit. Simply hold the tester near the wires, and if it beeps or lights up, there is still electrical power present. Wait for the tester to show no electrical activity before proceeding.
- Wear protective gloves and goggles to protect yourself from any potential electrical hazards or debris that may be present during the installation process.
- Ensure that the AC unit is completely shut off and not just in standby mode. Some units may have a separate disconnect switch, which needs to be turned off as well.
- Do not touch any exposed wires or terminals without proper insulation. This can prevent any accidental shocks or electrical mishaps.
By following these additional safety steps, you can have peace of mind knowing that you have taken all necessary precautions to ensure a safe installation process.
Step 3: Locating The Capacitor
Understanding where the capacitor is typically located in different AC units
After we have learned about the importance of the AC capacitor in Step 2, it is time to move on to Step 3: Locating the Capacitor. The capacitor is a crucial component of the air conditioning system, responsible for storing electrical energy and providing power to the motor. In order to replace or repair the capacitor, it is first necessary to know where it is located within your AC unit.
Identifying the components and connections attached to the capacitor
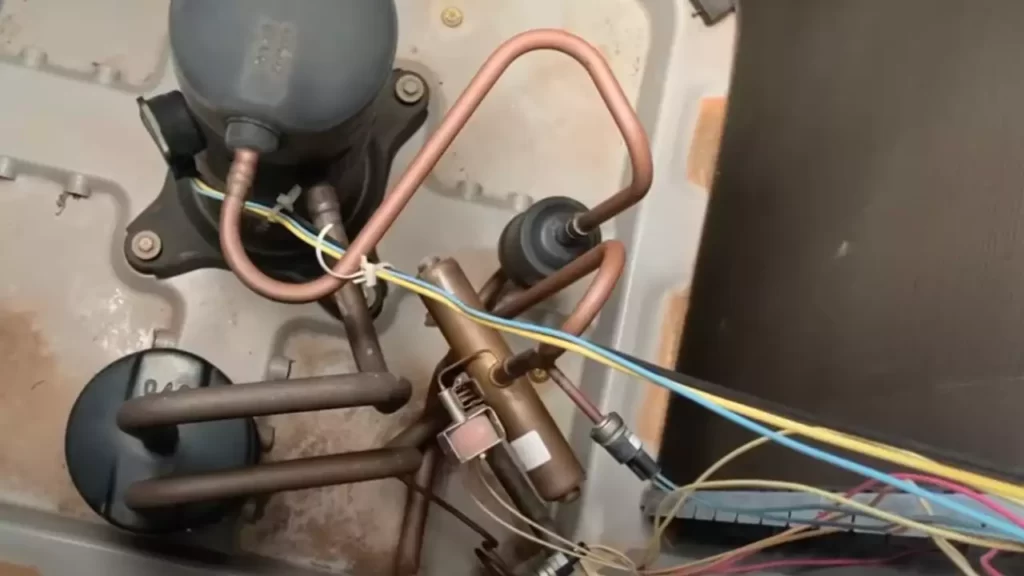
To successfully locate the capacitor, it is essential to familiarize yourself with the various components and connections that are attached to it. This will ensure a safe and efficient replacement or repair process. The capacitor is usually located near the condenser unit, which is the outdoor part of your air conditioner. Commonly, it can be found within a metal casing, providing protection from the elements.
Once you have located the capacitor, you will notice several connections and components that are attached to it. These include wires, terminals, and other electrical parts. It is crucial to identify these components before removing or disconnecting any wires to ensure a smooth installation process.
Ensure Adherence to HTML Syntax
While discussing the location of the capacitor and the components attached to it, it is important to adhere to HTML syntax for better readability and proper formatting:
- Step 3: Locating the Capacitor:
After we have learned about the importance of the AC capacitor in Step 2, it is time to move on to Step 3: Locating the Capacitor. The capacitor is a crucial component of the air conditioning system, responsible for storing electrical energy and providing power to the motor. In order to replace or repair the capacitor, it is first necessary to know where it is located within your AC unit.
Understanding where the capacitor is typically located in different AC units
To successfully locate the capacitor, it is essential to familiarize yourself with the various components and connections that are attached to it. This will ensure a safe and efficient replacement or repair process. The capacitor is usually located near the condenser unit, which is the outdoor part of your air conditioner. Commonly, it can be found within a metal casing, providing protection from the elements.
Identifying the components and connections attached to the capacitor
Once you have located the capacitor, you will notice several connections and components that are attached to it. These include wires, terminals, and other electrical parts. It is crucial to identify these components before removing or disconnecting any wires to ensure a smooth installation process.
Step 4: Removing The Old Capacitor
Now that you have discharged the capacitor to avoid electrical shocks, it’s time to properly disconnect the wires and terminals from the old capacitor. This step is crucial in ensuring a safe and successful capacitor replacement. Let’s walk through the process in detail:
Discharging the capacitor to avoid electrical shocks
Before removing the old capacitor, it’s important to discharge it to avoid any potential electrical shocks. Follow these steps to safely discharge the capacitor:
- Start by turning off the power supply to the air conditioning unit. This can be done either at the circuit breaker or by disconnecting the power source.
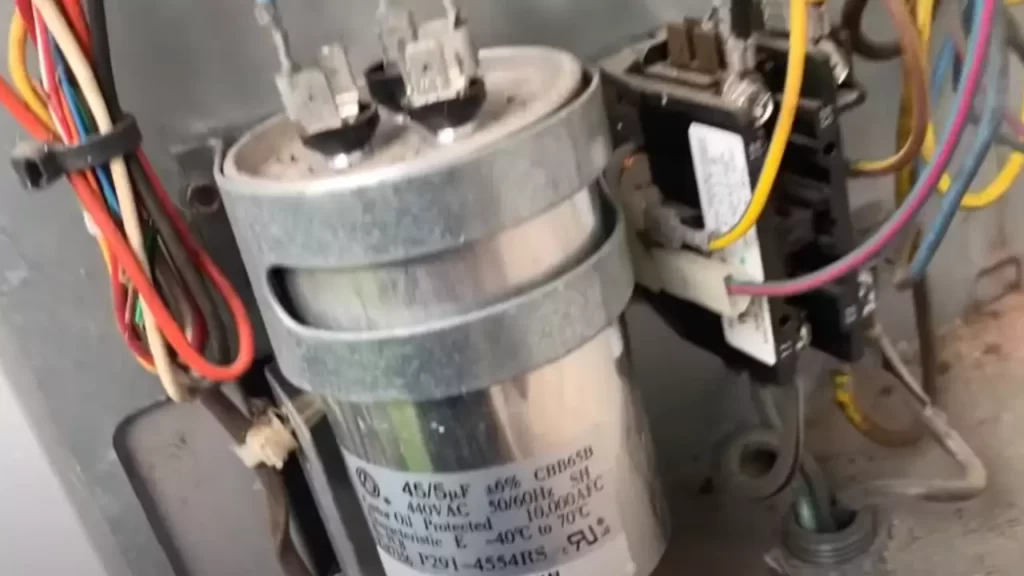
- Next, locate the capacitor within the AC unit. It will typically be a cylindrical-shaped component with two or more terminals.
- Identify the terminal labeled “C” or “COMMON.” Using an insulated screwdriver, carefully touch the metal part of the screwdriver head to the “COMMON” terminal and touch the other end of the screwdriver to any metal part of the unit. This will discharge any stored electrical energy in the capacitor.
- Repeat the same process for each terminal labeled “HERM” or “HERMETIC” and “FAN.” Make sure to discharge all terminals individually.
It’s essential to discharge the capacitor before proceeding with the removal process to ensure your safety. Remember to always exercise caution and wear protective gear such as gloves and safety glasses.
Properly disconnecting the wires and terminals from the capacitor
With the capacitor discharged, you can now proceed to disconnect the wires and terminals from the old capacitor. Follow these steps for a seamless removal process:
- Take note of the wire connections and their respective terminals on the capacitor. This will help you in reconnecting them correctly later.
- Start by removing the wires connected to the “C” or “COMMON” terminal. Loosen the screw or clip securing the wire and gently pull it away from the terminal.
- Repeat the same process for the “HERM” or “HERMETIC” and “FAN” terminals. Remove the wires connected to each terminal, taking care not to damage them in the process.
- Once all the wires are disconnected, inspect the capacitor for any additional retaining clips or fasteners. If present, remove them to fully detach the capacitor from the unit.
By properly disconnecting the wires and terminals, you ensure a smooth removal process without causing any damage to the AC unit or the new capacitor.
Now that you’ve successfully removed the old capacitor, you can move on to the next step of the installation process. Stay tuned for our next blog post where we discuss Step 5: Installing the New Capacitor.
Step 5: Installing The New Capacitor
Once you have successfully removed the old capacitor, it’s time to install the new one. This step is crucial in ensuring that your AC unit functions properly. In this section, we will walk you through the process of installing the new capacitor, making sure to match the voltage and microfarads rating, and attaching the wires and terminals to the corresponding connections.
Matching the voltage and microfarads rating of the old capacitor
Before proceeding with the installation, it is crucial to match the voltage and microfarads rating of the old capacitor. This ensures that the new capacitor is compatible with your AC unit and can provide the necessary electrical charge. To determine the voltage and microfarads rating of the old capacitor, refer to the manufacturer’s specifications or consult a professional if needed. Once you have this information, you can move on to the next step with confidence.
Attaching the wires and terminals to the corresponding connections on the new capacitor
Now that you have the new capacitor that matches the voltage and microfarads rating of the old one, it’s time to attach the wires and terminals. This step requires careful attention to detail to ensure proper connections and avoid any electrical hazards. Follow the steps below to complete this process:
- Turn off the power: Before you begin, make sure to turn off the power supply to your AC unit to prevent any accidents.
- Identify the wire connections: Take note of the wire connections on the old capacitor. These are usually labeled as “C” for the common wire, “FAN” for the fan wire, and “HERM” or “H” for the hermetic wire.
- Attach the wires: Carefully attach the corresponding wires to the terminals on the new capacitor. Make sure to match the common wire to the “C” terminal, the fan wire to the “FAN” terminal, and the hermetic wire to the “HERM” or “H” terminal.
- Secure the connections: Once the wires are attached, double-check the connections to ensure they are secure. Loose connections can lead to faulty operation or damage to your AC unit.
By following these steps, you can successfully install the new capacitor in your AC unit. However, if you are unsure about any aspect or encounter any difficulties, it is always recommended to seek professional assistance to avoid any potential risks or further damage to your AC system.
Remember to exercise caution when working with electrical components and always prioritize your safety. Now that the new capacitor is in place, proceed to the final step to test your AC unit and ensure it functions as expected.
Step 6: Testing The Ac System
Restoring power to the unit
Once you have successfully installed the AC capacitor, the next crucial step is to restore power to the unit. This will allow you to observe whether the new capacitor is functioning properly. Follow these steps to reconnect the power:
- Locate the circuit breaker that controls the air conditioning system. It is usually found in the main electrical panel of your home.
- Identify the breaker that corresponds to the air conditioning unit and switch it to the “On” position.
- Wait for a few moments to allow the system to power up and stabilize.
Observing the functionality of the new capacitor
Now that power has been restored, it’s time to observe the functionality of the new AC capacitor. You should pay close attention to the following:
- Listen for any unusual sounds coming from the air conditioning unit. A properly functioning capacitor should not produce any strange or excessive noises.
- Check the airflow from the vents. The air should be cool and consistent. If you notice weak airflow or warm air, there may be an issue with the installation.
- Observe the temperature of the air coming out of the vents. It should be noticeably cooler than the room temperature.
- Monitor the thermostat to see if it is correctly maintaining the desired temperature. The system should cycle on and off as necessary to regulate the temperature.
By observing and assessing these aspects of your air conditioning system, you can ensure that the new capacitor is functioning properly and that the installation was successful.
Troubleshooting common issues after installation
Despite your best efforts, it’s possible that you may encounter some issues after installing the AC capacitor. Here are a few common problems that might arise and some troubleshooting steps you can take:
- If the air conditioning unit fails to turn on at all, double-check the power supply. Make sure the circuit breaker is switched on and that power is reaching the unit. If necessary, call a professional electrician for assistance.
- If the air conditioner runs but does not cool the room effectively, it could indicate a refrigerant or compressor problem. Contact a licensed HVAC technician to diagnose and resolve the issue.
- In the event of insufficient airflow from the vents, there may be a blockage or obstruction in the system. Check for clogged filters or blocked air ducts, and clean or remove any obstructions as needed.
- If the air conditioning system continually short cycles or exhibits erratic behavior, it could be a sign of a faulty capacitor or another underlying issue. Consider contacting an HVAC professional to thoroughly inspect and diagnose the problem.
Remember, if you encounter any difficulties during the testing phase or experience persistent issues with your air conditioning system, it’s always best to consult with a professional to avoid causing any further damage or potential hazards.
Step 7: Maintenance Tips For Ac Capacitors
Step 7: Maintenance Tips for AC Capacitors
Maintaining your AC capacitor is crucial to ensure the proper functioning of your air conditioning system and extend its lifespan. Regular inspection and cleaning of the capacitor should be a part of your routine maintenance activities. This step will help you identify any potential issues and take necessary actions before they become major problems. Additionally, knowing the signs of capacitor failure and when to seek professional assistance can save you from more costly repairs in the future. In this section, we will discuss these maintenance tips in detail.
Regular Inspection and Cleaning of the Capacitor to Extend its Lifespan
Inspecting and cleaning your AC capacitor regularly can significantly prolong its lifespan and prevent any performance issues. Here are some important steps to follow:
- Turn off the power: Before starting any maintenance work, ensure to turn off the power to your air conditioning system. This step is essential to prevent any electric shock or injury.
- Remove the access panel: Locate the access panel on your AC unit. Use a screwdriver or the appropriate tool to remove the screws holding the panel in place. Once removed, set the panel aside in a safe location.
- Inspect for any visible damage: Take a close look at the capacitor and check for any obvious signs of damage, such as bulging or leaking. If you notice these signs, it indicates a faulty capacitor that needs to be replaced.
- Clean the capacitor: Using a soft brush or a vacuum cleaner with a brush attachment, carefully clean any dust or debris on the surface of the capacitor. Make sure not to apply excessive pressure or use water while cleaning.
- Check the capacitor’s connections: Gently inspect the wires and connections leading to the capacitor. Look for any loose or damaged wires, and if found, tighten or replace them accordingly.
- Reassemble and restore power: Once the cleaning is done and all the connections are secure, reassemble the access panel and securely fasten the screws. Finally, turn the power back on to your air conditioning system.
Signs of Capacitor Failure and When to Seek Professional Assistance
While regular maintenance can help prevent capacitor failure, it’s essential to be aware of the signs that indicate a malfunctioning capacitor. Recognizing these signs early on can help you avoid potential system breakdowns. Here are some indications that your capacitor may be failing:
- Intermittent cooling: If you notice that your air conditioning system is not consistently cooling your home, it could indicate a capacitor issue.
- Humming or buzzing sounds: Unusual sounds coming from your AC unit, such as humming or buzzing, can be a sign of capacitor malfunction.
- Frequent system cycling: If your air conditioner turns on and off frequently, it might be due to capacitor problems.
- Burning smell: A distinct burning odor coming from your AC unit could indicate a capacitor failure. In such cases, it is crucial to seek professional assistance immediately.
If you observe any of these signs or experience any other abnormal behavior with your AC system, it’s best to contact a professional technician for an accurate diagnosis and proper repairs. Attempting to fix capacitor issues without the necessary skills and knowledge can lead to further damage or safety hazards.
By following these maintenance tips and being attentive to signs of capacitor failure, you can ensure the smooth operation of your air conditioning system and potentially save yourself from costly repairs down the line.
https://www.youtube.com/watch?v=i8nDBZo6XyE&pp=ygUbSG93IHRvIEluc3RhbGwgQWMgQ2FwYWNpdG9y
Frequently Asked Questions
Can I Replace Ac Capacitor Myself?
Yes, you can replace the AC capacitor yourself. However, it is important to have a good understanding of electrical systems and safety precautions. Make sure to follow the manufacturer’s instructions and turn off the power before working on the capacitor.
If you’re unsure or uncomfortable, it’s best to hire a professional technician.
Can You Hook Up An Ac Capacitor Wrong?
Yes, it is possible to install an AC capacitor incorrectly. Incorrect installation can cause damage to the capacitor, the AC unit, or both. To ensure proper installation, it is recommended to consult a professional HVAC technician.
What Wires Go Where On Ac Capacitor?
The wires on an AC capacitor should be connected in a specific way. The common wire goes to the neutral terminal, the fan wire goes to the fan terminal, and the compressor wire goes to the compressor terminal. It’s important to double-check the connections for proper functionality.
Do You Have To Discharge A Capacitor Before Installing?
Yes, it is necessary to discharge a capacitor before installing it to avoid the risk of electric shock. Discharging the capacitor ensures that there is no residual charge stored in it, making it safe for installation.
Conclusion
To conclude, installing an AC capacitor is a crucial step in maintaining the efficiency of your cooling system. By following the step-by-step guide provided in this blog post, you can easily replace the capacitor on your own. Remember to prioritize safety and consult a professional if you encounter any difficulties.
Regular maintenance of your HVAC system is essential to ensure its smooth functioning and longevity. Stay cool and comfortable all year round with a properly functioning AC capacitor.