To install a wood stove chimney through a wall, you must first select a suitable location and mark the position. Then, using appropriate tools, cut a hole in the wall to accommodate the chimney.
Factors To Consider For Proper Placement
When installing a wood stove chimney through a wall, there are several important factors to consider for proper placement. Ensuring that the chimney is installed correctly not only ensures the optimal performance of your wood stove but also helps maintain the safety of your home. In this section, we will discuss the key factors to keep in mind during the installation process.
Existing layout and design of your home
The existing layout and design of your home play a crucial role in determining the placement of your wood stove chimney. Consider which rooms you plan to heat with the stove and how the chimney can be strategically positioned to distribute heat evenly. Additionally, take into account any obstructions such as windows, doors, or cabinets that may affect the placement of the chimney.
Structural considerations and load-bearing walls
Another crucial factor to consider is the structural integrity of your home. Take note of load-bearing walls and ensure that the installation of the chimney will not compromise the stability of your home. Engage the services of a professional to evaluate the structural feasibility of the installation and to recommend the appropriate support features such as brackets, braces, or reinforcements.
Clearance requirements from combustible materials
One of the most important considerations when installing a wood stove chimney is the clearance requirements from combustible materials. This ensures that the chimney is placed at a safe distance from walls, ceilings, and other flammable objects in your home. Refer to the manufacturer’s guidelines or local building codes to determine the specific clearance requirements for your wood stove chimney installation.
Accessibility and proximity to exterior walls
Lastly, consider the accessibility and proximity to exterior walls when determining the placement of your wood stove chimney. Installing the chimney close to an exterior wall can streamline the installation process and minimize complications. Additionally, having the chimney in close proximity to an exterior wall allows for easier access for maintenance and cleaning.
By carefully considering these factors, you can ensure that your wood stove chimney is properly placed for optimal performance and safety in your home.
Gathering The Necessary Tools And Materials
Installing a wood stove chimney through a wall requires careful planning and the right tools and materials to ensure a safe and efficient installation. Before you begin the installation process, it is important to gather all the necessary tools, materials, and safety equipment. By having everything you need on hand, you can streamline the installation process and avoid any unnecessary delays. In this section, we will discuss the required tools, materials, and safety equipment needed for a successful chimney installation.
Required tools for the installation process
To install a wood stove chimney through a wall, you will need the following tools:
- A power drill with various drill bits
- A measuring tape
- A level
- A reciprocating saw
- A masonry drill bit
- A chimney brush
- A caulk gun
- A screwdriver set
- A ladder or scaffolding for accessing the roof
Materials needed for the chimney installation
In addition to the tools, you will also need the following materials:
- Stovepipe sections
- Chimney pipe sections
- Chimney flashing
- Chimney cap
- Roof sealant
- High-temperature silicone caulk
- Stove cement
- Anchoring and support brackets
- Masonry screws and anchors
- Fireproof insulation
Safety equipment for personal protection
It is essential to prioritize safety during the chimney installation process. Ensure that you have the following safety equipment on hand:
- A dust mask to protect against airborne particles
- Gloves to protect your hands from sharp edges or hot surfaces
- Safety glasses to shield your eyes from debris
- A hard hat to protect your head when working at heights
- Sturdy work boots with slip-resistant soles
By gathering all the necessary tools, materials, and safety equipment beforehand, you can approach the chimney installation process with confidence and ensure a smooth and hassle-free experience. Remember to follow the manufacturer’s instructions and local building codes for a safe and reliable installation.
Assessing The Wall Structure And Condition
Before proceeding with the installation of a wood stove chimney through the wall, it is essential to assess the structure and condition of the wall. This step helps ensure the safety and efficiency of the installation process. Taking the time to thoroughly evaluate the interior and exterior walls will allow you to identify any potential issues that may need attention before proceeding.
Checking the condition of the interior and exterior walls
Start by examining the interior wall where the chimney will be installed. Look for any signs of damage, such as cracks, water stains, or mold growth. These issues can indicate underlying problems that could compromise the stability of the wall or pose a risk to your wood stove installation. If any issues are found, it is crucial to address them before proceeding.
Similarly, assess the condition of the exterior wall where the chimney will pass through. Look for any signs of deterioration, such as crumbling bricks or gaps in the mortar. Ensure that the wall is structurally sound and capable of supporting the weight and heat generated by the chimney. If any concerns arise, consult a professional to evaluate the integrity of the wall.
Finding the most suitable location for the chimney
Next, consider the placement of the chimney. The ideal location will allow for efficient venting while minimizing any potential issues. Aim to position the chimney closer to the center of the home’s structure, as this will help distribute heat more evenly throughout the space. Additionally, take into account any obstructions, such as other vents or plumbing systems, that could interfere with the chimney installation.
Furthermore, it is important to avoid installing the chimney near combustible materials or close to windows and doors. Ensure that there is sufficient space around the chimney to comply with safety regulations and allow for proper airflow. By finding the most suitable location for the chimney, you can maximize its functionality and minimize any potential risks.
Ensuring proper support and stability of the wall
Finally, assess the support and stability of the wall where the chimney will be installed. A wood stove chimney can put significant weight and pressure on the wall, so it is vital to ensure that it can withstand these forces. Check for any signs of weakness, such as sagging or shifting in the wall.
If the wall appears unstable or lacks proper support, consider reinforcing it before proceeding with the chimney installation. Consulting with a professional is recommended for determining the most suitable reinforcement method for your specific situation. Ensuring the proper support and stability of the wall will contribute to the long-term safety and reliability of your wood stove chimney installation.
Measuring And Marking The Wall For The Chimney
Before installing a wood stove chimney through the wall, it is crucial to measure and mark the wall accurately. This step ensures a secure fit for the vent pipe and efficient operation of your wood stove. In this section, we will guide you through determining the ideal height for the chimney installation, marking the wall accurately for the vent pipe, and ensuring precise measurements for a secure fit.
Determining the ideal height for the chimney installation
When determining the ideal height for installing your wood stove chimney, it is important to consider several factors. Firstly, check local building codes and regulations, as they might specify the minimum height requirement for venting systems. Additionally, keep in mind that the height of the chimney can affect the draft and the overall performance of your wood stove. Typically, a height of at least 10 to 12 feet above the roofline is recommended to ensure optimal draft and reduce the risk of downdrafts. However, it is advisable to consult a professional to determine the exact height required for your specific situation.
Marking the wall accurately for the vent pipe
Accurately marking the wall for the vent pipe is crucial to ensure a precise installation. Start by identifying the location where the wood stove will be placed. Once you have determined the spot, measure and mark it on the wall. Use a level to ensure the markings are straight and aligned properly. Additionally, take note of any obstacles, such as electrical outlets or studs, that might impact the placement of the vent pipe. Mark these obstacles on the wall as well, so you can plan the path of the chimney accordingly.
Ensuring precise measurements for a secure fit
Precise measurements are vital to ensure a secure fit of the vent pipe and prevent any leaks or inefficiencies in the wood stove chimney. Use a measuring tape to measure the distance from the floor to the marked location on the wall. Take accurate measurements at multiple points, as walls may not always be perfectly straight. It is also essential to measure the thickness of the wall, as this will determine the length of the chimney pipe required. Additionally, consider the type of wall material, such as brick, stone, or drywall, as it might require specific installation techniques or additional materials.
Once you have determined the ideal height, marked the wall accurately, and ensured precise measurements, you are ready to proceed with installing your wood stove chimney through the wall. In the next section, we will guide you through the necessary steps to safely install the chimney and ensure a successful wood stove setup.
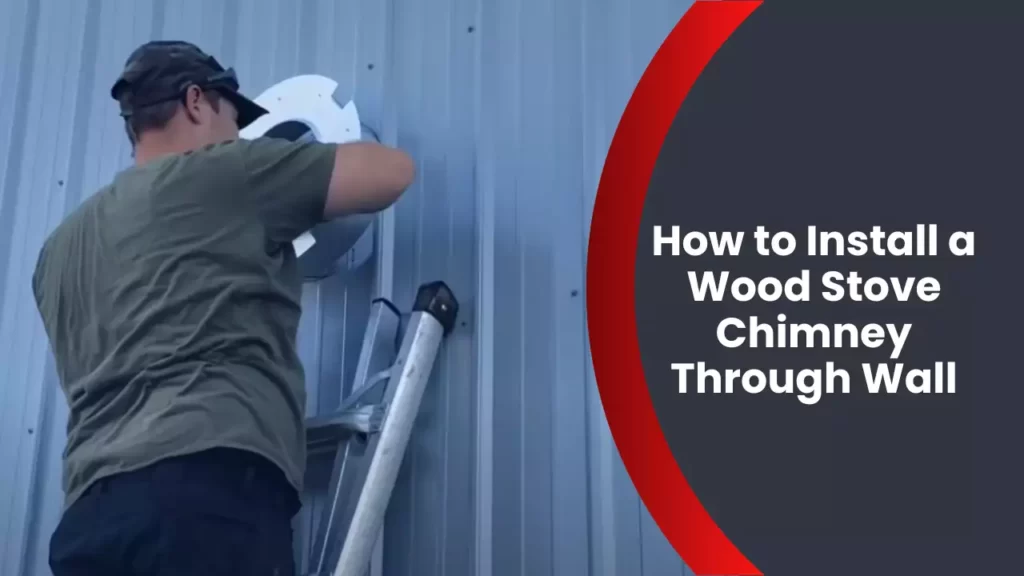
Cutting The Wall For The Chimney Opening
Installing a wood stove chimney through a wall is a crucial process that requires precision and careful planning. One of the first steps in this process is cutting the wall to create an opening for the chimney pipe to pass through. This step ensures a proper and secure fit for the chimney, allowing it to function efficiently. In this article, we will outline the necessary tools for cutting through the wall, the steps to create the chimney opening, and the safety precautions to be followed during the cutting process.
Choosing the appropriate tools for cutting through the wall
Before beginning the process of cutting through the wall, it is essential to gather the appropriate tools to ensure a smooth and efficient installation. Here are some common tools you’ll need:
| Tools | Required Quantity |
|---|---|
| Measuring Tape | 1 |
| Pencil or Chalk | 1 |
| Stud Finder | 1 |
| Saw (circular, reciprocating, or jigsaw) | 1 |
| Drill with Hole Saw Attachment | 1 |
| Safety Glasses | 1 |
Creating an opening for the chimney pipe to pass through
Once you have gathered the necessary tools, it’s time to create the opening for the chimney pipe. Follow these steps to ensure a proper fit:
- Using a measuring tape, identify the ideal location for the chimney opening based on the stove’s requirements and building codes.
- Mark the center point of the opening on the interior and exterior walls using a pencil or chalk.
- Use a stud finder to locate any studs, electrical wires, or plumbing that may be in the way. Mark these obstructions on the wall to avoid cutting through them.
- Using a saw, carefully cut through the marked area on the interior wall. Start small and gradually increase the size of the opening to avoid any mistakes.
- Repeat the same process on the exterior wall, ensuring that the cuts align with the opening on the interior wall.
- Once the opening is created, use a drill with a hole saw attachment to create a hole for the chimney pipe to pass through. Be sure to select a hole saw size that matches the diameter of the chimney pipe.
Maintaining safety precautions during the cutting process
Safety should always be a top priority when working with tools and cutting through walls. Here are a few safety precautions to follow during the cutting process:
- Put on safety glasses to protect your eyes from debris and dust.
- Wear gloves to safeguard your hands from sharp edges and splinters.
- Maintain a stable working platform by using a ladder or scaffolding if necessary.
- Ensure that all electrical power to the areas being worked on is turned off.
- Avoid rushing the process and take your time to guarantee accurate cuts.
- Clean up any debris or sawdust immediately to prevent accidents or tripping hazards.
- Follow the manufacturer’s instructions for the tools being used.
By carefully selecting the appropriate tools, following the correct steps, and maintaining safety precautions, you can successfully cut through the wall to create a proper opening for the wood stove chimney. This ensures a secure and efficient installation, allowing you to enjoy a warm and cozy atmosphere in your home.
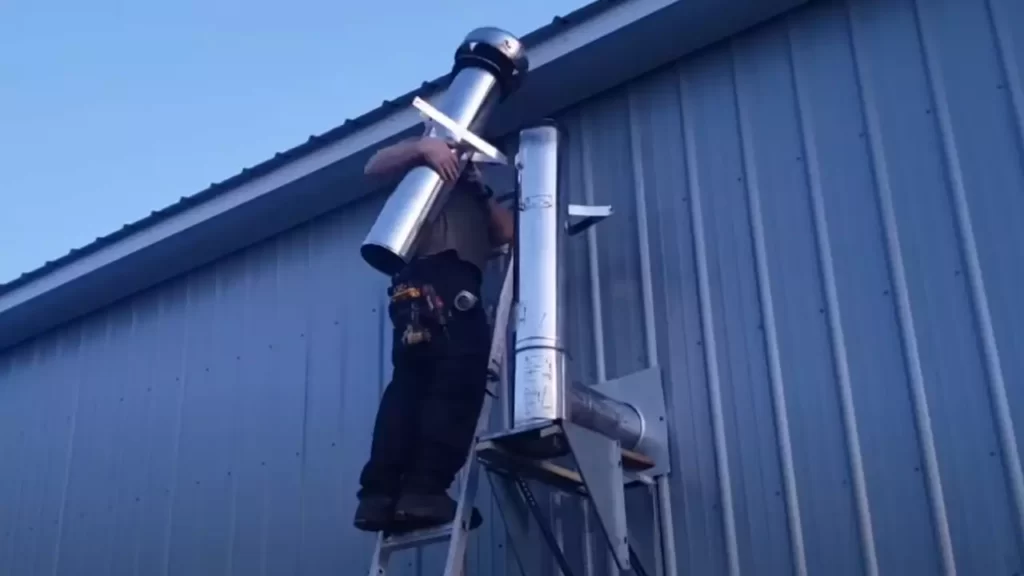
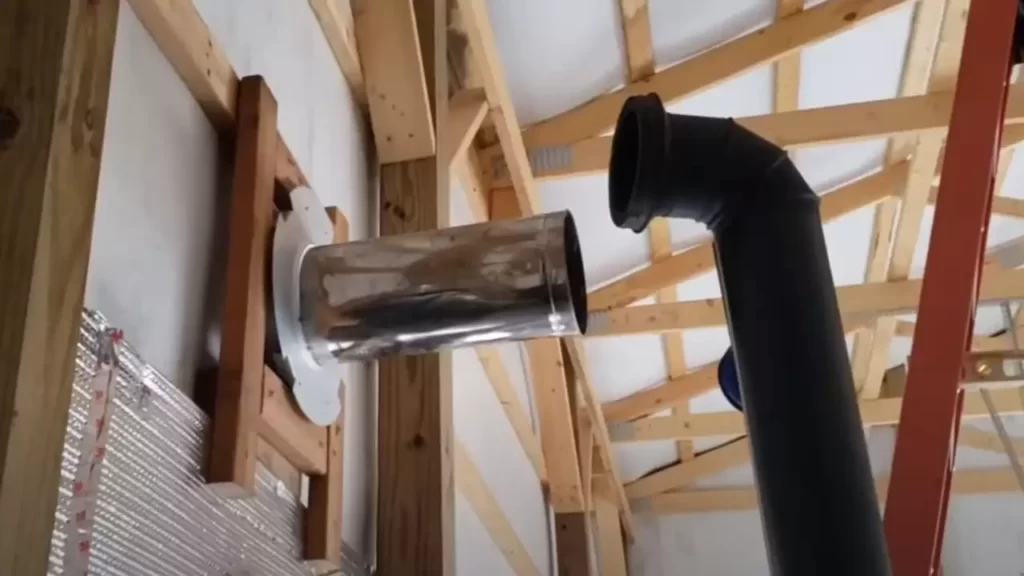
Assembling And Installing The Chimney Components
Connecting the Vent Pipe Sections Securely
One crucial step in installing a wood stove chimney through a wall is connecting the vent pipe sections securely. This ensures proper airflow and prevents any leaks or hazards. To achieve a secure connection:
- Make sure the vent pipe sections match the diameter requirements of your wood stove.
- Fit the male end of the first vent pipe section into the female end of the second section, ensuring a tight fit.
- Slide a stainless steel hose clamp over the connection and tighten it using a screwdriver or a socket wrench.
- Repeat the process for any additional vent pipe sections until the desired length is achieved.
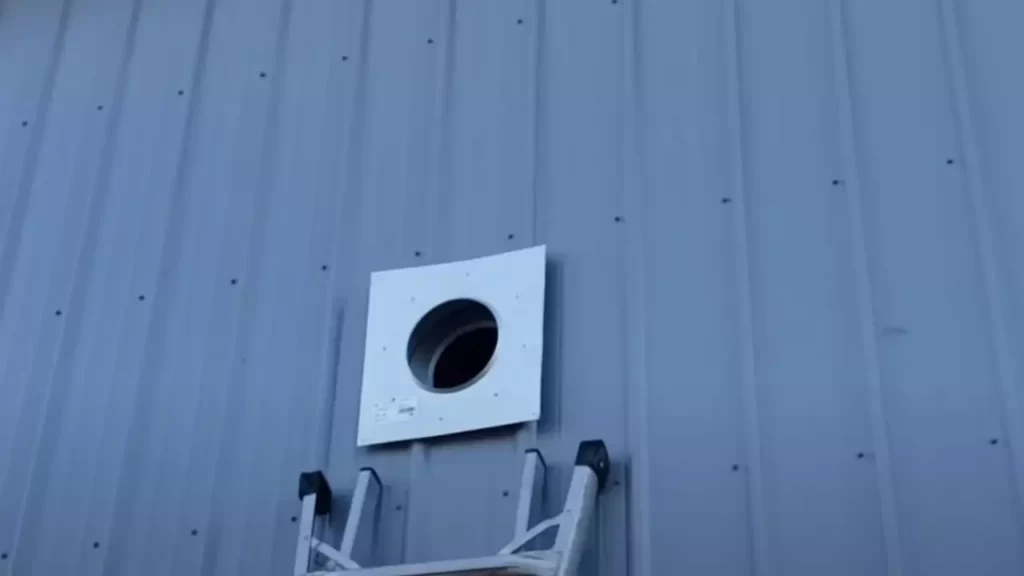
Installing the Wall Thimble for Proper Insulation
Installing a wall thimble is an essential part of the wood stove chimney installation process, as it provides proper insulation and protects the wall from heat damage. Follow these steps to install the wall thimble:
- Measure the thickness of the wall and choose a wall thimble that matches the measurement.
- Position the wall thimble in the desired location on the wall, ensuring it aligns with the vent pipe.
- Trace the outline of the wall thimble onto the wall, then cut out the marked area using a saw or a jigsaw.
- Insert the wall thimble into the hole, making sure it fits securely.
- Apply high-temperature silicone sealant around the edges of the wall thimble to create an airtight seal.
Attaching the Chimney Cap and Sealing Any Gaps
To complete the assembly of your wood stove chimney, attaching the chimney cap and sealing any gaps is crucial for optimal performance and safety. Follow these steps:
- Place the chimney cap over the top of the vent pipe.
- Secure the chimney cap using screws or clamps, depending on the specific design.
- Inspect the entire chimney assembly for any gaps or openings.
- Apply high-temperature silicone sealant to any gaps or openings to prevent any potential leaks.
- Ensure all components of the chimney are properly secured and sealed before using the wood stove.
Inspecting And Testing The Chimney Installation
After successfully installing a wood stove chimney through your wall, it is crucial to conduct a thorough inspection and test the installation to ensure its safety and efficiency. This inspection will help identify any potential errors in the installation and ensure that the chimney is functioning properly. Here are the key areas to focus on when inspecting and testing the chimney installation:
Conducting a thorough inspection for any installation errors
Inspecting the wood stove chimney installation is essential to ensure it meets all the necessary safety standards. Take the time to carefully examine each component of the chimney, starting from the point where it enters the wall. Look for any signs of damage, such as cracks or gaps, that could compromise the chimney’s integrity. Additionally, verify that all the components are properly aligned and connected according to the manufacturer’s instructions.
While inspecting, pay special attention to the joints and connections between the chimney sections. Ensure that the seals are tight and that there are no leaks that could lead to a loss of draft or the release of harmful fumes. If any issues are identified during the inspection, it is crucial to rectify them before using the wood stove.
Checking the airflow and draft efficiency of the chimney
One of the most vital aspects of a wood stove chimney installation is its ability to provide adequate airflow and draft efficiency. To test this, light a small amount of kindling or paper in your wood stove and observe the smoke as it exits through the chimney. Ideally, the smoke should steadily rise vertically without any noticeable backdraft or smoke spillage.
If you notice any irregularities, such as smoke escaping from unexpected places, it indicates a draft problem or an issue with the chimney’s design. In such cases, you may need to consult a professional chimney technician to troubleshoot and solve the problem effectively.
Verifying the stability and secure attachment of the components
Ensuring the stability and secure attachment of all chimney components is vital for the safe operation of your wood stove. Check each component, including the chimney cap, base support, and stove pipe, to confirm that they are tightly secured. Wiggle the components gently to make sure they are properly fastened and won’t become dislodged during use.
If you find any loose connections, tighten the fasteners or connectors until they are secure. It’s also crucial to verify that the chimney is clear of any obstructions or debris that could hinder proper airflow.
Remember, a well-installed and properly functioning wood stove chimney is crucial for the safe and efficient operation of your wood-burning stove. By conducting a thorough inspection, checking the airflow and draft efficiency, and verifying the stability and secure attachment of the components, you can enjoy the warmth and coziness of your wood stove with peace of mind.
Scheduling Regular Chimney Inspections And Cleanings
Importance of Regular Maintenance for a Safe and Efficient Chimney
Regular maintenance for your wood stove chimney is crucial to ensure its safe and efficient operation. Over time, creosote, a highly flammable substance, builds up inside the chimney. If not removed through proper cleaning, this can lead to a dangerous chimney fire. Additionally, debris such as leaves, twigs, and birds’ nests can accumulate, obstructing the airflow and reducing the efficiency of the chimney. By scheduling regular inspections and cleanings, you can prevent these issues and enjoy a well-functioning chimney for years to come.
Recommended Frequency for Professional Inspections and Cleanings
Professionally conducted chimney inspections and cleanings are essential to maintain the safety and efficiency of your wood stove chimney. The frequency of these inspections depends on several factors such as the type and frequency of wood burning, the age of the chimney, and local regulations. As a general guideline, it is recommended to have a professional inspection and cleaning performed at least once a year. This will ensure that any potential issues are identified early on and addressed promptly, minimizing the risk of chimney fires and maximizing the efficiency of your wood stove.
DIY Tips for Cleaning and Maintaining the Chimney
In addition to professional inspections and cleanings, there are certain DIY tips you can follow to maintain your chimney and contribute to its safe and efficient functioning. Here are some suggestions:
- Regularly inspect the chimney: In between professional inspections, take the time to visually inspect the chimney for any signs of damage or blockages. Look for cracks, loose bricks, or any excessive buildup of debris. If you notice any issues, it is advisable to contact a professional chimney sweep for further evaluation.
- Keep the area around the chimney clear: Ensure that there are no flammable materials or obstructions near the chimney. Trim any overhanging branches to prevent them from potentially causing damage to the chimney or obstructing the airflow.
- Install a chimney cap: A chimney cap can prevent animals from entering the chimney, as well as keep debris from accumulating. Make sure the cap is securely installed and free from any damage.
- Use the right fuel: Burning dry, well-seasoned wood is important for reducing the buildup of creosote and ensuring efficient combustion. Avoid burning items such as treated or painted wood, cardboard, or trash, as these can increase the risk of creosote buildup and chimney fires.
- Regularly clean the stove and flue: Clean the inside of your stove regularly, paying special attention to the flue pipe and flue connector. Remove any ash or soot buildup as these can restrict the airflow and reduce the stove’s efficiency.
- Be mindful of chimney usage: Avoid excessive smoldering or slow-burning fires, as these can contribute to the buildup of creosote. Instead, opt for smaller, hotter fires that promote complete combustion and minimize the formation of creosote.
By adhering to these DIY tips and scheduling regular professional inspections and cleanings, you can ensure the safety and efficiency of your wood stove chimney. Remember, a well-maintained chimney will not only provide you with a cozy and warm atmosphere but also give you peace of mind knowing that you are reducing the risk of chimney fires.
Identifying And Resolving Common Chimney Issues
Recognizing signs of creosote buildup and blockages
One of the most common issues that homeowners with wood stoves face is the buildup of creosote in the chimney. Creosote is a black, tar-like substance that forms as a result of burning wood. Over time, it can accumulate in the chimney, posing a fire hazard. To prevent any potential accidents, it is important to recognize the signs of creosote buildup and address it promptly.
There are a few indicators that suggest creosote buildup or blockages are present in your chimney:
- Black, sooty residue on the glass doors or surrounding areas of your wood stove.
- Unpleasant odor coming from the chimney, especially when the wood stove is in use.
- Decreased draft or difficulty in getting the fire started and maintaining a steady burn.
- Smoke or carbon monoxide alarms frequently going off.
If you notice any of these signs, it is crucial to take immediate action. Ignoring creosote buildup can lead to chimney fires or blockages that prevent harmful gases from escaping your home.
Troubleshooting draft problems and smoke leakage
Another common issue that can occur with wood stove chimney installations is draft problems and smoke leakage. These problems can be frustrating and can affect the efficiency and safety of your wood stove. However, with some troubleshooting, you can often resolve these issues on your own.
Here are a few steps to troubleshoot draft problems and smoke leakage:
- Check for any obstructions or blockages in the chimney, such as debris or small animals’ nests.
- Ensure that the damper is fully open when the wood stove is in use.
- Inspect the gasket seal around the door of the wood stove to ensure it is intact and providing a proper seal.
- Make sure the chimney is tall enough and extends above the roofline to create a good draft.
- Consider installing a chimney cap or rain cap to prevent wind-induced downdrafts and rainwater entry.
By taking these troubleshooting steps, you can often identify and resolve draft problems and smoke leakage issues, ensuring efficient operation of your wood stove and a comfortable living space.
Addressing issues with chimney caps or vent pipe connections
Proper installation of chimney caps and vent pipe connections is essential to ensure the safe and efficient operation of your wood stove. However, issues with these components can arise over time, requiring attention to prevent any potential problems.
If you encounter any issues with chimney caps or vent pipe connections, follow these steps to address the problem:
- Inspect the chimney cap for any damage or signs of wear. Replace it if necessary.
- Ensure that the chimney cap is securely fastened to the chimney and properly sealed.
- Check for any gaps or loose connections in the vent pipe. Repair or replace damaged sections.
- Verify that the vent pipe connections are tight and properly aligned, using high-temperature silicone sealant if needed.
- Consider installing a spark arrestor on the chimney cap to prevent sparks from escaping and potential fires.
Addressing any issues with chimney caps or vent pipe connections promptly will help maintain the longevity and safety of your wood stove installation. Regular inspections and maintenance are vital to ensure your wood stove operates efficiently and safely for many years to come.
Proper Disposal Of Wood Stove Debris
When it comes to installing a wood stove chimney through a wall, it’s important to not only consider the installation process but also the proper disposal of wood stove debris. This step is often overlooked, but it plays a crucial role in maintaining a safe and clean environment. In this section, we will discuss how to safely remove ashes and debris from the wood stove, dispose of ashes in an appropriate and fire-safe manner, and recycle or repurpose wood stove components and materials.
Safely removing ashes and debris from the wood stove
Before you can dispose of wood stove debris, you need to ensure that all ashes and debris are safely removed from the stove. This not only helps to prevent fire hazards but also promotes efficient wood stove operation. To safely remove ashes and debris from the wood stove, follow these steps:
- Carefully open the wood stove door and use a sturdy shovel or ash scoop to scoop the ashes into a metal container.
- Ensure that the ashes are completely cool before attempting to remove them to avoid the risk of causing a fire.
- Once the ashes are in the metal container, place a lid on top and securely seal it to prevent any potential fire hazards.
- Set the metal container aside in a safe and secure location until you are ready to dispose of the ashes.
Disposing of ashes in an appropriate and fire-safe manner
Disposing of wood stove ashes requires caution to prevent fire hazards. Follow these guidelines to ensure safe and appropriate disposal:
- Choose a suitable outdoor area away from any flammable materials, such as dry grass, leaves, or structures.
- Spread the ashes in a thin layer on the ground, ensuring they are fully extinguished and cool before doing so.
- Never dispose of wood stove ashes in or near garbage cans, plastic bags, or combustible containers.
- Avoid placing ashes directly in compost piles, as their high pH levels can be harmful to plants and organisms.
- Consider using a designated ash disposal site if one is available in your area, as they are specifically designed to handle wood stove ashes safely.
Recycling or repurposing wood stove components and materials
To minimize waste and take an environmentally-friendly approach, you can recycle or repurpose wood stove components and materials. Here are some ideas:
| Component/Material | Ideas for Recycling/Repurposing |
|---|---|
| Old stove pipes | Donate them to local DIY enthusiasts or artists who repurpose them into creative projects like furniture or sculptures. |
| Cast iron parts | Take them to a local metal recycling facility, where they can be melted down and repurposed into new products. |
| Fire bricks | Use them in landscaping projects, such as building retaining walls or creating a rustic-looking garden pathway. |
| Heat-resistant glass windows | Offer them for free on online platforms like Freecycle or Craigslist, giving others the opportunity to replace broken glass in their own wood stoves. |
By following these disposal guidelines and considering recycling or repurposing options, you can contribute to a sustainable and eco-friendly approach to wood stove installation and maintenance.
Frequently Asked Questions
How Much Does It Cost To Install A Wood Stove Chimney?
Installing a wood stove chimney through a wall typically costs around $500 to $2,000, depending on various factors such as the location, materials used, and the complexity of the installation. It is best to consult with a professional chimney installer for an accurate estimate.
Can I Install A Wood Stove Chimney Myself?
Installing a wood stove chimney through a wall is a complex task that requires specific knowledge and expertise. It is recommended to hire a professional chimney installer who understands the safety regulations and can ensure a proper installation that adheres to building codes.
What Materials Do I Need To Install A Wood Stove Chimney Through A Wall?
To install a wood stove chimney through a wall, you will need materials such as insulated stainless steel chimney pipe, firestop plates, brackets, wall thimbles, and flashing. It is important to use high-quality materials that are specifically designed for wood stove installations to ensure safety and efficiency.
How Long Does It Take To Install A Wood Stove Chimney Through A Wall?
The duration of installing a wood stove chimney through a wall depends on several factors, including the complexity of the installation, the location, and the experience of the installer. On average, it can take anywhere from a few hours to a full day to complete the installation process.
Conclusion
Installing a wood stove chimney through a wall may seem like a daunting task, but with the right knowledge and tools, it can be done easily. By following the steps and precautions outlined in this blog post, you can enjoy the warmth and comfort of your wood stove while ensuring the safety of your home.
Remember to consult local building codes and regulations, and always prioritize safety when installing a wood stove chimney. With proper installation, you can create a cozy atmosphere and reduce your heating costs during cold winter months. Happy stove installation!