Install a wall exhaust fan by measuring the wall, cutting a hole, mounting the fan, and connecting the wiring. Installing a wall exhaust fan is an effective way to improve ventilation and remove odors and moisture from a room.
Whether it’s in your bathroom, kitchen, or another area, a wall exhaust fan can help maintain a comfortable and healthy living environment. In this guide, we will go through the steps to install a wall exhaust fan successfully. From measuring the wall to cutting a hole, mounting the fan, and connecting the wiring, this process requires careful planning and execution.
By following the steps outlined below, you can ensure a properly installed wall exhaust fan that will effectively ventilate your space.
Understanding The Importance Of A Wall Exhaust Fan
When it comes to maintaining a healthy and comfortable indoor environment, having proper ventilation is crucial. One effective way to ensure good air circulation is by installing a wall exhaust fan. Whether it’s in the kitchen, bathroom, or any other area prone to dampness and odors, a wall exhaust fan can make a significant difference. In this article, we will delve into the importance of a wall exhaust fan, exploring its benefits and how it works.
Benefits of a Wall Exhaust Fan
1. Enhanced Air Quality:
- A wall exhaust fan helps remove pollutants, such as smoke, fumes, and airborne chemicals, from the indoor air. This is especially crucial in areas where cooking, painting, or using certain household cleaners take place.
- By expelling stale air and odors, a wall exhaust fan replaces them with fresh outdoor air, promoting a healthier and more pleasant environment.
2. Moisture Control:
- In areas with high humidity, such as bathrooms, a wall exhaust fan is essential for preventing excessive moisture build-up. This helps inhibit the growth of mold, mildew, and bacteria, which can cause health issues and damage to the structure of your home.
- A wall exhaust fan also aids in drying wet surfaces more quickly, reducing the chances of water damage and preserving the longevity of your fixtures and finishes.
3. Temperature Regulation:
A wall exhaust fan can assist in maintaining a comfortable indoor temperature. By expelling hot air during summer, it helps keep your living spaces cooler without solely relying on air conditioning. Similarly, during colder months, it aids in eliminating trapped cold pockets of air.
How a Wall Exhaust Fan Works
A wall exhaust fan operates by drawing air from within a room and expelling it to the outside. So how does this process work?
- The fan unit, typically mounted on an exterior wall, creates a negative pressure in the room.
- As a result, the air from the surrounding area is drawn into the fan housing through the grille or vent.
- Once inside, the air passes through the fan blades and is expelled through the exhaust vent, carrying unwanted pollutants and moisture with it.
- Simultaneously, fresh outdoor air is drawn in from gaps or windows, maintaining a healthy air balance.
Wall exhaust fans can be manually operated or connected to a switch for automatic activation. Some models even come equipped with sensors that detect humidity levels or changes in air quality, enabling them to start and stop automatically as needed.
Now that we’ve explored the importance of a wall exhaust fan and how it works, next up we will guide you through the installation process. Stay tuned!
Assessing The Requirements For Installation
Before you begin installing a wall exhaust fan in your home, it’s crucial to assess the requirements for the installation. This step will help you ensure that you choose the right location, measure the wall correctly, and determine the necessary power supply. By taking these factors into account, you can optimize the performance and effectiveness of your wall exhaust fan.
Choosing the right location for the fan
When it comes to selecting the ideal location for your wall exhaust fan, there are a few considerations to keep in mind. Firstly, you’ll want to choose a spot that allows for maximum air circulation and ventilation. This typically means placing the fan near a source of pollutants or moisture, such as a bathroom, kitchen, or laundry room.
In addition, ensure that there are no obstructions in the chosen location that could impede the airflow. This includes avoiding any potential interference from furniture, light fixtures, or other obstacles. The goal is to maximize the fan’s ability to expel stale air and replace it with fresh, clean air.
Measuring the wall for the fan
Precise measurements are essential to ensure a proper fit when installing a wall exhaust fan. To measure the wall accurately, start by locating the center of the desired installation area. Measure the height and width of the opening to determine the dimensions needed for the fan’s housing unit.
Keep in mind that the exact measurements will vary depending on the specific fan model you choose. Refer to the manufacturer’s instructions or specifications to determine the required dimensions for your wall exhaust fan.
Determining the necessary power supply
Proper power supply is crucial for the efficient operation of your wall exhaust fan. Determining the necessary power supply involves assessing the electrical requirements of the fan and ensuring it aligns with the available power source in your home.
Typically, wall exhaust fans operate on standard household voltage, either 120V or 240V. Check the specifications provided by the manufacturer to determine the specific voltage requirements for your chosen fan model.
It’s also essential to ensure that the power supply can handle the fan’s wattage. This information can generally be located on the fan’s packaging or in the accompanying documentation. If necessary, consult a qualified electrician to ensure the power supply is sufficient and meets all safety requirements.
By assessing these requirements for installation, including choosing the right location, measuring the wall accurately, and determining the necessary power supply, you are putting yourself in the best position for a successful installation of a wall exhaust fan in your home.
Gathering The Necessary Tools And Materials
Gathering the Necessary Tools and Materials
When it comes to installing a wall exhaust fan, gathering the necessary tools and materials is the first and crucial step. Having the right equipment on hand will not only simplify the installation process but also ensure its success. To help you get started, we have compiled a comprehensive list of the tools and materials you will need, which we have divided below for easy reference.
List of tools needed for installation
Before you begin the installation, make sure you have the following tools ready:
- Screwdriver (both flathead and Phillips head)
- Tape measure
- Pencil
- Hacksaw or reciprocating saw
- Drill
- Adjustable wrench or pliers
- Caulking gun
- Wire cutters/strippers
- Stud finder
- Level
- Safety goggles
- Work gloves
Make sure all these tools are easily accessible before you proceed with the installation.
List of materials needed for installation
In addition to the tools mentioned above, you will also need the following materials:
- Wall exhaust fan unit
- Exhaust duct
- Duct tape or metal clamps
- Mounting brackets or screws
- Electrical wire
- Nuts and bolts (if not provided with the fan)
- Caulk or weatherstripping
- Electrical connectors
- Wire nuts
- Paint or sealant (if desired)
Ensure that all of these materials are readily available before you begin the installation process to avoid interruptions. Additionally, it’s important to check the fan manufacturer’s instructions and specifications for any specific materials or equipment they recommend for your particular model.
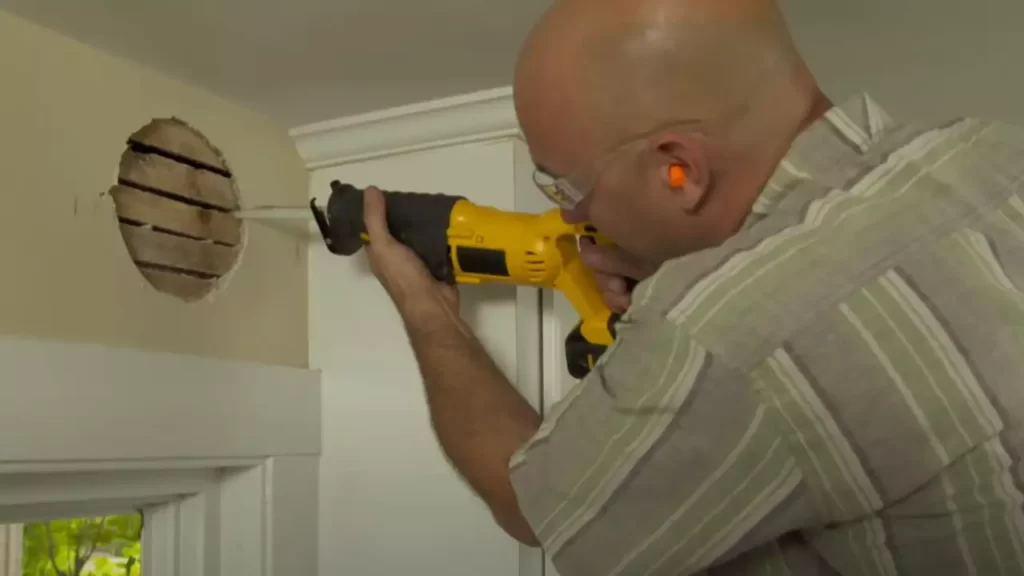
Preparing The Installation Site
Before you begin installing a wall exhaust fan, it is crucial to properly prepare the installation site. This step ensures a smooth and efficient installation process, and it also guarantees optimal performance and functionality of the exhaust fan. By following these simple steps, you can ensure that the installation site is ready for the exhaust fan and avoid any potential hindrances.
Preparing the wall for installation
First and foremost, inspect the wall where you intend to install the exhaust fan. Look for any signs of cracks, damage, or unevenness that may affect the installation. If necessary, repair any issues beforehand to ensure a secure and stable mounting surface for the fan.
Next, measure and mark the exact location where the exhaust fan will be installed. Use a pencil or marking tool to make precise markings on the wall. Double-check the measurements to ensure accuracy before proceeding with the installation.
Removing any obstacles in the installation area
Prior to installing the fan, it is essential to clear the installation area of any obstacles that could impede the proper functioning of the exhaust fan. Remove any furniture, decorations, or other items that may obstruct the installation site or restrict the airflow around the fan.
If there are any electrical outlets, switches, or light fixtures in close proximity to the installation area, take the necessary precautions to ensure their safety. Turn off the power supply to the area and cover the outlets and switches with protective covers. This step helps prevent any accidents or damage during the installation process.
Additionally, be mindful of any plumbing or wiring behind the wall where the exhaust fan will be mounted. Avoid drilling or cutting into these areas to prevent potential damage or disruptions to your home’s utilities.
By properly preparing the installation site, you can ensure a successful installation and optimal performance of your wall exhaust fan. Taking the time to inspect the wall, clear any obstacles, and safeguard nearby electrical components will contribute to a smooth installation process and help avoid any unnecessary complications.
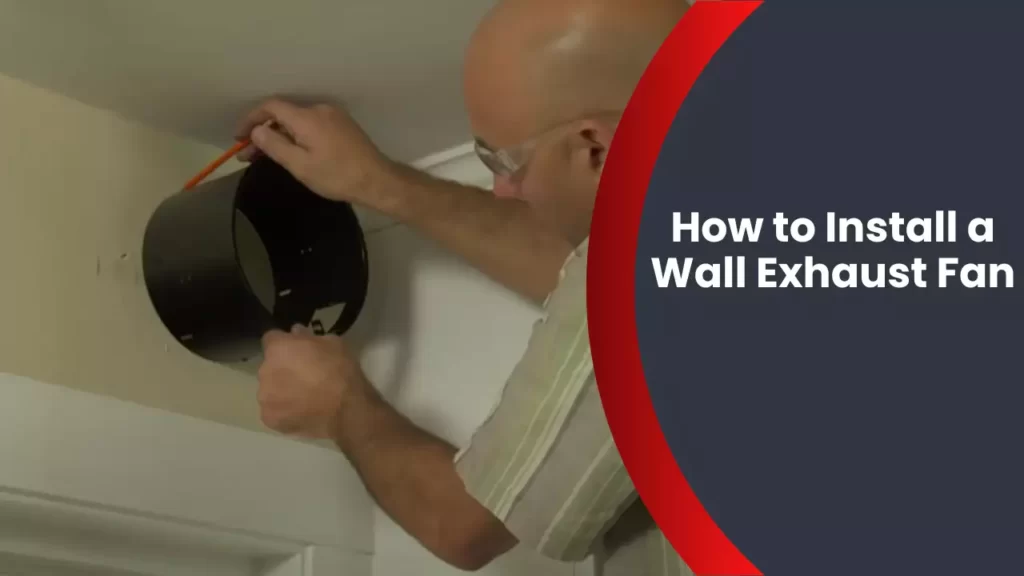
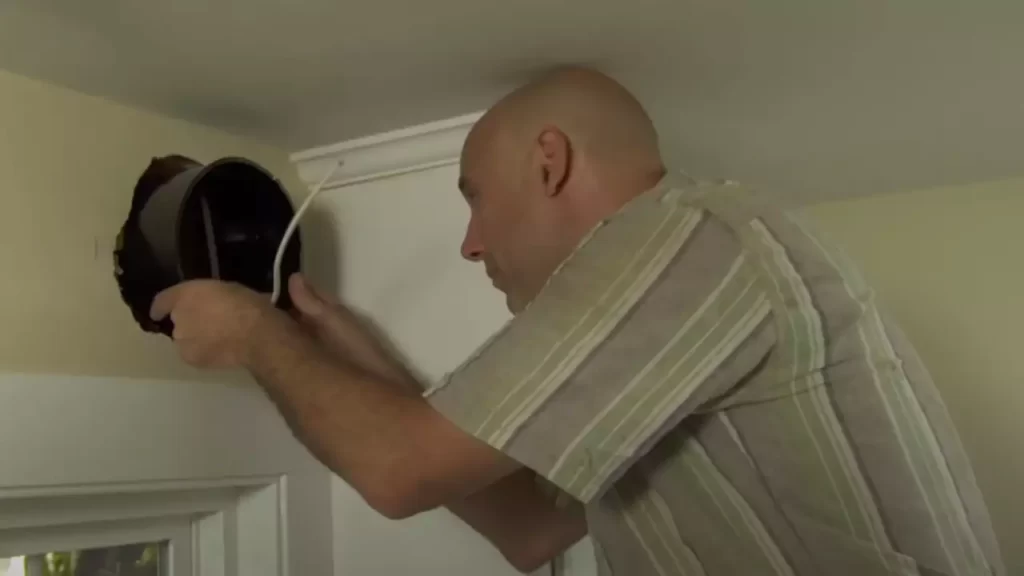
Mounting The Fan On The Wall
Installing a wall exhaust fan can greatly enhance ventilation in your home or workplace. Once you have chosen the right fan for your needs and gathered the necessary tools, it’s time to mount the fan on the wall. Follow this step-by-step guide to ensure a secure and proper installation.
Step-by-step guide to mounting the fan:
- Select the ideal location: Before mounting the fan, identify the best location on the wall. Consider factors such as proximity to the source of odors or humidity, as well as the accessibility for wiring.
- Mark the location: Use a pencil or marker to outline the dimensions of the fan on the wall. Double-check the measurements to ensure accuracy.
- Prepare the wall: Prior to installation, make sure the wall surface is clean, dry, and free from any obstructions. This will ensure a smooth and sturdy mount.
- Secure the fan housing: Using the appropriate screws or brackets, carefully attach the fan housing to the wall. Ensure that it is level and aligns with the marked location.
- Connect the wiring: Follow the manufacturer’s instructions to connect the wiring inside the fan housing. Make sure to turn off the power before working with any electrical connections.
- Attach the fan cover: Place the fan cover onto the housing and secure it using the provided screws or clips. This will protect the fan blades and ensure maximum efficiency.
- Test the fan: Once the installation is complete, turn on the power and test the fan to ensure it is functioning properly. Listen for any unusual noises or vibrations that may indicate a problem.
Securing the fan in place:
Properly securing the fan is crucial to prevent accidents and ensure long-term stability. Here are a few important steps to adhere to:
- Tighten all screws: Ensure that all screws and brackets used to mount the fan are securely tightened. This will prevent any unwanted movement or vibrations.
- Check for stability: Give the fan a gentle shake to ensure it is securely fastened to the wall. If there is any wobbling or instability, double-check the screws and make necessary adjustments.
- Verify proper airflow: Stand in front of the fan and assess the airflow. If you notice any obstructions or inconsistencies, reposition the fan or make adjustments to the surrounding area.
By following these clear steps, you can successfully mount your wall exhaust fan and enjoy improved ventilation and air quality in your space. Proper installation ensures optimal functionality and longevity of your fan.
Connecting The Electrical Wiring
When it comes to installing a wall exhaust fan, one of the most crucial steps is connecting the electrical wiring. This ensures that the fan operates effectively and safely. In this section, we will guide you through the process of wiring the fan to the power supply, while also discussing important electrical safety precautions to keep in mind. Let’s get started.
Understanding Electrical Safety Precautions
Before you begin any electrical work, it’s essential to prioritize safety. Keep in mind the following precautions:
- Ensure the power is turned off at the circuit breaker before starting any electrical work. This will prevent the risk of electric shock.
- Wear suitable protective gear, such as safety glasses and insulated gloves, to minimize the chance of injury.
- Never touch exposed wires with bare hands, as this could result in electric shock.
- If you are unsure about any electrical aspect of the installation, consider hiring a professional electrician to assist you.
By taking these safety precautions, you can minimize the risks associated with electrical work and ensure a safe installation process.
Wiring the Fan to the Power Supply
Now that you are familiar with electrical safety precautions, it’s time to wire the fan to the power supply. Begin by following these steps:
- Locate the power supply source, typically a nearby electrical outlet or an existing electrical junction box.
- Turn off the power supply connected to the source by switching off the breaker.
- Using wire strippers, strip the protective covering from the end of the fan’s electrical cable.
- Connect the fan’s electrical cable to the power supply source, ensuring to match the corresponding wires. Secure the connection using wire nuts.
- Once the connection is secure, carefully tuck the wires into the electrical box, ensuring there are no loose or exposed wires.
- Finally, restore the power by turning the breaker back on and test the fan to ensure it is functioning correctly.
By following these steps, you can successfully wire the fan to the power supply, enabling it to efficiently remove stale air from your space.
Remember, if you are uncomfortable with any aspect of the electrical work, it is always best to consult a qualified electrician to ensure the installation is done safely and effectively.
Testing The Fan And Troubleshooting
Testing the functionality of the fan
Once you have successfully installed your wall exhaust fan, it’s important to test its functionality to ensure proper operation. Testing the fan will help you identify any issues early on and take necessary measures to fix them. Here are the steps to test the fan:
- Turn on the power: Ensure the power to the fan is turned on at the circuit breaker or the main power source.
- Check for rotations: When you turn on the fan, visually check if the fan blades are rotating. If they are not, it could indicate a problem with the electrical connection or the motor.
- Listen for unusual sounds: Pay attention to any unusual or loud sounds coming from the fan. Excessive noise can indicate loose or faulty parts that may require adjustments or replacements.
- Feel the airflow: To check if the fan is properly ventilating the room, stand in front of the exhaust and feel the airflow. The airflow should be strong and consistent. If it feels weak or there is no airflow at all, there might be an obstruction blocking the airflow or a problem with the fan motor.
- Test the control switches: If your fan has control switches, such as speed settings or a timer, test these functions to ensure they are working as expected. Adjust the settings and observe if the fan responds accordingly.
Common troubleshooting tips and solutions
While installing a wall exhaust fan can be a straightforward process, it’s not uncommon to encounter a few hiccups along the way. Here are some common troubleshooting tips and solutions to help you address any issues that may arise:
| Issue | Solution |
|---|---|
| The fan doesn’t turn on | – Check if the power supply is properly connected and turned on. – Verify if the wiring connections are secure and not loose. – Test the power switch to ensure it’s functioning correctly. – If all else fails, consult a professional electrician for assistance. |
| Noisy operation | – Inspect the fan blades for any obstruction or damage. – Tighten any loose screws or bolts that may be causing the noise. – If the noise persists, consider lubricating the motor or contacting the manufacturer for further guidance. |
| Inadequate airflow | – Check if the air ducts are properly installed and free from obstructions. – Clean or replace the fan blades if they are clogged with dirt or debris. – Adjust any dampers or vents that might be blocking the airflow. – If the problem persists, consult an HVAC professional to assess the ventilation system. |
| Uneven air distribution | – Make sure the fan is properly sized for the room and its ventilation needs. – Consider using multiple fans or installing additional ventilation sources to create a more balanced airflow. |
By testing the functionality of your wall exhaust fan and troubleshooting any issues that arise, you can ensure that the fan operates efficiently and effectively, providing the desired ventilation for your space.
Finishing Touches And Maintenance
Securing any loose connections
Securing any loose connections is an important step in installing a wall exhaust fan. It ensures optimal performance and prevents any potential hazards. Before considering the job complete, make sure to check all connections and tighten any loose screws or bolts. This includes securing the fan housing to the wall, as well as ensuring a tight fit for all wiring and ductwork.
To secure the fan housing to the wall, use the appropriate screws or anchors depending on the type of wall material. If you’re unsure, consult the manufacturer’s instructions or seek guidance from a professional. Once the housing is firmly in place, check that all electrical connections are secure. Double-check the wiring connections, making sure they are tight and free of any frayed wires. If necessary, use wire connectors and electrical tape to ensure a secure connection.
In addition to securing the fan housing and electrical connections, it’s crucial to inspect and properly fasten any ductwork used in the installation. Loose or poorly connected ductwork can compromise the effectiveness of the exhaust fan. Ensure all connections are tight and use duct tape or metal clamps to secure the joints. Take the time to carefully examine all the connections, especially where the ductwork meets the fan housing and the exterior vent.
Regular maintenance of the wall exhaust fan
Maintaining your wall exhaust fan is essential for its longevity and efficient operation. Regular maintenance ensures that the fan continues to remove odors, humidity, and pollutants effectively. By following a few simple steps, you can keep your exhaust fan in optimal condition and minimize the need for repairs.
Start by inspecting the fan blades regularly. Over time, dust and debris can accumulate on the blades, reducing their ability to move air efficiently. Cleaning the blades with a damp cloth or vacuum cleaner helps maintain their effectiveness. While cleaning, be careful not to bend or damage the blades.
Aside from the blades, pay attention to the fan’s motor and bearings. These components require lubrication to prevent friction and extend their lifespan. Consult the manufacturer’s guidelines to determine the appropriate lubricant and frequency of maintenance. Apply the lubricant as directed, taking care not to use excessive amounts.
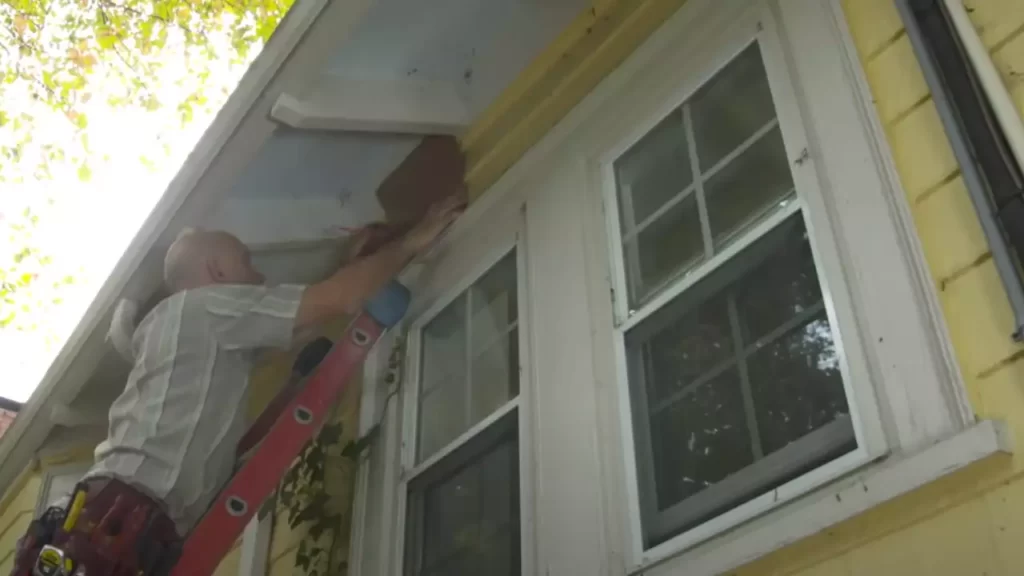
In addition to cleaning and lubricating, it’s essential to keep the exterior vent clean and free from obstruction. Regularly check for any debris, such as leaves or bird nests, that may accumulate in the vent. Use a brush or vacuum cleaner to remove any blockages that could impede airflow. A clear and unrestricted vent not only ensures efficient operation but also reduces the risk of fire hazards.
To summarize:
- Tighten any loose screws or bolts to ensure a secure installation.
- Double-check and secure all electrical connections, using wire connectors and electrical tape if necessary.
- Inspect and secure all ductwork connections using duct tape or metal clamps.
- Regularly clean the fan blades to maintain their effectiveness.
- Apply appropriate lubrication to the motor and bearings as recommended by the manufacturer.
- Keep the exterior vent clean and free from obstruction to ensure optimal airflow.
By following these simple maintenance steps, you can enjoy the benefits of a well-functioning wall exhaust fan for years to come.
Frequently Asked Questions
Can You Install Exhaust Fan In Wall?
Yes, you can install an exhaust fan in a wall.
How Do You Install An Exhaust Vent In The Wall?
To install an exhaust vent in the wall, follow these steps: 1. Select the desired location on the wall. 2. Mark and cut a hole in the wall to fit the vent. 3. Attach the duct pipe to the vent, ensuring a secure connection.
4. Insert the vent into the hole and fasten it firmly. 5. Test the vent to ensure proper airflow.
Where Should A Wall Exhaust Fan Be Placed?
A wall exhaust fan should be placed on an exterior wall near the source of the odors or pollutants. It should be installed at a height of approximately 6 to 8 feet from the floor and away from any obstructions.
This will ensure efficient ventilation and air circulation in the designated area.
Can I Install An Exhaust Fan Myself?
Yes, you can install an exhaust fan yourself. Just follow the provided instructions carefully and ensure you have the necessary tools and knowledge. However, if you’re unsure or uncomfortable, it’s always best to hire a professional to avoid any potential risks or mistakes.
Conclusion
Installing a wall exhaust fan is a relatively simple and cost-effective way to improve air circulation and ventilation in your space. By following the step-by-step guide provided in this blog post, you can confidently navigate the installation process. Remember to prioritize safety and consult a professional if needed.
Don’t let a poorly ventilated room hinder your comfort and well-being any longer – take action and install a wall exhaust fan today!