To install a single pole 20 amp breaker, turn off power to the circuit, remove the panel cover, and attach the breaker to an available slot on the hot bus bar. Then, connect the breaker wire to the circuit wire and tighten the connections.
Finally, restore power and test the circuit. Welcome to the world of electrical installations! Whether you’re a DIY enthusiast or a homeowner looking to make some electrical upgrades, understanding how to install a single pole 20 amp breaker can come in handy.
In this guide, we’ll provide you with step-by-step instructions on how to successfully install this type of circuit breaker. So, let’s dive in and learn how to safely and efficiently install a single pole 20 amp breaker.
Choosing The Right Breaker For Your Electrical System
Installing a single pole 20 amp breaker is an important task when it comes to electrical systems. A breaker acts as a safety device, protecting your electrical system from overloading and preventing damage or electrical fires. But how do you choose the right breaker for your specific electrical needs? In this section, we will discuss the considerations you should keep in mind when selecting a single pole 20 amp breaker.
Considerations for selecting a single pole 20 amp breaker
When it comes to selecting the right breaker for your electrical system, there are a few key factors you need to consider. Let’s take a closer look at these considerations:
1. Ampere Rating
The ampere rating of a breaker indicates the maximum amount of current it can handle without tripping. For a single pole 20 amp breaker, the ampere rating is fixed at 20 amps. It is important to choose a breaker with a rating that matches the electrical load you plan to connect to it. Overloading a breaker can lead to overheating and potential hazards. Therefore, ensure that the breaker’s ampere rating is appropriate for the electrical devices and appliances you intend to connect.
2. Circuit Compatibility
Another crucial factor to consider when selecting a single pole 20 amp breaker is circuit compatibility. Breakers are designed for specific types of circuits, such as general lighting or dedicated appliance circuits. It is essential to ensure that the breaker you choose is compatible with the circuit type you have in your electrical system. This compatibility ensures optimal performance and safety.
3. Brand Reputation
While it may seem easy to overlook, the reputation of the brand manufacturing the breaker is an important consideration. Opting for a well-known and reputable brand ensures that you are getting a quality product that has been tested and approved by industry standards. Investing in a reliable breaker guarantees superior protection for your electrical system and peace of mind knowing that you have made a wise choice.
By carefully considering the ampere rating, circuit compatibility, and brand reputation, you can choose the right single pole 20 amp breaker for your electrical system. Remember, ensuring the safety and efficiency of your electrical system is paramount, and investing in a suitable breaker is a step in the right direction. Now that you understand the essential factors to consider, you are ready to proceed with the installation process.
Gathering The Necessary Tools And Equipment
Installing a single pole 20 amp breaker doesn’t have to be a daunting task, especially if you have the right tools and equipment at your disposal. In this section, we’ll walk you through the essential tools you’ll need for a successful installation as well as the safety equipment you should never compromise on.
Essential Tools Needed for Installation
Before getting started, gather the following tools:
| Tool | Description |
|---|---|
| Screwdriver | A flathead or Phillips screwdriver, depending on the type of screw heads. |
| Wire Cutter/Stripper | Used to cut and strip the electrical wires. |
| Needle-Nose Pliers | These will come in handy for gripping and bending wires. |
| Voltage Tester | Used to check for the presence of electrical current. |
| Measuring Tape | Helps you measure and mark the appropriate locations. |
These tools are essential for a smooth installation process and will ensure that you have everything you need to get the job done efficiently.
Safety Equipment Required for Working with Electricity
Working with electricity requires utmost caution and adherence to safety guidelines. Make sure you have the following safety equipment on hand:
- Safety Goggles: Protect your eyes from potential sparks or debris.
- Rubber Gloves: Insulate your hands and protect against electrical shock.
- Non-Slip Shoes: Provide stability and reduce the risk of accidents.
Prioritize your safety and wear this equipment throughout the installation process. Remember, there is no compromise when it comes to working with electricity.
By gathering the necessary tools and equipment, you are setting yourself up for a successful single pole 20 amp breaker installation. Always remember to prioritize safety and follow the guidelines carefully. In the next section, we will go through the step-by-step process of installing the breaker.
Turning Off The Power Supply
Before you begin installing a single pole 20 Amp breaker, it is crucial to turn off the power supply to ensure your safety. Following the appropriate steps will help you avoid any electrical mishaps or accidents. In this section, we will discuss the process of locating and switching off the main electrical panel to shut off the power.
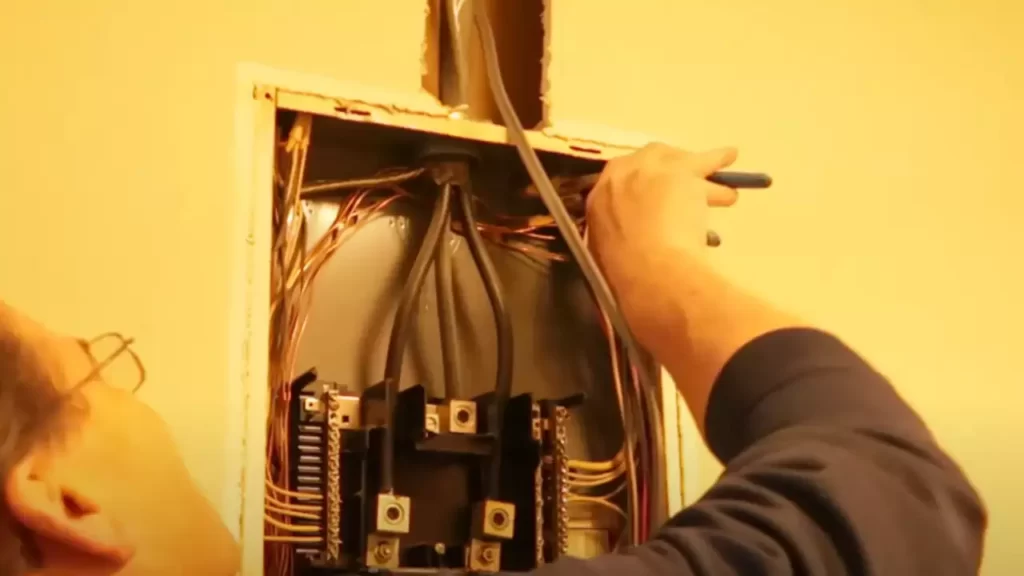
Locating and Switching Off the Main Electrical Panel
To start, you need to locate the main electrical panel in your home. Typically, it is found in the basement, utility room, or garage. Once you have identified the panel, follow the steps below to switch off the power:
- Put on a pair of insulated gloves and safety goggles for added protection.
- Open the door of the electrical panel by carefully removing the cover.
- Inside, you will find a row of circuit breakers or fuses. These control the power supply to different parts of your home. Locate the main circuit breaker, usually at the top or bottom of the panel.
- Using caution, flip the lever of the main circuit breaker to the “off” position. This action will cut off power to the entire electrical system of your home.
- For extra precaution, verify that the power is indeed turned off by attempting to switch on any lights or electrical appliances in your home.
Remember, it is crucial to double-check that the power supply is indeed shut off before proceeding with the installation. This ensures your safety and prevents any electrical accidents.

Removing The Panel Cover
Before you can install a single pole 20 amp breaker, you need to remove the panel cover safely. This step is crucial to ensure your safety and the proper installation of the breaker. Follow the steps below to remove the panel cover without any issues.
Safety Precautions When Handling Panel Covers
Before you begin, it’s important to take the necessary safety precautions to protect yourself from any potential risks. Here are a few safety tips to keep in mind:
- Turn off the main power supply before attempting to remove the panel cover. This will prevent any unexpected electrical shocks.
- Make sure you are wearing appropriate personal protective equipment (PPE) such as gloves and safety glasses.
- Avoid wearing any metal accessories such as jewelry or watches that could potentially contact live electrical components.
Steps to Safely Remove the Panel Cover
Once you have taken the necessary safety precautions, you can proceed to remove the panel cover following these steps:
- Use a screwdriver or the appropriate tool to unscrew the screws securing the panel cover. These screws are typically located around the edges of the panel.
- Once the screws are loosened, carefully lift the panel cover upward, ensuring it doesn’t interfere with any wires or electrical components inside.
- Pay attention to any wires or cables that may be attached to the panel cover. Carefully detach them to prevent any damage or accidental disconnections.
- Set the panel cover aside in a safe location, away from the work area, to minimize the risk of trips or falls.
With the panel cover safely removed, you can now proceed with the next steps of installing your single pole 20 amp breaker. Remember to exercise caution throughout the process and consult a professional if you’re unsure about any steps.
Identifying The Circuit
Locating the circuit you wish to install the breaker for
Identifying the correct circuit is an essential first step when installing a single pole 20 amp breaker. This ensures that you are working with the right circuit and prevents any potential damage or accidents. To locate the specific circuit, follow these steps:
- Begin by turning off the main power supply to your electrical panel. Safety is of utmost importance, and this step ensures that you are not working with live circuits.
- Carefully examine the labels or diagrams used in your electrical panel. These diagrams provide important information about the circuits and their corresponding devices or areas of the house they control.
- Look for a label or diagram that matches the area or device you want to power. For example, if you are installing a new circuit for a garage or kitchen appliance, search for a label that indicates these specific areas.
- Pay attention to any additional markings on the diagram that may help identify the circuit you need. This could include room numbers, specific appliances, or any unique labeling system used in your panel.
- If your panel does not have clear diagrams or labels, you can also identify the circuit by using a circuit breaker finder tool. This handy device helps you trace the path of a circuit by detecting the corresponding breaker.
Understanding the electrical diagram or labeling system used in the panel
To proceed with installing the single pole 20 amp breaker, a clear understanding of the electrical diagram or labeling system used in your panel is crucial. This information helps ensure that you select the correct circuit for the breaker installation.
- Examine the electrical diagram provided within the panel carefully. It will typically show the primary panels, sub-panels, and their corresponding circuits or devices.
- Each circuit should be marked with a number or letter identifier. This identifier helps in locating the specifics of that circuit.
- If your panel uses a labeling system instead of a diagram, familiarize yourself with the labels and what they represent. Pay attention to any abbreviations or symbols used.
- Take note of any special considerations mentioned in the diagram or labeling system, such as circuits dedicated to specific appliances or areas.
By carefully identifying the circuit you wish to install the single pole 20 amp breaker for and understanding the electrical diagram or labeling system used in your panel, you can proceed confidently with the installation process. Remember to prioritize safety and follow all necessary precautions to ensure a successful and efficient installation.
Preparing The Breaker And Wires
Before you can install a single pole 20 Amp breaker, it is crucial to properly prepare both the breaker and the wires to ensure a safe and effective connection. This step-by-step guide will walk you through the process of inspecting the breaker for any damage or defects, as well as preparing the wires for connection to the breaker.
Inspecting the breaker for any damage or defects
The first step in preparing the breaker is to carefully inspect it for any signs of damage or defects. This is an essential safety precaution, as a faulty breaker can pose serious risks, such as overheating or electrical fires.
To perform a thorough inspection, follow these steps:
- Visual examination: Carefully examine the breaker for any visible signs of damage, such as cracks, chips, or discoloration. Pay close attention to the terminals and connections, as loose or corroded wires can also indicate a problem.
- Testing the continuity: Using a multimeter set to the continuity or resistance mode, test the breaker by touching the probes to the terminals. A properly functioning breaker should show a reading of zero ohms, indicating a closed circuit. If the reading is significantly higher or infinity, it may indicate a faulty breaker.
- Checking for trip problems: If the breaker is equipped with a trip mechanism, test it by manually pushing it to the “off” position. It should easily reset back to the “on” position without any resistance or difficulty. If the breaker sticks or fails to reset, it may need to be replaced.
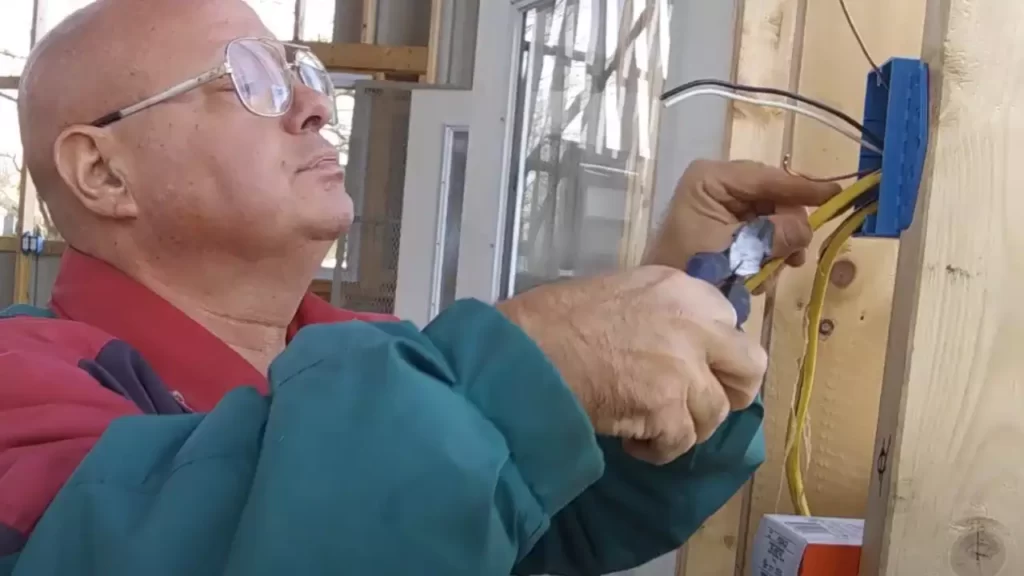
Preparing the wires for connection to the breaker
Once you have ensured that the breaker is in good condition, it’s time to prepare the wires for connection. This involves properly stripping the insulation and securing the wires to the breaker terminals, ensuring a reliable and safe electrical connection.
Follow these steps to prepare the wires:
- Measure and cut: Start by measuring the length of the wire needed to reach from the breaker to the electrical panel. Use a wire cutter to carefully cut the wire to the appropriate length, ensuring a clean and even cut.
- Strip the insulation: Using a wire stripper, carefully strip about 1 inch of insulation from the end of each wire. Be cautious not to damage the wire strands while stripping the insulation.
- Secure the wires: Once the insulation is stripped, insert the stripped end of each wire into the appropriate terminal on the breaker. Tighten the terminal screw firmly to secure the wire in place, ensuring a tight and reliable connection.
By following these steps, you can properly prepare the breaker and wires for installation of a single pole 20 Amp breaker. Remember, safety should always be the top priority when working with electricity, so double-check your work and consult a professional if you have any doubts or concerns.
Installing The Breaker
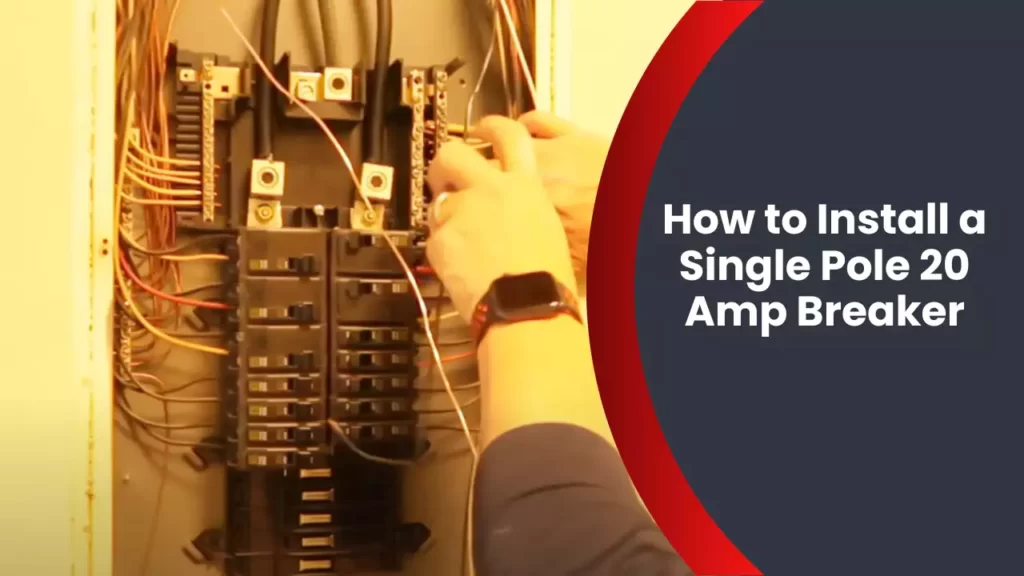
Once you have properly identified the panel and gathered the necessary tools and materials, it’s time to begin the process of installing the single pole 20 amp breaker. The installation process involves two key steps: properly positioning the breaker in the panel and connecting the wires to the breaker terminals. Follow the instructions below to ensure a safe and successful installation.
Properly positioning the breaker in the panel
Before positioning the breaker, make sure to turn off the main power supply to the panel by switching off the main breaker. This is crucial for your safety.
Once the power is off, open the panel door and locate an available slot in the panel where you want to install the breaker. The slot should be compatible with your breaker type and size, typically indicated by a label or marking on the panel.
Position the breaker in the slot by aligning the clips or hooks on the breaker with the ridges or grooves in the panel. Apply gentle pressure to snap the breaker into place, ensuring it is secure and flush with the other breakers in the panel.
Now that the breaker is properly positioned, you can move on to connecting the wires to the breaker terminals.
Connecting the wires to the breaker terminals
Start by making sure the wires you are connecting to the breaker are the appropriate gauge and size for a 20 amp circuit. It’s crucial to use the correct wire size to ensure the safety and efficiency of the circuit.
Strip the insulation off the ends of the wires, leaving approximately 1/2 inch of bare wire exposed. Insert the stripped ends of the wires into the corresponding terminals on the breaker, ensuring the wires are securely fastened.
Tighten the terminal screws using an appropriate screwdriver, ensuring a firm connection without over-tightening. A loose connection can lead to electrical hazards such as overheating or arcing.
After the wires are securely connected, double-check all connections to ensure they are tight and properly aligned. This step is crucial for preventing loose connections or potential circuit issues.
Once all the connections are secure, you can safely restore power to the panel by switching the main breaker back on. Test the circuit to ensure it is functioning properly, and if everything looks good, close the panel door.
Conclusion
By following these steps, you can confidently install a single pole 20 amp breaker in your electrical panel. Remember to exercise caution and prioritize safety throughout the installation process. Electric work can be dangerous, so if you are unsure or uncomfortable with any part of the process, it’s best to consult a professional electrician.
Securing The Breaker And Conducting A Visual Inspection
Securing the breaker properly and conducting a thorough visual inspection are crucial steps when installing a single pole 20 amp breaker. These steps ensure the breaker is safely connected to the electrical panel and minimize the risk of any installation errors that could lead to future problems or safety hazards. In this section, we will discuss how to ensure the breaker is securely attached to the panel and how to conduct a visual inspection to check for any potential issues or mistakes in the installation.
Ensuring the breaker is securely attached to the panel
When securing the breaker to the electrical panel, it is essential to follow the manufacturer’s instructions and adhere to electrical code requirements. Here are the steps to ensure a secure attachment:
- Turn off the main power supply to the panel to avoid any electrical shocks or accidents during the installation process.
- Remove the panel cover by unscrewing the screws or bolts holding it in place. Set the cover aside in a safe location.
- Identify the slot in the panel where you will be installing the single pole 20 amp breaker. Ensure that the slot is compatible with the breaker and make any necessary adjustments if needed.
- Insert the breaker into the designated slot following the instructions provided by the manufacturer. The breaker should fit snugly and securely, without any loose connections.
- Use the appropriate screws or bolts to fasten the breaker to the panel. Make sure the screws or bolts are tightened adequately but avoid overtightening, which could damage the breaker or the panel.
Conducting a visual inspection to check for any installation errors
After securing the breaker, it is crucial to conduct a visual inspection to ensure the installation has been done correctly and to identify any potential issues or errors that could compromise the safety and functionality of the electrical system. Here are the key areas to inspect:
- Check for any loose or exposed wires connected to the breaker. All wires should be securely fastened and properly insulated.
- Inspect the connections between the breaker and the panel for any signs of damage or overheating, such as melted insulation or discoloration.
- Ensure that all screws or bolts used to secure the breaker are tightened properly.
- Verify that there are no loose parts or debris inside the panel that could interfere with the breaker or cause a short circuit.
- Make sure there are no visible signs of water damage or moisture inside the panel, as this could pose a significant safety risk.
- Double-check the breaker’s rating to ensure it matches the electrical load it will be handling. Using an incorrect breaker could lead to overheating and potential damage to the electrical system.
By securing the breaker properly and conducting a thorough visual inspection, you can ensure a safe and reliable installation of a single pole 20 amp breaker. These steps not only minimize the risk of electrical hazards but also help maintain the overall integrity and efficiency of the electrical system.
Testing The Breaker And Restoring Power
After successfully installing a single pole 20 amp breaker, your next step is to test the breaker and restore power to your electrical circuit. This crucial step ensures that the breaker is functioning correctly and that your electrical system is safe to use. In this section, we will guide you through the process of turning the power back on and testing the functioning of the breaker, as well as troubleshooting common issues that may arise.
Turning the power back on
To turn the power back on, follow these simple steps:
- Locate the main power panel in your home or building. It is usually found in a basement, garage, or utility room.
- Open the panel door by unscrewing or unlatching it. Be cautious as the wires and components inside may still be live with electricity.
- Locate the breaker switch labeled with the corresponding circuit that you installed the single pole 20 amp breaker on. It should be in the “off” position.
- Slowly flip the breaker switch to the “on” position. You may hear a click as it engages.
- Ensure that the breaker switch remains in the “on” position without tripping back to the “off” position.
Testing the functioning of the breaker
Once the power is restored, you need to test the functioning of the breaker to ensure it is working as intended. Follow these steps:
- Identify the circuit or outlet that is connected to the breaker you just installed. This could be a specific room, appliance, or a group of outlets.
- Plug in a small appliance or turn on a light fixture connected to the circuit.
- If the power is successfully restored and the appliance or light turns on, then congratulations! The breaker is functioning properly, and you have successfully installed a single pole 20 amp breaker.
- If the power is still not restored, or the breaker trips, indicating an electrical fault, proceed to the next section on troubleshooting common issues.
Troubleshooting common issues that may arise
While installing a single pole 20 amp breaker is generally a straightforward process, there are a few common issues that may arise. Here are the steps you can take to troubleshoot these issues:
Issue: The breaker continues to trip or does not stay in the “on” position.
Solution:
- Turn off the power by flipping the breaker switch to the “off” position.
- Inspect the wiring connections to ensure they are tight and secure. Loose connections can cause the breaker to trip or not engage properly.
- If the connections are secure, check the circuit for any signs of an electrical fault, such as damaged wires, overloaded circuits, or faulty appliances.
- If you are unable to locate or resolve the issue, it is recommended to consult a qualified electrician for further assistance.
Remember, safety should always be your top priority when working with electricity. If you are unsure or uncomfortable with any step of the installation or troubleshooting process, it is always best to seek professional help.
Safety Tips For Working With Electrical Breakers
Safety Tips for Working with Electrical Breakers
When it comes to electrical work, safety should always be your top priority. Mishandling electrical equipment can lead to severe injuries and even fatal accidents. Therefore, it is crucial to follow safety precautions to protect yourself and those around you. In this section, we will discuss general safety precautions for handling electrical equipment and the measures you should take to prevent electrical shocks and injuries during the installation of a single pole 20 Amp breaker.
General Safety Precautions for Handling Electrical Equipment
Before you begin the installation process, it is important to ensure that you take the following safety precautions to avoid any accidents or injuries:
- Always turn off the main power supply to the circuit breaker panel before starting any work.
- Use personal protective equipment (PPE) such as gloves, safety glasses, and boots to protect yourself from potential electrical hazards.
- Make sure the area around the circuit breaker panel is clear and uncluttered to provide easy access and prevent tripping hazards.
- Inspect the electrical equipment for any visible signs of damage or wear before proceeding with installation.
- Never work on electrical equipment with wet hands or in damp conditions as this increases the risk of electrical shock.
- Avoid wearing loose-fitting clothing or jewelry that could become entangled in the equipment.
- Keep a fire extinguisher nearby in case of any electrical fires.
Measures to Prevent Electrical Shocks and Injuries During Installation
When installing a single pole 20 Amp breaker, it is essential to take the necessary precautions to prevent electrical shocks and injuries. Follow these measures to ensure a safe installation process:
- Double-check that the main power is off before working on the breaker panel. Use a non-contact voltage tester to verify that there is no electricity flowing through the panel.
- Securely lock out and tag the circuit breaker to alert others that work is being done on the panel.
- Avoid using metal tools or wearing conductive footwear when working with the electrical equipment.
- When connecting wires to the breaker, ensure that they are properly stripped and free from any damage.
- Follow the manufacturer’s instructions and guidelines for the installation process.
- Check that the breaker is compatible with the electrical load and wiring gauge before installing it.
- Tighten all connections securely and avoid over-tightening, which can damage the breaker.
- After installation, carefully test the breaker to ensure it is functioning correctly.
- If you face any difficulties or uncertainties during the installation process, it is recommended to seek professional assistance.
By adhering to these safety tips and precautions, you can minimize the risks associated with working on electrical breakers and ensure a safe installation process. Remember, when it comes to electricity, prioritizing safety is the key to avoiding accidents and injuries.
Frequently Asked Questions
What Is A Single Pole 20 Amp Breaker Used For?
A single pole 20 amp breaker is used to protect electrical circuits in residential homes and commercial buildings. It ensures that the flow of electrical current does not exceed 20 amps, preventing overloading and potential fires.
How Do You Install A One Pole Breaker?
To install a one pole breaker, follow these steps: 1. Turn off the main power supply. 2. Remove the panel cover. 3. Identify an available slot for the breaker. 4. Align the breaker’s tab with the panel’s bus bar. 5.
Push the breaker into place until it snaps. Make sure it is secure. 6. Reinstall the panel cover and restore power.
What Happens If You Put A 20 Amp Breaker On 14 Gauge Wire?
Using a 20 amp breaker with 14 gauge wire can be dangerous. The wire may overheat, causing a fire risk. It’s important to use the correct size breaker for the wire to prevent this from happening.
Does A 20 Amp Unit Need A Single Pole Breaker?
Yes, a 20 amp unit requires a single pole breaker.
Conclusion
Installing a single pole 20 amp breaker is a simple task that can greatly enhance the safety and efficiency of your electrical system. By following the steps outlined in this blog post, you can confidently tackle this project on your own.
Remember to adhere to electrical codes and safety precautions to ensure your installation is done correctly. With the detailed instructions and helpful tips provided, you’ll be well-equipped to successfully complete this task and have peace of mind in your electrical set-up.