To install a roof vent on a metal roof, start by measuring the area where the vent will be installed. Then, mark the area, cut the hole in the roof, apply roofing sealant around the edges of the hole, and secure the vent in place with screws.
Choosing The Right Roof Vent
Installing a roof vent on a metal roof is crucial for maintaining a properly ventilated and comfortable living space. A roof vent helps expel hot air and moisture from the attic, preventing damage to the roof and improving energy efficiency. But with so many options available, choosing the right roof vent can be overwhelming. In this section, we will explore the different types of roof vents and the important considerations to keep in mind when installing one on a metal roof.
Different Types of Roof Vents
When it comes to roof vents, there are several options to choose from, each offering unique benefits. Here are three common types of roof vents:
Ridge Vents
Ridge vents are installed along the peak of the roof and provide continuous ventilation along the entire roofline. These vents are commonly made of metal or durable plastic and blend seamlessly with the roof’s design. Ridge vents are highly effective in creating a balanced airflow and are particularly suitable for metal roofs, as they work well with the roof’s ridges and valleys.
Box Vents
Box vents, also known as static vents or turtle vents, are installed near the roof’s ridge or other high points. They are typically square or rectangular in shape and provide adequate ventilation by allowing air to passively escape through the top portion of the vent. Box vents are a cost-effective option and are compatible with metal roofs. However, they may not be as effective as ridge vents in areas with low wind flow.
Turbine Vents
Turbine vents, also called whirlybirds, are wind-powered vents that rotate as wind blows over them. As the turbines spin, they create suction, drawing hot air and moisture out of the attic. Turbine vents are highly effective in areas with consistent wind flow, making them a popular option for regions with strong breezes. Though turbine vents can be used on metal roofs, their spinning motion may cause additional wear and tear on the roof’s surface.
Considerations for Installing a Roof Vent on a Metal Roof
When installing a roof vent on a metal roof, there are a few important considerations to keep in mind:
Compatibility with Metal Roofing Materials
Ensure that the roof vent you choose is specifically designed for metal roofs. Metal roof vents are typically made of materials that are resistant to corrosion and can withstand the unique challenges of metal roofing, such as expansion and contraction due to temperature changes.
Roof Pitch
Consider the pitch or slope of your metal roof when selecting a roof vent. Different types of vents may have specific requirements regarding the pitch angle they can effectively ventilate.
Ventilation Requirements
It is essential to determine the ventilation requirements of your attic space. The size, location, and number of roof vents needed will depend on the size and layout of your attic, the volume of air you need to move, and local building codes. Consult a professional roofer or building contractor to determine the proper ventilation requirements for your metal roof.
By carefully selecting the right roof vent and considering these important factors, you can ensure optimal ventilation and longevity for your valuable metal roof.
Gathering The Necessary Tools And Materials
Installing a roof vent on a metal roof is an essential step in ensuring proper ventilation and preventing moisture buildup in your home. Before getting started, it’s important to gather all the necessary tools and materials to make the installation process smooth and efficient. Here are the essential tools and materials you’ll need:
Essential Tools for the Installation
When it comes to installing a roof vent on a metal roof, having the right tools is crucial. Here are the essential tools you’ll need:
- Tape Measure: Before beginning the installation process, it’s important to measure the area where the roof vent will be placed accurately. A tape measure will help you get precise measurements, ensuring a proper fit.
- Drill: To secure the roof vent to the metal roof, you’ll need a drill. Make sure to use a drill bit suitable for metal to create the necessary holes for the installation.
- Roofing Nails: Roofing nails are essential for securing the flashing and roof vent to the metal roof. Opt for nails specifically designed for roofing purposes to ensure durability and proper installation.
- Caulking Gun: A caulking gun is necessary for applying roofing sealant and adhesive. It allows for precise application, creating a secure and watertight seal.
- Flashing: Flashing is an important component of the roof vent installation. It helps redirect water away from the vent area and prevents leaks. Ensure you have the necessary flashing specifically designed for metal roofs.
Required Materials
In addition to the essential tools, you’ll also need the following materials for a successful roof vent installation:
- Roof Vent: The roof vent itself is a critical component. Choose a vent specially designed for metal roofs, ensuring proper airflow and ventilation.
- Roofing Screws: To secure the flashing and roof vent to the metal roof, you’ll need roofing screws. These screws should be resistant to corrosion and provide a secure attachment.
- Roofing Cement: Roofing cement is used to seal any gaps or joints, ensuring a watertight installation. Look for a cement specifically formulated for metal roofs.
- Metal Roofing Sealant: A quality metal roofing sealant will help create a durable and weatherproof seal between the roof vent and the metal roof.
- Roofing Tape: Roofing tape can provide an additional layer of protection against water intrusion. It is applied around the edges of the roof vent and helps create a tight seal.
By gathering all these essential tools and materials before starting the installation process, you’ll be well-prepared to tackle the task at hand. Remember to prioritize safety and follow all manufacturer instructions for both the tools and materials used.
Preparing The Roof For Vent Installation
Installing a roof vent on a metal roof can help improve ventilation and air circulation in your home. Before you begin the installation process, it’s crucial to prepare the roof properly to ensure a secure and long-lasting vent installation. In this section, we’ll discuss the essential steps to prepare your metal roof before installing a roof vent.
Measuring and Marking the Vent Location
The first step in preparing your roof for vent installation is to measure and mark the vent’s location. Careful measurements are vital to ensure proper positioning and spacing of the vent. Use a tape measure to determine the optimal placement for the vent, considering factors such as roof slope and nearby obstacles. Once you have identified the ideal location, mark it clearly with a pencil or marker.
Determining the Ideal Position
After marking the vent location, it’s crucial to determine the ideal position for the vent on your metal roof. This involves considering the roof’s structural composition, as well as the desired airflow and ventilation in your home. Take into account the roof’s ridges, valleys, and any other architectural elements that may affect the placement of the vent. Finding the optimal position ensures that the vent functions effectively and blends seamlessly with the roof’s aesthetics.
Ensuring Proper Vent Spacing
Proper vent spacing is essential for optimal airflow and ventilation. Depending on the type and size of the vent, there may be specific requirements for spacing between vents. Check the manufacturer’s specifications to determine the recommended spacing for your vent. Ensure that the vents are evenly spaced throughout the roof to achieve balanced air circulation.
Preparing the Roof Surface
Preparing the surface of your metal roof is crucial for a secure and watertight vent installation. Start by cleaning the area around the marked vent location to remove any dirt, debris, or loose materials. You can use a broom or a soft brush to sweep away any accumulated debris. This step is essential to create a clean surface for applying roofing sealant.
Cleaning the Area
Before applying roofing sealant, it’s important to clean the area around the vent location. Use a mild detergent and water solution to remove any stubborn dirt, grease, or grime. Scrub the area gently with a soft brush to ensure a clean and smooth surface. Rinse the area thoroughly with clean water and allow it to dry completely before proceeding with the vent installation.
Removing any Obstacles
Inspect the area around the vent location for any potential obstacles that may hinder the installation process. Remove any loose or protruding nails, screws, or other objects that could interfere with the vent’s proper placement or seal. Clearing the area of obstacles ensures a smooth and secure vent installation.
Applying Roofing Sealant
Before installing the vent, apply roofing sealant around the marked location on your metal roof. Roofing sealant helps create a watertight seal and prevents any water penetration. Follow the manufacturer’s instructions to apply the sealant properly. Ensure that the sealant is evenly distributed and covers the area around the vent location.
By following these essential steps to prepare your roof for vent installation, you can ensure a successful and long-lasting installation of a roof vent on your metal roof. Proper preparation plays a crucial role in the functionality and durability of the ventilation system in your home.
Installing The Roof Vent
Installing the Roof Vent
When it comes to installing a roof vent on a metal roof, it’s important to follow the proper steps to ensure a secure and watertight fit. One of the first steps in this process is cutting an opening in your metal roof to accommodate the vent. Using the appropriate tools, measuring and marking the opening, and properly attaching the vent to the roof are all crucial steps in this process. Additionally, securing the vent with roofing screws, applying roofing cement, and installing flashing are essential for preventing leaks. Finally, proper placement and alignment, as well as sealing with roofing cement, will provide the finishing touches to a successful installation.
1. Cutting an Opening
The first step in installing a roof vent on a metal roof is cutting an opening in the desired location. This can be done using a jigsaw or reciprocating saw with a metal blade. Ensure that the size of the opening matches the specifications provided by the vent manufacturer.
2. Using the Appropriate Tools
When working with a metal roof, it’s important to use the appropriate tools to avoid damaging the material. A jigsaw or reciprocating saw with a metal-cutting blade is ideal for cutting the opening, while a cordless drill with a metal drilling bit will come in handy for attaching the vent and securing it with roofing screws.
3. Measuring and Marking the Opening
Before cutting the opening, it’s essential to measure and mark the area accurately. Use a tape measure to determine the dimensions of the cutout, taking into consideration any overlapping flanges or brackets that may be present on the vent.
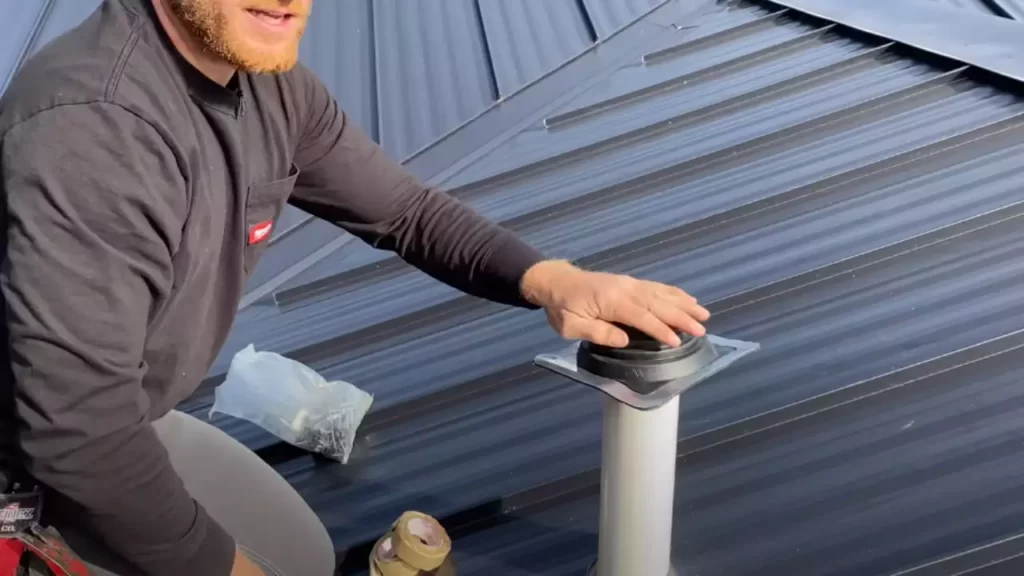
4. Attaching the Vent to the Roof
Once the opening has been cut, it’s time to attach the vent to the roof. Position the vent over the cutout, ensuring that it is centered properly. Use roofing screws or a compatible fastening system provided by the manufacturer to secure the vent to the metal roof.
5. Securing the Vent with Roofing Screws
To ensure a secure attachment, it’s important to use roofing screws that are specifically designed for metal roofs. These screws are typically self-tapping and have neoprene washers to provide a watertight seal. Place the screws in the pre-drilled holes on the vent flange and tighten them using a cordless drill.
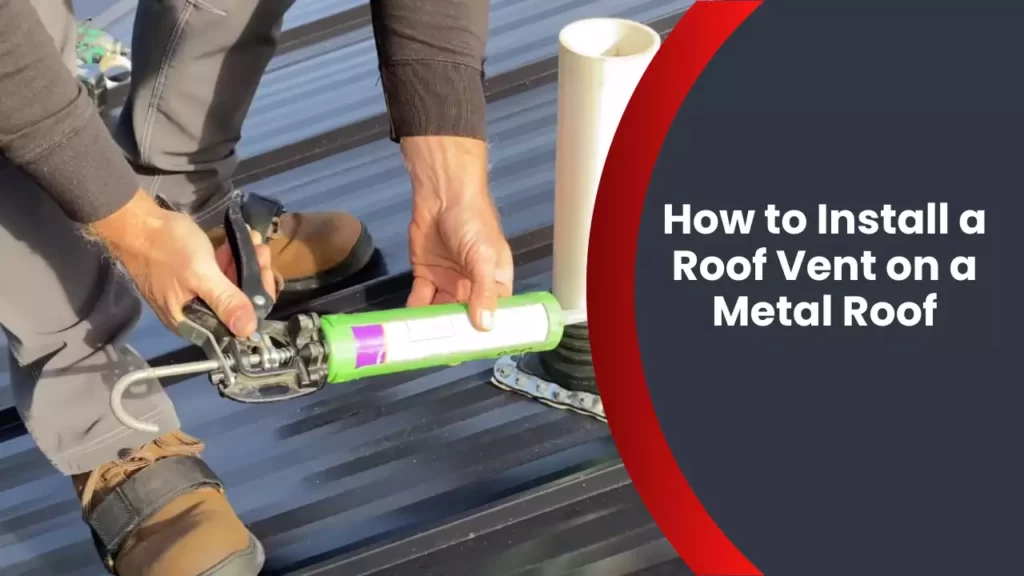
6. Applying Roofing Cement
After securing the vent with roofing screws, it’s recommended to apply roofing cement around the edges of the vent flange. This will provide an extra layer of protection against water infiltration and help to create a watertight seal.
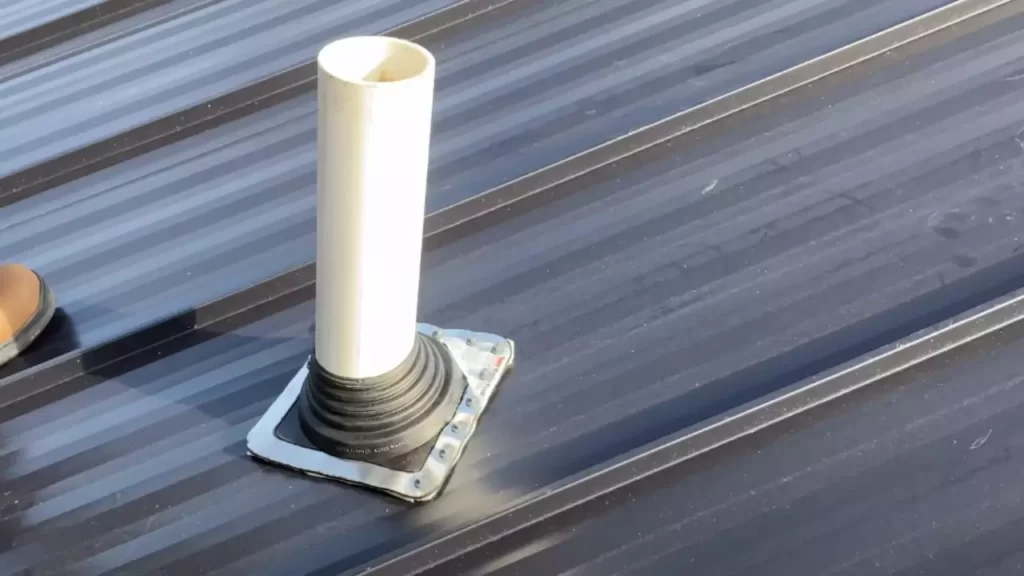
7. Installing Flashing
To further enhance the waterproofing of the roof vent installation, it’s essential to install flashing. Flashing is typically made of galvanized steel or aluminum and is placed around the vent to divert water away from the opening. Secure the flashing with roofing screws and apply roofing cement to seal any gaps.
8. Proper Placement and Alignment
Proper placement and alignment of the roof vent are crucial for its optimal functionality and longevity. Ensure that the vent is positioned in a location that allows for proper airflow and ventilation. Align the vent with the roof pitch to maximize its effectiveness in expelling hot air and moisture.
9. Sealing with Roofing Cement
To complete the installation, seal any gaps or exposed edges of the vent and flashing with roofing cement. Apply a generous amount of roofing cement around the perimeter of the vent and smooth it out using a putty knife or your fingers. This will provide an additional layer of protection against water penetration and ensure a secure and watertight seal.
In conclusion, installing a roof vent on a metal roof requires careful attention to detail to ensure a proper fit and prevent leaks. By following the steps outlined above, you can successfully install a roof vent and enhance the ventilation and durability of your metal roof. Remember to use the appropriate tools, measure and mark the opening accurately, secure the vent with roofing screws, apply roofing cement, install flashing, and properly align and seal the vent to achieve the best results.
Securing And Insulating The Vent
Securing and insulating the vent is a crucial step in installing a roof vent on a metal roof. This ensures that the vent is properly sealed and prevents any potential leaks or gaps that could compromise the roof’s integrity. In this section, we will discuss the essential techniques for sealing gaps and leaks, applying metal roofing sealant, using roofing tape, insulating the vent, choosing the right insulation material, and proper installation techniques.
Sealing Gaps and Leaks
Sealing gaps and leaks is vital to prevent any water or moisture from entering your home through the vent. It is necessary to thoroughly inspect the area around the vent for any gaps or openings that might exist. And to ensure a proper seal, follow these steps:
- Remove any debris, such as dirt or old sealant, from the area around the vent.
- Apply a bead of metal roofing sealant along the edges of the vent, making sure to cover any gaps or openings.
- Smooth out the sealant using a putty knife to ensure a tight and secure seal.
- Allow the sealant to dry completely before moving on to the next step.
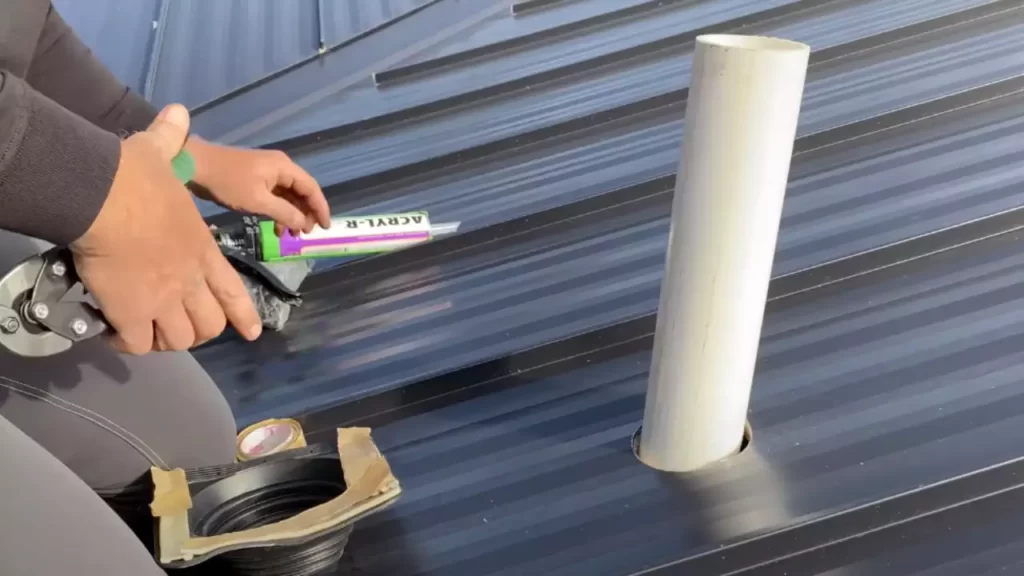
Applying Metal Roofing Sealant
Applying metal roofing sealant is an effective way to create a watertight barrier around the vent. Follow these steps to apply the sealant correctly:
- Clean the area around the vent to remove any dirt or debris.
- Using a caulking gun, apply a generous amount of metal roofing sealant around the base of the vent, ensuring it covers the edges completely.
- Smooth out the sealant using a putty knife to create an even and durable seal.
- Allow the sealant to dry thoroughly before continuing with the installation process.
Using Roofing Tape
Roofing tape provides an additional layer of protection against water and moisture, especially in areas prone to heavy rainfall or snowfall. To use roofing tape:
- Clean the surface around the vent to remove any dirt or debris.
- Measure and cut the roofing tape to match the length of the vent.
- Apply the roofing tape along the edges of the vent, ensuring it covers any gaps or openings.
- Press down firmly to ensure proper adhesion.
Insulating the Vent
Properly insulating the vent is essential to enhance energy efficiency and prevent heat loss or gain. Here are the necessary steps to insulate the vent:
- Choose the right insulation material based on your needs and the climate you live in.
- Measure and cut the insulation material to fit around the vent.
- Attach the insulation material securely using metal clips or fasteners.
- Seal any gaps or openings with metal roofing sealant or roofing tape to ensure a tight seal.
Choosing the Right Insulation Material
Choosing the right insulation material plays a significant role in the overall effectiveness of your roof vent. Consider factors such as insulation R-value, moisture resistance, and ease of installation when selecting insulation material. Some commonly used options include:
- Fiberglass insulation
- Spray foam insulation
- Cellulose insulation
- Mineral wool insulation
Proper Installation Techniques
Proper installation techniques are crucial for the long-term performance and durability of your roof vent. Follow these steps to ensure a successful installation:
- Refer to the manufacturer’s instructions for specific installation guidelines.
- Take proper safety measures, such as wearing protective gear and using secure ladders or scaffolding.
- Align the vent properly and secure it using appropriate fasteners or screws.
- Apply sealing techniques discussed earlier, such as metal roofing sealant or roofing tape, to ensure a tight seal.
- Regularly inspect and maintain the vent to prevent any potential issues in the future.
By following these securing and insulation techniques, you can confidently install a roof vent on your metal roof, ensuring proper functionality and protection for your home.
Testing The Ventilation
Installing a roof vent on a metal roof is a great way to improve the airflow and ventilation in your home or building. However, it’s essential to test the ventilation system to ensure it’s working effectively. By doing so, you can detect any issues or blockages early on and maintain proper ventilation over time. In this section, we’ll explore some simple yet effective methods to test the ventilation of your roof vent.
Checking for Proper Airflow
The first step in testing the ventilation is to check for proper airflow. This can be done by simply feeling the air coming out of the vent. Stand beneath the vent and place your hand near the opening.
-
Check if you can feel a steady stream of air coming out. If the airflow is weak, it could indicate a blockage or an issue with the vent.
-
If the airflow seems insufficient, try removing any external obstructions like debris or nests that might be obstructing the vent.
-
If the airflow remains weak, you may need to consult a professional to inspect and troubleshoot the problem.
Using Smoke or a Paper Test
An effective way to determine if your roof vent is working properly is by conducting a smoke or paper test. Here’s how you can do it:
-
Light a small piece of smoke-producing material, such as incense or a smoke pellet.
-
Hold it near the roof vent and observe the smoke’s direction. It should be pushed out of the vent if the ventilation is functioning correctly.
-
If the smoke is not being pushed out or is being redirected, it could indicate a blockage or an issue with the vent.
-
You can also perform a paper test by holding a thin strip of paper near the vent. The paper should be drawn towards the vent if it is working effectively.
Detecting any Issues or Blockages
To ensure proper ventilation, it’s important to detect and address any issues or blockages in your roof vent. Regular inspections will help you identify potential problems before they worsen. Here are a few things to keep in mind:
-
Check for any signs of damage or wear on the vent itself. Look for cracks, loose seals, or rust.
-
Inspect the surrounding area for debris, such as leaves or branches, that could obstruct the vent.
-
Examine the vent pipe for any signs of blockages or obstructions.
-
If you notice any issues, contact a professional roofer to address the problem.
Monitoring and Maintaining the Ventilation
Once you’ve installed a roof vent and tested its ventilation, it’s essential to keep it well-maintained for optimum performance. Here are a few tips to help you monitor and maintain the ventilation:
-
Regularly inspect the vent for any signs of damage, corrosion, or blockages. This should be done at least once a year.
-
Clear any debris that accumulates on or near the vent regularly. This will prevent blockage and ensure proper airflow.
-
If you live in an area with heavy snowfall, consider installing a snow guard or a snow deflector to prevent snow buildup on the vent.
Regular Inspections
Regular inspections are the key to maintaining a well-functioning roof vent. Make it a habit to inspect your vent at least once a year, preferably during the spring or fall seasons. This way, you can address any issues or blockages before they lead to more significant problems.
Cleaning the Vent
To keep your roof vent in optimal condition, regular cleaning is necessary. Here’s a simple process to clean your vent:
-
Using a ladder, access the roof and carefully remove any debris or obstructions from the vent. You can use a brush or a leaf blower to do this.
-
Inspect the vent for any signs of damage or wear. Look for cracks, loose screws, or worn seals.
-
If necessary, use a mild detergent mixed with water to clean the vent and remove any stubborn dirt or grime.
-
Rinse the vent thoroughly with water and ensure it is completely dry before reassembling it.
By following these guidelines for testing and maintaining your roof vent’s ventilation, you can enjoy a well-ventilated and comfortable living or working space. Remember, if you encounter any significant issues or are unsure about the installation or maintenance process, it’s always best to seek professional assistance.
Frequently Asked Questions
Can You Put Roof Vents In A Metal Roof?
Yes, it is possible to install roof vents in a metal roof. Roof vents help ventilate attics and reduce heat buildup. They can be installed in metal roofs to improve airflow and prevent moisture buildup, maintaining a comfortable indoor environment.
Can A Ridge Vent Be Installed On An Existing Metal Roof?
Yes, a ridge vent can be installed on an existing metal roof.
What Is The Best Way To Vent A Metal Roof?
The best way to vent a metal roof is by using ridge vents. These vents are installed at the peak of the roof and allow hot air to escape while drawing in fresh air through soffit vents. This helps to regulate temperature and moisture levels, prolonging the lifespan of the roof.
Should A Metal Roof Be Vented?
Yes, a metal roof should be vented. Ventilation helps to prevent moisture buildup, reduce heat transfer, and extend the lifespan of the roof. It allows air to circulate, reducing the risk of condensation and potential damage to the roof structure.
Vented metal roofs are more energy-efficient and help maintain a comfortable indoor environment.
Conclusion
Installing a roof vent on a metal roof is a simple and effective way to improve ventilation in your home and protect it from moisture damage. By following the step-by-step instructions provided in this blog post, you can ensure a successful installation.
Remember to choose the right type of vent, prepare the area properly, and use appropriate tools and materials. With proper installation, your metal roof vent will provide many benefits for years to come. So, get started today and enjoy a better, healthier living environment.