To install a ridge cap on a metal roof, follow these steps: first, clean the roof surface thoroughly, then apply a bead of roofing sealant along the ridge line. Position the ridge cap over the sealant and secure it in place with screws.
Installing a ridge cap on a metal roof is an essential step in completing the roof installation process. A ridge cap is a protective cover that goes over the peak of the roof, providing weatherproofing and enhancing the aesthetics of the roof.
By following a few simple steps, you can ensure a proper and secure installation of the ridge cap. We will guide you through the process of installing a ridge cap on a metal roof, ensuring the durability and longevity of your roofing system.
Tools And Materials Needed
When it comes to installing a ridge cap on a metal roof, having the right tools and materials is essential. This ensures a smooth and successful installation process. Here is a detailed list of the tools and materials you will need:
List of tools required for the installation process
- A ladder: A sturdy ladder is necessary to safely access the roof.
- Safety harness: Don’t forget to wear a safety harness to prevent accidents and falls.
- Tape measure: This tool helps you accurately measure the length of the ridge cap.
- Straight edge: Use a straight edge to ensure the ridge cap is aligned properly.
- Tin snips: Tin snips are useful for cutting the ridge cap to the required length.
- Power drill: A power drill makes it easier to create pilot holes for the fasteners.
- Screwdriver or screw gun: Use a screwdriver or screw gun to secure the ridge cap in place.
- Roofing hammer: A roofing hammer is handy for driving nails or fasteners into the metal.
- Roofing felt: This material acts as a barrier between the metal roof and the ridge cap, providing extra protection against leaks.
List of materials required for the installation process
- Ridge cap: Choose a ridge cap that matches the style and color of your metal roof.
- Screws or nails: Use screws or nails specifically designed for metal roofing to secure the ridge cap.
- Ridge vent: If your metal roof requires ventilation, consider installing a ridge vent along with the ridge cap.
- Caulk or sealant: Apply caulk or sealant to seal any gaps or seams, preventing water leakage.
- Roofing cement: Roofing cement is used to secure the roofing felt in place.
- Protective gloves: Wear protective gloves to protect your hands during the installation process.
- Safety glasses: Safeguard your eyes with safety glasses to prevent any debris from causing injuries.
With these tools and materials at your disposal, you’ll be well-prepared to install a ridge cap on your metal roof. Remember to take all necessary safety precautions and follow the manufacturer’s instructions for best results.
Preparing The Roof For Installation
Preparing the roof for installation is an essential step in ensuring a successful and long-lasting ridge cap on your metal roof. By taking the time to inspect the roof for any damage or loose elements and cleaning the roof surface before installation, you can create a solid foundation for the ridge cap. Below, we will outline the necessary steps for preparing your metal roof for ridge cap installation.
Inspecting the metal roof for any damage or loose elements
Before proceeding with the installation, it is important to inspect the metal roof for any damage or loose elements. This step ensures that you have a stable structure to attach the ridge cap to and prevents any future issues with the roof. Consider these key points as you inspect your metal roof:
- Look for any visible damage such as cracks, dents, or rust. These can compromise the integrity of the roof and may need to be repaired before installing the ridge cap.
- Check for any loose screws, nails, or other fasteners. Tighten or replace them as necessary to secure the metal roof panels in place.
- Inspect the sealant around any roof penetrations, such as vents or chimneys. Make sure they are intact and in good condition.
Cleaning the roof surface before installation
Prior to installing the ridge cap, it is crucial to clean the roof surface thoroughly. This ensures proper adhesion between the roof and the ridge cap, promoting a strong and durable bond. Follow these steps to clean the roof surface effectively:
- Start by removing any loose debris, such as leaves, branches, or dirt, from the roof. Use a broom or a leaf blower to clear off the surface.
- Next, use a mild detergent mixed with water to wash any stubborn dirt or stains. Apply the solution using a soft-bristle brush or a low-pressure power washer, working in small sections.
- Rinse the roof thoroughly with clean water to remove any soap residue or remaining dirt.
- Allow the roof surface to dry completely before proceeding with the installation. This prevents moisture from becoming trapped between the roof and the ridge cap.
By thoroughly inspecting the metal roof and cleaning the roof surface, you have prepared your roof for the installation of the ridge cap. These steps ensure a solid foundation and promote the longevity of your metal roof. With a well-prepared roof, you can confidently move forward with the installation process, knowing that your ridge cap is securely attached and protected.
Measuring And Cutting The Ridge Cap
Determining the length of the ridge cap required
Before you can start installing a ridge cap on your metal roof, it’s important to determine the correct length of the ridge cap needed for your project. These measurements will ensure a precise fit and a professional-looking finish.
The first step is to measure the length of the ridge of your roof. To do this, you’ll need to get up on the roof and use a measuring tape to measure from one end of the ridge to the other. Make sure to account for any overhang on either side, as the ridge cap will need to cover these areas as well. Write down this measurement, as it will be used to cut the ridge cap to size later.
Using appropriate tools to cut the ridge cap to size
Once you have determined the length of the ridge cap required, it’s time to cut the ridge cap to size. To do this, you will need a few specific tools to ensure a clean and accurate cut.
The primary tool you will need is a metal-cutting saw with fine-tooth blades. This type of saw is designed to cleanly cut through metal without causing any damage to the material. Make sure to wear appropriate safety gear, such as goggles and gloves, when operating the saw to protect yourself from any potential injuries.
Before making any cuts, it’s essential to mark the ridge cap with precise measurements. Use a pencil or a marker to make a line across the ridge cap, indicating the length you measured earlier. Ensure that the line is straight and clearly visible. This will serve as your guideline when cutting the ridge cap to size.
Once marked, carefully place the ridge cap on a stable surface, such as a workbench or sawhorses. Make sure the ridge cap is securely positioned before you start cutting. Align the marked line with the cutting edge of the saw and slowly and steadily guide the saw along the line, applying even pressure.
Remember, it’s important to take your time during this process to avoid any mistakes or uneven cuts. If your ridge cap is longer than the length you measured, it’s better to trim off a little at a time until it fits perfectly, rather than cutting off too much at once and ending up with a ridge cap that is too short.
After cutting the ridge cap to size, inspect the edges for any sharp or jagged areas. If necessary, use a metal file or sandpaper to smooth out any rough edges. This will help ensure a neat and professional-looking installation.
Following these steps will help you measure and cut the ridge cap accurately, resulting in a secure and visually appealing final touch to your metal roof.
Attaching The Ridge Cap To The Metal Roof
When you are installing a ridge cap on a metal roof, properly attaching it is crucial to ensure a secure and durable finish. This step-by-step guide will walk you through the process, from selecting the right type of fasteners to aligning and securing the ridge cap to the metal roof.
Choosing the Right Type of Fasteners for the Installation
When it comes to attaching the ridge cap to a metal roof, using the right type of fasteners is essential for a successful installation. There are several options available, but it’s important to select ones that are compatible with both the ridge cap material and the metal roofing panels.
Some commonly used fasteners for attaching ridge caps to metal roofs include:
- Screws: Self-tapping metal screws are a popular choice for attaching ridge caps. They have a sharp point and threads designed to penetrate the metal panels, providing a secure grip.
- Rivets: Another option is using rivets, which are durable and offer excellent holding power. They require a rivet gun for installation.
Before you proceed, make sure to check the manufacturer’s recommendations or consult with a roofing professional to determine the best type and size of fasteners for your specific metal roof and ridge cap materials.
Selecting the Appropriate Spacing for Attaching the Ridge Cap
Proper spacing is crucial when attaching the ridge cap to the metal roof. It is important to space the fasteners evenly to distribute the load and ensure a secure attachment. The spacing requirements may vary depending on the manufacturer’s guidelines, the ridge cap profile, and local building codes.
Here are a few key points to consider:
- Refer to the manufacturer’s instructions: The manufacturer’s guidelines will provide the recommended spacing for attaching the ridge cap. Always follow these instructions for optimal results.
- Consider local building codes: Check your local building codes or consult with a roofing professional to determine if there are any specific requirements for ridge cap attachment in your area.
- Evenly distribute the fasteners: To ensure the ridge cap is securely attached, space the fasteners evenly along the length of the ridge cap. This helps prevent any potential stress points.
Properly Aligning and Securing the Ridge Cap to the Metal Roof
Proper alignment and secure installation of the ridge cap are essential to achieve a professional-looking finish and ensure weather-tightness. Follow these steps to properly align and secure the ridge cap:
- Carefully position the ridge cap: Place the ridge cap on top of the roof, aligning it with the ridge line. Ensure it is centered and evenly overhangs both sides of the roof.
- Secure the ridge cap: Starting from one end, use the chosen fasteners to secure the ridge cap to the metal roof. Again, ensure even spacing and drive the fasteners through the pre-drilled holes provided in the ridge cap and into the metal roofing panels.
- Continue along the length of the ridge cap: Move along the length of the ridge cap, attaching it securely with the chosen fasteners. Take care to maintain alignment and spacing consistency.
- Check for proper attachment: Once the installation is complete, walk along the ridge cap to ensure all fasteners are securely in place. Double-check the alignment and spacing to make sure everything is properly attached.
By selecting the right type of fasteners, spacing them appropriately, and properly aligning and securing the ridge cap to the metal roof, you can achieve a professional-looking and long-lasting installation. Following these guidelines will help ensure that your metal roof and ridge cap provide reliable protection and add aesthetic appeal to your structure.
Sealing And Waterproofing
When it comes to the installation of a ridge cap on a metal roof, one of the crucial steps is sealing and waterproofing. This is essential to protect your roof from potential leaks and water damage. In this section, we will discuss two important techniques to ensure proper sealing and waterproofing: applying a sealant to prevent water penetration and utilizing flashing or waterproofing techniques for added protection. By following these guidelines, you can safeguard your metal roof and extend its lifespan.
Applying a Sealant to Prevent Water Penetration
Applying a high-quality sealant is a vital step in preventing water penetration through the ridge cap. This sealant creates a barrier between the metal roof and the ridge cap, preventing water from seeping through gaps or holes. Here’s how you can apply a sealant effectively:
- Start by cleaning the ridge cap and the areas where it will be attached to the metal roof. Remove any dirt, dust, or debris that could hinder proper adhesion.
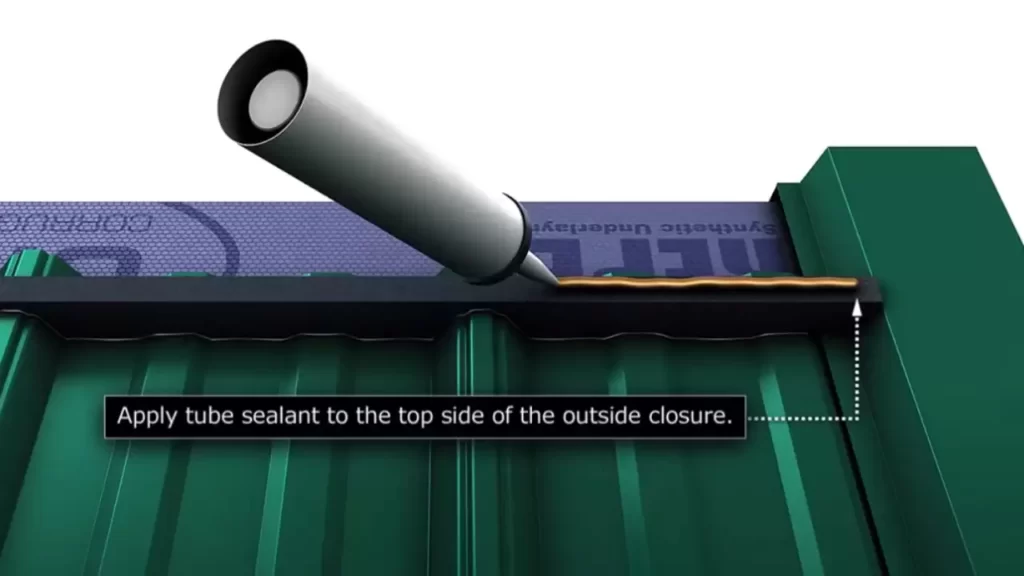
- Using a caulking gun, apply a generous layer of roofing sealant along the length of the ridge cap. Make sure to pay extra attention to the joints and seams to create a watertight seal.
- Smooth out the sealant using a putty knife or a specialized tool designed for this purpose. This will ensure an even distribution of the sealant and eliminate any air pockets.
- Allow the sealant to cure according to the manufacturer’s instructions. This may take anywhere from a few hours to a couple of days, depending on the specific product.
Utilizing Flashing or Waterproofing Techniques for Added Protection
In addition to applying a sealant, incorporating flashing or waterproofing techniques can provide an extra layer of protection against water infiltration. Flashing is a thin, weather-resistant material typically made of metal or rubber that is installed around roof features, such as vents, chimneys, and skylights, to prevent water from entering the underlying structure.
Here are some important considerations when utilizing flashing or waterproofing techniques:
- Ensure that the flashing material used is compatible with both the metal roof and the ridge cap. This will guarantee proper adhesion and long-lasting protection.
- Install the flashing beneath the ridge cap, extending it along the length of the roof. This will create a barrier that redirects water away from the ridge cap, minimizing the risk of leaks.
- Secure the flashing in place by using roofing nails or screws, ensuring a tight seal. Be cautious not to damage the metal roof or the ridge cap during this process.
| Flash Material | Compatibility |
|---|---|
| Metal Flashing | Compatible with most metal roofs and ridge caps |
| Rubber Flashing | Ideal for flexible or non-metal roofs and ridge caps |
By following these sealing and waterproofing techniques, you can significantly reduce the risk of water penetration and increase the longevity of your metal roof. Remember, prevention is key when it comes to protecting your investment.
Finishing Touches And Maintenance
Once the ridge cap has been installed on your metal roof, it’s important to pay attention to the finishing touches and maintenance to keep it in optimal condition. Here are two crucial steps to follow:
Inspecting the installed ridge cap for any issues or defects
After the ridge cap has been installed, you should conduct a thorough inspection to identify any potential issues or defects. This step is essential to ensure the ridge cap provides adequate protection against leaks and other problems. To inspect the ridge cap, follow these simple steps:
- Carefully examine the ridge cap for any visible signs of damage, such as cracks, dents, or misalignments. These issues can compromise the integrity of the ridge cap and may require immediate attention.
- Check the fasteners used to secure the ridge cap in place. Ensure they are securely tightened and properly aligned. Loose or misaligned fasteners can lead to leaks and other issues.
- Inspect the sealant used along the ridge cap seams. Look for any signs of deterioration or gaps that could allow water to seep through. If any issues are detected, reapplying sealant may be necessary.
By conducting regular inspections and promptly addressing any issues, you can ensure the longevity and effectiveness of your metal roof’s ridge cap.
Cleaning and maintaining the ridge cap to extend its lifespan
To keep your ridge cap in optimum condition and extend its lifespan, regular cleaning and maintenance are key. Follow these maintenance tips:
- Clear any debris, such as leaves or branches, from the ridge cap. Accumulated debris can obstruct rainwater flow and lead to water pooling, which may cause damage over time.
- Use a soft-bristle brush or a low-pressure power washer to remove any dirt, grime, or moss that may have accumulated on the ridge cap surface. Regular cleaning helps prevent issues like discoloration and corrosion.
- Inspect the ridge cap for any signs of rust or corrosion. If any areas are affected, gently remove the rust using a wire brush and apply a metal primer and paint specifically designed for metal roofs.
- Check the sealant periodically and reapply as necessary. Over time, weather conditions and exposure to the elements can cause the sealant to deteriorate. Maintaining a secure seal prevents water infiltration and ensures the ridge cap’s effectiveness.
By incorporating these maintenance practices into your routine, you can prolong the lifespan of your metal roof’s ridge cap and enjoy its protective benefits for years to come.
Helpful Tips And Safety Precautions
If you are planning to install a ridge cap on your metal roof, it is crucial to follow some helpful tips and take necessary safety precautions. The ridge cap, which runs along the ridge of the roof, not only protects against leaks but also adds a finishing touch to the overall appearance of your roof. By ensuring a successful installation process and prioritizing safety, you can achieve a durable and visually appealing result. In this section, we will discuss some essential tips and safety precautions that you should keep in mind while working on a metal roof.
Tips for ensuring a successful installation process
Follow these tips to make sure your installation process goes smoothly:
- Measure and cut accurately: Before starting the installation, ensure you have measured the ridge accurately and cut the ridge cap accordingly. This will ensure a precise fit and prevent any gaps or overlaps.
- Use proper tools and materials: It’s important to use the right tools and materials for the installation. This includes appropriate screws, sealants, and ridge vents if required. Using high-quality materials will enhance the longevity of the ridge cap and the overall roof.
- Secure the ridge cap firmly: When installing the ridge cap, make sure each section is properly aligned and tightly secured to the roof. This will prevent any potential damage caused by strong winds or heavy rain.
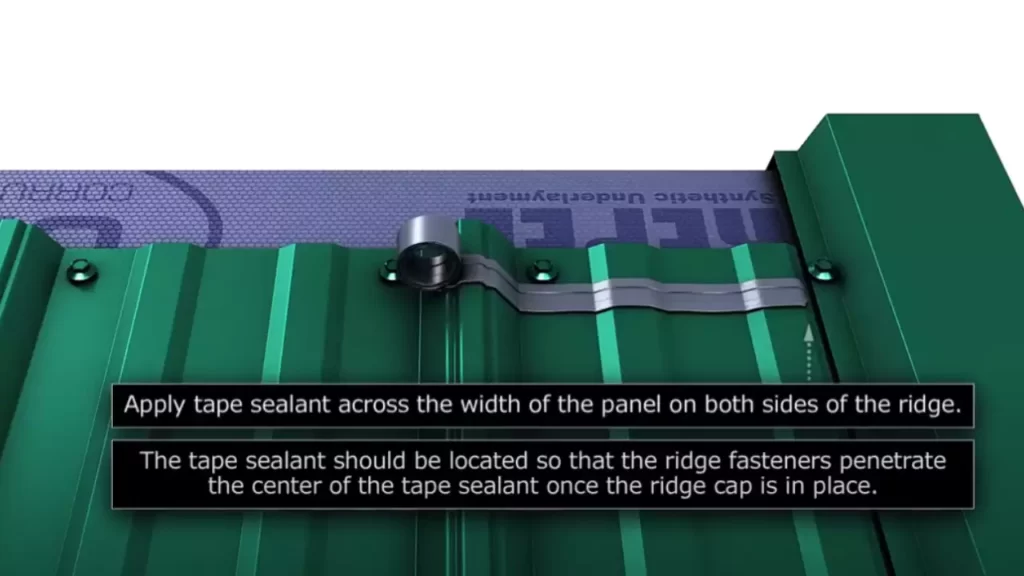
- Apply sealant correctly: Apply a generous amount of sealant between each section of the ridge cap to ensure a watertight seal. This will help in preventing any water penetration and subsequent leaks.
- Check for proper ventilation: If your metal roof requires ventilation, ensure that you have installed ridge vents along with the ridge cap. This will allow adequate airflow and help maintain optimal temperature and moisture levels in your attic or living space.
Safety precautions to consider while working on a metal roof
When working on a metal roof, safety should be a top priority. Follow these safety precautions to minimize any risks:
- Use proper safety equipment: Always wear appropriate safety gear such as gloves, non-slip shoes, and a hard hat. This will protect you from any potential injuries or falls.
- Work in favorable weather conditions: Avoid installing the ridge cap during extreme weather conditions such as high winds or rain. Working in calm and dry weather will ensure better stability and safety.
- Securely anchor yourself: Use a secure ladder and consider using a safety harness or rope to anchor yourself while working on the roof. This will provide additional stability and prevent accidental slips or falls.
- Be cautious of electrical hazards: When working near electrical lines or equipment, be aware of their presence and take necessary precautions to avoid any accidents.
- Seek professional assistance if needed: If you are unsure about any aspect of the installation process or encounter any difficulties, it is best to seek professional assistance. They have the necessary expertise and equipment to ensure a safe and successful installation.
By following these helpful tips and safety precautions, you can confidently install a ridge cap on your metal roof with a focus on both quality and safety. Prioritize these guidelines to achieve a durable and visually appealing outcome.
Frequently Asked Questions
How Do You Install A Ridge Cap On A Corrugated Metal Roof?
To install a ridge cap on a corrugated metal roof, follow these steps: 1. Position the ridge cap at the top of the roof. 2. Secure it in place with metal screws or nails, ensuring they penetrate into the roof.
3. Repeat this process along the length of the ridge, overlapping the caps to create a watertight seal. 4. Use roofing sealant on the edges for added protection. 5. Inspect for any loose screws or gaps and make necessary adjustments.
How Do You Cut A Metal Roof Ridge Cap?
To cut a metal roof ridge cap, follow these steps: 1. Measure and mark the desired length on the ridge cap. 2. Use metal cutting snips or a circular saw with a metal-cutting blade to carefully cut along the marked line.
3. Ensure proper safety precautions, such as wearing gloves and eye protection, while cutting.
How Do You Install A Ridge Cap?
To install a ridge cap, start by positioning it at the ridge of the roof and aligning it with the top edges. Secure the cap using roofing nails, placing them about 12 inches apart. Repeat the process for the entire length of the ridge.
Finally, apply roofing cement to seal the cap in place.
How Wide Should The Ridge Cap Be On A Metal Roof?
The width of the ridge cap on a metal roof depends on the type of metal roofing you have installed. It typically ranges from 8 to 12 inches. However, it’s recommended to consult with a professional roofer or the manufacturer to determine the ideal width for your specific metal roof.
Conclusion
To conclude, installing a ridge cap on a metal roof is a crucial step to ensure the durability and longevity of your roof structure. By following the steps outlined in this guide, you can confidently tackle this task and enjoy a weather-tight and secure roofing system.
Remember to prioritize safety and gather the necessary tools beforehand. With proper execution, your metal roof will be well-protected and resistant to any external elements. So, get started and enjoy the benefits of a well-installed ridge cap on your metal roof.