To install a recessed dryer vent box, first, mark the desired location on the wall and cut a hole for the box. Then, insert and secure the box into the wall using screws or adhesive.
Choosing The Right Dryer Vent Box
When it comes to installing a recessed dryer vent box, choosing the right one is crucial for ensuring efficient and safe operation. A dryer vent box not only helps to save space and streamline your laundry area but also prevents potential fire hazards and improves air ventilation. In this section, we will explore the importance of a recessed dryer vent box and discuss the key factors to consider when selecting the perfect option for your dryer.
Importance of a recessed dryer vent box
An appropriately installed recessed dryer vent box offers several advantages. Firstly, it allows the dryer to be pushed closer to the wall, creating a more streamlined and organized laundry space. Secondly, it prevents lint and moisture from accumulating in the wall cavity, reducing the risk of mold growth or damage to the surrounding structure. Lastly, a recessed dryer vent box improves the airflow efficiency of the dryer, helping it to operate more effectively and prolonging its lifespan.
Factors to consider when selecting a dryer vent box
-
Size and shape compatibility with your dryer
When choosing a dryer vent box, it is important to ensure that its dimensions and shape are compatible with your specific dryer model. This will ensure a proper fit and facilitate a smooth installation process. Measure the depth, width, and height of your dryer and compare it with the specifications of the vent box to ensure a perfect match.
-
Material durability and fire resistance
Another crucial factor to consider is the material used to construct the dryer vent box. Opt for a high-quality, durable material that is resistant to heat and fire. This will help to minimize the risk of fire hazards and ensure the longevity of the vent box. Look for options made from aluminum or stainless steel, as these materials are known for their durability and fire-resistant properties.
-
Ease of installation and maintenance
Choose a dryer vent box that offers hassle-free installation and maintenance. Look for features such as pre-drilled screw holes, clear instructions, and compatible mounting hardware. Additionally, consider a vent box that is easy to clean and maintain. This will save you time and effort in the long run and help to keep your dryer operating at its best.
By taking these factors into account, you can make an informed decision when selecting the right dryer vent box for your needs. Remember, ensuring compatibility with your dryer, opting for a durable and fire-resistant material, and prioritizing ease of installation and maintenance are key to a successful and safe installation.
Preparing For The Installation Process
When it comes to installing a recessed dryer vent box, proper preparation is key to ensure a smooth and efficient installation process. By taking the time to gather the necessary tools and materials, as well as clearing the area around the dryer, you can set yourself up for success in this project. In this section, we will discuss each step in detail, including the tools and materials required to complete the installation.
Gathering the necessary tools and materials
Before you start the installation process, it’s important to gather all the tools and materials you will need. Having everything ready and within reach will make the job easier and prevent interruptions. Here are the essential items you will need:
| Tools | Materials |
|---|---|
|
|
|
|
|
Make sure to check if your vent box kit includes all the necessary components for installation. This will ensure that you have everything you need to complete the job without any delays.
Clearing the area around the dryer
Before you begin installing the recessed dryer vent box, it’s important to clear the area around the dryer. Remove any items that may obstruct your movement or may be damaged during the installation process. Clearing the area will also provide you with the space you need to work comfortably and safely. Not only will this prevent accidents, but it will also allow for better airflow once the vent box is installed.
Shutting off the dryer and disconnecting the power
Prior to installation, it’s crucial to shut off the power to your dryer and disconnect it from the electrical supply. This step is essential for your safety and to avoid any accidental electrical shocks during the installation process. Refer to the dryer’s user manual or consult a professional if you are unsure how to properly disconnect the power.
By following these steps in preparing for the installation process, you will be well on your way to successfully installing a recessed dryer vent box. Having all the necessary tools and materials at hand, clearing the area around the dryer, and disconnecting the power will ensure a smooth and hassle-free installation.
Assessing The Wall For Installation
Determining the Location for the Vent Box
Before installing a recessed dryer vent box, it’s crucial to choose the ideal location on your wall. This ensures proper ventilation and allows for easy access when it’s time for maintenance or repairs. Here’s a simple guide on determining the location for the vent box:
1. Identify an Exterior Wall
Firstly, you need to identify an exterior wall in close proximity to your dryer. This wall should provide direct access to the outside for efficient venting. Typically, laundry rooms are positioned against an exterior wall, but for other setups, ensure that the chosen wall allows for venting without any complicated ductwork.
2. Consider the Dryer’s Location
Next, consider the dryer’s location within the laundry room and its proximity to the chosen exterior wall. Ideally, you want to place the vent box as close to the dryer as possible. This minimizes the distance the air needs to travel, which helps maintain optimal airflow and efficiency.
3. Accessibility for Maintenance
It’s crucial to ensure that the chosen location allows for easy accessibility when it comes to maintenance or repairs. Keep in mind that dryer vents require regular cleaning to prevent buildup and potential fire hazards. Choosing a location that is easily accessible will make the task much simpler.
4. Safety Considerations
Lastly, take safety considerations into account when positioning the vent box. Make sure there are no electrical wires, plumbing pipes, or other potential obstructions behind the chosen wall area. Check for clear, open space that allows for proper installation without damaging any existing infrastructure.
Measuring and Marking the Cutout Area
Once you have determined the ideal location for the recessed dryer vent box, it’s time to measure and mark the cutout area. Follow the steps below to ensure precise measurements:
1. Gather the Necessary Tools
Before you start, gather the necessary tools for accurate measurements. You’ll need a measuring tape, a level, and a pencil or marker. These tools will help ensure your cutout is perfectly aligned and true.
2. Measure the Vent Box Dimensions
Take the measurements of your recessed dryer vent box. This includes the height, width, and depth of the box. Note them down for reference during the marking process. It is essential to measure accurately to avoid any discrepancies during installation.
3. Mark the Cutout Dimensions on the Wall
Using your measuring tape and a level, mark the cutout dimensions directly on the wall. Start by measuring and marking the height of the box, ensuring it aligns perfectly with the vent box dimensions you noted earlier. Repeat this step for the width and depth of the vent box.
4. Double-Check the Measurements
Once you’ve marked the cutout dimensions, double-check your measurements to ensure accuracy. Take a step back, observe the marked area, and use the level to confirm that the lines are straight and evenly aligned. Making any necessary adjustments at this stage will save you time and effort during the actual installation process.
Checking for Any Potential Obstructions
Prior to installing the recessed dryer vent box, you need to ensure there are no potential obstructions that could hinder the process or compromise the venting efficiency. Follow these steps to check for any potential obstructions:
1. Inspect the Chosen Wall Area
Begin by inspecting the chosen wall area for any visible obstructions. Look for electrical outlets, switches, or light fixtures that might impede the installation. Ensure there is sufficient space to cut into the wall without damaging any electrical wiring or other components.
2. Locate and Identify Obstructions Behind the Wall
Using a stud finder, locate any studs, pipes, or wiring behind the wall in the marked cutout area. Mark their positions on the wall to avoid accidentally cutting or damaging them when installing the vent box. Moving any necessary wiring or pipes may require professional assistance, so consider consulting an expert if needed.
3. Check the Exterior Wall for Clearance
On the exterior side of the chosen wall, inspect for any potential obstructions as well. Look for landscaping, siding, or any other exterior elements that may interfere with the venting process. Ensure there is clear space for air to flow freely from the vent box to the outside.
4. Proceed with Installation Recommendation
If you encounter any major obstructions, it is advisable to consult a professional for guidance on how to proceed. They will be able to provide expert advice and ensure a safe and efficient installation process.
Cutting The Wall And Creating An Opening
Outlining the cutout area with a pencil
To begin the installation process of a recessed dryer vent box, the first step is to outline the area where you will be cutting the wall. Start by using a pencil to mark the desired location for the opening. Take measurements carefully to ensure accuracy and precision. Keep in mind the dimensions of the dryer vent box you will be installing for a proper fit. Take your time during this step to avoid any mistakes that could affect the overall outcome of the installation. Once you have marked the outline, you are now ready to proceed to the next step.
Using a drywall saw to carefully cut the opening
Now that you have outlined the cutout area, it’s time to grab a drywall saw. This specialized saw is designed to help you make clean and precise cuts in drywall. Begin by aligning the saw blade along the pencil markings. Remember, safety should always come first, so make sure to wear protective eyewear and gloves while using the saw. Slowly and steadily make your cuts along the marked lines, ensuring that you are staying within the outlined area. Take your time and pay attention to detail to create a smooth and straight cut. Once you have completed the cutting process, it’s time to move on to the next step.
Removing the excess drywall and ensuring a clean opening
After cutting the opening, you will have excess drywall that needs to be removed. Carefully inspect the cut edges and remove any loose or jagged pieces of drywall. You can use pliers or a utility knife to accomplish this task. Smooth out any rough edges to create a clean and neat opening for the recessed dryer vent box. Be cautious while handling the drywall as it can be fragile. It is important to ensure that the opening is free from any obstructions that could impede the installation process later on. By removing the excess drywall and ensuring a clean opening, you are now ready to proceed to the next phase of the installation.
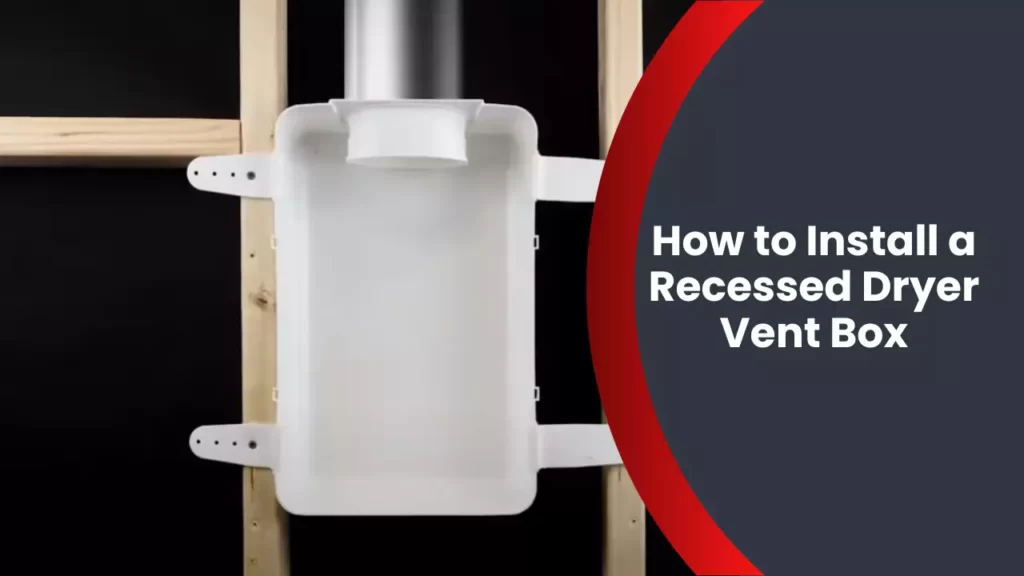
Installing And Securing The Vent Box
Properly installing and securing a recessed dryer vent box is crucial for efficient and safe operation of your dryer. In this section, we will focus on the steps required to attach the vent box to the wall, align and screw it into position, and ensure a proper seal with the wall.
Attaching the Vent Box to the Wall
Before attaching the vent box to the wall, make sure you have chosen an appropriate location that allows for proper venting of the dryer exhaust. Once you have determined the placement, follow these steps:
- Use a pencil to mark the outline of the vent box on the wall. Ensure that the opening is centered between two wall studs for proper support.
- Drill pilot holes into the marked outline using an appropriate size drill bit.
- Position the vent box over the drilled pilot holes and align it with the marked outline.
- Secure the vent box to the wall by inserting screws through the holes in the box and into the pilot holes. Use a screwdriver or drill to tighten the screws, ensuring a secure attachment to the wall.
Aligning and Screwing the Box into Position
Proper alignment and secure screwing of the vent box are essential for a tight and reliable connection. Follow these steps to align and screw the box into position:
- Ensure that the vent box is level and straight. Use a level tool and adjust the position if necessary.
- Insert screws through the pre-drilled holes on the sides of the vent box, aligning them with the corresponding wall studs.
- Tighten the screws securely, ensuring that the vent box is firmly attached to the wall.
Ensuring a Proper Seal with the Wall
A proper seal between the vent box and the wall is important to prevent any air leaks and maintain the efficiency of the dryer. Here’s how to ensure a proper seal:
- Apply a generous amount of caulk to the edges of the vent box where it meets the wall. This will create a tight seal and prevent any air leakage.
- Smooth out the caulk with a caulk smoothing tool or your finger to ensure an even and neat finish.
- Allow the caulk to dry according to the manufacturer’s instructions before using the dryer.
By following these steps, you can successfully install and secure a recessed dryer vent box, ensuring proper ventilation and preventing potential hazards associated with dryer exhaust.
Connecting The Dryer Vent Hose
Connecting the dryer vent hose is a crucial step in properly installing a recessed dryer vent box. It enables the efficient and safe venting of hot air from your dryer to the outside. In this section, we will guide you through the process of measuring and cutting the vent hose to the correct length, attaching it to both the dryer and the vent box, and securing the connections using duct tape.
Measuring and cutting the vent hose to length
Before you begin connecting the vent hose, you’ll need to measure the distance between your dryer and the recessed dryer vent box. To do this, take a tape measure and measure the length from the back of your dryer to the location where the vent box will be installed. Make sure to account for any bends or turns the hose will need to make.
Once you have the measurement, add a few inches to ensure a proper fit. It’s better to have the hose slightly longer than needed, as you can always trim it down later. Use a pair of tin snips or a similar tool to cut the vent hose to the desired length.
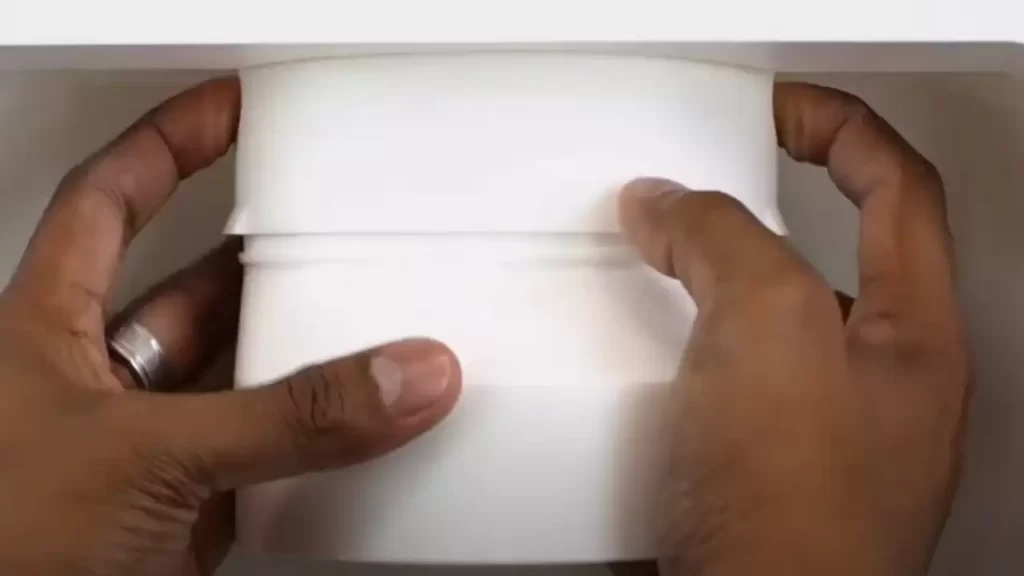
Attaching the vent hose to the dryer and vent box
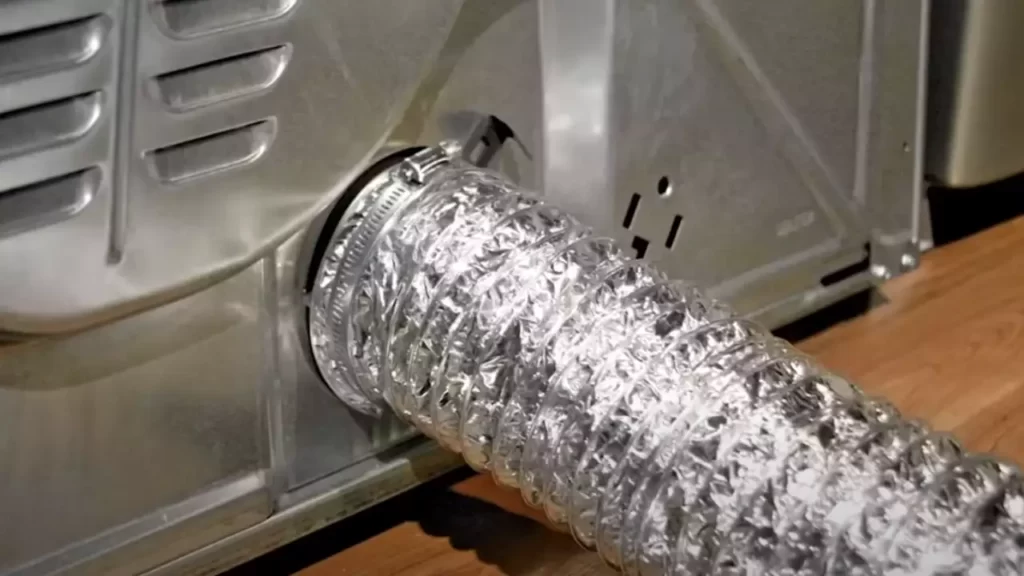
With the vent hose cut to the correct length, it’s time to attach one end to the dryer and the other end to the vent box. Begin by sliding one end of the hose over the dryer’s vent outlet, which is typically located on the back of the machine. Make sure to push the hose securely onto the outlet, ensuring a tight fit.
Next, move to the recessed dryer vent box and slide the opposite end of the hose over the vent opening. Again, press the hose firmly onto the vent box to ensure a snug connection. Ensure that both ends are securely attached and that there are no gaps or loose fittings.
Using duct tape to secure the connections
Once the vent hose is connected to both the dryer and the vent box, it’s time to secure the connections using duct tape. This will help prevent any air leaks and ensure that the hot air is properly vented to the outside.
To do this, wrap a strip of duct tape around the connection where the hose meets the dryer’s vent outlet. Be sure to completely cover the connection with the tape, creating a tight seal. Repeat this process for the connection between the hose and the vent box.
In addition to securing the main connections, it’s also a good idea to use duct tape to secure any bends or turns in the vent hose. This will prevent the hose from sagging or coming loose over time.
With the connections securely taped, double-check that all connections are tight and secure. Once everything is properly connected, you can now test your dryer to ensure that the hot air is properly venting outside.
By following these steps and properly connecting the dryer vent hose, you can ensure a safe and efficient venting system for your dryer. Now that you have completed this step, the next section will cover the proper installation of the recessed dryer vent box in your wall.
Testing And Maintenance
Checking for any air leaks
Before we move on to testing and maintenance, it is important to ensure that there are no air leaks in your recessed dryer vent box. Air leaks can hinder the proper airflow and efficiency of your dryer. Here are the steps to check for air leaks:
- Inspect the seal between the dryer vent box and the wall. Look for any gaps or cracks.
- Use a flashlight to check the area around the vent box for any signs of air leakage, such as visible light around the edges.
- If you find any air leaks, use a duct sealant or foil tape to seal them. Make sure to follow the manufacturer’s instructions for the best results.
Conducting a test run to ensure proper airflow
Once you have installed the recessed dryer vent box and checked for any air leaks, it is crucial to conduct a test run to ensure that there is proper airflow. This will help prevent any potential issues in the long run. Here’s how you can do it:
- Turn on your dryer and let it run for a few minutes.
- Check the airflow coming out of the vent box. It should be strong and steady.
- Feel around the area of the vent box for any warm air leaks. This could indicate a problem with the installation that needs to be addressed.
- If you notice any issues with the airflow or detect warm air leaks, you may need to reposition or seal the vent box accordingly.
Regularly inspecting and cleaning the vent box
To maintain the proper functioning of your recessed dryer vent box, it is essential to regularly inspect and clean it. This will help prevent any blockages or buildup that can affect the airflow. Here are some guidelines for inspecting and cleaning the vent box:
- Remove the vent cover and brush off any dust or lint that may have accumulated on the surface.
- Inspect the interior of the vent box for any debris or obstructions. Use a vacuum cleaner or a brush to remove any dirt or lint.
- Check the vent box for any signs of damage, such as cracks or loose connections. If you notice any issues, repair or replace the vent box as needed.
- Ensure that the vent cover is securely in place and functioning properly.
Troubleshooting common issues and repairs
Occasionally, you may encounter common issues with your recessed dryer vent box that require troubleshooting and repairs. Here are some possible problems and the steps to address them:
| Issue | Possible Cause | Solution |
|---|---|---|
| Poor airflow | Blockage or clog in the vent box | Clean the vent box thoroughly to remove any obstructions |
| Condensation buildup | Inadequate insulation or improper installation | Check the insulation and ensure proper installation to prevent condensation |
| Vent cover not closing properly | Worn-out or damaged vent cover | Replace the vent cover with a new one |
By following these testing and maintenance steps for your recessed dryer vent box, you can ensure its optimal performance and prolong its lifespan. Regular inspection, cleaning, and troubleshooting will help maintain proper airflow and prevent any potential issues.
Frequently Asked Questions
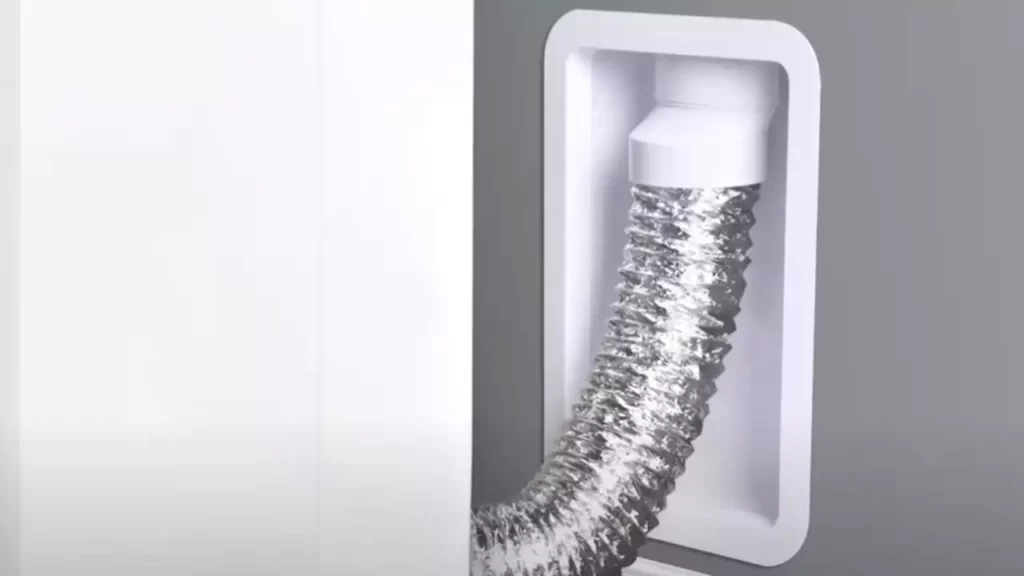
What Is A Recessed Dryer Vent Box?
A recessed dryer vent box is a wall-mounted rectangular box that allows you to push your dryer closer to the wall, saving space and preventing the hose from bending or crimping. It’s a convenient solution for tight laundry spaces.
How Do I Install A Recessed Dryer Vent Box?
To install a recessed dryer vent box, you’ll need to measure and cut a hole in the wall, attach the box to the framing, connect the dryer hose, and secure everything in place. Make sure to follow the manufacturer’s instructions and use proper tools for a safe installation.
What Are The Benefits Of Using A Recessed Dryer Vent Box?
Using a recessed dryer vent box offers several benefits. It provides a clean and aesthetic appearance, saves space, prevents hose kinks and blockages, improves airflow, reduces fire hazards, and allows the dryer to be pushed closer to the wall for a more streamlined look in your laundry room.
Conclusion
Installing a recessed dryer vent box not only improves the appearance of your laundry room but also enhances the safety and efficiency of your dryer. By following the step-by-step guide in this blog post, you can easily complete the installation process.
Remember to choose the right location, measure accurately, and use the necessary tools and materials. With the recessed dryer vent box in place, you can rest assured that your dryer will function optimally while keeping your home safe from potential fire hazards.
So, why wait? Get started on this simple yet impactful DIY project today!