To install a metal roof valley, start by measuring and marking the valley centerline. Next, lay down the metal roof valley flashing, making sure the pieces overlap correctly.
Understanding The Importance Of A Metal Roof Valley
What is a roof valley and its role in a metal roof system
A metal roof valley is a crucial component of any metal roof system. It is the intersection where two roof slopes meet, forming a V-shaped groove or channel. This design allows water to flow off the roof and into the gutters, preventing water accumulation and potential damage.
The main role of a roof valley in a metal roof system is to provide a pathway for water to safely move away from the roof surface. This is especially important during heavy rainfall or when snow and ice melt on the roof. Without a properly installed and functioning roof valley, water can pool, seep through the roof, and result in leaks and water damage to the interior of your home or building.
Why proper installation is crucial for preventing leaks and water damage
When it comes to installing a metal roof valley, proper installation techniques are essential for preventing leaks and water damage. Here’s why:
- Water diversion: A well-installed metal roof valley ensures that water is efficiently diverted off the roof and into the gutters. This prevents water from pooling and causing potential structural issues or leakage into your home.
- Seamless integration: Proper installation ensures that the metal roof valley seamlessly integrates with the rest of the roofing system. This eliminates gaps or openings that could allow water to penetrate and result in water damage.
- Weather resistance: A correctly installed metal roof valley provides enhanced weather resistance. It creates a watertight seal and protects against water infiltration, even during severe storms or heavy precipitation.
- Longevity: By utilizing the correct installation techniques, the lifespan of your metal roof valley can be extended. This reduces the chances of premature wear and tear, ultimately saving you money in potential repairs or replacements.
Properly installing a metal roof valley is not only about achieving a visually appealing finish, but also about protecting your home or building from potential water damage. By hiring a professional contractor or following manufacturer guidelines, you can ensure that your metal roof valley is installed correctly and functions as an effective water diversion system.
Essential Tools And Materials
When it comes to installing a metal roof valley, having the right tools and materials is essential for a successful and efficient installation. In this section, we will discuss the various tools and materials you will need to ensure a smooth process from start to finish.
List of Tools Required for the Installation
To get started on your metal roof valley installation, you will need the following tools:
- Tape measure
- Chalk line
- Metal shears or tin snips
- Roofing hammer
- Nail gun or drill with proper attachments
- Safety harness and ropes
- Ladder or scaffold
- Caulking gun
- Metal roofing screws or nails
- Ladder stabilizer
These tools will help you accurately measure and mark the metal panels, cut them to the desired length and shape, secure them to the roof, and ensure your safety while you work at heights.
Overview of the Necessary Materials and Their Specifications
Now that you have the tools ready, let’s take a look at the necessary materials and their specifications:
1. Metal Panels: Choose high-quality metal panels that are specifically designed for roofing applications. These panels should have the required thickness and strength to withstand extreme weather conditions. Opt for a durable metal such as galvanized steel or aluminum, which will provide longevity and resistance to corrosion.
2. Underlayment: Install a suitable underlayment material, such as synthetic roofing felt or self-adhesive membrane, to provide an additional layer of protection against moisture and improve energy efficiency.
3. Flashing: Use metal flashing, typically made of aluminum or galvanized steel, to create a watertight seal around the roof valley. Flashing plays a crucial role in preventing water penetration and ensures the longevity of your roof.
4. Sealant: Apply a high-quality roofing sealant compatible with the metal panels and flashing material. This will further enhance the waterproofing properties and ensure a tight seal along the edges and seams.
5. Fasteners: Use metal roofing screws or nails specifically designed for metal roofing applications. These fasteners should be corrosion-resistant and recommended by the manufacturer of the metal panels.
Make sure to carefully read the specifications provided by the manufacturer for each material, as they may vary depending on the specific brand or type of metal roof system you are using.
By having the essential tools and materials at hand, you are well-prepared to confidently tackle the installation of a metal roof valley. Now that we have covered the necessary equipment, the next section will delve into the step-by-step process of installing the metal panels.
Preparing The Roof Valley For Installation
Before installing a metal roof valley, it is essential to properly prepare the area to ensure a smooth and successful installation. This involves inspecting the existing roof valley for any damage or issues and clearing debris from the area. Let’s take a closer look at these important steps:
Inspecting the Existing Roof Valley for Any Damage or Issues
Prior to installation, it is crucial to inspect the existing roof valley for any signs of damage or issues. This step helps identify potential problems that may affect the installation process or the performance of the metal roof valley in the long run. Below are some important points to consider while inspecting:
- Look for cracks, punctures, or other signs of damage on the roof valley surface.
- Check for any loose or missing shingles, as they may indicate underlying issues that need to be addressed.
- Inspect the flashing around the roof valley area to ensure that it’s in good condition and securely attached.
- Examine the gutter system connected to the roof valley to ensure it is functioning properly and not obstructed.
Clearing Debris and Preparing the Area for Installation
Once the inspection is complete, it’s time to clear debris and prepare the area for the metal roof valley installation. This step helps create a clean and stable foundation for the new roof valley. Here are some important guidelines to follow:
- Remove any loose debris, such as leaves, branches, and dirt, from the roof valley area.
- Clean the gutter system to ensure proper water flow and prevent any obstructions.
- Repair or replace any damaged or deteriorated underlayment or sheathing materials.
- Ensure that the area is adequately ventilated to prevent moisture buildup and potential issues in the future.
By inspecting the existing roof valley and clearing the area of debris, you lay the foundation for a successful metal roof valley installation. These preparatory steps not only ensure a smooth installation process but also help prolong the lifespan of your new metal roof valley.
Measuring And Cutting The Metal Valley Panels
Proper Measurement Techniques for Accurate Panel Sizing
Proper measurement techniques are crucial when it comes to installing a metal roof valley. Accurate measurements ensure that the metal valley panels fit seamlessly, enhancing the roof’s durability and aesthetic appeal. To get started, gather a measuring tape, chalk line, and a marker. Follow these simple steps for precise measurements:
- Measure the width of the valley. Begin by measuring the width at the top of the valley and then at the bottom. Take these measurements at multiple points along the valley to address any inconsistencies.
- Calculate the necessary panel size. You’ll want to add a couple of inches to the width measurement to allow for a proper overlap between the panels. This overlap is essential to prevent any water or debris from seeping through the valley.
- Use the chalk line to mark the panel’s width. Starting from the edge of the panel, use the measuring tape to mark the appropriate width measurement along the length of the panel. Repeat this step for all the metal valley panels required for installation.
By following these measurement techniques, you can ensure the panels are accurately sized, saving time and avoiding mistakes during the installation process.
Using a Metal Shear or Snips to Cut the Panels to the Required Size
Once you have the proper measurements, it’s time to cut the metal valley panels to the required size. This step is critical to ensure a seamless installation and a professional look. There are two common tools that can be used for cutting metal panels: a metal shear and snips.
Metal shear: A metal shear is a fantastic tool for precision cutting, especially if you have multiple panels to cut. It allows you to make clean cuts effortlessly, saving you time and effort. Simply place the panel on the shear, align the mark you made, and press the shear’s handle to make the cut. Repeat this process for all the panels needed.
Snips: Snips are a useful alternative when you have limited cutting needs or when working in a tight area. If you’re using snips, align the panel’s edge with the mark you made and start cutting. Make sure to follow the line precisely to maintain accuracy. Although snips require more effort, they provide greater flexibility when it comes to cutting curves or uneven shapes.
Ensure each cut is clean and accurate, allowing the panels to fit together perfectly. Take your time and use caution while cutting to avoid any accidental damage or injury.
By using these simple measurement techniques and the appropriate tools, you can ensure accurate panel sizing and a flawless installation of your metal roof valley.

Installing The Underlayment
When it comes to installing a metal roof valley, one crucial step that shouldn’t be overlooked is installing the underlayment. The underlayment serves as a protective layer between the metal roof and the roof deck, providing an additional barrier against water, ice, and extreme weather conditions. In this section, we will discuss the purpose and benefits of underlayment, followed by step-by-step instructions for its installation in the valley.
Understanding the Purpose and Benefits of Underlayment
The underlayment plays a vital role in the overall functionality and durability of a metal roof. It is designed to provide an extra layer of protection against leakage, condensation, and potential damage caused by moisture infiltration. Here are some key benefits of installing underlayment:
- Waterproofing: The underlayment acts as a waterproof barrier, preventing water from seeping through the roof and causing leaks.
- Ice and Snow Protection: During winter months, underlayment helps to minimize the risks of ice dams and snow infiltration, protecting the roof and the underlying structure.
- Condensation Control: By creating a moisture-resistant layer, underlayment helps reduce condensation buildup in the roof system, preventing potential damage or mold growth.
- Added Insulation: Underlayment materials with thermal properties can provide an additional layer of insulation, improving energy efficiency and reducing heating and cooling costs.
- Soundproofing: Certain underlayment materials can help reduce exterior noise, providing a quieter and more comfortable living environment.
Step-by-step Instructions for Installing the Underlayment in the Valley
Now that we understand the importance of underlayment, let’s dive into the step-by-step process of installing it in the metal roof valley:
- Clean the surface: Begin by thoroughly cleaning the valley area, removing any debris or dirt that may hinder the underlayment’s adhesion.
- Measure and cut the underlayment: Measure the length of the valley and cut the underlayment sheets accordingly, ensuring they extend past the valley area by at least 6 inches on each side.
- Start at the bottom: Begin by placing the first sheet of underlayment at the bottom of the valley, aligning it with the edge of the roof deck. Secure it in place using roofing nails or staples, ensuring proper spacing according to manufacturer recommendations.
- Overlap the sheets: When placing subsequent sheets, overlap them with the previous one by at least 6 inches. This overlapping ensures a continuous and watertight barrier.
- Secure the edges: Use roofing cement or adhesive to seal the edges of the underlayment sheets, preventing any potential water infiltration through the seams.
- Repeat the process: Continue installing the underlayment sheets, following the same overlapping and securing process, until you reach the top of the valley.
By following these step-by-step instructions, you can effectively install the underlayment in the metal roof valley, ensuring proper protection and enhanced longevity for your roof system.
Fitting And Securing The Metal Valley Flashing
Positioning the Metal Valley Flashing Correctly on the Underlayment
Ensuring proper positioning of the metal valley flashing is crucial when it comes to installing a metal roof valley. In order to prevent leaks and achieve a professional finish, you should carefully position the flashing on the underlayment. Here’s a step-by-step guide on positioning the metal valley flashing correctly:
- Start by identifying the centerline of the valley and mark it on the underlayment. This will serve as a guide to position the flashing.
- Carefully unroll the metal valley flashing strip along the length of the valley, aligning it with the centerline.
- Make sure the flashing extends beyond the valley edges on both sides. This will provide adequate coverage and protection against water infiltration.
- Press down firmly on the flashing to adhere it to the underlayment, ensuring it is securely positioned.
- Double-check the alignment of the flashing with the centerline to ensure it is straight and centered within the valley.
By following these steps, you can position the metal valley flashing accurately, creating a solid foundation for the rest of the installation process.
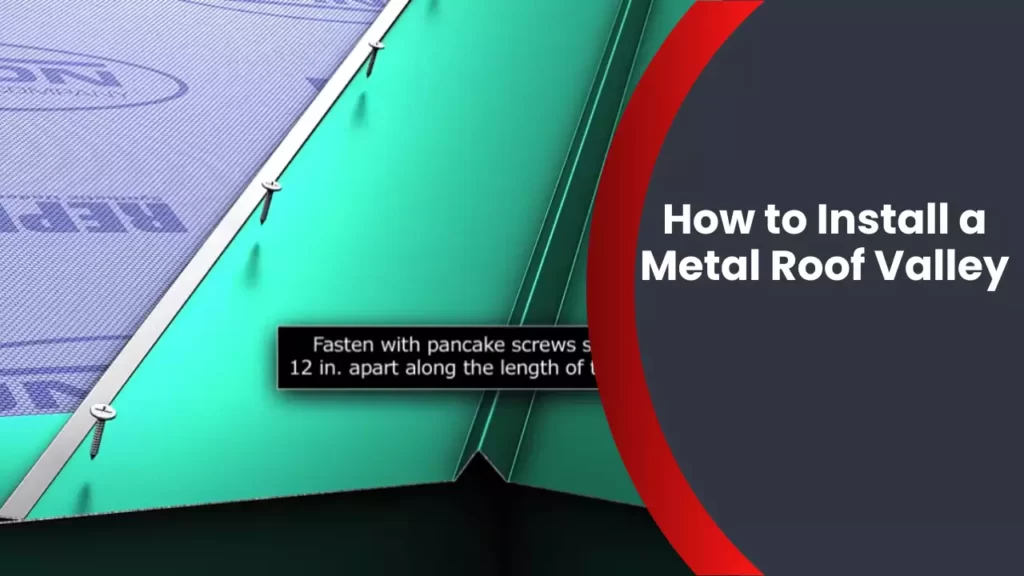
Securing the Flashing Using Screws or Nails
Securing the metal valley flashing is essential to ensure it stays in place and withstands the elements. By using screws or nails, you can firmly attach the flashing, providing long-lasting protection. Here’s how to secure the flashing:
- Using a suitable drill or hammer, carefully insert screws or nails through the edges of the flashing and into the roof deck.
- Place the fasteners approximately every 12 inches along the length of the flashing to ensure a secure attachment.
- Make sure the fasteners are inserted at an angle, preferably in a zigzag pattern, to provide additional strength and prevent water from pooling.
- Avoid overdriving the screws or nails, as this may damage the flashing or compromise its effectiveness.
- After securing one side of the valley, repeat the process on the opposite side, ensuring the flashing is securely fastened all along the valley.
By properly securing the metal valley flashing, you can enhance the durability and stability of your metal roof installation. Remember to use the appropriate fasteners and follow the manufacturer’s guidelines for the specific metal flashing you are working with.
Installing a metal roof valley requires precision and attention to detail. Positioning the metal valley flashing correctly and securing it properly are crucial steps to ensure a successful installation. By following the steps outlined above, you can achieve a secure and watertight metal roof valley that will withstand the test of time.
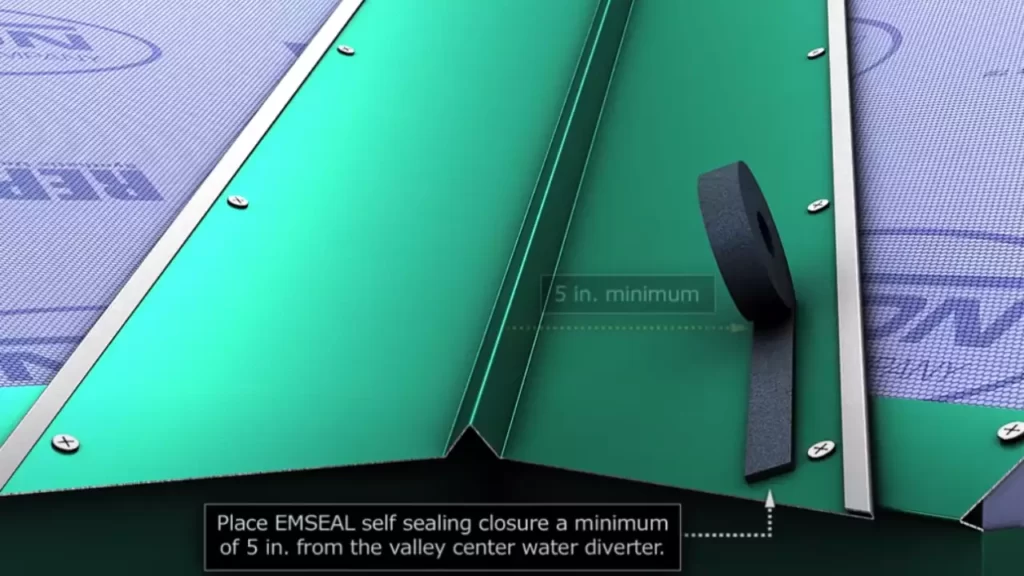
Sealing And Waterproofing The Valley
When it comes to installing a metal roof valley, one of the most crucial steps is to ensure proper sealing and waterproofing. Neglecting this step could lead to costly leaks and damage down the line. In this section, we will discuss the techniques and best practices for creating a seamless and durable waterproofing barrier in the valley.
Applying a quality sealant to ensure a watertight seal
Applying a quality sealant is essential to achieve a watertight seal in the metal roof valley. A sealant acts as a protective barrier against water infiltration and helps to prevent leaks. Here are the steps to apply a sealant effectively:
- Clean the valley: Before applying the sealant, it’s important to clean the valley thoroughly. Remove any debris or dirt that might hinder the adhesion of the sealant.
- Choose the right sealant: Select a sealant specifically formulated for metal roofs. Look for a high-quality sealant that is waterproof and weather-resistant.
- Apply the sealant: Using a caulking gun, carefully apply the sealant along the length of the valley. Make sure to fill any gaps or seams in the metal roofing panels.
- Smooth the sealant: Smooth the sealant using a putty knife to create an even and uniform seal. This will improve the aesthetic appeal of the valley and enhance its overall durability.
By following these steps and using a quality sealant, you can ensure a watertight seal in the metal roof valley, protecting it from moisture and potential leaks.
Techniques for creating a seamless and durable waterproofing barrier
Creating a seamless and durable waterproofing barrier is crucial to the longevity of a metal roof valley. Here are some techniques to achieve this:
- Overlap the metal panels: When installing the metal roofing panels in the valley, ensure they overlap each other properly. This overlapping technique helps to create a smooth surface that prevents water from seeping through.
- Use flashing: Incorporating flashing into the valley installation can provide an added layer of waterproofing. Flashing should be placed beneath the metal panels and extend up the adjacent roof surfaces to divert water away from the valley.
- Proper fastening: Securely fasten the metal roofing panels to prevent any movement or shifting that could compromise the waterproofing. Be sure to follow the manufacturer’s guidelines for correct fastening techniques.
- Inspect for gaps: Regularly inspect the valley for any gaps or openings that might allow water to penetrate. If you notice any issues, address them promptly by applying additional sealant or making necessary repairs.
By employing these techniques, you can create a seamless and durable waterproofing barrier in the metal roof valley, minimizing the risk of leaks and potential water damage.
Testing And Inspecting The Installed Valley
Conducting a Visual and Water Test to Ensure Proper Installation
Once you have successfully installed a metal roof valley, it’s crucial to conduct a thorough testing and inspection to ensure that the installation has been done correctly. This step is essential to identify any potential issues or problem areas that may require further attention. Taking the time to test and inspect the installed valley will help guarantee its durability and effectiveness in diverting rainwater away from your roof.
Checking for Any Leaks or Areas that Require Additional Attention
One of the primary objectives of the testing and inspection process is to check for any leaks or areas that may require additional attention. Water leaks can cause extensive damage to your roof and the interior of your home if not addressed promptly. By carefully examining the installed valley, you can identify any potential leaks, gaps, or loose seams that may have occurred during the installation.
Here are some steps to help you effectively check for leaks or areas that require additional attention:
- Inspect the valley visually: Begin by carefully examining the entire length and width of the installed valley. Look for any visible signs of damage, such as punctures, dents, or misaligned sections. Additionally, keep an eye out for any loose seams or improperly fastened components.
- Perform a water test: After visually inspecting the valley, it’s time to conduct a water test. Start by saturating the valley with water using a hose or bucket. Observe the flow of water as it moves along the valley and ensure it is properly channeled towards the downspout or gutter. Pay close attention to any signs of water leakage, especially near the seams or joints.
- Check the interior for signs of leaks: While conducting the water test, it’s essential to also check the interior of your home for any signs of leakage. Carefully inspect the attic or ceiling area, looking for any water stains or dampness. These signs indicate that water is seeping through the installed valley and require immediate attention.
By following these steps, you can effectively test and inspect the installed metal roof valley, ensuring its durability and functionality. Addressing any issues promptly will help prevent future damage and maintain the longevity of your roof.
Maintenance And Care For A Metal Roof Valley
Maintaining and caring for your metal roof valley is essential to ensure its longevity and performance. Regular maintenance and inspections can help you identify and address any issues before they become major problems. By following these tips and being proactive, you can extend the lifespan of your metal roof valley.
Tips for Regular Maintenance and Inspections to Extend the Lifespan
Performing regular maintenance and inspections is crucial to keep your metal roof valley in optimal condition. Here are some essential tips to help you extend its lifespan:
- Keep the roof clean: Regularly remove debris such as leaves, branches, and other particles that can accumulate on the valley. This ensures that water can flow freely and prevents any potential damage.
- Inspect for leaks: Check for any signs of leaks, such as water stains, mold, or mildew. If you notice any, it’s important to address them immediately to prevent further damage.
- Clear snow and ice: In colder climates, it’s crucial to remove snow and ice buildup on your metal roof valley. This prevents excess weight that can strain the structure and cause potential damage.
- Trim overhanging branches: If there are trees near your roof, make sure to trim any overhanging branches. This helps prevent branches from falling during storms and causing damage to your metal roof valley.
- Regularly inspect sealants: Check the condition of the sealants around your metal roof valley. If any are deteriorating or damaged, reapply or replace them as necessary to maintain a watertight seal.
Common Issues to Watch Out for and How to Address Them
While regular maintenance can help prevent many issues, there are some common problems you should watch out for. Here are a few and how to address them:
| Issue | Solution |
|---|---|
| Loose or missing fasteners | Regularly inspect and tighten any loose fasteners. Replace missing ones immediately to prevent water penetration. |
| Corrosion | Clean the affected area and apply a rust-resistant coating to prevent further corrosion. If extensive, consider consulting a professional. |
| Ponding water | Ensure proper drainage to prevent water from pooling in the valley. Adjust the slope if needed or install additional drainage systems. |
| Damaged flashing | Inspect and replace damaged or deteriorated flashing. Proper flashing installation prevents water infiltration and helps maintain the integrity of the metal roof valley. |
| Improper installation | If you suspect an incorrect installation, consult a professional to assess and correct any issues. Proper installation is essential for the performance and longevity of your metal roof valley. |
By following these maintenance tips and being attentive to potential issues, you can ensure that your metal roof valley remains in excellent condition for years to come. Regular inspections and addressing problems promptly are key to maximizing the lifespan and performance of your metal roof valley.
Frequently Asked Questions
How Do You Install Metal Valley On A Shingle Roof?
To install a metal valley on a shingle roof, follow these steps: 1. Begin by removing the existing shingles along the valley area. 2. Install a layer of underlayment along the valley to provide added protection. 3. Next, place the metal valley flashing in the center of the valley area, ensuring it extends beyond the edge of the roof.
4. Secure the metal valley flashing using roofing nails or screws, making sure to fasten it securely to the roof deck. 5. Finally, install new shingles on either side of the metal valley, overlapping the edges to create a watertight seal.
How Do You Seal A Metal Roof Valley?
To seal a metal roof valley, follow these steps: 1. Clean the area thoroughly to remove any dirt or debris. 2. Apply a specialized metal roof sealant along the valley, ensuring full coverage. 3. Use a brush or roller to evenly spread the sealant and create a watertight seal.
4. Allow the sealant to dry completely before exposing it to the elements. 5. Regularly inspect and maintain the seal to prevent leaks and damage.
Do Screws Go On Ridge Or Valley On A Metal Roof?
Screws should go on the ridge of a metal roof rather than the valley.
Is Valley Metal Installed Over Felt?
Valley metal is typically installed over felt during the roofing process. It provides added protection and helps to prevent water seepage.
Conclusion
Installing a metal roof valley can be a challenging task, but with the right technique and knowledge, it can be done successfully. By following the step-by-step instructions in this guide, you can ensure a secure and durable roof valley that will protect your home for many years to come.
Remember to take safety precautions and seek professional help if needed. With proper care and maintenance, your metal roof valley will add beauty and functionality to your home.