To install a manual transfer switch, follow these steps precisely: Turn off power, attach switch to junction box, connect wiring, connect generator plug, test switch function. Installing a manual transfer switch is a straightforward process that allows you to safely and easily switch your household power source between the utility grid and a backup generator.
By installing this switch, you have the peace of mind that comes with knowing you can quickly and efficiently switch power sources during an outage. With the help of this guide, you will be able to successfully install a manual transfer switch and have a reliable backup power solution at your disposal.
What Is A Manual Transfer Switch And Why Do You Need It?
A manual transfer switch is a crucial device that allows you to connect your home’s electrical system to an external power source during a power outage. It acts as a safety mechanism, ensuring a smooth and safe transition from the utility power to the backup power source, such as a generator. In this section, we will delve into the definition and purpose of a manual transfer switch, as well as the importance of having one during power outages.
Definition and Purpose of a Manual Transfer Switch
A manual transfer switch, often referred to as a MTS, is an electrical switch specifically designed for connecting a building’s electrical system to a generator. Its main purpose is to provide a convenient, efficient, and safe way to switch from the utility power to the backup power without the need for multiple plugs or cables.
Typically, a manual transfer switch consists of an enclosure, load terminals, and line terminals. The enclosure protects the switch from external factors such as dust and moisture, ensuring its durability and longevity. The load terminals are connected to the electrical system of the building, while the line terminals connect to the generator. By simply flipping the switch, you can control the flow of electricity between these two power sources.
Importance of Having a Manual Transfer Switch During Power Outages
Power outages can occur unexpectedly, leaving you and your family in the dark and disrupting the functioning of essential appliances and systems. Having a manual transfer switch installed in your home is essential for several reasons:
- Safety: During a power outage, the utility power supply may be temporarily disconnected from your home to ensure the safety of utility workers. A manual transfer switch provides a safe and regulated connection to an alternative power source, preventing hazardous back-feeding of electricity.
- Convenience: With a manual transfer switch, the transition from utility power to backup power becomes seamless. You no longer need to fumble with extension cords or make complex wiring connections. Simply flip the switch, and your home is powered by the generator.
- Protection of Appliances: Sudden power surges or fluctuations during power restoration can damage sensitive appliances and electronics. A manual transfer switch helps protect these valuable items by ensuring a stable and controlled transfer of power.
- Comfort: During a power outage, your heating, ventilation, and cooling systems may stop working. With a manual transfer switch, you can power your HVAC system using a generator, ensuring a comfortable living environment even during prolonged outages.
Whether you live in an area prone to frequent power outages or you simply want to be prepared for unexpected events, having a manual transfer switch is a smart investment. It not only ensures the smooth operation of essential systems and appliances but also provides peace of mind knowing that you can rely on backup power when you need it the most.
Components Of A Manual Transfer Switch
When it comes to installing a manual transfer switch for your home, it’s important to understand the key components involved. These components work together seamlessly to allow you to safely and efficiently switch between utility power and generator power during a power outage. In this article, we will explore the main components of a manual transfer switch and their functions.
Main Switch
The main switch is the heart of a manual transfer switch. This switch serves as the primary control mechanism to transfer power between the utility and generator sources. When the switch is in the utility position, it allows the power from the main grid to flow into your home’s electrical panel. On the other hand, when the switch is in the generator position, it enables the power from your standby generator to supply electricity to your home. The main switch, typically installed in a weatherproof enclosure, ensures a smooth transition between power sources.
Breakers and Fuses
Breakers and fuses play a crucial role in protecting your electrical system from overloading during power transfers. Breakers act as automatic switches that detect excessive electrical currents and trip to disconnect the circuit. Fuses, on the other hand, contain a metal wire that melts when exposed to excessive currents, thus interrupting the circuit. These protective devices safeguard your home and appliances from potential damage or fire caused by electrical faults. Make sure to choose the appropriate breakers and fuses based on your electrical load requirements when installing a manual transfer switch.
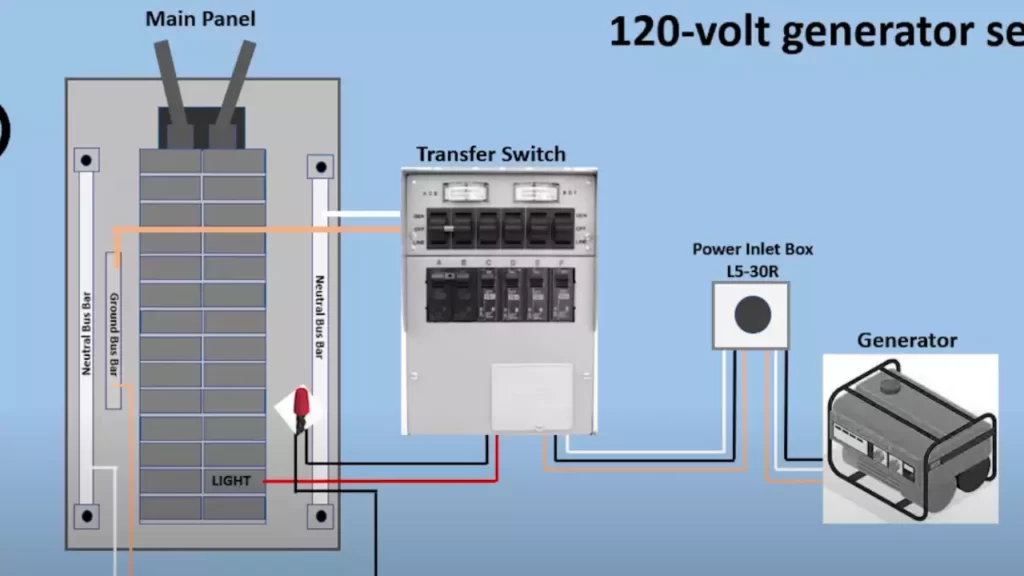
Power Inlet Box
The power inlet box is an external connection point that allows you to plug in your generator safely. It serves as the link between your generator and the manual transfer switch. The power inlet box is typically installed on an exterior wall, and its purpose is to provide a secure and weatherproof connection for the generator power cord. This component ensures that the electricity from your generator flows into the transfer switch without any risk of exposure to the weather elements.
Utility and Generator Connections
In order to establish proper electrical connections, the manual transfer switch requires both utility and generator connections. The utility connection provides a direct link to the main power grid, allowing the switch to tap into the utility power. On the other hand, the generator connection links the manual transfer switch to your standby generator, enabling the switch to transfer power from the generator when needed. It’s important to ensure that these connections are securely made to guarantee a reliable and safe power transfer between the two sources.
Overall, understanding the components of a manual transfer switch is crucial for a successful installation. The main switch, breakers and fuses, power inlet box, and utility and generator connections work in harmony to ensure a seamless transition between utility and generator power during power outages. By installing a manual transfer switch with all the necessary components, you can rest assured that your home will have a reliable backup power solution in times of need.
Safety Precautions Before Installation
Before attempting to install a manual transfer switch, it is crucial to take certain safety precautions to protect yourself and others from potential electrical hazards. Understanding the risks involved and following proper safety procedures will ensure a safe and successful installation. In this article, we will discuss three essential safety precautions you should take before installing a manual transfer switch.
Understanding electrical hazards
Prior to any electrical work, it is important to have a clear understanding of the potential hazards involved. Electricity is a powerful force that can cause serious injury or even death if not handled properly. By being aware of common electrical hazards, you can take appropriate precautions and reduce the risk of accidents.
Turning off the power supply
Before you begin installing the manual transfer switch, it is absolutely essential to turn off the power supply to your home. This will prevent any electrical current from flowing through the circuits you will be working on, minimizing the risk of electric shock.
To turn off the power, locate the main circuit breaker in your electrical panel and switch it to the “Off” position. It is also advisable to notify other occupants of your home to avoid accidentally turning the power back on while you are working.
Wearing necessary protective gear
When working with electricity, it is crucial to protect yourself by wearing the necessary protective gear. This includes but is not limited to:
- Insulated rubber gloves to protect your hands from electric shock
- Safety goggles to shield your eyes from potential sparks or debris
- A sturdy pair of work boots with rubber soles to provide insulation from the ground
Wearing this protective gear will greatly reduce the risk of injury or accidents while installing the manual transfer switch.
By adhering to these important safety precautions – understanding electrical hazards, turning off the power supply, and wearing necessary protective gear – you can ensure a safe and successful installation of a manual transfer switch. Stay tuned for the next part of this series, where we will guide you through the step-by-step process of installing a manual transfer switch.
Checking The Compatibility Of Your Electrical System
Determining the voltage and amperage
Before installing a manual transfer switch, it is crucial to check the compatibility of your electrical system. Ensuring that the voltage and amperage of your system match the requirements of the transfer switch is essential for a successful installation.
Determining the voltage:
The first step is to determine the voltage of your electrical system. Most residential systems in the United States operate at a standard voltage of 120/240 volts. However, it is always recommended to double-check the voltage to avoid any potential issues during the installation process. One way to determine the voltage is by referring to the specifications provided by the manufacturer of the main electrical panel or by consulting a licensed electrician.
Determining the amperage:
Next, you need to determine the amperage of your electrical system. The amperage indicates the amount of current that can flow through the system without causing any damage. It is crucial to choose a transfer switch that can handle the maximum amperage of your electrical system to ensure safe and efficient operation.
To determine the amperage, locate the main electrical panel and look for the main circuit breaker. The number on the main circuit breaker represents the total amperage capacity of your electrical system. It is essential to choose a transfer switch that matches or exceeds this amperage rating.
Assessing the appropriate transfer switch size
What is transfer switch size?
The transfer switch size refers to the maximum amperage capacity that the transfer switch can handle. It is crucial to assess the appropriate transfer switch size to ensure seamless power transfer during an outage.
Steps to assess the appropriate transfer switch size:
-
- Identify the critical circuits:
First, identify the circuits that are essential for powering essential appliances and systems during an outage. These may include circuits for lighting, heating and cooling systems, refrigerator, and other vital equipment.
-
- Calculate the cumulative amperage:
Next, calculate the cumulative amperage of all the critical circuits that you have identified. This can be done by adding the individual amperage ratings of each circuit.
-
- Choose a transfer switch:
Based on the cumulative amperage calculated, choose a transfer switch that has a capacity equal to or slightly higher than the total amperage. It is crucial not to exceed the capacity of the transfer switch, as it can lead to overload and potential damage to the switch and connected circuits.
-
- Consider future needs:
Lastly, consider any potential future needs or expansions that may require additional circuits. If you anticipate adding more circuits in the future, it is advisable to choose a transfer switch with a higher capacity to accommodate these changes.
By following these steps, you can determine the appropriate transfer switch size for your electrical system, ensuring a smooth and reliable power transfer during outages.
Gathering The Required Tools And Materials
Gathering the required tools and materials is the first step towards installing a manual transfer switch successfully. It is essential to have the necessary tools and materials at hand to ensure a smooth and efficient installation process. In this section, we will discuss the list of tools needed for installation, the types of wires and cables required, and other materials including conduit, fittings, and grounding system.
List of tools needed for installation
Below is a comprehensive list of tools that you will require to install a manual transfer switch:
- Screwdriver set
- Wire strippers
- Wire cutters
- Adjustable wrench
- Electric drill
- Drill bits
- Hammer
- Measuring tape
- Level
- Label maker or tape
- Cable ties
- Flashlight
Types of wires and cables required
When installing a manual transfer switch, it is important to use the correct types of wires and cables to ensure safe and reliable operation. Here are the main types of wires and cables you will need:
- Main electrical cables: These cables are responsible for connecting the load center to the transfer switch. They should have the appropriate voltage and ampacity rating.
- Control wires: These wires enable the transfer switch to communicate with the backup power source. They are typically low voltage wires and should be sized according to the manufacturer’s specifications.
- Grounding wires: Proper grounding is crucial for electrical safety. You will need grounding wires to connect the transfer switch, load center, and backup power source to the grounding system.
Other materials including conduit, fittings, and grounding system
In addition to the tools and wires, there are other materials required for a manual transfer switch installation:
- Conduit: Conduit is used to protect and route the wires, ensuring they are securely housed and meet electrical code requirements.
- Fittings: Various fittings such as connectors and couplings are needed to join different sections of conduit and secure the cables in place.
- Grounding system: A proper grounding system is essential for electrical safety. It typically includes grounding rods, clamps, and conductors to provide a path for electrical fault currents.
Mounting The Manual Transfer Switch
Installing a manual transfer switch is an essential step in setting up a backup power system for your home or office. The transfer switch allows you to safely switch between the utility power and a generator during a power outage. To optimize the installation process, it’s crucial to mount the transfer switch in a suitable location, install it onto the wall securely, and ensure proper grounding. In this guide, we will walk you through each step, providing clear instructions to help you mount your manual transfer switch with ease.
Choosing the Suitable Location
Before you start mounting the transfer switch, it’s important to select an appropriate location. Here are a few considerations to keep in mind:
- Choose a location near the circuit breaker panel and close to the generator.
- Ensure there is enough space around the transfer switch for easy access and maintenance.
- Avoid areas prone to flooding or excessive moisture.
Installing the Transfer Switch onto the Wall
Once you’ve chosen the ideal location, it’s time to install the transfer switch onto the wall. Follow these steps:
- Locate the wall studs using a stud finder.
- Use a level to ensure the transfer switch is straight.
- Mark the locations for the mounting holes on the wall.
- Drill holes into the wall at the marked locations.
- Attach the transfer switch to the wall using suitable screws or bolts.
By securely fastening the transfer switch to the wall, you ensure its stability and prevent any accidental dislodging during operation. Always refer to the manufacturer’s instructions for specific details regarding the mounting process.
Ensuring Proper Grounding
Proper grounding is a crucial aspect of a manual transfer switch installation. It helps protect your electrical system and ensures safety. Follow these steps to ensure proper grounding:
- Locate the grounding bar on the transfer switch.
- Connect a copper grounding wire to the grounding bar.
- Connect the other end of the grounding wire to a suitable grounding point, such as a copper grounding rod directly driven into the ground.
- Ensure a secure and tight connection at both ends of the grounding wire.
The grounding wire provides a path for electric current to safely flow into the ground, preventing any potential electrical hazards. Always consult a licensed electrician if you are unsure about the grounding requirements or need assistance in properly grounding the transfer switch.
Now that you have successfully mounted the manual transfer switch and ensured proper grounding, you are one step closer to having a reliable backup power system. Stay tuned for the next section of our guide, where we will cover the wiring process to connect the transfer switch to your electrical circuits.
Connecting The Transfer Switch To The Electrical Panel
Once you have determined the ideal location for your manual transfer switch, it’s time to connect it to your electrical panel. This step is crucial as it ensures a safe and reliable transfer of power from the utility grid to your backup generator. Follow these steps to complete the connection process:
Removing the panel cover
The first step is to remove the cover of your main service panel. This panel houses the circuit breakers and other essential electrical components. Before you begin, ensure that you have turned off the main circuit breaker to avoid any potential electrical hazards.
To remove the panel cover, locate the screws or latches holding it in place. Use a screwdriver or the appropriate tools to remove them. Once the cover is removed, be cautious of any live wires or exposed electrical parts. It’s always recommended to wear gloves and take necessary safety precautions throughout the process.
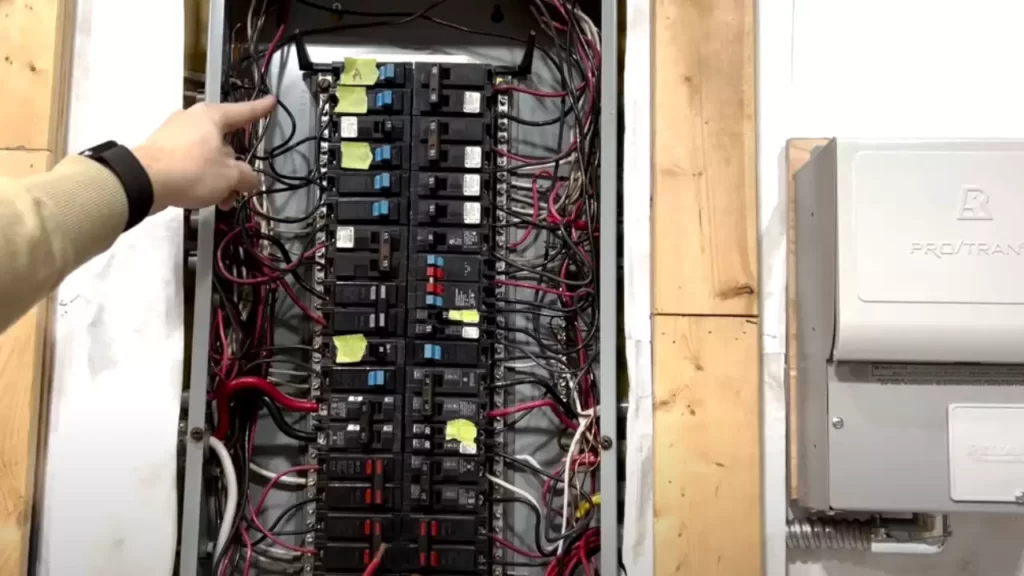
Identifying the main service panel connections
Next, you’ll need to identify the main service panel connections that will be used to connect the transfer switch. These connections are typically labeled, making it easier to recognize them. Look for labels such as “Main,” “Line,” or “Utility” to identify the appropriate connections.
It’s essential to double-check the labels and ensure you have correctly identified the connections before proceeding. The accuracy of this step will ensure a smooth and effective transfer of power during an outage.
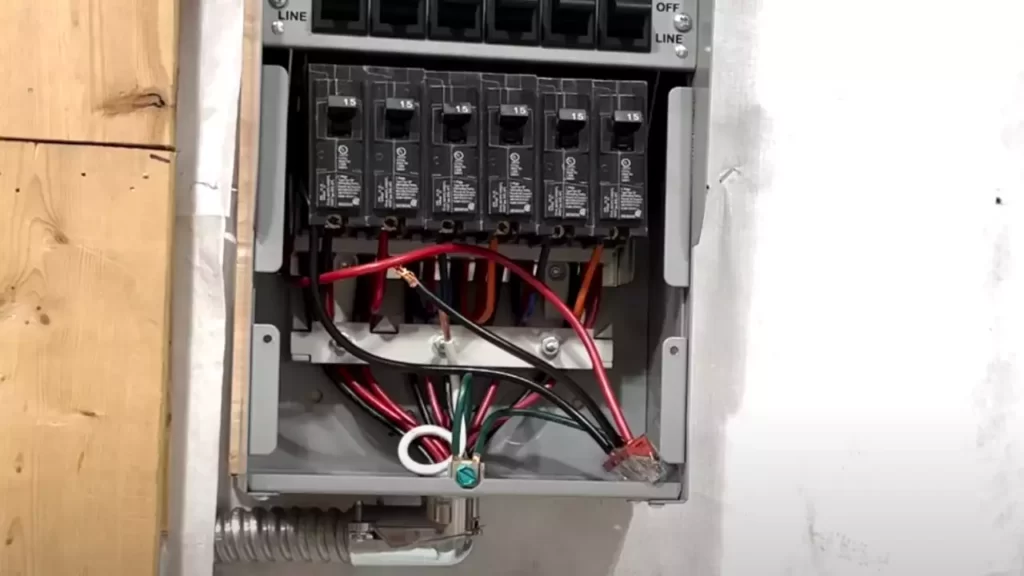
Making the necessary wire connections
With the main service panel connections identified, it’s time to make the necessary wire connections to link the transfer switch. Start by turning off the main circuit breaker to ensure your safety while handling the wires.
Using the appropriate wire connectors, connect the wires from the transfer switch to the corresponding connections in the electrical panel. Follow the manufacturer’s instructions and adhere to local electrical codes to ensure proper installation.
As you make each wire connection, ensure that the wires are securely fastened and there are no loose connections. Loose or improper connections can lead to electrical hazards or system malfunctions.
Once all the wire connections are made, you can now secure the transfer switch in its designated location and replace the electrical panel cover.
Remember, if you’re unsure about any step of the installation process, it’s always recommended to consult a professional electrician. They have the expertise and experience to ensure a safe and efficient installation of your manual transfer switch.
Installing The Power Inlet Box
Selecting the appropriate location
Choosing the right location to install your power inlet box is crucial for safe and efficient operation. Here are some important factors to consider:
- Accessibility: The power inlet box should be easily accessible for maintenance and connection to the generator. Choose a location that is convenient for you, but also keeps it out of the way of foot traffic and potential damage.
- Proximity to the electrical panel: The power inlet box needs to be installed close to your main electrical panel. This allows for a shorter and more direct wiring path, reducing potential voltage drops and improving overall performance.
- Weather protection: Select a location that is sheltered from the elements, such as rain, snow, and direct sunlight. This will help prevent the power inlet box from getting damaged and ensure its longevity.
Wiring the power inlet box
Now that you have selected the ideal location, it’s time to wire the power inlet box. Follow these steps:
- Ensure that the main electrical panel’s power is turned off before proceeding with any wiring.
- Connect the power inlet box to the main electrical panel using PVC conduit and appropriate electrical fittings. This will provide a secure and watertight connection.
- Inside the power inlet box, strip the outer sheathing of the 10/3 cable and secure it into the designated terminals. Make sure to follow the manufacturer’s instructions for proper wiring.
- Tighten the fittings on the power inlet box to secure the cable and ensure a proper seal against water and debris.
- From the power inlet box, run the 10/3 cable to the location where your portable generator will be positioned during use.
- Install a weatherproof electrical junction box near the generator location and connect the other end of the 10/3 cable into the junction box. Secure the cable in place to prevent any strain or tension on the connections.
- Within the electrical junction box, strip the cable’s sheathing and connect the individual wires to the corresponding terminals, ensuring a secure and tight connection.
- Once the wiring is complete, protect the connections by installing appropriate covers on both the power inlet box and the electrical junction box.
By following these steps, you can successfully install the power inlet box for your manual transfer switch. Remember to always prioritize safety and consult a licensed electrician if you are unsure about any aspect of the installation process.
Testing The Manual Transfer Switch
Once you have successfully completed the installation of a manual transfer switch, it is essential to conduct thorough testing to ensure proper operation and reliability in case of a power outage. Proper testing will give you the peace of mind that your switch is fully functional and ready to perform its intended purpose. In this section, we will discuss the steps involved in testing a manual transfer switch.
Performing a functionality check
The first step in testing your manual transfer switch is to perform a functionality check. This involves switching the utility power supply to the generator power supply and vice versa to verify that the switch is working correctly. Follow these steps:
- Start by ensuring that the utility power supply is disconnected and the generator power supply is turned off.
- Switch the manual transfer switch to the generator position to activate the generator power supply.
- Verify that the generator power supply is providing electricity to the desired circuits or appliances.
- Next, switch the manual transfer switch back to the utility position to reconnect the utility power supply.
- Confirm that the utility power supply is now delivering electricity to the circuits or appliances that were originally powered by the generator.
If the transfer switch successfully transfers power between the utility and generator sources, your functionality check is complete.
Conducting various tests to ensure proper operation
In addition to the functionality check, it is recommended to conduct various tests to ensure the proper operation of your manual transfer switch. Here are some additional tests you can perform:
- Load test: Turn on a few appliances or lights to simulate a load and confirm that the transfer switch can handle the expected electrical demand.
- Diagnostics test: Use a multimeter to measure the voltage and frequency of the generator power supply and ensure they meet the required specifications.
- Emergency shutdown test: Simulate an emergency situation by turning off the generator while the switch is in the generator position. Verify that the switch detects the loss of generator power and automatically transfers back to the utility power supply.
By conducting these tests, you can verify that your manual transfer switch is functioning correctly and ready to provide reliable power transfer during a power outage.
Regular Maintenance Of The Transfer Switch
Regular maintenance of the transfer switch is crucial to ensure its proper functioning and reliability during power outages. By keeping the switch clean, inspecting it regularly, lubricating moving parts, and performing periodic tests, you can extend its lifespan and avoid any potential issues that may arise. In this section, we will discuss the steps you need to take to maintain your manual transfer switch effectively.
Cleaning and Inspecting the Switch
Regular cleaning and inspection of the transfer switch are essential for its optimal performance. Over time, dust, debris, and moisture can accumulate on the switch, affecting its connections and functionality. To clean the switch:
- Start by disconnecting the power supply and turning off the switch.
- Carefully remove the cover of the switch using the appropriate tools.
- Using a soft cloth or brush, gently clean the surface of the switch, paying special attention to the contacts and terminals.
- Inspect the switch for any signs of damage, such as loose wires, corrosion, or overheating.
- If you notice any issues, make sure to address them promptly by tightening loose connections, replacing damaged wires, or seeking professional assistance if necessary.
Lubricating Moving Parts
To ensure smooth operation and prevent mechanical problems, it’s important to lubricate the moving parts of your manual transfer switch regularly. Here are the steps to follow:
- Refer to the manufacturer’s guidelines to identify the specific parts that require lubrication.
- Use a high-quality lubricant recommended for electrical equipment.
- Apply a small amount of lubricant to the designated parts, such as hinges, levers, and rotating joints.
- Be careful not to over-lubricate, as excessive lubrication can attract dust and cause more harm than good.
Testing the Switch Periodically
Regular testing of the manual transfer switch is crucial to verify its proper functioning and readiness for a power outage. Follow these steps to perform periodic tests:
- Notify all occupants and ensure no one is operating electrical equipment during the test.
- Start by turning off the main power supply and connecting the alternate power source to the transfer switch.
- Switch on the transfer switch and monitor if the power is successfully transferred to the desired circuits.
- Verify that the switch is capable of handling the load connected to it without any issues.
- Once the test is complete, return the switch to its original position and restore the main power supply.
By regularly cleaning and inspecting your manual transfer switch, lubricating its moving parts, and testing it periodically, you can ensure its reliability and functionality when it matters most. Make sure to follow the manufacturer’s guidelines and seek professional assistance if you encounter any difficulties during maintenance. By taking these simple steps, you can keep your transfer switch in optimal condition and have peace of mind knowing that you are prepared for unexpected power outages.
Common Troubleshooting Issues
Identifying potential problems
When it comes to installing a manual transfer switch, there are several common troubleshooting issues that homeowners may encounter. Identifying and understanding these potential problems is crucial in order to ensure a smooth and reliable operation of the transfer switch. Here are some of the most common problems:
1. Incorrect wiring connections: One of the first things to check if you’re facing issues with your manual transfer switch is the wiring connections. Ensure that all wires are correctly connected to their respective terminals. An incorrectly wired transfer switch can cause power failure or damage to appliances.
2. Misalignment of switch positions: Another potential problem is the misalignment of the switch positions. Make sure that the transfer switch is in the correct position to ensure a seamless transfer of power between the utility and generator. A misaligned switch can result in a partial power outage or prevent the generator from starting.
3. Inadequate power supply: If your transfer switch is not transferring power properly, it could be due to a malfunctioning generator or insufficient power supply. Check the generator for any issues such as low fuel, a faulty spark plug, or a clogged air filter. Ensure that the generator is capable of producing enough power to meet the electrical demands of your home.
Diagnosing and resolving issues with the manual transfer switch
If you’re experiencing any problems with your manual transfer switch, follow these steps to diagnose and resolve the issue:
- Inspect the transfer switch: Start by visually inspecting the transfer switch for any signs of physical damage or loose connections. Tighten any loose wires or screws and replace any damaged components.
- Check the voltage: Use a multimeter to measure the voltage across the various terminals of the transfer switch. Ensure that the voltage is within the specified range. If the voltage readings are abnormal, there may be a problem with the generator or the utility power supply.
- Test the switch positions: Manually operate the transfer switch to ensure that it moves freely between the utility and generator positions. If there is any resistance or difficulty in switching positions, the switch may need to be replaced.
- Inspect the wiring connections: Carefully examine the wiring connections of the transfer switch and make sure they are securely fastened. Look out for any signs of damage or corrosion on the wires. Replace any faulty wiring to ensure a reliable connection.
Remember, if you are not confident in troubleshooting or resolving any issues with your manual transfer switch, it’s always best to consult a professional electrician. They have the expertise and knowledge to diagnose and fix any problems with your transfer switch and ensure the safety of your electrical system.
Seeking Professional Help When Needed
If you’re considering installing a manual transfer switch for your electrical system, it’s essential to understand the importance of professional assistance. While some DIY projects can save you money and provide a sense of accomplishment, electrical work requires specialized knowledge and expertise. Knowing when to call an electrician can not only help ensure your safety but also avoid any potential damage to your home or electrical system.
Knowing When to Call an Electrician
While installing a manual transfer switch may seem straightforward, there are specific situations where it’s best to seek professional help. These situations can vary depending on the complexity of your electrical system and the local regulations. Here are a few instances where calling an electrician is highly recommended:
- If you lack electrical experience: Working with electricity can be dangerous, especially if you’re not familiar with electrical systems and installations. If you don’t have the necessary knowledge and experience, it’s best to leave the installation of a manual transfer switch to a licensed electrician.
- For complex electrical systems: If your electrical system is intricate, with multiple circuits and high voltage connections, it’s crucial to involve a professional. They can assess your system’s requirements accurately and ensure that the manual transfer switch is correctly installed without compromising the safety and efficiency of your electrical setup.
- For compliance with local codes and regulations: Electrical work is governed by strict codes and regulations set by local authorities. Calling an electrician ensures that your installation meets these requirements, avoiding any potential legal issues or safety hazards.
Understanding the Importance of Professional Assistance
Seeking professional assistance for installing a manual transfer switch is vital for various reasons:
- Expertise: Licensed electricians have the necessary training and qualifications to handle electrical installations safely. They are familiar with the latest industry standards and ensure that your transfer switch is installed correctly and efficiently.
- Ensuring Safety: Electrical work can be hazardous, with the risk of electrocution or fire if not done correctly. Electricians prioritize safety during the installation process, minimizing any potential risks and ensuring that your electrical system operates safely.
- Preventing Damage: Incorrect installations can result in damage to your electrical system, appliances, or even your entire home. Electricians have the expertise to avoid damage and troubleshoot any issues that may arise during the installation, safeguarding your investment and minimizing the chances of costly repairs.
By recognizing the value of professional assistance and calling an electrician when needed, you can ensure a smooth and reliable installation of your manual transfer switch. Don’t hesitate to reach out to a licensed electrician to handle the job safely and efficiently.
Frequently Asked Questions
Do You Have To Turn Off The Main Breaker When Using A Transfer Switch?
Yes, you need to turn off the main breaker when using a transfer switch. This is to ensure the safety of both the electrical system and those working on it. The transfer switch allows you to switch between utility power and a backup generator, and by turning off the main breaker, you prevent power from flowing back into the utility lines.
Do You Bond The Neutral In A Manual Transfer Switch?
No, the neutral is not bonded in a manual transfer switch.
Can I Install My Own Manual Transfer Switch?
Yes, you can install your own manual transfer switch as long as you follow proper electrical safety guidelines and have the necessary knowledge and skills. However, it is recommended to consult a licensed electrician to ensure a proper installation and avoid any potential risks or problems.
Is A Manual Transfer Switch Worth It?
A manual transfer switch is worth it because it allows for safely and easily switching between grid power and a backup generator during a power outage. It ensures uninterrupted power supply, protects electrical equipment, and offers peace of mind. It’s a reliable solution for emergency power needs.
Conclusion
To sum it up, installing a manual transfer switch is a crucial step in ensuring uninterrupted power supply during emergencies. By following the detailed steps mentioned in this guide, you can easily set up a manual transfer switch and protect your home or business from unexpected power outages.
Remember, safety should be your priority throughout the installation process. So, stay cautious, refer to the manufacturer’s instructions, and seek professional guidance if needed. With a properly installed manual transfer switch, you can have peace of mind and be prepared for any unexpected power disruptions.