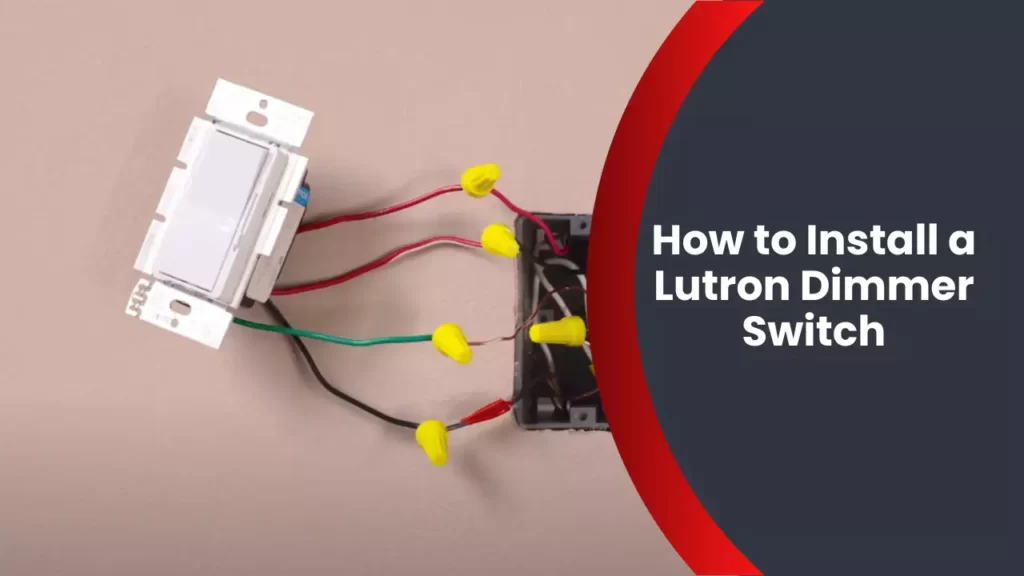
To install a Lutron Dimmer Switch, follow these steps: Turn off the power, remove the existing switch, connect the dimmer wires, and secure the dimmer. Installing a Lutron Dimmer Switch is a simple and efficient way to control the lighting in your space.
Whether you want to create ambiance or save energy, a dimmer switch allows you to adjust the brightness to your preference. In this guide, we will walk you through the installation process of a Lutron Dimmer Switch step by step.
By the end, you’ll be able to enjoy the benefits of personalized lighting in your home or office. Let’s get started!
Understanding The Basics Of A Lutron Dimmer Switch
What is a Lutron dimmer switch?
A Lutron dimmer switch is a device that allows you to control the level of lighting in a room. Unlike traditional switches that simply turn lights on or off, a dimmer switch gives you the ability to adjust the brightness to your preference. Whether you want to create a cozy ambiance or increase visibility for tasks, a Lutron dimmer switch provides you with versatile lighting control.
How does a dimmer switch work?
Lutron dimmer switches work by regulating the amount of electrical power supplied to the lights. They utilize advanced technology that alters the voltage waveform to reduce or increase brightness. When you rotate the dimmer switch, it adjusts the resistance in the circuit, thus controlling the amount of electricity flowing to the lights. This dimming mechanism allows you to tailor the lighting level according to your needs and preferences.
Benefits of installing a dimmer switch in your home
Installing a Lutron dimmer switch in your home offers several advantages that enhance both aesthetics and functionality. Consider the following benefits:
- Energy efficiency: By reducing the brightness of your lights, dimmer switches help conserve energy and lower your electricity bills. You have the flexibility to adjust lighting levels based on the specific requirements of each room, ensuring lights are never unnecessarily bright.
- Mood enhancement: Dimmer switches enable you to create the perfect atmosphere for any occasion. Whether you’re hosting a romantic dinner or having a movie night, you can easily dim the lights to match the desired ambiance.
- Extended bulb lifespan: Constantly running lights at full brightness can decrease the lifespan of your light bulbs. With a dimmer switch, you can extend the lifespan by reducing the intensity, saving you money on frequent bulb replacements.
- Flexible lighting options: With a Lutron dimmer switch, you have the ability to adjust lighting levels to suit different activities. Brighter lights are ideal for tasks that require focus and clarity, while dimmer settings create a soothing environment for relaxation or sleep.
- Enhanced comfort: Dimmer switches provide an added level of comfort by reducing glare from overly bright lights. They allow you to find the perfect balance of light without straining your eyes or causing discomfort.
By understanding the basics of a Lutron dimmer switch, you can make an informed decision about installing one in your home. With their energy-saving capabilities, mood-enhancing qualities, and overall convenience, dimmer switches offer a simple yet effective way to improve the lighting experience in any room.
Preparing For Installation
Before diving into the installation process of your Lutron dimmer switch, it’s important to make sure you’re adequately prepared. By taking a few simple steps, you can ensure a smooth and successful installation.
Tools and Materials Needed
The first thing you’ll need to do is gather the necessary tools and materials. Here is a list of everything you’ll need:
| Tools | Materials |
|---|---|
|
|
Safety Precautions to Consider Before Starting the Installation
Prior to beginning the installation of your Lutron dimmer switch, it’s essential to prioritize safety. Here are a few precautions to keep in mind:
- Turn off the power: Before working with any electrical wiring, make sure to turn off the power supply to the switch at the circuit breaker panel. This will help prevent any accidents or electric shocks.
- Test the wires: Use a voltage tester to check if the wires in the electrical box are live. This ensures that there’s no power flowing through them before you start working on the installation.
- Follow the manufacturer’s instructions: Each dimmer switch may have specific guidelines provided by the manufacturer. Take the time to read and understand these instructions before proceeding with the installation.
- Secure electrical connections: Ensure all wire connections are properly secured using wire nuts and electrical tape to prevent any loose or exposed wires.
Choosing the Right Dimmer Switch for Your Specific Needs
To achieve the desired lighting control, it’s crucial to select the right dimmer switch for your specific needs. Consider the following factors when choosing a dimmer switch:
- Bulb compatibility: Different dimmer switches may be designed for certain types of bulbs, such as incandescent, LED, or CFL. Make sure the switch you choose is compatible with the bulbs you’ll be using.
- Single-pole or multi-location: Determine whether you need a single-pole dimmer switch, which controls a light from one location, or a multi-location switch, which allows control from multiple switches.
- Dimming capabilities: Some dimmer switches offer advanced features like preset lighting levels or fade-in and fade-out capabilities. Consider these options if you require more customizable lighting control.
- Style and design: Dimmer switches come in various styles and finishes, so choose one that complements your home decor and personal preferences.
By carefully considering these factors, you can ensure that the dimmer switch you select meets your specific lighting requirements.
Step 1: Turning Off The Power
Before beginning the installation process of your Lutron dimmer switch, it is crucial to turn off the power to the area where you will be working. This step is important for your safety and to prevent any electrical mishaps.
Locating and turning off the correct circuit breaker
The first thing you need to do is locate the circuit breaker that controls the power supply to the area where you will be installing the dimmer switch. The circuit breakers are typically found in the electrical panel of your home. It is essential to know which circuit breaker corresponds to the specific area you are working on to turn it off.
To locate the correct circuit breaker:
- Start by finding the electrical panel in your home. It is usually located in the basement, garage, or utility room.
- Open the panel door, and you will see a series of switches or breakers.
- Look for labels or markings on the breakers that indicate the different areas or rooms they power. If there are no labels, you may need to test each breaker individually.
- Identify the breaker that controls the power to the area where you will be installing the dimmer switch.
- Once you have located the correct breaker, flip the switch to the “off” position. This action will cut off the power supply to that specific area or room.
Testing the power to ensure it is completely off
After turning off the circuit breaker, it is crucial to test the power to ensure it is completely off before proceeding with the installation. Testing the power will provide an extra layer of safety and prevent any accidental electric shocks.
Follow these steps to test the power:
- Gather a voltage tester or a multimeter to check the presence of electrical current.
- Make sure the tester is working correctly by testing it on a known power source, such as a working outlet.
- Next, carefully insert the tester’s prongs into the switch aperture or outlet where you are installing the dimmer switch.
- Observe the tester’s readings or indicators. If the tester does not show any signs of electrical current, it is safe to proceed with the installation. However, if the tester indicates the presence of electricity, it means the power is still on, and you should double-check the circuit breaker.
It is crucial to ensure that the power is completely off to prevent any accidents during the installation of your Lutron dimmer switch. Taking these necessary precautions will make the installation process much safer and more efficient.
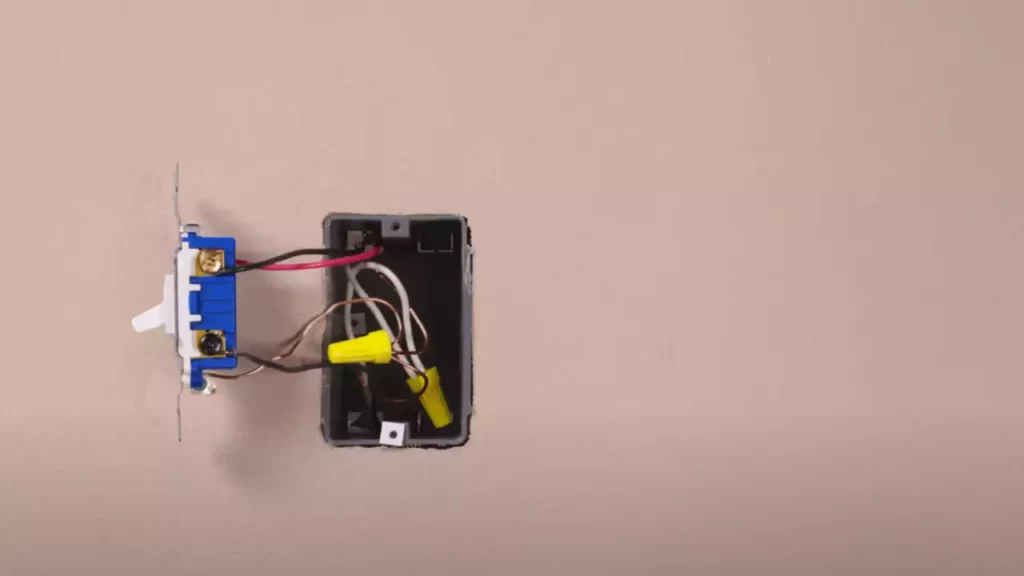
Step 2: Removing The Existing Switch
Before you install your new Lutron dimmer switch, you’ll need to remove the existing switch. This step is crucial to ensure a safe and successful installation. Follow these simple steps to easily remove the existing switch:
Removing the switch cover plate
The first thing you need to do is remove the switch cover plate. This plate is typically held in place by one or two screws, which can be easily removed using a screwdriver. Once the screws are loose, gently pull the cover plate away from the wall to reveal the switch.
Unscrewing and disconnecting the wires from the existing switch
Once the switch cover plate is removed, you’ll need to unscrew and disconnect the wires from the existing switch. Here’s how:
- Start by turning off the power to the switch at the circuit breaker. This is crucial for your safety.
- Using a screwdriver, carefully unscrew the screws that are holding the wires in place on the existing switch. Remember to make a note of the wire colors and their corresponding locations.
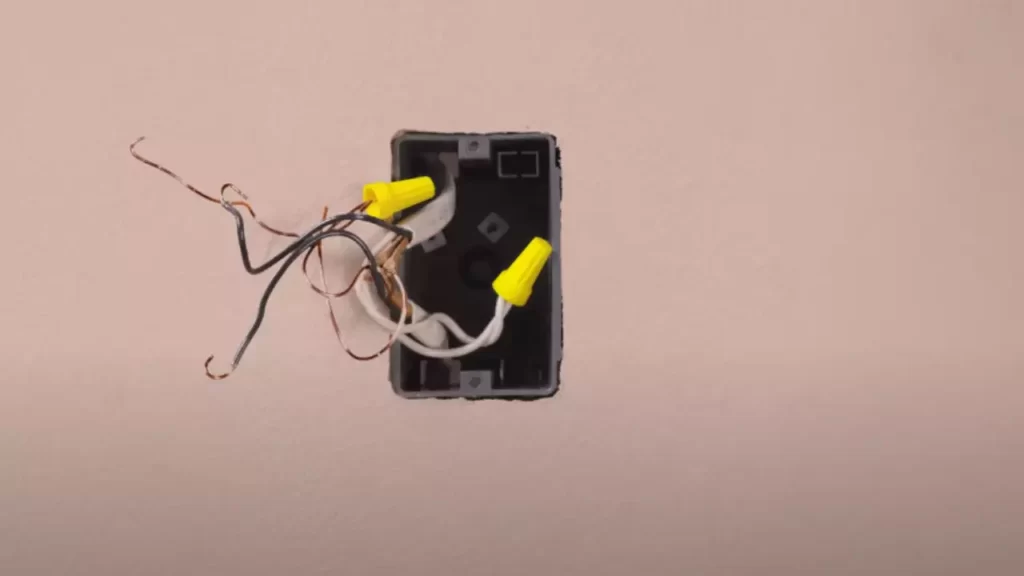
- After unscrewing the wires, gently pull them out and disconnect them from the existing switch. You may need to use a pair of pliers to loosen any tightly connected wires.
Make sure to double-check that all wires are completely disconnected before proceeding to the next step.
Once you’ve successfully removed the switch cover plate and disconnected the wires from the existing switch, you can move on to the next step of installing your Lutron dimmer switch. Stay tuned for step 3 where we’ll guide you through the process of wiring your new dimmer switch.
Step 3: Preparing The Dimmer Switch
Now that you have turned off the power supply and removed the existing switch, it’s time to prepare the Lutron dimmer switch for installation. This step will ensure that your new dimmer switch functions properly and meets your desired lighting preferences. In this section, we will familiarize ourselves with the different parts of the Lutron dimmer switch and adjust the switch settings as needed.
Familiarizing yourself with the different parts of the Lutron dimmer switch
Before you begin installing the dimmer switch, it’s important to become acquainted with its various components. This will help you understand how to properly install and operate the switch, ensuring optimal performance. The Lutron dimmer switch typically consists of the following parts:
| Component | Description |
|---|---|
| Faceplate | The faceplate is the visible cover of the dimmer switch that conceals the wiring and provides a sleek look. |
| Slide control | The slide control is the main feature of the dimmer switch that allows you to adjust the lighting intensity by sliding it up or down. |
| On/Off button | The on/off button is located next to the slide control and is used to turn the lights on or off without adjusting the dimming level. |
| LED indicator | The LED indicator light provides visual feedback, indicating whether the lights are on or off. |
Adjusting the switch settings as needed
Every home is unique, and your lighting requirements may vary. Luckily, the Lutron dimmer switch offers customizable settings to suit your preferences. Here’s how you can adjust the switch settings:
- Locate the adjustment tabs or screws on the dimmer switch. They are usually found on the side or bottom of the switch.
- Using a small screwdriver, gently turn the tabs or screws to adjust the brightness settings.
- Test the dimmer switch by sliding the control up and down to ensure it provides the desired level of illumination.
- If you find that the lights flicker or there is buzzing noise when the dimmer is in use, you can fine-tune these settings to eliminate any potential issues.
- Once you are satisfied with the adjustment, secure the adjustment tabs or screws to lock in your preferred settings.
By adjusting the switch settings, you can achieve the perfect lighting ambiance in your home. It’s essential to experiment with the dimmer switch to find the ideal balance between brightness and energy efficiency. With the Lutron dimmer switch, you have the flexibility to create a cozy atmosphere or a well-lit space with just a simple adjustment.
In the next section, we will move on to the exciting part – installing the Lutron dimmer switch in your home.
Step 4: Wiring The Dimmer Switch
Now that you have successfully removed the old switch and prepared the junction box, it’s time to wire the new Lutron dimmer switch. This step is crucial to ensure proper functioning and compatibility with your home’s electrical system. Follow the steps below to correctly identify and connect the wires to the appropriate terminals on the dimmer switch.
Identifying and connecting the wires to the appropriate terminals on the dimmer switch
Before beginning the wiring process, make sure to turn off the power supply to the circuit you’re working on. This is an essential safety precaution to avoid any electrical accidents. Once the power is switched off, you can begin identifying the wires and their corresponding terminals.
- Start by identifying the dimmer switch’s terminals. Typically, Lutron dimmer switches have four main terminals:
- Next, identify the wires in the junction box by their color. The most common wire colors you’ll encounter are:
- Black: This wire carries the incoming power supply and connects to the dimmer switch’s black terminal.
- Red: This wire leads to the light fixture and connects to the dimmer switch’s red terminal.
- Green or bare: This wire is the grounding wire and should be connected to the dimmer switch’s green terminal.
- White: If present in your wiring, the white wire is the neutral wire and should be connected to the dimmer switch’s white terminal.
- Once you have identified the wires and their corresponding terminals, connect them securely. To do this:
- Strip the insulation of each wire to expose a small length of the conductor.
- Insert the stripped end of the wire into the corresponding terminal on the dimmer switch.
- Tighten the screw on each terminal to secure the connection. Make sure the connection is tight and there is no exposed wire outside the terminal.
| Terminal | Description |
|---|---|
| Black (Hot) | This terminal connects to the black wire, which carries the incoming power supply. |
| Red (Load) | The red terminal connects to the wire that leads to the light fixture. |
| Green (Ground) | This terminal connects to the grounding wire, usually green or bare. |
| White (Neutral) | If available, connect the white terminal to the neutral wire, which can be found in some older installations. |
Securing the connections with wire nuts or electrical tape
After connecting the wires to the appropriate terminals, it’s important to secure the connections to prevent any accidental exposure or loose connections. There are two primary methods you can use to secure the connections:
- Wire nuts: Twist the exposed ends of the connected wires together clockwise until they are tightly joined. Then, cover the connection with a wire nut, twisting it clockwise until it is firmly in place. This method ensures a secure and insulated connection.
- Electrical tape: If you prefer using electrical tape, wrap it tightly around the connection, ensuring that all exposed wire ends are covered. This provides additional insulation and ensures the wires stay securely connected.
Remember that it’s vital to secure all wire connections properly, as loose or exposed wires can lead to electrical hazards or malfunctioning of the dimmer switch. Take the time to double-check each connection before proceeding to the next step in the installation process.
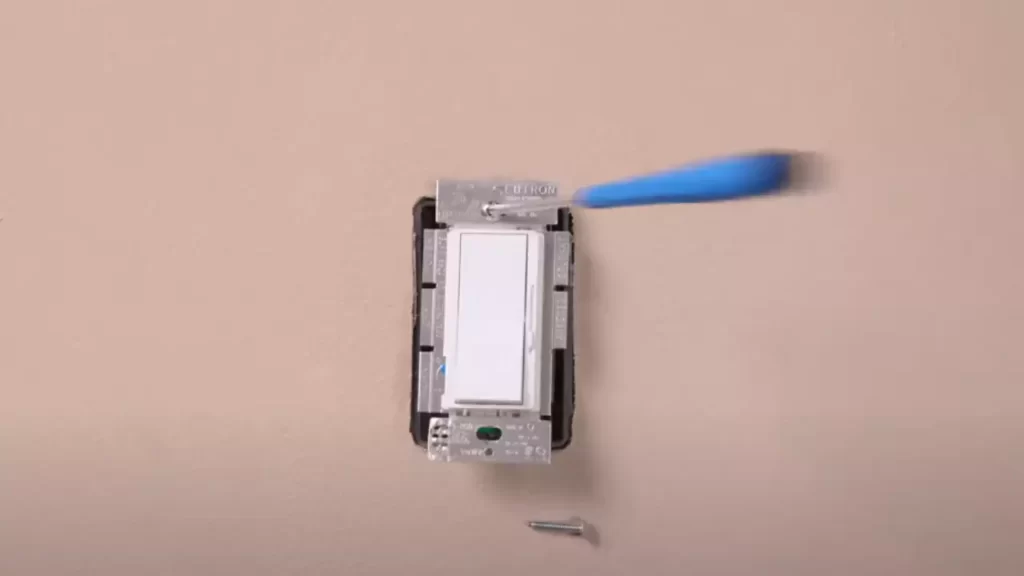
Step 5: Installing The Dimmer Switch
Now that you’ve prepared the electrical box and wired the dimmer switch, it’s time to proceed with the installation process. Follow these simple steps to mount the dimmer switch securely onto the electrical box and ensure proper functionality.
Mounting the dimmer switch onto the electrical box
1. Carefully hold the dimmer switch over the electrical box, aligning the screw holes on the switch with those on the box.
2. Insert the provided screws through the holes on the switch and into the box. Tighten them securely, but make sure not to overtighten as it may damage the switch or the electrical box.
Safely securing the switch in place
1. Once the dimmer switch is mounted, gently push it into the electrical box.
2. Confirm that the switch is flush against the wall and level with the surrounding switches or outlets.
3. If needed, use a screwdriver to adjust the alignment of the switch by loosening the screws slightly, repositioning the switch, and then tightening the screws again. This will ensure a neat and professional appearance.
4. Verify that the switch is securely in place and does not wiggle or move when touched. This will help prevent any accidental disconnections or damage to the wiring.
Remember, the proper installation of a dimmer switch is crucial for both safety and functionality purposes. So, by following these steps, you can ensure a hassle-free installation and enjoy the benefits of having a Lutron dimmer switch in your home.
Step 6: Testing The Dimmer Switch
Congratulations! You’re almost done with the installation process. Now it’s time to verify that your Lutron Dimmer Switch is working correctly. Follow these steps to test its functionality.
Turning the power back on
Before testing the dimmer switch, you need to restore the power supply to your lighting circuit. Locate the circuit breaker panel in your home and switch the corresponding breaker back to the “on” position. This will restore electricity to the lights connected to your dimmer switch.
Checking the functionality of the dimmer switch
Once the power is back on, it’s time to ensure that your dimmer switch is functioning properly. Follow these steps to test its functionality:
- Turn the switch on: Begin by turning the dimmer switch on. You should hear the familiar “click” sound as you do so.
- Adjust the brightness: Gradually rotate the dimmer switch to increase or decrease the brightness of the lights. Observe whether the lights respond accordingly, smoothly transitioning from brighter to dimmer.
- Test the full range: Slide the dimmer switch from its lowest to its highest setting, ensuring that the lights adjust accordingly. The range should be smooth and without any flickering.
- Check for buzzing or overheating: While testing the dimmer switch, pay attention to any unusual buzzing sounds or excessive heat emitted from the switch. If you notice either of these issues, it may be a sign of a faulty installation and you should consult a professional electrician.
- Confirm compatibility: If you have connected the dimmer switch to LED or CFL bulbs, verify that the lights are compatible with the switch. Some dimmers may require specific bulb types, so be sure to consult the manufacturer’s instructions.
By following these steps, you can ensure that your Lutron Dimmer Switch is working as intended. If you encounter any issues during the testing process, it’s always a good idea to consult the manufacturer’s guidelines or seek assistance from a professional electrician. With a properly installed and fully functional dimmer switch, you can enjoy customizable lighting and create ambiance in your home.
Troubleshooting Common Issues
After successfully installing your Lutron Dimmer Switch, you might encounter some common issues that can affect its performance. Don’t worry, though, as most of these issues can be easily resolved with a few troubleshooting steps. Below, we have outlined the common issues you may encounter and how to address them.
Dimmer switch not working properly
If your dimmer switch is not working as expected, there could be a few reasons behind this issue. Follow these troubleshooting steps to identify and resolve the problem:
- Double-check the wiring connections: Make sure that all the wires are securely connected and properly attached to both the switch and the electrical panel. Loose or incorrect wiring can lead to malfunctioning of the dimmer switch.
- Verify the power supply: Ensure that the power supply to the dimmer switch is not interrupted. Check the circuit breaker to see if it has tripped. If it has, reset it and observe if the switch starts working properly.
- Check the compatibility: Lutron dimmer switches are designed to work with specific types of bulbs. Ensure that you are using compatible bulbs with the dimmer switch. Using incompatible bulbs can cause flickering or inconsistent performance.
- Inspect the dimming range: Some dimmer switches have a minimum and maximum wattage rating. Verify that the total wattage of the bulbs connected to the dimmer switch falls within the specified range. If the wattage exceeds the maximum limit, it can lead to issues with the dimmer switch.
Flickering lights or buzzing sounds
Flickering lights or buzzing sounds are common problems that can occur when using a dimmer switch. To troubleshoot and resolve these issues, follow these steps:
- Adjust the dimmer settings: If the lights are flickering or buzzing, try adjusting the dimmer switch to different levels. Sometimes, the lights may flicker or emit buzzing sounds when the dimmer is set too low or too high. Find the optimal setting that works best for your specific bulbs.
- Replace incompatible bulbs: Incompatibility between the dimmer switch and the bulbs can cause flickering or buzzing. Make sure you are using bulbs that are compatible with the specific dimmer switch model you have installed. Replace any incompatible bulbs with ones that are recommended by Lutron.
- Dimmer overload: Exceeding the maximum wattage rating of the dimmer switch can result in flickering lights or buzzing sounds. Check the total wattage of the bulbs connected to the dimmer switch and ensure it falls within the specified range. If it doesn’t, consider reducing the number of bulbs or upgrading to a higher-rated dimmer switch.
By following these troubleshooting steps, you should be able to resolve most common issues associated with Lutron Dimmer Switches. Enjoy the convenience and control that a dimmer switch provides in your home!
Additional Tips And Considerations
Additional Tips and Considerations
When installing a Lutron Dimmer Switch, there are a few additional tips and considerations to keep in mind. Understanding the dimming range and compatibility with different types of bulbs is vital to achieve the desired lighting effect. Additionally, adjusting the dimmer switch settings according to your specific lighting needs can enhance the ambiance of any room.
Understanding the dimming range and compatibility with different types of bulbs
Before installing a Lutron Dimmer Switch, it is important to understand the dimming range and which bulbs it is compatible with. Not all bulbs are suitable for dimming, and using the wrong bulb can result in flickering or inadequate dimming.
Here are a few things to consider:
| Dimming Range | Compatible Bulbs |
|---|---|
| Full Range Dimming (0-100%) | Incandescent, Halogen |
| Leading Edge Dimming (0-100%) | Most Dimmable LEDs |
| Trailing Edge Dimming (0-100%) | Most Dimmable CFLs, Dimmable LEDs |
Adjusting the dimmer switch settings for desired lighting levels
Once the Lutron Dimmer Switch is installed, you can adjust the settings to achieve your desired lighting levels. Follow these steps:
- Start by turning the dimmer switch to its highest level.
- Turn on the lights and check if they are too bright for your preference.
- If the lighting is too bright, start gradually lowering the dimmer switch until you reach a comfortable level.
- Alternatively, if the lighting is not bright enough, gradually increase the dimmer switch until the desired level is achieved.
- Repeat the adjustment process for each dimmer switch in the room to ensure consistent lighting throughout.
By carefully adjusting the dimmer switch settings, you can create the perfect ambiance for any occasion.
Frequently Asked Questions
How Do You Wire A Lutron Dimmer Light Switch?
To wire a Lutron dimmer light switch, first turn off the power at the circuit breaker. Then, remove the existing switch and disconnect the wires. Connect the corresponding wires from the Lutron dimmer switch to the electrical wires using wire connectors.
Finally, secure the switch into the wall box and restore power to test the dimmer.
Can You Install Lutron Yourself?
Yes, you can install Lutron yourself. It is a simple and user-friendly process that does not require professional help. Just follow the instructions provided with the Lutron product and you’ll be able to install it easily.
How Do You Install A Lutron 3 Way Dimmer Switch?
To install a Lutron 3-way dimmer switch, turn off the power, remove the old switch, and identify the common wire. Connect the common wire to the new dimmer switch’s black wire. Then, connect the remaining switch wires to the dimmer switch and secure it in the electrical box.
Finally, restore power and test the dimmer switch.
Can You Install A Dimmer Switch Yourself?
Yes, you can install a dimmer switch yourself. It’s a simple process that doesn’t require professional help. Just make sure to follow the instructions carefully and turn off the power before starting. Remember to use the right tools and take necessary safety precautions.
Conclusion
Installing a Lutron dimmer switch is a simple and effective way to enhance the lighting in your home. By following the step-by-step instructions provided in this blog post, you can achieve the perfect ambiance in any room. With its user-friendly design and compatibility with various light sources, the Lutron dimmer switch is a valuable addition to any home.
So why wait? Get started on your installation today and enjoy the benefits of personalized lighting.