Install a Hunter Fan by following the instructions provided in the user manual. A Hunter Fan is easy to install with the proper tools and step-by-step guidance.
Hunter Fans are a popular choice for homeowners who want to improve air circulation and add style to their living spaces. Installing a Hunter Fan is a simple process that requires some basic tools and careful attention to the provided instructions.
Whether you’re replacing an old ceiling fan or installing a new one, this guide will outline the necessary steps to get the job done. We will walk you through the process of installing a Hunter Fan, ensuring optimal performance and functionality. So, let’s get started and have your Hunter Fan up and running in no time.
Find The Perfect Location For Your Hunter Fan
Choosing the right location for your Hunter Fan is crucial to ensuring optimal airflow and functionality. With a few considerations, you can find the perfect spot that not only complements the aesthetics of your space but also enhances the overall comfort. In this guide, we will take you through the essential steps in finding the ideal location for your Hunter Fan installation.
Measure your ceiling height and choose the proper fan size
Before you start with the installation process, it’s important to measure your ceiling height accurately. This step will help you select the right fan size to ensure maximum performance. To measure your ceiling height, follow these simple steps:
- Use a measuring tape to measure the distance between the floor and the ceiling.
- Note down this measurement, as it is a critical factor in determining the fan size that will work best in your space.
- Refer to the Hunter Fan size guide to select a fan that fits the height of your ceiling.
Assess the room layout and identify the most suitable location
Once you have selected the appropriate fan size, it’s time to assess your room layout to identify the most suitable location for your Hunter Fan. Consider the following factors:
- Look for a central location in the room to ensure even distribution of airflow.
- Identify any architectural features or obstructions, such as beams or sloping ceilings, which may affect the placement of your fan.
- Consider the aesthetics of the room and choose a location that enhances the overall design.
By carefully assessing your room layout, you can find the best spot that not only provides optimal airflow but also adds to the visual appeal of your space.
Ensure at least 8 inches of clearance between the blades and any obstruction
When determining the location for your Hunter Fan, it’s important to ensure there is sufficient clearance between the fan blades and any adjoining obstructions. This clearance is essential for safe and efficient operation. Follow these guidelines:
- Measure the distance between the chosen location and any nearby walls or furniture.
- Ensure there is a minimum of 8 inches of clearance between the fan blades and any obstruction to prevent any accidents or damage.
- If your room layout does not allow for the required clearance, consider alternative locations or explore low-profile fan options that provide a better fit.
Check for sufficient electrical supply in the chosen location
Before proceeding with the installation, it is crucial to check if the chosen location has sufficient electrical supply to power the Hunter Fan. Follow these steps:
- Inspect the existing electrical wiring to ensure it can support the voltage requirements of the fan.
- If needed, consult a qualified electrician to make any necessary upgrades or modifications to the electrical system.
- Ensure there is a nearby electrical outlet or junction box that can accommodate the fan’s wiring.
By checking the electrical supply in advance, you can avoid any potential issues and ensure a smooth installation process.
Taking the time to find the perfect location for your Hunter Fan will greatly enhance its performance, aesthetics, and overall functionality. By measuring ceiling height, assessing room layout, ensuring clearance, and checking electrical supply, you can enjoy the cool breeze and stylish design that Hunter Fans offer.
Assemble Your Hunter Fan
Once you have unboxed your Hunter fan and laid out all the included parts, it’s time to start assembling your stylish and efficient cooling solution. Proper assembly is crucial for a seamless installation that ensures optimal performance and longevity of your fan. In this guide, we will walk you through each step, from identifying and organizing the components to securely attaching the fan blades and mounting the fan canopy.
Unbox your Hunter fan and lay out all the included parts
Begin the assembly process by carefully unboxing your Hunter fan and laying out all the parts included in the package. It’s essential to ensure that you have received all the components before starting the installation. Here is a list of the typical components you should find:
| Components | Quantity |
|---|---|
| Motor Housing | 1 |
| Fan Blades | 3-5, depending on the model |
| Mounting Hardware | Varies |
| Canopy | 1 |
| Electrical Wires | As required |
Make sure to keep all the packaging materials handy in case you need them later. Double-checking the contents will save you time and hassle during the installation process.
Identify and organize the components for easy installation
Now that you have all the parts laid out, it’s important to identify and organize them according to the assembly instructions. This step will make the installation process much smoother. Refer to the instruction manual provided with your Hunter fan to understand the specific arrangement of the components.
Organize the mounting hardware, screws, or brackets, and separate them according to their respective locations to avoid confusion during installation. This way, you’ll have everything you need within arm’s reach when putting together your Hunter fan.
Attach the fan blades securely to the motor housing
Once you have organized the components, it’s time to attach the fan blades securely to the motor housing. Carefully align each blade with the corresponding slot on the motor housing, making sure they are securely fastened. Use the provided screws or fasteners to firmly attach each blade, ensuring that they are evenly spaced for balanced airflow.
Remember to handle the fan blades with care and avoid bending or damaging them during installation. Properly attaching the blades will guarantee smooth and efficient operation, minimizing any unnecessary noise or vibration.
Mount the fan canopy and ensure it is securely fastened
After attaching the fan blades, you can now proceed to mount the fan canopy. The canopy conceals the wiring and provides a polished appearance to your fan installation. Following the instructions provided with your Hunter fan, position the canopy over the motor housing and align it with the mounting brackets.
Securely fasten the canopy by tightening the screws or other fasteners until it is firmly in place. This step is essential for the stability and safety of your Hunter fan, ensuring it remains securely attached to the ceiling.
With the fan canopy securely fastened, you have successfully assembled your Hunter fan. Now you can move on to the next steps of wiring and mounting the fan to enjoy its cooling breeze and stylish design.

Wiring And Connecting Your Hunter Fan
Proper wiring and connection of your Hunter Fan is crucial to ensure its safe and efficient operation. By following these steps, you can easily install your Hunter Fan and enjoy its cooling breeze in no time.
Turn off the power at the circuit breaker before starting any electrical work
Before you begin installing your Hunter Fan, it’s essential to turn off the power at the circuit breaker. This ensures your safety and prevents any accidents from occurring. Locate the circuit breaker panel in your home and switch off the power to the room where you’ll be installing the fan. Double-check that the power is indeed off before proceeding.
Remove the existing ceiling fan or light fixture if applicable
If you have an existing ceiling fan or light fixture in the designated area, you’ll need to remove it before installing your Hunter Fan. Begin by turning off the wall switch and disconnecting any electrical connections between the fixture and the junction box. Carefully remove the fixture from the ceiling, taking note of any screws or mounting hardware that may need to be reused later.
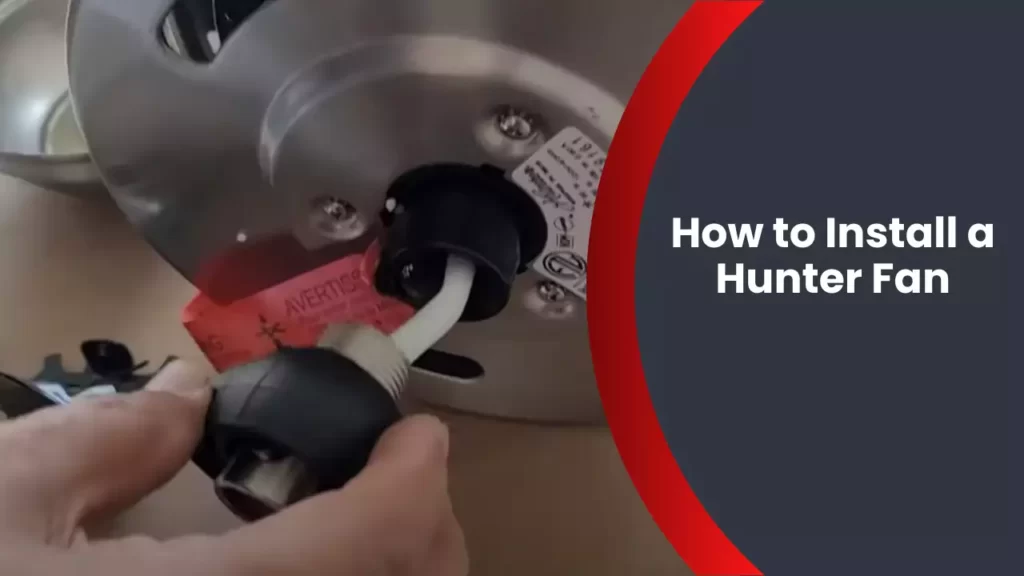
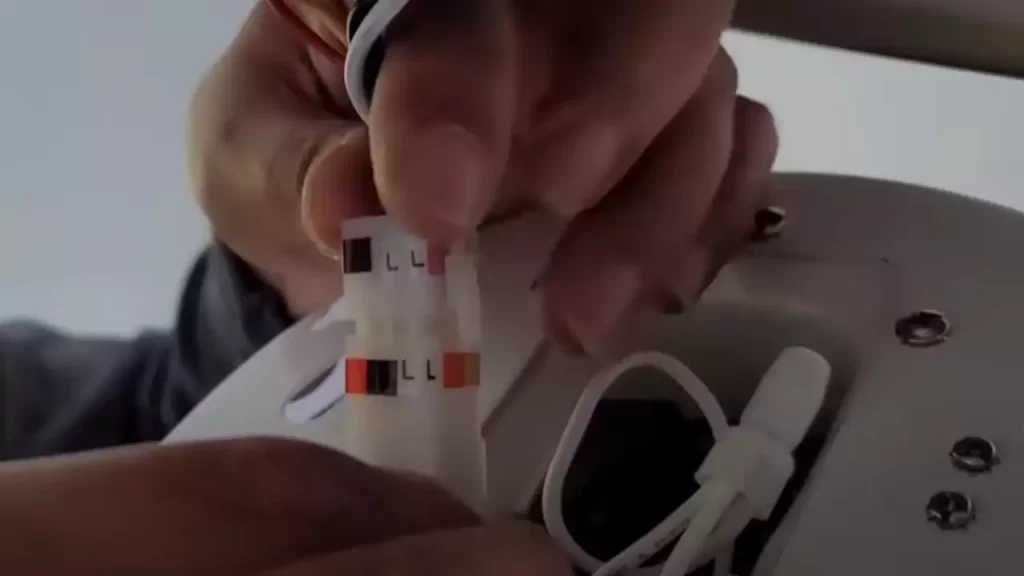
Connect the fan’s wiring to the corresponding wires in the junction box
Now that you’ve prepared the area and removed any previous fixtures, you can begin connecting your Hunter Fan. Start by identifying the wires in the junction box: typically, you’ll have a black (hot) wire, a white (neutral) wire, and a bare copper or green wire (ground). Refer to the Hunter Fan installation instructions to determine the exact wiring configuration for your particular fan model.
Next, match the corresponding wires from the fan to those in the junction box. Connect the black (hot) wire from the fan to the black (hot) wire in the junction box, the white (neutral) wire from the fan to the white (neutral) wire in the junction box, and the bare copper or green wire from the fan to the copper or green wire in the junction box. Secure each connection by twisting the wires together clockwise and applying a wire nut.
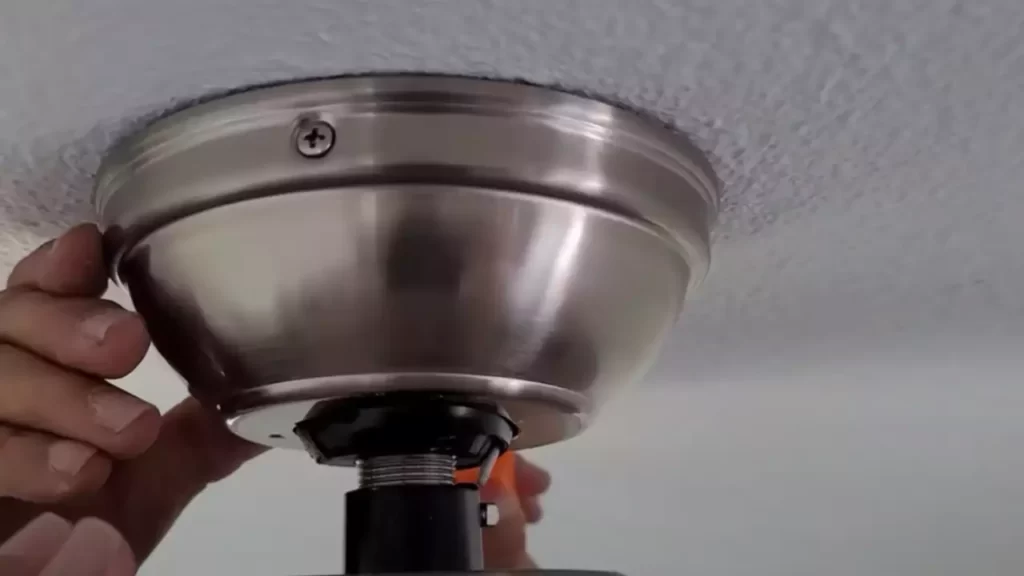
Securely attach the fan to the ceiling bracket or mounting plate
With the wiring complete, it’s time to securely attach your Hunter Fan to the ceiling bracket or mounting plate. Lift the fan and align the mounting holes on the fan’s canopy with the corresponding holes on the bracket or plate. Use the provided screws to fasten the fan in place. Ensure that all screws are tightened firmly but not excessively, taking care not to over-torque them.
Double-check that all connections are secure and that the fan is safely attached to the ceiling. Restore power at the circuit breaker and test the fan’s operation by flipping the wall switch. If everything is properly installed, you should be able to enjoy the gentle breeze and soothing ambiance of your new Hunter Fan!
Installing The Fan’S Features And Accessories
Install the fan’s light kit, if included, following the manufacturer’s instructions
Now that you have installed your Hunter Fan and it’s securely mounted, it’s time to move on to installing its features and accessories. One key feature that many Hunter Fans come with is a light kit. Installing the light kit is a straightforward process, as long as you follow the manufacturer’s instructions. Start by turning off the power to the fan at the circuit breaker to ensure safety. Then, locate the light kit assembly and carefully remove it from its packaging. Take note of the different components, such as the light fixtures, bulbs, and wiring. Follow the instructions provided by the manufacturer to connect the light kit to the fan. This may involve connecting wiring harnesses or screwing in the light fixtures. Ensure that all connections are secure and tight. Once everything is in place, turn the power back on and test the lights. If everything is functioning properly, congratulations! You have successfully installed the fan’s light kit.
Attach any additional features or accessories, such as a remote control
In addition to the light kit, Hunter Fans often offer additional features and accessories to enhance your ceiling fan experience. One popular accessory is a remote control, which allows you to conveniently operate the fan from anywhere in the room. To attach a remote control, start by identifying the receiver unit. It is usually located inside the fan’s canopy or housing. Carefully remove the canopy cover to expose the wiring and receiver. Then, follow the instructions provided with the remote control kit to connect the receiver to the wiring. This usually involves matching the corresponding wires and securely twisting them together. Once the wires are connected, tuck them back into the canopy and reattach the canopy cover. Make sure everything is securely fastened. Finally, insert the batteries into the remote control and test its functionality. Your fan is now ready to be controlled remotely, providing you with added convenience and ease of use.
Ensure all connections are secure and the fan functions properly
After installing the fan’s features and accessories, it’s important to ensure that all connections are secure and that the fan functions properly. Start by visually inspecting all the connections, checking for any loose or exposed wiring. Tighten any loose screws or connections as needed. Next, switch on the fan and observe its operation. Ensure that it runs smoothly and quietly, without any wobbling or unusual noises. Test the different fan speeds to ensure they are working correctly. If your fan has a reversible motor, check that it can switch between the forward and reverse modes effectively. Additionally, test the functionality of any installed accessories, such as the light kit or remote control. If there are any issues or abnormalities, refer to the manufacturer’s instructions or contact their customer support for assistance. By thoroughly checking all connections and functionalities, you can have peace of mind knowing that your Hunter Fan is properly installed and ready to provide you with cool comfort and style.
Balancing And Leveling Your Hunter Fan
Test the fan for any wobbling or uneven operation
Before you begin the installation of your Hunter Fan, it’s important to test it for any wobbling or uneven operation. This step is crucial as a balanced fan not only ensures smooth operation but also prevents unnecessary wear and tear, noise, and potential accidents.
To test for any imbalance, turn on the fan and observe its movements closely. If you notice any wobbling or shaking, it means that the fan blades are not properly aligned. This could be contributed to a variety of factors, including improper installation, bent blades, or an uneven mounting surface.
It’s worth mentioning that an unbalanced fan not only affects its performance but also reduces its efficiency in providing proper air circulation. Therefore, taking the time to balance and level your Hunter Fan is of utmost importance.
Use a balancing kit or adjustable downrod to correct any issues
If you detect any wobbling or uneven operation during the initial testing, don’t worry. Hunter Fans come equipped with balancing kits or adjustable downrods to help you correct these issues.
The balancing kit typically includes a weight clip and adhesive weights. To use the kit, start by attaching the weight clip to one of the fan blades. This allows you to experiment with the fan’s balance and determine the best placement for the weights.
If your fan is installed on an adjustable downrod, you can make use of the built-in leveling mechanism. Simply adjust the length of the downrod until the fan operates smoothly and without any wobbling.
Make adjustments until the fan is balanced and operates smoothly
Once you have identified the area of imbalance and chosen the appropriate method for correction, it’s time to make adjustments until your Hunter Fan is perfectly balanced and operates smoothly.
Turn off the fan before making any adjustments to ensure your safety. Start by adding small weights to the weight clip and observe if it reduces the wobbling. If needed, move the weights towards different fan blades until you achieve a balanced rotation.
If you are using an adjustable downrod, adjust the length accordingly to level the fan. Gradually increase or decrease the length and monitor the fan’s movement until you achieve an even rotation without any shaking or wobbling.
Remember to periodically test the fan’s operation while making adjustments to ensure each change brings you closer to a perfectly balanced fan.
Once you have achieved a balanced and smoothly operating Hunter Fan, you can rest assured knowing that you’ve optimized its performance and extended its lifespan. Take the time to go through the balancing and leveling process as it will greatly enhance your fan’s efficiency and enjoyment.
Testing And Finalizing Your Hunter Fan Installation
Once you have successfully installed your Hunter Fan, it is important to perform a series of tests to ensure that everything is functioning properly. In this section, we will guide you through the necessary steps to test and finalize your Hunter Fan installation, giving you the confidence that your fan is operating efficiently.
Restore power at the circuit breaker and turn on the fan
To kickstart the testing phase, restoration of power is crucial. Head over to your circuit breaker and switch on the power supply to the fan. Once the power is restored, proceed to turn on the fan using the included remote control or wall switch, depending on the model you have. This will activate the fan’s motor and bring it to life, ready for further examination.
Check all functions, including fan speed and lighting
Now that your Hunter Fan is up and running, it’s time to go through a comprehensive check of its functions. Begin by testing the different fan speeds to ensure they are operating correctly. Utilize the fan’s control options to adjust the speed settings, carefully observing any difference in airflow and noise level with each adjustment. This will help you determine if the fan is functioning smoothly across all speed settings.
Next, evaluate the lighting feature of your Hunter Fan, if applicable. Turn on the fan’s integrated lights or any separate light fixtures and assess their brightness, color temperature, and adjustability. Ensure that the lighting is working without flickering or any other irregularities, as this will contribute to the overall ambiance of the room.
Inspect for any unusual noises or operation
During the testing process, it is essential to pay attention to any unusual noises or operational issues that may arise. Observe the fan closely while it is running, listening for any clicking, grinding, or other irregular sounds. These noises could indicate a problem and may require further investigation or professional assistance. Additionally, keep an eye out for any vibrations or wobbling of the fan, as these signs could suggest an incorrect installation or an unbalanced fan.
Confirm that the fan is securely mounted and operating correctly
A securely mounted fan is not only vital for safety reasons but also ensures optimal performance. Take a moment to thoroughly inspect the fan’s mounting and make certain that it is tightly fastened to the ceiling or wall. Check the stability of the fan by gently pushing on it from different angles, making sure there is no excessive movement. Additionally, confirm that the fan blades are properly aligned and not hitting any obstructions, ensuring smooth and efficient operation.
By following the above steps and conducting a detailed examination of your Hunter Fan, you can rest assured that your installation is complete and successful. Taking the time to test and finalize your fan installation guarantees optimal performance and a pleasant cooling experience in your space. Now, sit back, relax, and enjoy the cool breeze provided by your Hunter Fan.
Maintaining Your Hunter Fan For Optimal Performance
Maintaining Your Hunter Fan for Optimal Performance
To ensure that your Hunter Fan continues to provide you with cool breezes and optimal performance, it is essential to invest some time and effort into regular maintenance. By following a few simple steps, you can keep your fan running smoothly for years to come. Let’s take a closer look at the key aspects of fan maintenance to keep in mind.
Regularly dust the fan blades and clean the fan housing
————————————————————-
The first step in maintaining your Hunter Fan is to regularly dust the fan blades and clean the fan housing. Over time, dust and dirt can accumulate on the blades and inside the housing, leading to reduced airflow and potentially causing the fan to work harder than necessary. To prevent this, it’s important to clean your fan at least once every three months.
Here’s a step-by-step guide on how to clean your Hunter Fan:
1. Start by turning off the fan and unplugging it from the power source.
2. Gently wipe the blades with a soft, damp cloth to remove any dust or dirt. Be careful not to bend or damage the blades while cleaning.
3. For the fan housing, use a mild detergent diluted in water to clean the surface. Again, make sure to use a soft cloth and avoid getting water into the motor or electrical components.
4. Once you’re done cleaning, let the fan dry completely before turning it back on.
Lubricate the bearings or moving parts, as recommended by the manufacturer
—————————————————————————–
To keep your Hunter Fan operating smoothly and quietly, it’s important to lubricate the bearings or any other moving parts as recommended by the manufacturer. Proper lubrication ensures that the fan operates efficiently while reducing the risk of wear and tear.
Here’s how to properly lubricate your Hunter Fan:
1. Consult the manufacturer’s instructions for the recommended lubrication method and the type of lubricant to use.
2. Before applying the lubricant, make sure the fan is turned off and unplugged.
3. Locate the lubrication points on the fan, which are typically marked with “L” or “Lubricate.”
4. Apply a small amount of lubricant to each lubrication point, following the manufacturer’s guidelines.
5. Turn the fan on and let it run for a few minutes to distribute the lubricant evenly.
Replace any worn-out or damaged components as needed
—————————————————–
Just like any other appliance, Hunter Fans may experience wear and tear over time. It is important to regularly inspect your fan for any signs of worn-out or damaged components and replace them as needed. Ignoring these issues could lead to further damage or malfunction.
Here are a few components to keep an eye on:
– Fan blades: If you notice any cracks, warping, or excessive wobbling, it’s time to replace the blades.
– Pull chain: If the pull chain becomes stiff or breaks, it should be replaced to ensure easy operation.
– Motor capacitor: If the fan is not functioning properly or has a slow start, the motor capacitor might need to be replaced.
– Electric wires: Loose or frayed wires can pose a safety hazard and should be replaced immediately.
Keep an eye out for any signs of wear or malfunction and address them promptly
——————————————————————————–
Even with regular maintenance, unforeseen issues can sometimes arise. That’s why it’s important to keep a vigilant eye on your Hunter Fan for any signs of wear, malfunction, or unusual noise. Addressing these issues promptly can prevent further damage and keep your fan running smoothly.
Here are some signs to look out for:
– Excessive noise: If your fan suddenly starts making loud noises, it could indicate a problem with the bearings, motor, or balance. Contact the manufacturer or a professional electrician for assistance.
– Slow speed: If your fan’s speed is noticeably slower than usual, it could be a sign of a motor or capacitor issue.
– Inconsistent operation: If the fan intermittently turns on or stops working altogether, there may be a problem with the electrical wiring or the pull chain switch.
By following these maintenance tips and addressing any issues promptly, you can ensure that your Hunter Fan continues to provide you with optimal performance and refreshing airflow for years to come. Don’t neglect the regular care and attention your fan deserves, and it will reward you with a cool and comfortable living space
Frequently Asked Questions
Are Hunter Fans Easy To Install?
Yes, Hunter fans are easy to install. Their installation process is simple and straightforward. You can easily follow the provided instructions and set up the fan in no time.
What Color Wires Go Together For A Ceiling Fan?
The color wires that go together for a ceiling fan are typically black to black, white to white, and green to green. Black connects to the hot wire, white connects to the neutral wire, and green connects to the ground wire.
What Wires Go Where On A Ceiling Fan?
Connect the white wire to the white wire, black wire to the black wire, and green wire to the bare copper or green wire. Check the manufacturer’s instructions for specific wire placement.
What Does Red Wire Go To On Ceiling Fan?
The red wire on a ceiling fan is typically the hot wire for the fan’s light kit. It connects to the hot wire in your electrical box to provide power to the light. Make sure to consult the manufacturer’s instructions or hire a professional electrician for proper installation.
Conclusion
Installing a Hunter fan is a simple and efficient way to improve the comfort and aesthetics of your home. With the step-by-step guide provided in this blog post, you can easily install a Hunter fan without any hassle. Remember to follow the safety precautions and consult the instruction manual for specific details.
Enjoy the cool breeze and stylish design of your new Hunter fan, enhancing your living space effortlessly. Happy fan installation!