To install a Hunter ceiling fan with light, follow the manufacturer’s instructions for wiring and mounting. The process involves connecting the fan’s wiring to the existing electrical wiring in the ceiling, securely attaching the fan to the ceiling bracket, and installing the light kit if desired.
Understanding The Hunter Ceiling Fan Model And Components
Brief Introduction to Hunter Ceiling Fans
In this section, we will delve into the world of Hunter ceiling fans. Hunter is a widely recognized and trusted brand known for its high-quality ceiling fans that combine functionality and style. These fans are designed to bring comfort and sophistication to any room, while also providing a cool breeze during hot summer months.
Overview of the Different Components of a Hunter Ceiling Fan With Light
Before we dive into the installation process, it is important to familiarize ourselves with the different components of a Hunter ceiling fan with light. Having a good understanding of these parts will make the installation process much smoother.
Fan Motor
The fan motor is at the heart of any ceiling fan. It is responsible for driving the blades, creating the airflow that keeps the room cool. The Hunter ceiling fan models come with powerful motors that ensure quiet operation, energy efficiency, and reliable performance.
Blades
The blades of a Hunter ceiling fan come in various lengths and finishes, allowing you to choose the style that best matches your decor. These blades are usually made of high-quality materials like wood or composite, providing durability and optimal airflow.
Light Kit
What sets Hunter ceiling fans apart from others is the option to have a built-in light kit. This allows the fan to serve two purposes: cooling the room and providing illumination. The light kit can be customized, with choices ranging from traditional glass shades to modern integrated LED lights.
Downrod
The downrod is a metal pole that connects the fan motor to the mounting bracket, allowing the fan to hang at the desired height. Hunter ceiling fans usually come with adjustable downrods, giving you the flexibility to install the fan at the perfect distance from the ceiling.
Mounting Bracket
The mounting bracket is the piece that attaches the fan to the ceiling. It provides stability and ensures that the fan is securely installed. Hunter ceiling fans typically come with a universal mount, suitable for different types of ceilings.
Key Considerations Before Starting the Installation Process
Before you begin installing your Hunter ceiling fan with light, there are a few important considerations to keep in mind. These will help ensure a successful installation and enhance the performance of your fan.
- Make sure you have all the necessary tools and equipment ready. This includes a ladder, wire connectors, electrical tape, a screwdriver, and a voltage tester.
- Ensure the power to the circuit you’ll be working on is turned off. This will prevent any accidents or electrical shocks during the installation process. Use a voltage tester to double-check that the power is indeed off.
- Read the installation instructions provided by Hunter carefully. Each model may have slight variations in the installation process, so it is essential to follow the specific instructions for your fan.
- It is advisable to have a helper during the installation process. Ceiling fans can be heavy and cumbersome to lift, so having someone assist you will make the task easier and safer.
- Take note of the weight limit of your ceiling, as some Hunter fans may be heavier than others. Ensure that your ceiling can support the weight of the fan you have chosen.
By taking these key considerations into account, you will be fully prepared to embark on the installation process and enjoy the benefits of your Hunter ceiling fan with light.
Preparing For Installation
Before you can enjoy the cool breeze and cozy ambiance of your new Hunter ceiling fan with light, there are a few important steps to be taken. Proper preparation is crucial to ensure a smooth and successful installation. In this section, we will guide you through gathering the necessary tools and equipment, checking for any electrical requirements or restrictions, ensuring a safe and suitable location for the fan, as well as turning off the power and clearing the work area. Let’s get started!
Gathering the necessary tools and equipment
To install your Hunter ceiling fan with light, you will need the following tools and equipment:
| Tools | Equipment |
|---|---|
| – Screwdriver (flathead and Phillips head) | – Ceiling fan with light kit |
| – Pliers | – Ladder |
| – Wire cutters | – Electrical tape |
| – Wire strippers | – Safety glasses |
| – Electrical tester | – Non-contact voltage detector |
| – Hammer | – Step ladder |
| – Level | – Stud finder |
Checking for any electrical requirements or restrictions
Before beginning the installation process, it is important to check for any electrical requirements or restrictions in your home. Follow these steps:
- Locate the electrical panel in your home.
- Identify the breaker or fuse that controls the power supply to the room where you plan to install the ceiling fan with light.
- Turn off the power by flipping the breaker switch or removing the fuse.
- Use a non-contact voltage detector to ensure the power is truly off.
- Consider consulting a professional electrician if you are unsure about any electrical aspects.
Ensuring a safe and suitable location for the fan
Choosing the right location for your Hunter ceiling fan with light is crucial for both safety and efficiency. Follow these guidelines:
- Identify a suitable ceiling location near an existing electrical box.
- Ensure there is enough clearance between the fan blades and any surrounding walls or furniture.
- Measure and mark the desired location for the fan, taking into consideration the fan’s blade sweep.
- Use a stud finder to locate ceiling joists for secure installation.
Turning off the power and clearing the work area
Prior to starting the installation, it is essential to turn off the power supply and clear the work area. Follow these steps:
- Locate the breaker or fuse that controls the power supply to the room.
- Switch off the breaker or remove the fuse to cut off the power.
- Use an electrical tester to verify that the power is indeed off.
- Clear the work area of any furniture or obstacles that may hinder the installation process.
By gathering the necessary tools and equipment, checking for electrical requirements or restrictions, ensuring a safe and suitable location, as well as turning off the power and clearing the work area, you are now fully prepared for the installation of your Hunter ceiling fan with light. In the next section, we will walk you through the step-by-step installation process.
Installing The Hunter Ceiling Fan
Installing a Hunter ceiling fan is a straightforward process that can help improve air circulation and add a touch of style to any room. In this guide, we will walk you through the step-by-step instructions on how to install a Hunter ceiling fan with a light. We’ll cover everything from mounting the fan bracket or hanger to balancing and adjusting the fan to ensure optimum performance.
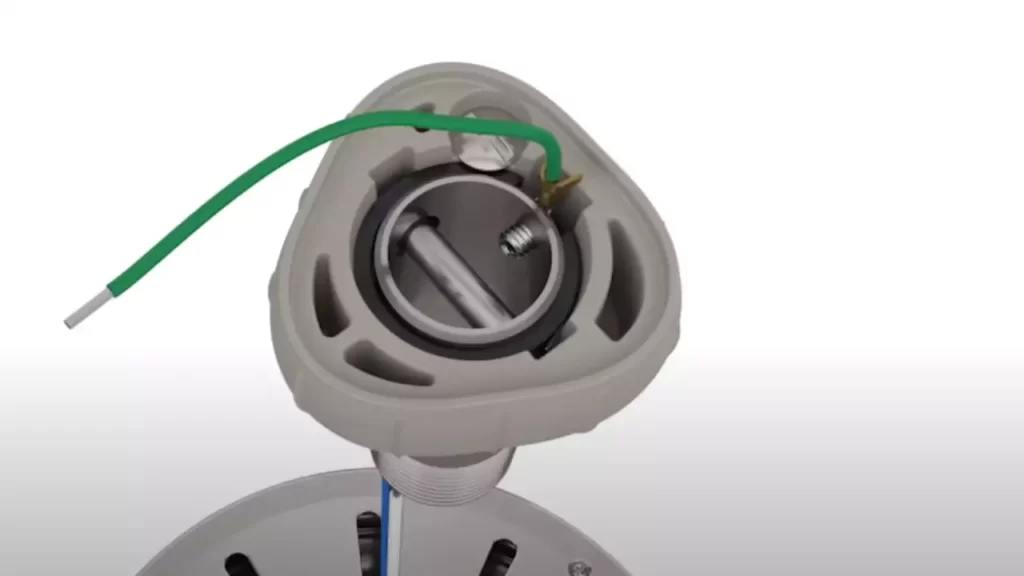
Mounting the Fan Bracket or Hanger
Before you can install your Hunter ceiling fan, you need to mount the fan bracket or hanger to the ceiling. Here’s how:
- Turn off the power to the existing light fixture at the circuit breaker.
- Remove any existing light fixture and electrical box from the ceiling.
- Securely attach the fan bracket or hanger to the electrical box using the provided screws.
- Ensure that the bracket or hanger is level and firmly attached to the ceiling.
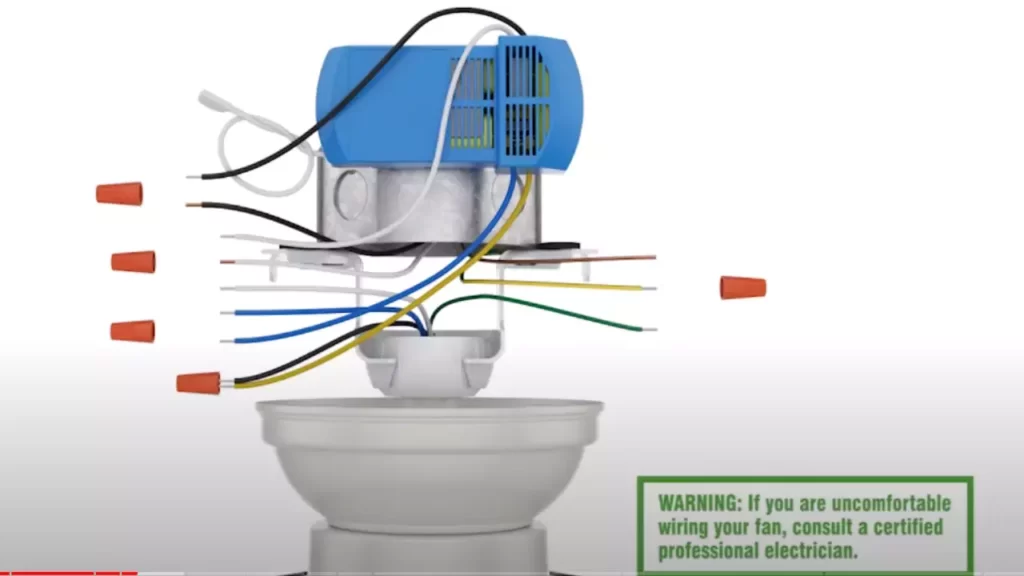
Connecting and Securing the Wiring
After mounting the fan bracket or hanger, you can begin connecting and securing the wiring. Follow these steps:
- Identify the wires coming from the ceiling and the wires on the ceiling fan.
- Connect the like-colored wires together using wire connectors and twist them clockwise until tight.
- Tuck the connected wires into the electrical box, ensuring they are not pinched or tangled.
- Secure the fan to the bracket or hanger using the provided screws.
Attaching the Fan Blades and Canopy
Now it’s time to attach the fan blades and canopy to complete the installation process.
- Align the holes in the fan blades with the holes in the fan motor.
- Securely attach the fan blades to the motor using the provided screws.
- Slide the canopy over the downrod and up to the ceiling.
- Secure the canopy to the ceiling by tightening the screws.
Installing the Light Kit and Bulbs
If your Hunter ceiling fan comes with a light kit, you can now install it. Here’s how:
- Remove the screws on the bottom of the fan’s motor housing.
- Gently lower the motor housing to access the wiring.
- Connect the light kit wiring to the fan wiring, following the manufacturer’s instructions.
- Attach the light kit to the motor housing using the provided screws.
- Insert the light bulbs into the sockets and tighten them securely.
Assembling and Installing Any Add-On Features
Depending on the specific Hunter ceiling fan model you have, you may need to assemble and install additional features like a remote control. Follow the manufacturer’s instructions to assemble and install any add-on features.
Balancing and Adjusting the Fan
Before turning on your Hunter ceiling fan, it’s essential to balance and adjust it for optimum performance. Follow these steps:
- Turn on the fan at its lowest speed and observe its operation.
- If you notice any wobbling, use a balancing kit (usually provided) to balance the fan blades.
- Tighten any loose screws or connections to eliminate any noise or wobbling.
- Continue adjusting until the fan operates smoothly and silently.
That’s it! You have successfully installed a Hunter ceiling fan with a light. Enjoy the cool breeze and ambient lighting it provides while adding a touch of style to your space.
Testing And Troubleshooting
Once you have successfully installed your Hunter ceiling fan with light, it is crucial to verify its functionality and troubleshoot any common installation issues. This step ensures that your fan operates as intended and provides optimal comfort in your space. Below, we will guide you through the necessary steps and provide tips for a smooth and trouble-free experience.
Verifying the fan and light functionality
To ensure that your Hunter ceiling fan with light is operating correctly, you need to check its functionality. Follow the steps below:
- Make sure the fan is securely mounted and balanced.
- Turn on the power switch and use the remote control or wall control (if applicable) to set the fan to its highest speed.
- Observe the fan blades’ rotation to confirm that they are spinning in the right direction. Usually, the blades should rotate counterclockwise during warm seasons to create a cooling breeze.
- Test the fan’s different speed settings to ensure they are functioning appropriately.
- Next, test the light fixture by turning it on and off using the wall switch or remote control. Ensure the light provides sufficient illumination in the room.
- If any issues arise during this verification process, refer to the troubleshooting section below for solutions.
Troubleshooting common installation issues
Even with careful installation, you might encounter certain issues when setting up your Hunter ceiling fan with light. Here are some common problems and their possible solutions:
| Issue | Solution |
|---|---|
| The fan isn’t running or has a low airflow |
|
| The light isn’t turning on |
|
Tips for ensuring smooth operation and minimizing noise
To enhance the performance of your Hunter ceiling fan with light and minimize any potential noise, consider the following tips:
- Regularly clean and dust the fan blades to avoid the accumulation of debris that can cause imbalance and noise.
- Ensure all screws and bolts are tightened properly to prevent any loose parts that may contribute to noise.
- Apply a thin layer of lubrication to the motor if you notice any squeaking or grinding sounds during operation.
- Balance the fan using a balancing kit or by adjusting the position of the blades if you detect excessive wobbling or vibrations.
Addressing any additional wiring or electrical concerns
During the installation process, you may encounter specific wiring or electrical concerns. It is important to address these to ensure a safe and functional ceiling fan setup. If you encounter any of the following situations, consult a professional electrician:
- Insufficient or incompatible electrical wiring for the fan installation.
- Confusion regarding the wiring connections due to differences in wire colors or configurations.
- Difficulty in accessing or working with the electrical supply.
- Uncertainty about the appropriate circuit breaker sizing or fuse requirements.
- Any other electrical concerns that require expertise.

Safety Precautions And Maintenance Tips
When it comes to installing a Hunter Ceiling Fan with Light, safety should always be a top priority. It is important to follow the proper steps to ensure a safe and efficient installation. Additionally, proper care and maintenance are crucial for the longevity and performance of your ceiling fan. In this section, we will discuss the important safety precautions to follow during installation, proper care and maintenance tips, troubleshooting tips for common operational issues, and a recommended cleaning and maintenance schedule.
Important safety precautions to follow during installation
Installing a ceiling fan requires working with electrical wiring and heavy machinery. To ensure a safe installation process, it is vital to adhere to the following safety precautions:
- Turn off the power: Before starting any electrical work, always turn off the power to the area where you will be installing the ceiling fan. This can be done by switching off the circuit breaker in your electrical panel.
- Use proper tools and equipment: Make sure that you have the right tools and equipment for the installation. This includes a voltage tester, wire stripper, pliers, screwdrivers, and a ladder or step stool.
- Familiarize yourself with the instructions: Read and understand the installation instructions provided by Hunter Fan Company. Following the manufacturer’s guidelines is key to a safe and successful installation.
- Securely mount the fan: Ensure that the ceiling fan is securely mounted to a ceiling joist or support bracket. This will prevent any wobbling or instability during operation.
- Properly connect the wiring: Take extra care when connecting the fan’s wiring to the electrical system. Follow the color-coded instructions provided in the manual and make sure the connections are tight and secure.
- Test the fan before finalizing the installation: Once the fan is installed, turn the power back on and test the fan’s functionality. Make sure all the settings and features are working properly.
Proper care and maintenance of the Hunter ceiling fan with light
To keep your Hunter ceiling fan with light in optimal condition, proper care and maintenance are essential. Here are some tips to ensure its longevity and efficient performance:
- Regularly dust and clean the fan blades: Use a soft cloth or a brush attachment on a vacuum cleaner to remove dust from the fan blades. This will prevent build-up and maintain smooth operation.
- Check and tighten screws and bolts: Over time, vibrations from the fan’s movement can loosen screws and bolts. Periodically inspect and tighten any loose hardware to prevent rattling or noise.
- Oil the fan motor: Some Hunter ceiling fans require motor lubrication to keep them running smoothly and quietly. Refer to the manufacturer’s instructions to determine if your fan requires oiling and the recommended frequency.
- Inspect the light fixture: Regularly check the light fixture for any loose or burnt-out bulbs. Replace any defective bulbs promptly to maintain proper lighting.
- Keep the fan remote and control panel clean: Clean the remote control and control panel with a soft, slightly damp cloth to remove any dirt or fingerprints. Avoid using abrasive cleaners that can damage the surface.
Troubleshooting tips for common operational issues
In case you encounter any operational issues with your Hunter ceiling fan, here are some troubleshooting tips to help you identify and resolve common problems:
| Issue | Troubleshooting Tips |
|---|---|
| The fan doesn’t turn on |
|
| The fan wobbles or makes noise |
|
| The light doesn’t work |
|
Recommended cleaning and maintenance schedule
To keep your Hunter ceiling fan with light in top condition, it is recommended to follow this cleaning and maintenance schedule:
- Dust the fan blades every month using a soft cloth or vacuum cleaner brush attachment.
- Tighten screws and bolts every six months to prevent any loosening.
- Oil the fan motor annually or as recommended by the manufacturer.
- Check the light fixture and replace any burnt-out bulbs as needed.
- Clean the remote control and control panel periodically to remove dirt and fingerprints.
By following these safety precautions and maintenance tips, you can enjoy the comfort and efficiency of your Hunter ceiling fan with light for years to come.
Enhancing The Functionality And Aesthetics
Installing a Hunter ceiling fan with light is not just about enjoying a cool breeze on a hot summer day. It’s also an opportunity to enhance the functionality and aesthetics of your living space. With the right choices and settings, you can create a welcoming ambiance that complements your room’s decor. In this section, we will explore some additional features and options for the Hunter ceiling fan with light, guide you on selecting the right fan speed and light settings, and provide styling tips to seamlessly integrate the fan into your room’s overall design.
Exploring additional features and options for the Hunter ceiling fan with light
When it comes to Hunter ceiling fans, there are a variety of features and options available that can further enhance your experience. These include:
- Remote control functionality for convenient operation from anywhere in the room
- Dimmable lights to create the perfect ambiance for any occasion
- Reverse airflow mode for efficient air circulation during both summer and winter
- Energy-saving options to reduce your electricity consumption
- Quiet motor technology for peaceful and undisturbed relaxation
By exploring these additional features and options, you can customize your Hunter ceiling fan with light according to your specific needs and preferences.
Selecting the right fan speed and light settings
To fully optimize your Hunter ceiling fan with light, it’s essential to choose the appropriate fan speed and light settings. These settings can depend on factors such as the room size, ceiling height, and personal comfort preferences. Consider these tips when selecting your fan speed and light settings:
- For larger rooms, it is advisable to use a higher fan speed to ensure proper air circulation. Conversely, lower fan speeds work well in smaller spaces.
- To maximize energy efficiency, match the fan speed with the air conditioning or heating settings in the room.
- Experiment with different light settings to find the perfect brightness level for tasks or relaxation.
- When adjusting the fan speed or light settings, take into account the noise level, ensuring it doesn’t disrupt the overall tranquility of the space.
By selecting the right fan speed and light settings, you can create a comfortable and welcoming atmosphere that meets your specific requirements.
Styling tips for integrating the fan into your room’s decor
The Hunter ceiling fan with light serves not only as a functional piece but can also contribute to the overall aesthetic appeal of your room. Here are some styling tips to seamlessly integrate the fan into your room’s decor:
- Choose a fan that complements the existing color scheme and design elements of your room.
- Consider the size and scale of the fan to ensure it fits harmoniously with the room’s proportions.
- Opt for fan blades that match the overall style of your space, whether it’s modern, rustic, or traditional.
- Position the fan in a central location to make it a focal point of the room.
- Accessorize with light fixtures or decorative elements that enhance the fan’s presence and blend seamlessly with the room’s decor.
By following these styling tips, you can effortlessly integrate the Hunter ceiling fan with light into your room’s design, creating a cohesive and visually appealing space.
Frequently Asked Questions
What Wires Go Where On A Ceiling Fan?
Connect the black wire from the fan to the black wire in the ceiling. Connect the white wire from the fan to the white wire in the ceiling. Connect the blue wire from the fan to the blue wire in the ceiling (if available).
Finally, connect the green or bare copper wire from the fan to the green or bare copper wire in the ceiling.
Are Hunter Fans Easy To Install?
Yes, Hunter fans are easy to install. You can quickly install them without any hassle.
How Do You Wire A Hunter Ceiling Fan With A Light Kit?
To wire a Hunter ceiling fan with a light kit, follow the provided installation manual and connect the fan’s wires to the corresponding wires in your electrical box. Ensure that the electrical power is turned off before starting the installation process for safety.
What Is The Blue Wire On A Ceiling Fan Connected To?
The blue wire on a ceiling fan is usually connected to the fan’s light kit. It powers the light bulbs and allows you to control the lighting in the room.
Conclusion
Installing a Hunter ceiling fan with light is a simple process that can enhance the comfort and aesthetic appeal of your space. By following the step-by-step instructions provided in this blog post, you can easily complete the installation on your own.
Remember to carefully read the manufacturer’s instructions and take necessary safety precautions. With the right tools and a little patience, you’ll be enjoying the cool breeze and soft lighting in no time. Happy installing!