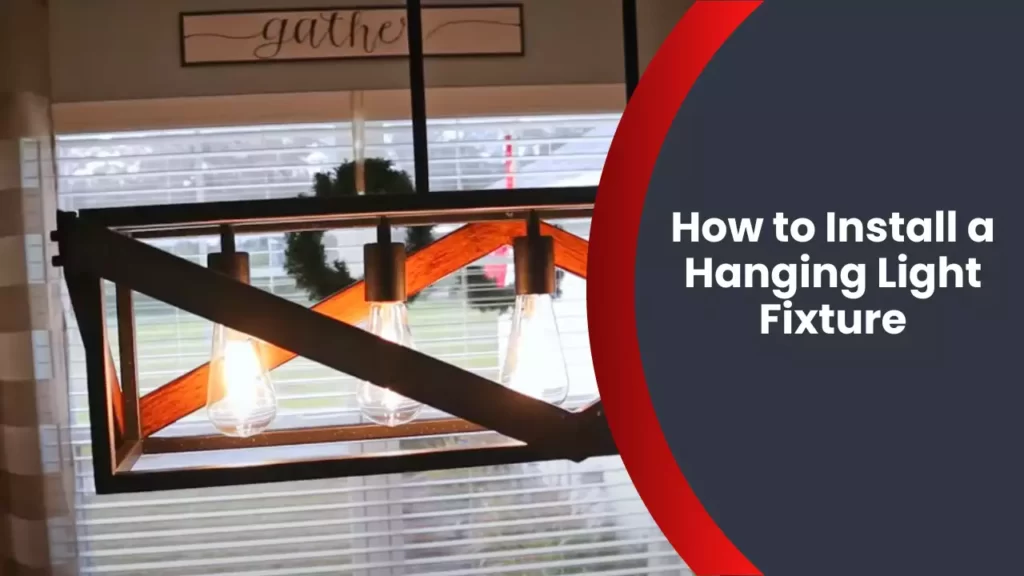
To install a hanging light fixture, start by turning off the power source, attaching the mounting bracket to the electrical box, connecting the wires, securing the fixture canopy, and fixing the light bulbs.
Understanding The Basics Of Hanging Light Fixtures
Before you embark on the exciting task of installing a hanging light fixture, it’s important to grasp the basics. Understanding the ins and outs of these fixtures will not only make the installation process smoother but also help you choose the right type for your space. In this section, we’ll explore the different types of hanging light fixtures available and the safety precautions you should consider before getting started.
Types of Hanging Light Fixtures and Their Installation Requirements
When it comes to hanging light fixtures, you’ll find a wide range of options to suit various styles and spaces. Let’s take a closer look at some popular types and the installation requirements associated with each:
| Type of Hanging Light Fixture | Installation Requirements |
|---|---|
| Pendant Lights | These versatile fixtures are suspended from the ceiling by a rod, chain, or cord. Installation typically involves connecting the wiring, securing the mounting bracket, and hanging the fixture at the desired height. |
| Chandeliers | Chandeliers add elegance and charm to any room. Installing one involves attaching the mounting bracket, wiring the fixture, and ensuring it is properly balanced and supported. |
| Track Lighting | Track lighting provides adjustable illumination across a space. Installing track lighting involves mounting the track to the ceiling, connecting the wiring, and attaching the individual light fixtures to the track. |
It’s important to read the manufacturer’s instructions for specific installation requirements, as they may vary depending on the model and design of the fixture.
Safety Precautions to Consider Before Starting the Installation Process
Ensuring your safety and the safety of your property should be your top priority when installing a hanging light fixture. Before you begin the installation process, keep these safety precautions in mind:
- Turn off the power: Before starting any electrical work, turn off the power supply to the area where you’ll be working. This helps prevent electrical shocks and other accidents.
- Use proper tools and equipment: Ensure you have the necessary tools, such as a screwdriver, wire strippers, and pliers, to complete the installation. Failing to use appropriate tools may result in damage to the fixture or injury to yourself.
- Check the weight rating: Before choosing a hanging light fixture, check the weight rating of the mounting box or bracket. Make sure it can support the weight of the fixture you plan to install to avoid accidents or damage to the ceiling.
- Securely attach the fixture: Properly securing the fixture is crucial to prevent it from falling or becoming unstable over time. Follow the manufacturer’s instructions for attaching the fixture to the mounting bracket or support system.
- Test the wiring: After installation, ensure all wiring connections are secure and properly insulated. It’s a good idea to test the fixture before fully attaching it to verify that the wiring is functioning correctly.
By adhering to these safety precautions, you can minimize the risk of accidents and ensure a successful hanging light fixture installation.
Tools And Materials Needed For Installing A Hanging Light Fixture
Installing a hanging light fixture can instantly transform the look and feel of any room. Whether you’re replacing an existing fixture or adding a completely new one, having the right tools and materials is essential for a successful installation. In this section, we’ll cover the essential tools you’ll need and provide a comprehensive list of materials along with suggestions on where to purchase them.
Essential tools required for a successful installation
Before you begin installing your hanging light fixture, make sure you have the following tools on hand:
- Screwdriver
To secure the fixture to the ceiling or wall, you’ll need a screwdriver. Make sure you have both Phillips and flathead screwdrivers to accommodate different screw types. - Pliers
Pliers will come in handy for various tasks, such as bending wires, tightening nuts, or adjusting the position of the fixture. - Wire strippers
If you need to connect or replace wires, wire strippers are a must-have tool. These tools enable you to remove the insulation from the wires without damaging them. - Voltage tester
Before you start working with any electrical wiring, it’s crucial to ensure the power is turned off. Use a voltage tester to check if the circuit is live or not, providing an additional layer of safety. - Ladder or step stool
Having a stable and secure platform to reach the installation area is vital. So, make sure you have a ladder or step stool that can safely support your weight.
List of materials needed and where to purchase them
Here’s a comprehensive list of materials you’ll need to install a hanging light fixture, along with suggestions on where to purchase them:
| Material | Where to Purchase |
|---|---|
| Hanging light fixture | Local home improvement stores or online retailers such as Amazon or Wayfair. |
| Light bulbs | Local supermarkets, hardware stores, or online retailers like Home Depot or Lowe’s. |
| Mounting bracket | Local home improvement stores or online retailers such as Walmart or Ace Hardware. |
| Wire connectors | Electrical supply stores, local hardware stores, or online retailers like Grainger or Electric Supply Online. |
| Electrical tape | Local hardware stores or online retailers such as AutoZone or Harbor Freight. |
| Wire nuts | Electrical supply stores, local hardware stores, or online retailers like Grainger or Electric Supply Online. |
It’s important to ensure you’re purchasing materials from reputable stores or online retailers to guarantee quality and safety. Additionally, consider checking customer reviews and ratings for specific products to make an informed purchasing decision.
Step-By-Step Instructions For Installing A Hanging Light Fixture
Installing a hanging light fixture can instantly transform the ambiance and appearance of any room. While it may seem like a complicated task, with the right tools and a clear set of instructions, you can easily tackle this project. In this guide, we will take you through the step-by-step process of installing a hanging light fixture, from shutting off the power to testing the final result. Let’s get started!
Shutting off the power and preparing the workspace
Before you begin any electrical work, it is essential to ensure your safety by turning off the power. Locate your home’s electrical panel and find the corresponding breaker for the room you will be working in. Switch off the breaker to cut off the electricity supply. Once the power is off, gather your tools and prepare your workspace.
Here’s a checklist of tools you will need:
- Screwdriver
- Wire strippers
- Wire connectors
- Tape measure
- Ladder or step stool (if needed)
Make sure you have ample lighting in the area to help you see what you’re doing. Clear the workspace of any obstructions and place a drop cloth or old sheet underneath the area where you will be working to protect the floor or furniture from potential damage.
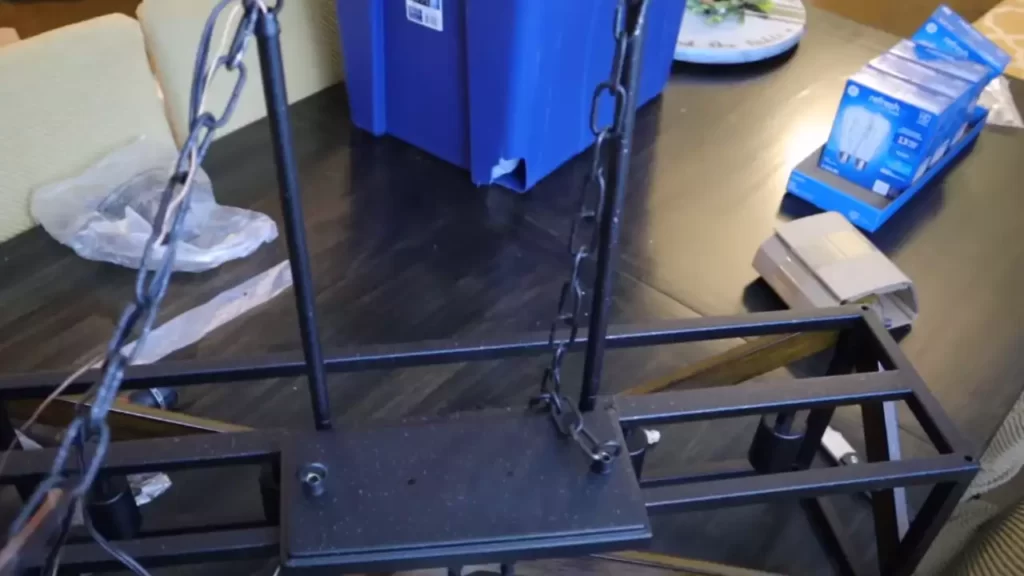
Assembling the hanging light fixture components
Once you have prepared your workspace, it’s time to assemble the components of your hanging light fixture. Carefully unpack all the parts and lay them out on a clean surface.
Here is a list of common components you may find:
| Component | Description |
|---|---|
| Canopy | The decorative plate that covers the electrical box |
| Chain or cord | Used to hang the fixture from the ceiling |
| Mounting bracket | Attaches the fixture to the ceiling |
| Wire nuts | Connect and secure the fixture wires to the electrical wires |
| Fixture body | The main part of the light fixture |
Refer to the manufacturer’s instructions for your specific light fixture to ensure proper assembly. Once assembled, set it aside and move on to the next step.
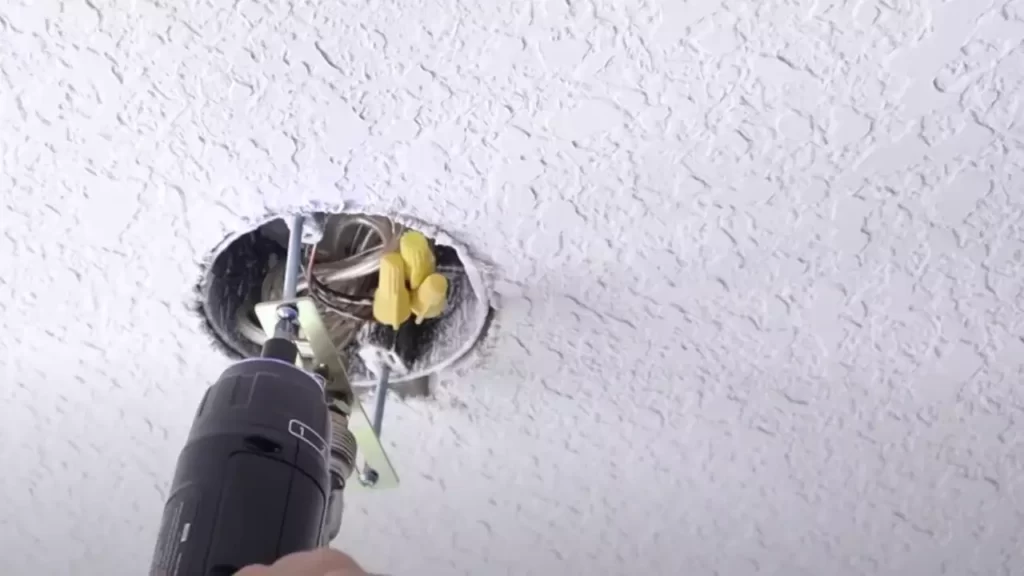
Wiring the fixture to the electrical box
With the components assembled, it’s time to wire the fixture to the electrical box. Carefully remove the cover from the electrical box, exposing the wires inside.
Identify the black (hot), white (neutral), and copper or green (ground) wires in both the fixture and the electrical box. Use wire strippers to remove about ¾ inch of insulation from the ends of the wires.
Take the black wire from the fixture and twist it together with the black wire from the electrical box. Secure them with a wire nut, making sure the connection is tight and the wires are properly joined. Repeat this process for the white and copper/green wires.
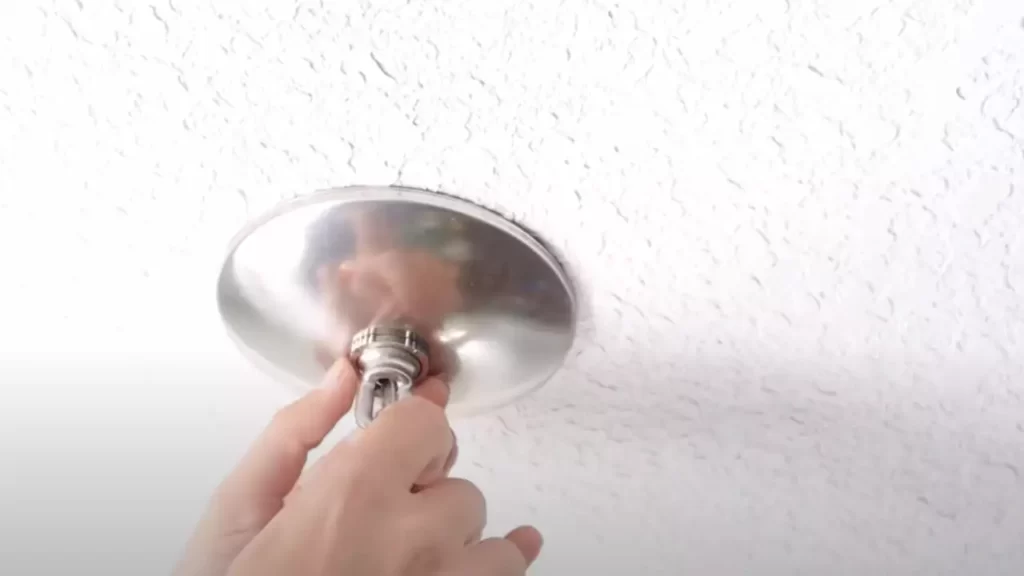
Attaching the fixture to the ceiling and securing it properly
Once the wiring is complete, carefully lift the fixture and align its mounting bracket with the holes in the electrical box. Secure the bracket to the box using screws provided or your own if necessary. Double check that the fixture is securely attached and doesn’t wobble.
If your fixture has a chain or cord, thread it through the canopy and attach it to the mounting bracket. Use pliers to tighten the chain links, ensuring proper support for the fixture.
Installing light bulbs and testing the fixture
With the fixture securely attached, it’s time to install the light bulbs. Refer to the manufacturer’s instructions for the maximum wattage recommendation and suitable bulb types for your fixture. Screw the bulbs into the sockets and make sure they are secure.
Now, it’s time to test your newly installed hanging light fixture. Turn the power back on at the breaker and flip the light switch. If everything is wired correctly, the fixture should illuminate, casting a warm glow across your space.
Remember to turn off the power again before making any adjustments or servicing the fixture. Take the time to clean up your workspace, discarding any packaging or debris.
Congratulations, you have successfully installed a hanging light fixture! Enjoy the new look and improved lighting in your space.
Troubleshooting Common Issues During Hanging Light Fixture Installation
Installing a hanging light fixture can be an exciting way to elevate the ambiance of your space. However, it is not uncommon to encounter certain issues during the installation process. In this section, we will address some common problems that you may come across and provide practical solutions. By troubleshooting these issues, you can ensure that your hanging light fixture is installed securely and functions properly.
Identifying and addressing wiring problems
One of the most common issues you may encounter during hanging light fixture installation is wiring problems. Faulty or mismatched wires can lead to malfunctioning lights or even pose safety risks. To address this issue, follow these steps:
- Start by turning off the power supply to the light fixture at the circuit breaker.
- Inspect the wires for any signs of damage, such as fraying or exposed copper.
- If you notice any damaged wires, carefully cut away the damaged portion and strip the wire ends to expose fresh copper.
- Ensure that the wires are securely connected using wire nuts, making sure that the corresponding colors are matched (black to black, white to white, and green or bare copper to the ground).
- Double-check the connections to ensure they are tight and snug.
- Once everything is properly connected, carefully tuck the wires into the electrical box and secure the fixture in place.
- Finally, turn on the power supply and test the light to ensure it is functioning correctly.
Dealing with insufficient support for heavier fixtures
If you have chosen a hanging light fixture that is on the heavier side, insufficient support can become an issue that needs to be addressed. Here’s what you can do:
- Start by assessing the existing electrical box to determine if it is suitable to support the weight of the fixture.
- If the electrical box is not rated for the weight of your fixture, you will need to install a ceiling fan brace. This brace provides additional support and stability.
- Carefully follow the manufacturer’s instructions to install the ceiling fan brace in the ceiling joist.
- Once the brace is securely in place, attach the electrical box to it using the provided screws.
- Next, proceed with the rest of the installation process by connecting the wires and attaching the fixture accordingly.
Adjusting the height and leveling the fixture
During the installation process, you may find that your hanging light fixture needs some adjustments in height or leveling to achieve the desired aesthetic. Here’s how you can address this issue:
- Start by loosening the screws or nuts that hold the fixture in place.
- Gently adjust the height by raising or lowering the fixture until it reaches the desired position.
- Once you have adjusted the height, use a level to ensure that the fixture is properly aligned.
- Tighten the screws or nuts to secure the fixture in its new position.
- Double-check the alignment and stability of the fixture before turning on the power supply.
Fixing flickering or dimming lights
While dimming lights can create a cozy atmosphere, excessive flickering or dimming can indicate an issue. Follow these steps to fix flickering or dimming lights:
- Check the light bulbs to ensure they are securely screwed in.
- If the bulbs are loose, tighten them gently to establish a secure connection.
- If the issue persists, switch to LED bulbs, as traditional incandescent bulbs may not be compatible with dimmer switches.
- Consider replacing the dimmer switch if the problem continues, as it may be incompatible with the type of light bulbs you are using.
By troubleshooting these common issues, you can ensure a successful hanging light fixture installation. Remember to always prioritize safety and consult a professional electrician if needed.
Enhancing The Aesthetics Of A Hanging Light Fixture Installation
Installing a hanging light fixture not only brightens up a space but also adds a touch of elegance and style to the overall decor. To truly maximize the impact of your lighting installation, it’s important to consider ways to enhance its aesthetics. From choosing the right fixture for your space to using decorative elements that complement the overall design, every detail counts. In this article, we will explore some key tips and techniques to elevate the visual appeal of your hanging light fixture installation.
Choosing the Right Hanging Light Fixture for Your Space
When it comes to selecting a hanging light fixture, it’s essential to find one that not only suits your style preferences but also matches the overall design of your space. Here are some factors to consider:
- Consider the size and scale of the fixture in relation to the room. A large, dramatic chandelier may look stunning in a spacious dining area, while a smaller pendant light can be a perfect fit for a cozy corner.
- Take into account the style and theme of the room. An industrial-style pendant light may be ideal for a modern and minimalist space, while a crystal chandelier can add a touch of glamour to a traditional or vintage-inspired room.
- Pay attention to the material and finish of the fixture. Metallic finishes like brass or chrome can create a sleek and contemporary look, while rustic materials like wood or wrought iron can bring warmth and character to the space.
- Consider the type of lighting effect you want to achieve. Some fixtures provide direct downward light, which is ideal for task lighting in areas like the kitchen or office, while others offer more diffused or directional lighting for ambient or accent purposes.
Tips for Proper Placement and Positioning of the Fixture
The placement and positioning of your hanging light fixture play a crucial role in enhancing its overall impact. Here are some tips to keep in mind:
- Hang the fixture at an appropriate height. Generally, the bottom of the fixture should be positioned around 30 to 36 inches above a table or countertop and at least 7 feet above the floor to ensure ample clearance.
- Consider the shape and size of the room. In a rectangular room, a linear fixture can help to visually elongate the space, while a round or geometric fixture can add interest to a square or asymmetrical room.
- Ensure the fixture is centered and aligned with the focal point of the room, such as a dining table or seating area.
- If you have multiple fixtures, ensure they are evenly spaced and aligned with each other or other elements in the room, such as windows, furniture, or architectural features.
Using Decorative Elements to Complement the Fixture and Overall Design
Once you have installed your hanging light fixture, consider incorporating decorative elements that complement its style and the overall design of the space. Some ideas include:
- Add a decorative ceiling medallion around the base of the fixture to create a more polished and finished look. Ceiling medallions come in various styles, sizes, and materials, allowing you to choose one that complements your fixture and enhances the aesthetics.
- Use decorative bulbs or shades to add a touch of personality. From vintage-inspired Edison bulbs to colorful and patterned lampshades, these small details can elevate the visual appeal of your lighting installation.
- Consider incorporating complementary wall sconces, table lamps, or floor lamps to enhance the overall lighting scheme and create a cohesive look throughout the room.
- Accessorize the surrounding area with decorative elements such as artwork, mirrors, or plants that complement the style and color palette of the fixture and tie the entire space together.
By carefully considering the choice of hanging light fixture, its proper placement and positioning, as well as incorporating complementary decorative elements, you can create a visually stunning lighting installation that enhances the aesthetics of your space. Let your creativity shine and transform your room into a well-lit, stylish sanctuary.
Hiring A Professional For Hanging Light Fixture Installation
If you have a new hanging light fixture, you may be excited to install it on your own and save some money. While DIY projects can be rewarding, it’s important to know when it’s best to leave the job to a professional. Hiring a professional electrician for hanging light fixture installation can ensure safety and proper installation, giving you peace of mind.
Situations when it’s best to hire a professional electrician
While installing a hanging light fixture may seem straightforward, certain situations call for the expertise of a professional electrician. Here are a few scenarios where hiring a professional is highly recommended:
- Complex wiring: If the wiring in your home is complex or outdated, it’s best to hire a professional electrician. They have the knowledge and experience to handle intricate wiring systems, minimizing the risk of electrical hazards.
- Height and accessibility: If the location where you want to install the hanging light fixture is high or difficult to access, it’s safer to call in a professional. They have the necessary equipment and safety measures to work at heights, reducing the risk of accidents.
- Code compliance: Electrical codes and regulations vary from location to location. Hiring a professional electrician ensures that your hanging light fixture installation complies with local electrical codes, avoiding potential issues with inspections or insurance claims.
- Previous electrical problems: If you’ve experienced electrical problems in the past, it’s best to consult a professional. They can assess the situation, identify any underlying issues, and ensure your new light fixture is installed safely and effectively.
Factors to consider when hiring an electrician for the job
When it’s time to hire an electrician for your hanging light fixture installation, keep the following factors in mind:
- License and certification: Ensure that the electrician you hire has a valid license and appropriate certifications. This guarantees that they have the necessary knowledge and skills to handle electrical work.
- Experience and expertise: Look for an electrician who specializes in residential electrical installations. Their experience in hanging light fixture installation will ensure a smooth and efficient process.
- References and reviews: Check online reviews and ask for references from previous clients. This will give you insights into the electrician’s reputation and the quality of their work.
- Price estimates: Obtain quotes from multiple electricians to compare prices. However, remember that the cheapest option may not always be the best. Consider the overall value, including their expertise and reputation, when making your decision.
Understanding the importance of proper installation for safety and longevity
Proper installation of a hanging light fixture is crucial for both safety and the longevity of the fixture itself. When a light fixture is not correctly installed, it can pose various risks, including electrical hazards and damage to the fixture or your home.
A professional electrician will ensure that the wiring is correctly connected, preventing issues like short circuits or overloaded circuits. They will also install the fixture securely, minimizing the chance of it becoming loose or falling. By adhering to safety guidelines and best practices, a professional installation enhances the overall longevity and reliability of your hanging light fixture.
So, while installing a hanging light fixture yourself may seem tempting, hiring a professional electrician is the best choice in many scenarios. Their expertise, knowledge, and attention to detail will ensure a safe and successful installation, giving you the perfect lighting solution for your home.
Maintaining And Caring For Hanging Light Fixtures
In order to ensure that your hanging light fixture remains in good condition and continues to provide optimal illumination, it is important to regularly maintain and care for it. By following a few simple steps, you can keep your fixture looking its best and ensure its longevity.
Regular Cleaning and Dusting Techniques
To maintain the appearance of your hanging light fixture, regular cleaning and dusting are crucial. Dust particles and grime can accumulate on the surface of the fixture over time, diminishing its shine and reducing the amount of light it emits. Here are some cleaning techniques you can use:
- Use a soft cloth lightly dampened with water or a mild cleaning solution to wipe the surface of the fixture. Avoid using abrasive cleaners or rough materials that could scratch the fixture.
- Gently remove any dust or debris from the fixture with a soft-bristle brush or a lint-free cloth. This will help to prevent dust build-up and maintain the fixture’s appearance.
- If your fixture has glass components, such as shades or globes, you can remove them and clean them separately with warm soapy water. Dry them thoroughly before reattaching them to the fixture.
Replacing Light Bulbs and Addressing Maintenance Issues
Regularly replacing light bulbs is essential to maintain the functionality of your hanging light fixture. Burnt-out bulbs not only diminish the amount of light, but they can also strain the other bulbs in the fixture. Follow these steps to ensure optimal performance:
- Switch off the power to the fixture by turning off the corresponding circuit breaker or removing the fuse.
- Gently remove the old bulb from the socket by twisting it counterclockwise.
- Insert the new bulb into the socket and twist it clockwise until it is securely in place.
- Restore power to the fixture and test the bulb to ensure it is working properly.
In addition to replacing bulbs, it is important to address any maintenance issues that may arise with your hanging light fixture. This includes fixing loose or damaged wires, repairing or replacing broken components, and ensuring that all screws and fasteners are secure. If you are unsure or uncomfortable handling such maintenance tasks, it is advisable to consult a professional electrician for assistance.
Inspecting and Testing for Safety Purposes
Periodically inspecting and testing your hanging light fixture is crucial for safety reasons. This will help identify any potential hazards or issues that may compromise the proper functioning of the fixture. Follow these guidelines:
- Ensure that the fixture is securely attached to the ceiling or support structure. Check for any signs of loosening or instability.
- Inspect the wiring for any signs of damage or wear, such as frayed insulation or exposed wires. If any issues are found, it is important to address them promptly to prevent electrical hazards.
- Test the fixture by turning it on and off to ensure that the switch is functioning properly. Pay attention to any flickering lights or other irregularities, as these could indicate wiring or connection problems.
By following these maintenance and care tips for your hanging light fixture, you can keep it looking beautiful and ensure its safe and efficient operation for years to come.
Frequently Asked Questions
How Do You Install A Wall Mounted Light Fixture?
To install a wall mounted light fixture, follow these steps: 1. Turn off power to the area. 2. Attach the mounting bracket to the electrical box with screws. 3. Connect the wires from the fixture to the corresponding wires in the electrical box, using wire nuts.
4. Secure the fixture to the mounting bracket. 5. Restore power and test the light.
How Do You Install A Light Fixture Yourself?
To install a light fixture yourself: 1. Turn off the power and remove the old fixture. 2. Connect the new fixture’s wires to the corresponding house wires. 3. Securely attach the fixture to the ceiling or wall. 4. Turn the power back on and test the light.
5. If unsure, consult an electrician for assistance.
Is It Easy To Install Hanging Lights?
Installing hanging lights is relatively easy. The process involves mounting a ceiling hook, attaching the light fixture, and connecting the wiring. It is recommended to follow the manufacturer’s instructions and ensure the power is turned off before installation. With some basic tools and careful steps, anyone can successfully install hanging lights.
How Are Light Fixtures Attached To Ceiling?
Light fixtures are attached to the ceiling using a mounting bracket. The bracket is secured to the ceiling using screws or bolts. The fixture is then attached to the bracket using mounting screws. Make sure to follow the manufacturer’s instructions for the specific fixture being installed.
Conclusion
Installing a hanging light fixture may seem intimidating, but with the right knowledge and tools, it can be a manageable DIY project. By following the step-by-step guide provided in this blog post, you’ll be able to confidently install a hanging light fixture in your home.
Remember to turn off the power, gather the necessary materials, and consult the instructions specific to your fixture. With a little patience and attention to detail, you’ll have a stylish and functional lighting solution in no time. Happy installing!