To install a GFCI outlet with 2 wires, you need to follow simple steps.
Understanding The Basics Of Gfci Outlets
What is a GFCI Outlet?
A Ground Fault Circuit Interrupter (GFCI) outlet is a safety device that helps protect against electric shocks caused by ground faults. It is designed to quickly detect any imbalances in current flow between the hot and neutral wires of an electrical circuit.
Why are GFCI Outlets Important?
GFCI outlets are important because they provide an additional layer of protection against electrical hazards, especially in areas where there is a higher risk of electric shock. They are commonly used in areas near water, such as bathrooms, kitchens, and outdoor spaces. By quickly detecting ground faults, they can help prevent potentially dangerous situations and reduce the risk of electrical injuries.
Different Types of GFCI Outlets
There are several types of GFCI outlets available, each with its own unique features and applications. Here are some of the most common types:
- Standard GFCI Outlet: This is the most basic type of GFCI outlet and can be identified by the two buttons on the faceplate – one for ‘Test’ and the other for ‘Reset’.
- GFCI Outlet with Self-Testing Capability: This type of GFCI outlet can automatically perform self-tests to ensure that it is functioning properly. It is a convenient option as it eliminates the need for manual testing.
- Weather-Resistant GFCI Outlet: This type of GFCI outlet is specifically designed for outdoor use and provides enhanced protection against environmental factors such as moisture and rainfall.
- TR GFCI Outlet: The ‘TR’ stands for Tamper-Resistant, and this type of GFCI outlet has built-in tamper-resistant shutters that prevent the insertion of foreign objects into the electrical slots.
Understanding the basics of GFCI outlets is crucial when it comes to electrical safety. By knowing what a GFCI outlet is, why it’s important, and the different types available, you can make informed decisions when installing or replacing outlets in your home or workplace.
Essential Tools For Installing A Gfci Outlet
If you’re planning to install a GFCI (Ground Fault Circuit Interrupter) outlet with just two wires, you’ll need a few essential tools to ensure a safe and successful installation. These tools will be invaluable in helping you complete the job quickly and efficiently, without any unnecessary complications. Let’s take a look at the tools you’ll need!
1. Screwdriver
A screwdriver is an indispensable tool when it comes to installing a GFCI outlet. It will help you remove the existing outlet cover, disconnect the wires from the old outlet, and connect the wires to the new GFCI outlet. Make sure to choose a screwdriver with the appropriate head size for the screws you’ll encounter during the installation process. For most outlets, a standard flathead or Phillips screwdriver will suffice.
2. Voltage Tester
Before you begin working on the electrical wiring, it’s essential to test for voltage to ensure your safety. A voltage tester will help you determine if the wires are live or if the power has been properly shut off. This tool is designed to detect the presence of electrical current, notifying you when it’s safe to proceed with the installation. Remember, working with live wires can be extremely dangerous, so don’t skip this step!
3. Wire Cutters/Strippers
To properly connect the wires to your new GFCI outlet, you may need to cut or strip the insulation from the ends of the wires. Wire cutters can help you cleanly cut through the wires, while wire strippers can remove the insulation without damaging the conductor. Having these tools on hand will make the installation process much easier and ensure clean and secure connections.
4. Wire Connectors
Wire connectors, also known as wire nuts or twist-on connectors, are essential for joining wires together securely. During the installation of a GFCI outlet, you’ll need wire connectors to connect the existing wires to the corresponding wires on the GFCI outlet. These connectors come in various sizes to accommodate different wire gauges, so ensure you have the right size for your specific wires. This will help create a reliable and long-lasting electrical connection.
By having these essential tools at your disposal, you’ll be well-equipped to install a GFCI outlet with just two wires. Remember to follow all safety precautions, such as shutting off the power at the circuit breaker before working on the wiring, and consult a professional if you are unsure about any aspect of the installation process. Now you’re ready to get started and enjoy the convenience and added safety of your new GFCI outlet!

Materials Needed For The Installation Process
Before you embark on the task of installing a GFCI outlet with 2 wires, it’s important to ensure that you have the necessary materials at hand. By gathering these items in advance, you’ll be well-prepared to complete the installation successfully.
GFCI Outlet
The first item you’ll need is a GFCI outlet. This type of outlet is designed to protect against electrical shock by immediately cutting off power to the circuit if it detects any imbalances in the electrical current. Make sure you choose a GFCI outlet that matches the voltage and amperage of your electrical system.
Electrical tape
Electrical tape is essential for insulating and protecting exposed wires. It not only helps to prevent short circuits and electrical shocks but also ensures a secure and reliable connection. Before installing the GFCI outlet, you’ll need to tightly wrap the exposed parts of the wires with electrical tape.
Electrical boxes
Electrical boxes are containers that house the electrical connections, ensuring safety and providing a neat and organized installation. These boxes come in various shapes and sizes, so choose one that suits your needs. You may require a single-gang or double-gang electrical box, depending on the number of outlets you plan to install.
Mounting screws
To securely attach the GFCI outlet and electrical box to the wall, you’ll need mounting screws. These screws help ensure a stable installation that will withstand the test of time. Make sure the screws are appropriate for the material of your wall and are long enough to anchor the outlet firmly.
By gathering these essential materials, you’re taking a crucial step in the installation process. Once you have everything at hand, you’ll be ready to move on to the next stages of installing your GFCI outlet with 2 wires.
Identifying The Line And Load Wires
When it comes to installing a GFCI outlet with only two wires, it is essential to correctly identify the line and load wires. The line wire is the one that brings the current from the electrical panel to the outlet, while the load wire is responsible for distributing the current to other outlets or devices connected downstream. Understanding the difference between these wires is crucial for a successful installation.
Understanding Line and Load Connections
In order to install a GFCI outlet properly, it’s important to understand the concept of line and load connections. The line terminals on the GFCI outlet are where the power source is connected, while the load terminals are meant for connecting other outlets or devices downstream.
Locating and Identifying the Wires in Your Outlet Box
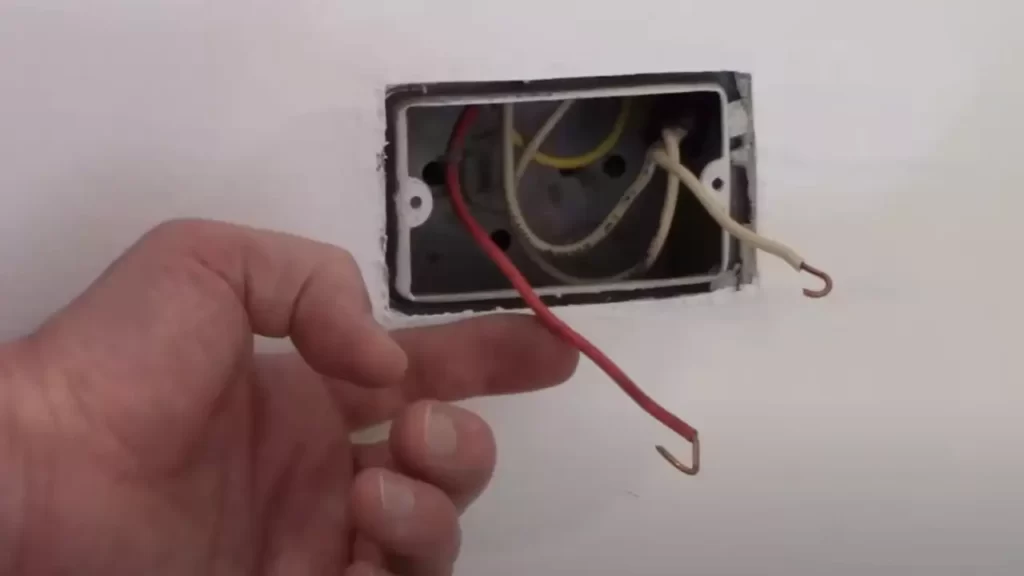
Before identifying which wire is the line and which one is the load, you need to locate the wires in your outlet box. In most cases, you will find a black (hot) wire, a white (neutral) wire, and a bare copper or green wire (grounding wire) within the box.
- Start by turning off the power to the outlet from the main electrical panel. This ensures your safety during the installation process.
- Next, use a voltage tester to confirm that the power is indeed turned off by touching the tester to each wire. If the tester doesn’t light up or make a sound, it means the power is off.
- Once you have confirmed that the power is off, carefully remove the outlet cover plate and expose the wires inside.
- Using a wire stripper, remove a small portion of the insulation from each wire to expose the copper or aluminum conductor.
Now that you have located and exposed the wires, it’s time to identify the line and load wires:
| Wire Color | Typical Identification |
|---|---|
| Black | Line (hot) wire |
| White | Neutral wire |
| Bare Copper or Green | Grounding wire |
By following these steps and understanding the purpose of each wire, you can easily identify the line and load wires in your GFCI outlet. This will ensure a safe and effective installation process.
Preparing The Electrical Box And Wires
Before you can start installing a GFCI outlet with 2 wires, it is crucial to properly prepare the electrical box and wires. This involves switching off the power, removing the old outlet, and preparing and stripping the wires. Following these steps will ensure a safe and successful installation.
Switching Off the Power
The first and most important step in preparing the electrical box and wires is to switch off the power. This is critical to prevent any electrical shocks or accidents while working with the wires. To turn off the power:
- Locate the circuit breaker panel in your home.
- Identify the breaker that controls the outlet you are working on.
- Switch the breaker to the “off” position.
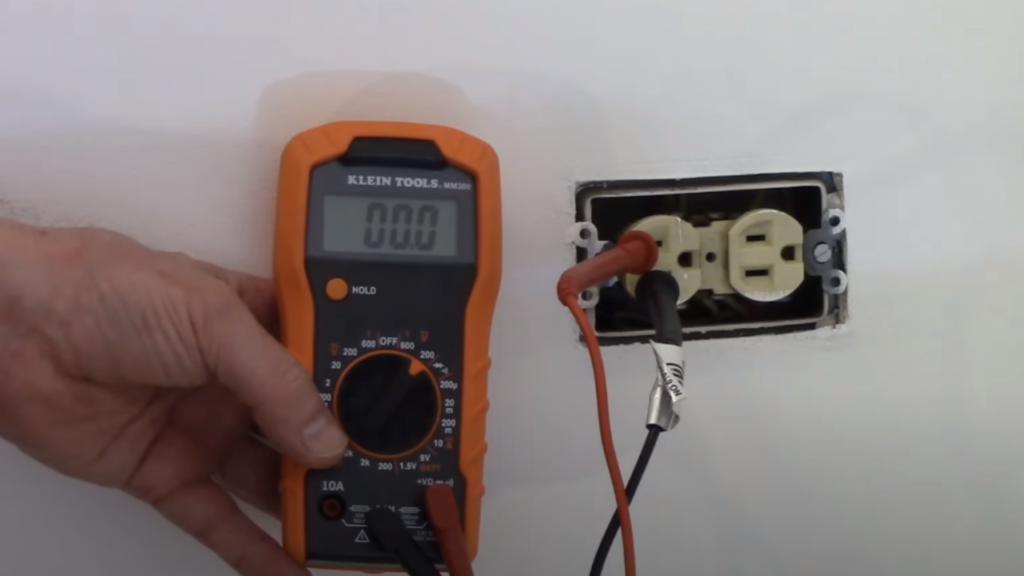
- Verify that the power is off by testing the outlet with a voltage tester.
Removing the Old Outlet
Once the power is switched off, it’s time to remove the old outlet. Follow these steps:
- Use a screwdriver to remove the screws securing the outlet cover plate.
- Gently pull the cover plate away from the wall to expose the outlet.
- Loosen the screws holding the outlet in the electrical box.
- Carefully pull the outlet out of the box, ensuring the wires are still connected.
- Double-check that the power is off using a voltage tester before proceeding.
Preparing and Stripping the Wires
With the old outlet removed, it’s time to prepare and strip the wires to connect them to the new GFCI outlet. Here’s what you need to do:
- Inspect the wires for any signs of damage or wear. Replace any damaged wires as necessary.
- Using wire strippers, carefully remove the outer insulation from the wires, exposing about half an inch of bare wire at the ends.
- If there is a ground wire (usually green or bare copper), ensure it is properly stripped and ready for connection.
- Check the wires for any loose strands or frayed ends. Trim them if necessary to ensure a clean connection.
- Once the wires are properly prepared, you’re ready to connect them to the GFCI outlet.
By following these steps to prepare the electrical box and wires, you’ll be well on your way to installing a GFCI outlet with 2 wires. Remember to prioritize safety at all times and consult a professional electrician if you are unsure about any step of the process.
Wiring The Gfci Outlet
Installing a GFCI outlet is an important step in ensuring the safety of your electrical system. Properly wiring the GFCI outlet is crucial to allow it to function as intended. In this section, we will walk you through the process of wiring the GFCI outlet with 2 wires.
Connect the Ground Wire
The first step in wiring the GFCI outlet is to connect the ground wire. The ground wire is typically green or bare copper and provides a safe path for electrical currents in case of a fault. To connect the ground wire, follow these steps:
- Strip the end of the ground wire to expose about 3/4 inch of wire.
- Locate the ground screw on the GFCI outlet, usually green in color.
- Insert the stripped end of the ground wire into the ground screw.
- Tighten the ground screw using a screwdriver to secure the connection.
Attach the Line Wires
Once the ground wire is connected, it’s time to attach the line wires. The line wires are the wires that provide power to the GFCI outlet. To attach the line wires, follow these steps:
- Identify the line wires, which are typically black and white in color.
- Strip about 3/4 inch of insulation from the end of each line wire.
- Locate the line terminals on the GFCI outlet.
- Insert the stripped end of the black line wire into the brass line terminal.
- Tighten the brass line terminal screw to secure the connection.
- Insert the stripped end of the white line wire into the silver line terminal.
- Tighten the silver line terminal screw to secure the connection.
Testing the Outlet
Once the ground and line wires are securely connected, it’s important to test the GFCI outlet to ensure it is functioning correctly. Testing the outlet involves checking the ground fault circuit interrupter feature, which is designed to trip the outlet if it detects an imbalance in the electrical current. Follow these steps to test the outlet:
- Press the “Reset” button on the GFCI outlet to restore power to the outlet.
- Plug a lamp or a small electrical device into the GFCI outlet.
- Press the “Test” button on the GFCI outlet to simulate a ground fault.
- The GFCI outlet should trip, cutting off power to the connected device.
- Press the “Reset” button again to restore power to the outlet.
By following these steps, you can ensure that your GFCI outlet with 2 wires is wired safely and correctly. Remember, if you’re unsure about any part of the installation process, it’s always best to consult a qualified electrician to avoid any potential hazards.
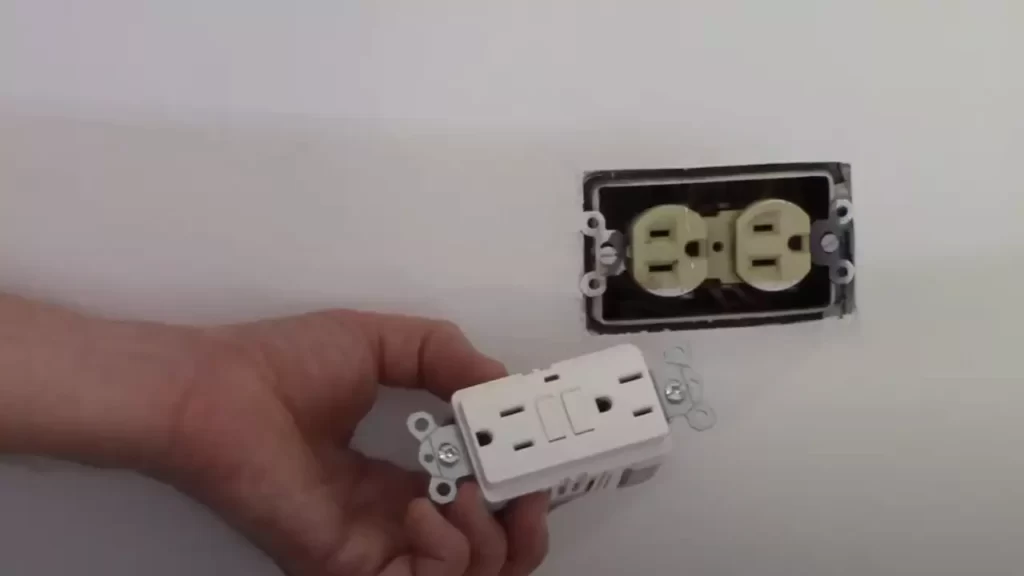
Mounting The Gfci Outlet
After properly connecting the wires to the GFCI outlet, the next step is to securely mount it to the electrical box. This ensures that the outlet stays in place and functions safely. Here’s how you can secure the outlet to the electrical box:
Securing the Outlet to the Electrical Box
To secure the GFCI outlet to the electrical box, follow these steps:
- Make sure the power to the outlet is turned off. This is crucial for your safety as well as preventing any damage to the outlet during installation.
- Take the GFCI outlet and align it with the holes in the electrical box. The holes in the outlet should line up with the screw holes in the electrical box.
- Insert the screws provided with the outlet through the holes and into the screw holes in the electrical box. Use a screwdriver to tighten the screws until the outlet is securely attached to the electrical box.
- Double-check to ensure that the outlet is flush against the electrical box and that there are no gaps between the outlet and the box. This will ensure a proper and secure fit.
Installing the Cover Plate
Once the GFCI outlet is securely mounted to the electrical box, you can proceed to install the cover plate. The cover plate not only protects the outlet but also adds a finished look to your installation. Here’s how you can install the cover plate:
- Take the cover plate and align it with the screw holes on the GFCI outlet.
- Insert the screws provided with the cover plate through the screw holes in the cover plate and tighten them with a screwdriver until the cover plate is snug against the GFCI outlet.
- Check to make sure the cover plate is aligned properly and there are no gaps between the plate and the outlet.
- Finally, give the cover plate a gentle tug to ensure it is securely attached to the GFCI outlet.
With the GFCI outlet securely mounted and the cover plate installed, you have successfully completed the installation process. Remember to turn the power back on and test the outlet to ensure it is functioning properly.
Testing The Gfci Outlet And Resetting Tripped Circuits
Once you have successfully installed a GFCI outlet with 2 wires, it’s important to test the outlet to ensure it is working properly. Additionally, knowing how to reset a tripped GFCI outlet can save you from potential electrical hazards in the future. In this section, we will guide you through testing a GFCI outlet and resetting any tripped circuits.
How to Test a GFCI Outlet
Testing a GFCI outlet is a straightforward process that involves a few simple steps. Follow the steps below to ensure the GFCI outlet is in good working condition:
- Before you start testing, make sure all devices connected to the GFCI outlet are disconnected.
- Locate the ‘Test’ and ‘Reset’ buttons on the GFCI outlet.
- Press the ‘Test’ button firmly. You should hear a click as the button is pushed in and the power to the outlet is shut off.
- Use a voltage tester to check if the power is indeed off. Place the voltage tester into the outlet slots to verify that no electricity is flowing.
- Once the power is confirmed to be off, press the ‘Reset’ button on the GFCI outlet. You should hear a click again as the button pops back out, restoring power to the outlet.
- Use the voltage tester again to confirm that the power has been restored.
| Step | Description |
|---|---|
| 1 | Disconnect all devices connected to the GFCI outlet. |
| 2 | Locate the ‘Test’ and ‘Reset’ buttons on the outlet. |
| 3 | Press the ‘Test’ button firmly to shut off the power. |
| 4 | Use a voltage tester to check if the power is off. |
| 5 | Press the ‘Reset’ button to restore power to the outlet. |
| 6 | Use the voltage tester to confirm power restoration. |
Testing a GFCI outlet on a regular basis, preferably monthly, is recommended to ensure its continued functionality. This proactive approach helps identify any potential issues before they become safety hazards.
Resetting a Tripped GFCI Outlet
If a GFCI outlet has tripped due to a fault or overload, it will need to be reset to restore power. Follow these steps to reset a tripped GFCI outlet:
- Identify the GFCI outlet causing the tripped circuit. Check all GFCI outlets in the area to locate the one with the ‘Reset’ button popped out.
- Press the ‘Reset’ button firmly in. You should hear a click as the button resets.
- Use a voltage tester to confirm that power has been restored to the outlet.
It’s important to note that if the GFCI outlet keeps tripping after being reset, there may be an underlying wiring issue or a problem with one of the connected devices. In such cases, consulting a professional electrician is recommended to ensure the safety of your electrical system.
Addressing Wiring Problems
When installing a GFCI outlet with only two wires, you may encounter various wiring problems that need to be addressed. These issues can range from identifying faulty wiring to correcting any wiring issues that arise during the installation process. In this section, we will discuss how to identify faulty wiring and provide step-by-step instructions on how to correct wiring problems to ensure a safe and effective installation.
Identifying Faulty Wiring
Before proceeding with the installation of a GFCI outlet, it is important to identify any faulty wiring that may exist. Faulty wiring can lead to serious safety hazards, such as electrical shocks or fire hazards. To determine if you have faulty wiring, follow these steps:
- Turn off the power to the circuit you will be working on by switching off the circuit breaker at the main electrical panel.
- Inspect the wiring for any signs of damage, such as frayed or exposed wires, melted insulation, or loose connections. If you notice any of these issues, it is important to address them before proceeding with the installation.
- Use a voltage tester to ensure that the circuit is indeed turned off and that there is no live electrical current present.
By taking these precautions and identifying any faulty wiring beforehand, you can ensure a safer installation process and prevent any potential hazards.
Correcting Wiring Issues
If you encounter any wiring issues during the installation of a GFCI outlet with two wires, it is crucial to correct them promptly to ensure the outlet functions properly and safely. Here’s a step-by-step guide on how to correct common wiring problems:
- If the wiring appears to be loose or disconnected, turn off the power to the circuit and reconnect the wires securely.
- If the wiring is damaged or frayed, cut off the damaged portion and strip the insulation from the wire ends. Then, carefully reconnect the wires using wire connectors.
- If the wiring is too short to reach the GFCI outlet, you may need to extend the wires using approved wire connectors and additional lengths of wire. Ensure proper insulation and secure connections.
- After correcting any wiring issues, double-check all connections to ensure they are secure and properly insulated.
By following these steps, you can address and correct common wiring problems that may arise during the installation of a GFCI outlet with two wires. Remember to always prioritize safety and consult a professional if you are unsure about any aspect of the installation process.
Additional Tips And Safety Precautions
When it comes to installing a GFCI outlet with two wires, it is important to not only understand the electrical codes and regulations but also take the necessary safety precautions. Safety should be the priority when working with electrical components. In this section, we will discuss some additional tips and safety precautions to ensure a successful and safe installation. It is always recommended to hire a professional electrician if you are unsure about any step or if you lack the necessary electrical knowledge.
Understanding Electrical Codes and Regulations
Before you start the installation process, it is crucial to familiarize yourself with the electrical codes and regulations that are applicable in your area. These codes and regulations are in place to ensure the safety of both the installer and the occupants of the premises. Failure to adhere to these codes can result in serious consequences, including electrical shock or fire hazard.
Safety Precautions to Follow During Installation
During the installation process, it is important to follow safety precautions to minimize the risks involved. Here are some safety tips to keep in mind:
- Turn off the power: Before beginning any electrical work, make sure to turn off the power supply to the outlet. This can be done by switching off the corresponding circuit breaker.
- Use proper tools and equipment: Ensure that you use the right tools and equipment for the installation. Using incorrect tools can lead to accidents and damage to the outlet.
- Wear protective gear: Protect yourself by wearing safety goggles, gloves, and appropriate clothing. This will safeguard you from any potential electrical hazards.
- Check the wiring: Before connecting the GFCI outlet, double-check the wiring to ensure it is secure and properly insulated. Loose or exposed wires can lead to electrical shock.
- Test the outlet: Once the installation is complete, test the GFCI outlet to ensure it is working properly. Use a voltage tester to check for any live wires before plugging in any devices.
Hiring a Professional Electrician
If you are unsure about any step in the installation process or if you lack the necessary electrical knowledge, it is highly recommended to hire a professional electrician. A licensed electrician has the expertise and experience to handle electrical installations safely and efficiently. They will ensure that the GFCI outlet is installed correctly, minimizing the risk of electrical accidents or faulty wiring.
By following these additional tips and safety precautions, you can ensure a successful and safe installation of a GFCI outlet with two wires. Remember, electrical work can be dangerous, so always prioritize safety and consult a professional if needed.
Frequently Asked Questions
How Do You Install A Gfci Outlet With 2 Wires?
To install a GFCI outlet with 2 wires, start by turning off the power to the circuit. Then, remove the old outlet and disconnect the wires. Connect the GFCI’s Line and Load terminals to the respective wires, and secure them with wire connectors.
Finally, install the GFCI outlet into the electrical box and test it to ensure proper functioning.
Can I Install A Gfci Outlet Without A Ground Wire?
Yes, you can install a GFCI outlet without a ground wire. However, it is important to note that the outlet will not provide a ground connection. To use the GFCI outlet in this scenario, you need to label it as “No Equipment Ground” and follow the manufacturer’s instructions carefully.
What Are The Benefits Of Installing A Gfci Outlet?
Installing a GFCI outlet can provide multiple benefits. It offers enhanced safety by detecting ground faults and instantly shutting off the power, protecting against electrical shock. GFCI outlets also provide increased protection against electrical fires and can be installed in areas prone to moisture, such as bathrooms, kitchens, and outdoor spaces.
Conclusion
Installing a GFCI outlet with just two wires may seem intimidating, but with the right knowledge and tools, it can be done easily. By following the steps outlined in this guide, you can ensure the safety of your electrical system and protect yourself from potential hazards.
Remember to always follow the manufacturer’s instructions and seek professional help if needed. With practice, you’ll become more confident in your electrical skills. So go ahead, upgrade your outlets, and enjoy the peace of mind that comes with knowing you’ve installed a GFCI outlet correctly.