To install a flush mount ceiling fan, first turn off the power, then assemble the fan blades, attach the fan bracket to the ceiling, connect the wires, and finally attach the fan motor to the bracket. Installing a flush mount ceiling fan requires following these steps carefully and ensuring the power is completely turned off prior to beginning the installation process.
Consider the following guide to successfully install a flush mount ceiling fan in your home. By adhering to safety measures and correctly connecting the wires, you can enjoy the benefits of a cool and comfortable room with a stylish ceiling fan.
Selecting The Right Ceiling Fan
Factors to consider when choosing a flush mount ceiling fan
Selecting the right ceiling fan is crucial when it comes to enhancing the functionality and aesthetics of your space. Whether you’re looking to cool down a room or improve air circulation, a flush mount ceiling fan can be a perfect choice. However, with so many options available in the market, it’s essential to consider several factors before making your purchase. In this article, we will delve into these factors and guide you on how to choose the ideal flush mount ceiling fan for your space.
Measuring the ceiling height and room size
The first step in selecting a flush mount ceiling fan is to measure your ceiling height and determine the size of your room. Measuring the ceiling height will help you choose the appropriate fan size to ensure optimal performance and prevent any clearance issues. For ceilings taller than 9 feet, consider using a downrod to lower the fan and facilitate better air circulation.
Next, take into account the room size. Larger rooms generally require fans with a larger blade span to effectively cool down the space. Conversely, smaller rooms may benefit from fans with smaller blade spans. It’s important to find the right balance between the size of your room and the size of your fan to achieve optimal airflow and comfort.
Understanding the fan’s blade span and motor size
The blade span and motor size are critical factors to consider when selecting a flush mount ceiling fan. The blade span, measured from the tip of one blade to the tip of the opposite blade, determines the fan’s ability to move air. Ideally, a larger room would benefit from a fan with a wider blade span, while a smaller room may require a more compact blade span.
In addition to the blade span, the motor size also plays a vital role in a ceiling fan’s performance. A motor with sufficient power ensures efficient airflow and quiet operation. Look for fans with motors that feature high-performance capabilities, such as multiple speeds and reversible rotation, allowing you to adjust the airflow according to your needs and preferences.
By considering the ceiling height, room size, blade span, and motor size, you can confidently select a flush mount ceiling fan that perfectly suits your needs. Make sure to take accurate measurements and thoroughly research your options, comparing features and specifications. With the right ceiling fan in place, you can enjoy improved air circulation, comfort, and energy efficiency in your space.
Preparing For Installation
When it comes to installing a flush mount ceiling fan, proper preparation is key to ensure a smooth and successful installation. This section of the blog post will guide you through the necessary steps to prepare for the installation process.
Gathering the necessary tools and materials
Before you begin the installation, gather all the tools and materials required for the job. Having everything on hand will save you time and effort. Here is a list of items you will need:
| 1. | Ceiling fan kit |
| 2. | Screwdriver set |
| 3. | Electrical tester or voltage detector |
| 4. | Wire nuts |
| 5. | Wire strippers |
| 6. | Ladder or step stool |
Make sure you have all these tools and materials readily available before starting the installation process.
Turning off the power to the existing light fixture
Before removing the old light fixture, you must first turn off the power to it. This ensures your safety while working with electrical connections. Follow these steps to turn off the power:
- Locate your home’s electrical panel.
- Open the panel door.
- Find the breaker corresponding to the room where the ceiling fan is located.
- Switch the breaker to the “off” position.
Ensure that the power is completely off by testing the existing light fixture with an electrical tester or voltage detector.
Removing the old light fixture and preparing the electrical box
Once the power is turned off, you can proceed to remove the old light fixture. Follow these steps:
- Loosen the screws or nuts holding the fixture to the ceiling.
- Gently lower the fixture and disconnect the wires.
- Remove the mounting bracket.
- Inspect the electrical box for any damage or loose connections.
- Tighten any loose connections or replace the electrical box if necessary.
Ensure the electrical box is secure and suitable for ceiling fan installation.
By gathering the necessary tools and materials, turning off the power, and properly removing the old light fixture while preparing the electrical box, you are now ready to proceed with the installation process.
Wiring And Mounting The Ceiling Fan
When it comes to installing a flush mount ceiling fan, the wiring and mounting process is an essential step that ensures the fan operates safely and securely. By following these steps, you can successfully connect and secure your ceiling fan, providing a comfortable and stylish addition to any room.
Connecting the fan’s wires to the electrical box wires
Before you begin wiring your flush mount ceiling fan, ensure that the power is turned off at the breaker box. Once that is confirmed, follow these steps:
- Identify the electrical box wires and the fan’s wires. The typical wires in the electrical box include a black wire (hot), a white wire (neutral), and a bare copper or green wire (ground).
- Match the corresponding colored wires from the fan to the electrical box wires. Connect the black wire from the fan to the black wire in the box, the white wire from the fan to the white wire in the box, and the green or copper wire from the fan to the ground wire in the box.
- Secure each connection with wire connectors or wire nuts to ensure a tight and safe connection.
- Once all the connections are secure, gently push the wires back into the electrical box.
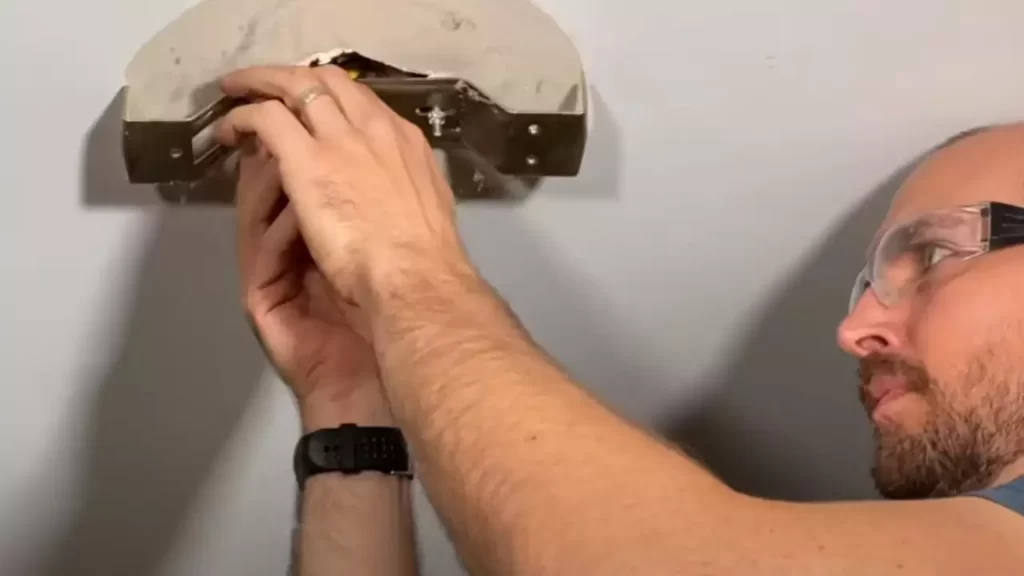
Securing the fan’s mounting bracket to the ceiling
To properly mount your flush mount ceiling fan, follow these steps:
- Hold the mounting bracket against the ceiling, aligning it with the electrical box.
- Insert the screws provided with the fan through the bracket and into the holes in the electrical box.
- Tighten the screws using a screwdriver or drill, ensuring the bracket is secured firmly to the ceiling.
- Use a level to ensure the bracket is perfectly horizontal. Adjust if necessary.
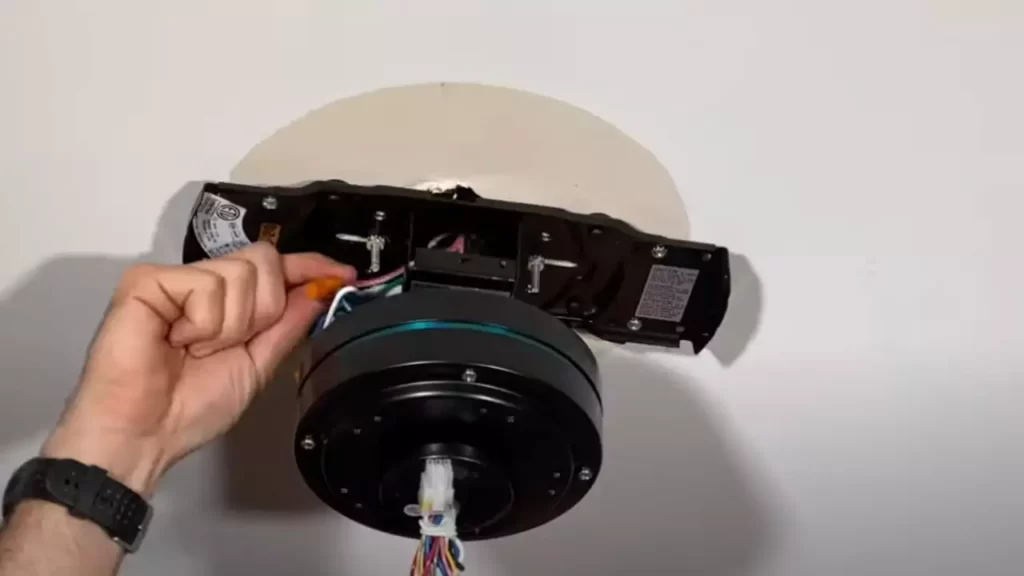
Hanging and wiring the fan motor to the mounting bracket
Now that the bracket is securely attached, it’s time to hang and wire the fan motor:
- Follow the manufacturer’s instructions and use the provided hook or hanging ball to suspend the fan motor from the mounting bracket.
- Carefully thread the fan’s wires through the canopy cover and down into the mounting bracket.
- Align the holes on the fan motor with the holes on the mounting bracket.
- Insert and tighten the screws provided to secure the fan motor to the mounting bracket.
- Double-check all the wire connections, ensuring they are properly secured and not tangled.
- Finally, attach the canopy cover to hide the wiring and give your ceiling fan a finished look.
With the fan motor securely mounted, you can now restore power at the breaker box and test the functionality of your newly installed flush mount ceiling fan. Enjoy the comfort and style it brings to your space!
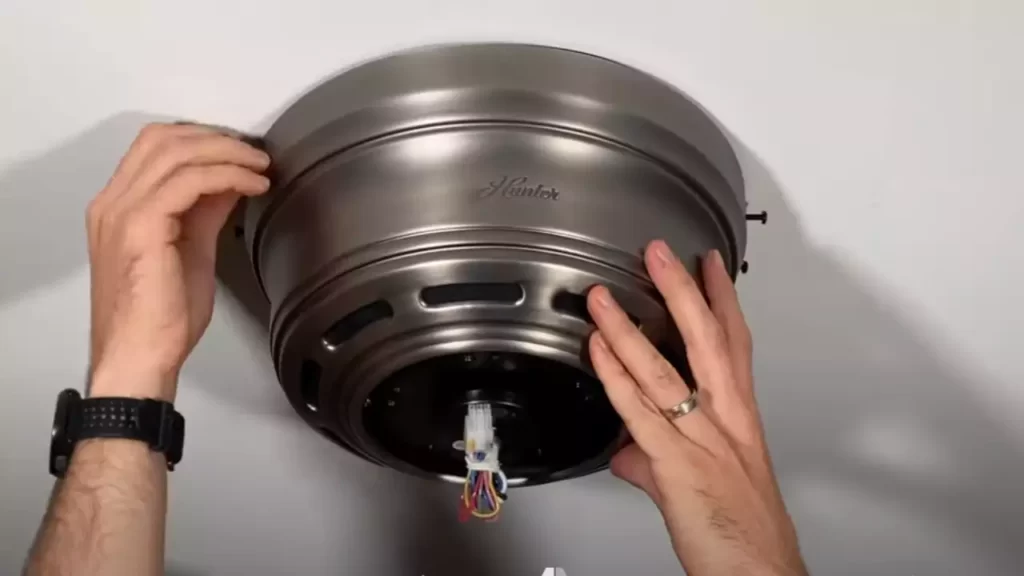
Attaching Blades And Light Kit
Once you have securely mounted your flush mount ceiling fan onto the ceiling, it’s time to attach the blades and light kit (if applicable) to complete the installation. Follow these simple steps to ensure a smooth and successful installation.
Installing the fan blades onto the motor
Before attaching the fan blades, make sure all screws and hardware are easily accessible. Place the motor housing on a stable surface and carefully unwrap the blades. Identify the screw holes on each blade and align them with the corresponding holes on the motor.
- Tighten the screws with a screwdriver in a diagonal pattern to maintain balance and stability. Ensure they are securely fastened, but avoid over-tightening as it may damage the blades or motor.
- Double-check that all blades are evenly spaced and aligned. Adjust them if necessary to ensure a symmetrical appearance.
Adjusting the balance of the fan blades
Properly balanced fan blades prevent wobbling and noise during operation. Here’s how you can adjust the balance:
- Use a balancing kit, typically included with the ceiling fan, or purchase one separately if needed.
- Attach the balancing clip to the leading edge of one blade, about halfway between the motor and the tip.
- Turn the fan on and observe its operation. If you notice any wobbling or uneven movement, rotate the blade with the balancing clip to different positions until you find the smoothest operation.
- Once you have found the optimal position, remove the balancing clip and repeat this process with each blade individually.
Connecting and installing the light kit (if applicable)
If your ceiling fan includes a light kit, follow these steps for a safe and successful installation:
- Identify the light kit attachment points on the motor housing and connect the corresponding wires from the light kit to the fan.
- Secure the connections with wire nuts and ensure they are tightly fastened to prevent any loose connections.
- Install the light bulbs according to the manufacturer’s instructions.
- Attach the light kit to the motor housing using the provided screws or brackets.
Remember to refer to the specific instructions provided by the manufacturer for your flush mount ceiling fan, as these steps may vary slightly depending on the model. With the fan blades and light kit securely attached, your flush mount ceiling fan is now ready to provide comfort and style to any room.
Testing And Final Adjustments
Once you have successfully installed your flush mount ceiling fan, it’s time to move on to the testing and final adjustments phase. This step ensures that your fan is set up correctly and functioning properly so that you can enjoy a cool and comfortable environment in your home. In this section, we will discuss how to reconnect the power and test the fan’s functionality, adjust the fan’s speed and direction settings, as well as troubleshoot common installation issues. Let’s get started!
Reconnecting the power and testing the fan’s functionality
Before reconnecting the power, double-check that the fan’s electrical connections are secure and the wires are properly capped. Once you are confident in the wiring, turn the power back on at the circuit breaker and flip the fan’s wall switch to the “On” position. Here’s a step-by-step process to test the fan’s functionality:
- Turn on the fan at the wall switch.
- Listen for any unusual noises, such as creaking or rattling. If you hear any, turn off the fan immediately and inspect for loose screws or other issues.
- Observe the fan blades as they rotate. Ensure they spin smoothly and there is no wobbling.
- Check that the fan’s lights (if applicable) turn on and off properly.
- Test the fan’s multiple speed settings by gradually increasing and decreasing the speed using the fan’s pull chains or remote control.
If any issues arise during this testing phase, refer to the troubleshooting section below for assistance.
Adjusting the fan’s speed and direction settings
Once you have ensured that the fan is functioning correctly, you may want to adjust its speed and direction settings to suit your preferences. Here’s how:
- Locate the fan’s control switch or remote control that is designed for adjusting the fan’s speed and direction.
- Depending on the model, you may have different speed options such as low, medium, and high. Select the speed that provides the desired level of air circulation.
- Some fans also offer a reverse direction option, which can be useful for both summer and winter seasons. In summer, the counterclockwise direction creates a cooling breeze, while in winter, the clockwise direction helps distribute warm air.
- Experiment with different speed and direction settings until you find the most comfortable configuration for your space.
Troubleshooting common installation issues
Despite your best efforts, you may encounter a few common installation issues. Here are some troubleshooting tips to help you resolve them:
| Issue | Solution |
|---|---|
| The fan doesn’t turn on. | Check the power connection and ensure that the circuit breaker is in the “On” position. If the issue persists, consult an electrician. |
| The fan wobbles or shakes. | Make sure that all screws, including those attaching the fan blades to the motor, are tightened securely. Use a balancing kit if needed. |
| The fan makes unusual noise. | Inspect the fan blades for any obstructions or loose parts. Tighten any loose screws and ensure that the fan is properly mounted. |
| The lights on the fan flicker. | Check the bulb connections and ensure that they are tightly screwed in. If the issue persists, try using a different type or brand of bulbs. |
| The fan doesn’t change speed. | Ensure that the fan’s speed settings are adjusted correctly using the control switch or remote control. If the issue persists, consult the fan’s instruction manual. |
By following these troubleshooting steps, you will be able to address common installation issues and ensure that your flush mount ceiling fan operates smoothly. Now that your fan is installed, tested, and adjusted, you can sit back, relax, and enjoy the comfort and style it brings to your living space.
Tips For Regular Maintenance
Cleaning and Dusting the Fan Blades and Housing
Cleaning and dusting your flush mount ceiling fan on a regular basis is essential to ensure optimal performance and airflow. Over time, dust and dirt accumulate on the blades and housing, which can hinder the fan’s efficiency and create an unpleasant environment. Here are some simple steps you can follow to clean and dust your fan:
- Gather the necessary tools: Before you start, make sure you have a sturdy ladder, a microfiber cloth or a feather duster, and a mild cleaning solution. Avoid using harsh chemicals that can damage the fan.
- Switch off the fan: Make sure the fan is turned off and the power supply is disconnected to avoid any accidents during the cleaning process.
- Clean the blades: Begin by gently wiping each blade with a microfiber cloth or a feather duster. Start from the center of the blade and move towards the outer edge, ensuring you remove any built-up dust or debris. Repeat this process for each blade.
- Pay attention to the housing: Besides cleaning the blades, it’s important to clean the fan’s housing as well. Dampen a cloth with a mild cleaning solution and wipe away any dirt or grime from the housing. Be careful not to let any liquid seep into the electrical components.
- Dry and reassemble: After cleaning the blades and housing, use a dry cloth to remove any remaining moisture. Once dry, reassemble the fan and ensure all connections are properly secured before turning the fan back on.
Checking the Fan’s Motor and Hardware for Wear and Tear
Regularly monitoring the motor and hardware of your flush mount ceiling fan is crucial to prevent any potential breakdowns and ensure its longevity. Here’s a step-by-step guide to help you inspect the fan’s motor and hardware:
- Power off the fan: Prior to performing any inspections, make sure the fan is disconnected and switched off to avoid any electrical accidents or injuries.
- Inspect the fan motor: Begin by visually examining the fan motor for any signs of wear and tear such as loose wires or visible damage. Note down any abnormal observations for further analysis or professional assistance.
- Check the fan’s hardware: Next, carefully examine the various hardware components, including screws, brackets, and mounting accessories. Tighten any loose screws or connections to ensure stability and safety.
- Listen for unusual noises: Turn the fan on and listen for any unusual noises such as grinding, rattling, or squeaking. These sounds can indicate problems with the fan’s motor or other internal components.
- Conduct periodic inspections: Make it a habit to periodically check the fan’s motor and hardware for wear and tear. Regular inspections can help detect issues early on and prevent more extensive damage.
- Seek professional help: If you notice any significant damage or if the fan’s performance continues to be compromised, it’s advisable to contact a professional electrician or the manufacturer for further assistance.
Replacing Any Necessary Parts or Contacting Professional Help
In certain cases, regular maintenance may require replacing certain parts of your flush mount ceiling fan. If you encounter any issues during your maintenance routine or notice specific problems with the fan, follow these steps:
- Identify the problem: Assess the fan’s performance and determine the specific part that needs replacement. It could be a malfunctioning motor, a damaged blade, or a faulty switch.
- Order the replacement part: Contact the manufacturer or visit their website to order the appropriate replacement part. Ensure you provide accurate details to receive the correct component.
- Consider professional assistance: If you are uncertain about replacing the part yourself or if the warranty is still valid, it’s best to contact a professional electrician or the manufacturer’s customer service.
- Follow the installation instructions: Once you have the replacement part, carefully follow the installation instructions provided by the manufacturer. Take note of any specific tools or techniques required for a successful replacement.
- Test the fan: After replacing the necessary part, reconnect the power supply and test the fan to ensure it is functioning properly. If the issue persists, contact the manufacturer or seek professional help to address the problem.
By adhering to these regular maintenance tips, you can extend the lifespan of your flush mount ceiling fan and enjoy its efficient cooling abilities for years to come.
Frequently Asked Questions
Can Any Ceiling Fan Be Flush Mounted?
Yes, any ceiling fan can be flush mounted.
Is It Better To Have A Flush Mount Ceiling Fan?
Yes, it is better to have a flush mount ceiling fan. It provides better air circulation and saves space compared to traditional ceiling fans. With its sleek and modern design, it seamlessly blends with the ceiling and enhances the overall aesthetic of any room.
How Do You Install A Ceiling Fan Without A Downrod?
To install a ceiling fan without a downrod, follow these steps: 1. Shut off the power to the fan. 2. Attach the mounting bracket to the ceiling. 3. Connect the wires from the ceiling to the fan’s wiring. 4. Mount the fan to the bracket.
5. Turn on the power and test the fan.
What Is The Difference Between Low Profile And Flush Mount Ceiling Fans?
Low profile ceiling fans are designed for rooms with low ceilings and have a shorter downrod. Flush mount ceiling fans, on the other hand, are installed directly onto the ceiling without a downrod. This makes them ideal for rooms with standard or higher ceilings, providing more space and airflow.
Conclusion
Installing a flush mount ceiling fan is a simple and cost-effective way to improve airflow and add comfort to any room. By following the step-by-step instructions in this guide, you can easily complete the installation process. Remember to gather all the necessary tools and materials before starting, and take safety precautions throughout.
With a little bit of time and effort, you’ll be able to enjoy the benefits of a cool and comfortable space in no time. So, go ahead and get started on your ceiling fan installation project today!