To install a fluorescent light fixture, start by turning off the electricity, removing the old fixture, connecting the wires, and securing the fixture in place. Then, insert the light bulbs, restore the power, and test the fixture.
Ensure your safety by following these simple steps to install a fluorescent light fixture easily and efficiently. Whether you are replacing an old fixture or installing a new one, this guide will provide you with the necessary steps to complete the installation process successfully.
Illuminate your space with a fluorescent light fixture by following this straightforward installation guide.
Factors To Consider When Selecting A Fixture
Lighting Needs
Your lighting needs are one of the primary factors to consider when selecting a fluorescent light fixture. Before purchasing a fixture, it’s essential to assess the purpose of the lighting and the ambiance you want to create.
- Are you looking for bright, white light for a workspace or kitchen?
- Do you need a warm, soft glow for a relaxing environment in a living room or bedroom?
- Are you trying to enhance the aesthetics of a specific area, such as a gallery or retail space, by using different light colors?
- Or do you simply want general lighting for a hallway or utility room?
Considering your lighting needs helps narrow down your options and ensures you select a fixture that suits your specific requirements.
Fixture Size and Type
The size and type of the fluorescent light fixture play a crucial role in determining its functionality and suitability for your space. The fixture’s size should align with the dimensions of the area where you plan to install it.
1. Measure the space: Take accurate measurements of the ceiling or wall area where the fixture will be mounted. Consider the height, width, and depth limitations to ensure proper fit and clearance.
2. Fixture type: Determine the most appropriate type of fixture for your needs. Common options include surface-mounted fixtures, recessed fixtures, and pendant fixtures. Surface-mounted fixtures are affixed directly to the ceiling or wall. Recessed fixtures are installed flush with the ceiling, offering a clean and streamlined look. Pendant fixtures hang from the ceiling, providing focused lighting or decorative accents.
3. Aesthetic considerations: Additionally, think about the design and style of the fixture that complements your existing decor. Whether you prefer a modern, sleek fixture or a more traditional and ornate design, there are numerous options available to suit your taste.
Energy Efficiency
Energy efficiency is a vital consideration when selecting any lighting fixture, including fluorescent lights. By choosing an energy-efficient fixture, you not only contribute to environmental sustainability but also save on your electricity bills.
Here are factors to keep in mind for energy-efficient fluorescent light fixtures:
1. Energy Star rating: Look for fixtures with an Energy Star rating, as they meet strict energy efficiency guidelines set by the U.S. Environmental Protection Agency. This certification ensures that the fixture consumes less energy while still delivering high-quality lighting.
2. Lumens and watts: Consider the lumens and wattage of the fixture. Lumens indicate the brightness provided by the light, while wattage measures the amount of power consumed. Opt for fixtures with high lumen output and low wattage to maximize energy efficiency without compromising on illumination.
3. Integrated LED options: Some fluorescent light fixtures come with integrated LED technology. LEDs are known for their energy efficiency and longevity, offering substantial energy savings compared to traditional fluorescent bulbs.
By carefully considering these factors—your lighting needs, fixture size and type, and energy efficiency—you can make an informed decision when selecting a fluorescent light fixture that perfectly suits your space and requirements.
Essential Tools For The Installation
When it comes to installing a fluorescent light fixture, having the right tools at hand is essential for a smooth and efficient process. These tools not only help you complete the job safely, but they also ensure that the installation is done correctly. Here are the must-have tools you’ll need:
Screwdriver
A screwdriver is a versatile tool that comes in handy for various tasks, including installing a fluorescent light fixture. Opt for a screwdriver with a comfortable grip and interchangeable heads to handle different types of screws. With a screwdriver, you can easily remove the existing fixture and secure the new one in place.
Wire Strippers
Wire strippers are essential for preparing the electrical wires before connecting them to the light fixture. These tools allow you to cleanly remove the insulation from the wires without damaging the conductive copper underneath. It is crucial to select wire strippers that are specifically designed for the gauge of wire you are working with to ensure a precise and secure connection.
Wire Connectors
Wire connectors, also known as wire nuts, are small devices used to join electrical wires together. These connectors ensure a secure and reliable connection, preventing any electrical faults or hazards. When installing a fluorescent light fixture, wire connectors are used to connect the fixture’s wires to the existing wiring in your home.
Voltage Tester
A voltage tester is an invaluable tool for anyone working with electrical installations. It allows you to verify if a wire has an electrical current flowing through it, helping you identify live wires and ensure your safety. Before starting the installation process, always use a voltage tester to confirm that the power to the existing fixture is turned off.
Ladder or Step Stool
Installing a fluorescent light fixture often requires reaching heights above the ground. That’s why a ladder or step stool is necessary to safely access the installation area. Choose a ladder or step stool that is sturdy and provides secure footing, ensuring your safety while working at elevated heights.
In conclusion, having the essential tools for installing a fluorescent light fixture is crucial for a successful and safe installation process. With a screwdriver, wire strippers, wire connectors, a voltage tester, and a ladder or step stool, you’ll be well-equipped to tackle this task with confidence. Remember, always prioritize safety when working with electrical installations and ensure the power is turned off before starting any electrical work.
Preparing The Work Area
Preparing the Work Area
Before you begin installing a fluorescent light fixture, it’s crucial to prepare the work area properly to ensure your safety and a smooth installation process. Follow these steps to ensure everything is ready:
Switch off the Power
The first step to take when preparing the work area is to switch off the power. Look for the circuit breaker panel in your home and locate the breaker that controls the electricity to the area where you’ll be installing the light fixture. Switch off the breaker to ensure that no current is running through the wires when you start working. This is a crucial safety measure that should never be skipped.
Clearing the Workspace
Once you’ve switched off the power, it’s time to clear the workspace. Remove any furniture, equipment, or objects that may hinder your access to the area where the light fixture will be installed. Having a clutter-free workspace not only allows you to maneuver easily but also minimizes the risk of accidents or damage to your property. Remember, safety should always be a top priority.
Assembling the Fixture Components
With the workspace cleared, it’s time to assemble the components of your fluorescent light fixture. Lay out all the parts on a clean surface, checking that you have everything you need. Read the manufacturer’s instructions carefully and ensure you understand how the pieces fit together. Take note of any special tools required for the assembly, such as wire strippers or pliers.
If you’re unsure about any part of the assembly process, consult the instruction manual or seek guidance from a knowledgeable professional. Properly assembling the fixture components will help ensure a secure and functional installation.
Wiring The Fixture
Now that you have your fluorescent light fixture ready, it’s time to tackle the wiring process. This step is crucial for ensuring your new fixture functions properly and safely. In this section, we will guide you through the process of identifying the fixture wires, connecting them to the power supply, and securing the wiring connections.
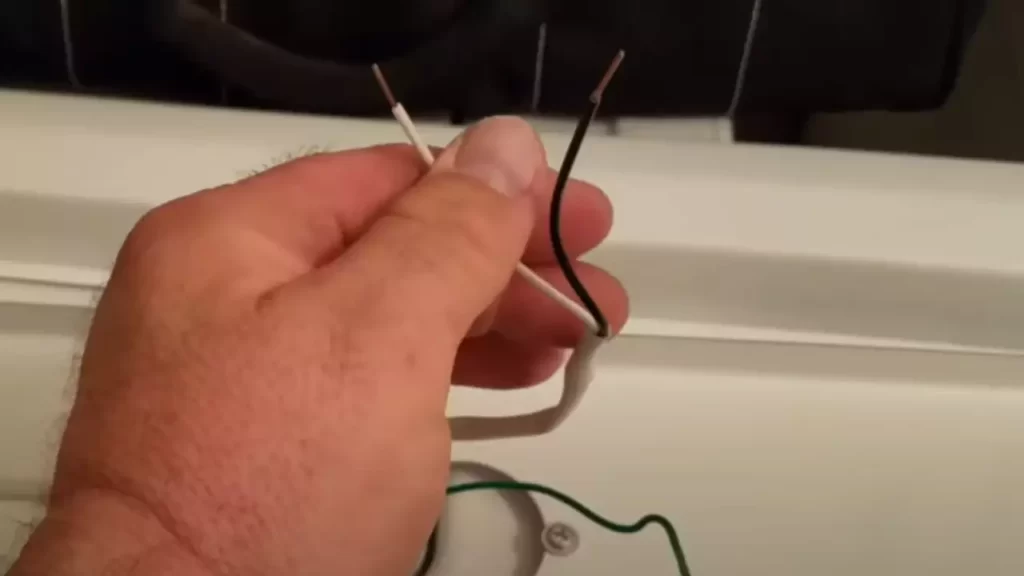
Identifying the Fixture Wires
The first step in wiring your fluorescent light fixture is to identify the various wires. Your fixture will typically have three or four wires: one black wire, one white wire, and in some cases, one or two additional colored wires. These additional wires may be red, blue, or yellow, and they are used for specific purposes such as ballast control or grounding.
To identify the wires, refer to the manufacturer’s instructions or the labeling on the fixture. The black wire is the hot wire, the white wire is the neutral wire, and the additional colored wires serve their designated purposes.
Connecting the Fixture Wires to the Power Supply
Now that you have identified the fixture wires, it’s time to connect them to the power supply. This step requires precision and caution to ensure that the connections are secure and correct.
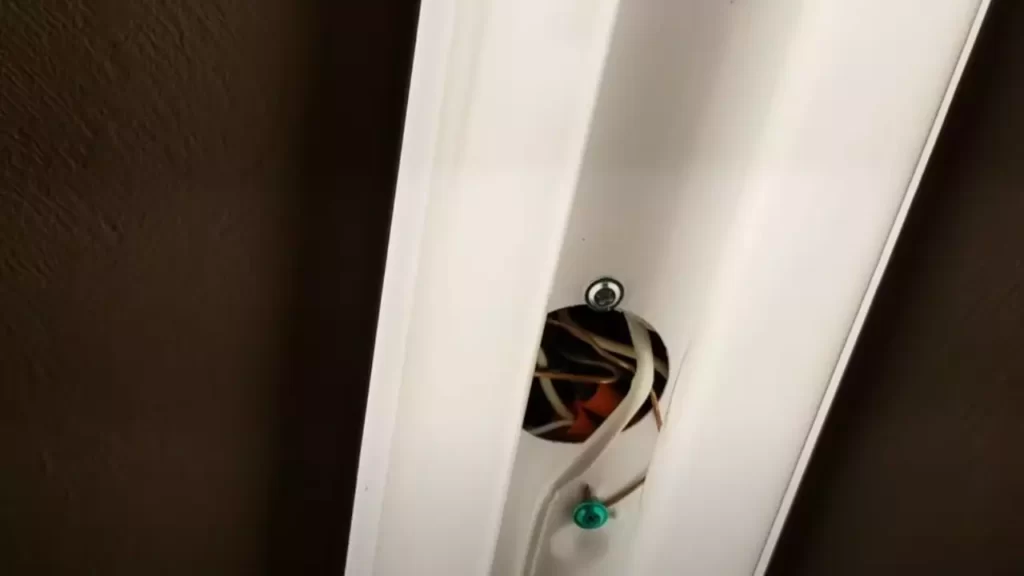
You will need to turn off the power supply before proceeding. Locate the junction box or the power source where you will be connecting the fixture wires. Open the junction box cover and expose the electrical wires inside. You will typically find black, white, and copper wires in the junction box.
Proceed by connecting the fixture wires to the corresponding wires in the junction box. Match the black fixture wire to the black power supply wire, the white fixture wire to the white power supply wire, and the additional colored wires to their corresponding wires if applicable. Twist the stripped ends of the wires together and secure them with wire nuts.
Securing the Wiring Connections
After connecting the fixture wires to the power supply, it’s important to ensure that the wiring connections are secure. This step ensures that the wires are held together tightly and reduces the risk of loose connections or electrical hazards.
Start by carefully tucking the connected wires into the junction box, making sure they are properly positioned and not pinched or strained. You can use cable ties or electrical tape to secure the wires and prevent them from moving or getting tangled.
Once the wires are secure, carefully close the junction box cover and tighten the screws to hold it in place. Ensure that there are no exposed wires or loose connections visible outside the junction box.
With the wiring connections secured, you can proceed with assembling and installing the remaining components of your fluorescent light fixture.
Attaching The Fixture To The Ceiling
Once you have positioned the fluorescent light fixture correctly, it’s time to attach it securely to the ceiling. This step-by-step guide will walk you through the process of attaching the fixture to ensure a safe and stable installation.
Positioning the Fixture
In order to attach the fixture accurately, you need to first position it in the desired location on the ceiling. Consider factors such as the room’s layout and lighting requirements to determine the best placement for the fixture. Keep in mind that fluorescent light fixtures should typically be positioned centrally to ensure even distribution of light.
Once you have decided on the location, hold the fixture up to the ceiling to confirm that it aligns with your intended position. Ensure that there is enough space around the fixture for any required wiring and maintenance.
Marking the Mounting Holes
With the fixture in the desired position, mark the locations of the mounting holes on the ceiling. These holes will be used to secure the fixture in place. Use a pencil or marker to make small marks at each hole location, ensuring they are clearly visible.
To ensure stability, it is recommended to have at least two mounting holes for smaller fixtures, while larger or heavier fixtures may require three or more mounting holes. Refer to the manufacturer’s instructions for specific guidance on hole placement.
Installing the Mounting Bracket
Once the mounting holes are marked, it’s time to install the mounting bracket. The mounting bracket provides a secure base for attaching the fixture to the ceiling. Align the bracket with the marked holes and use a screwdriver or drill to attach it firmly to the ceiling.
Ensure that the screws are tightly fastened to avoid any movement or instability. Double-check that the bracket is level and securely attached to the ceiling.
Once the bracket is installed, the next step is to connect the wiring and secure the fixture to the bracket. Refer to our previous blog post on ‘How to Wire a Fluorescent Light Fixture’ for detailed instructions on wiring the fixture safely and efficiently.
By following these simple steps for attaching the fixture to the ceiling, you can ensure a successful installation that provides ample light and durability for years to come.
Attaching The Lamp Holders And Bulbs
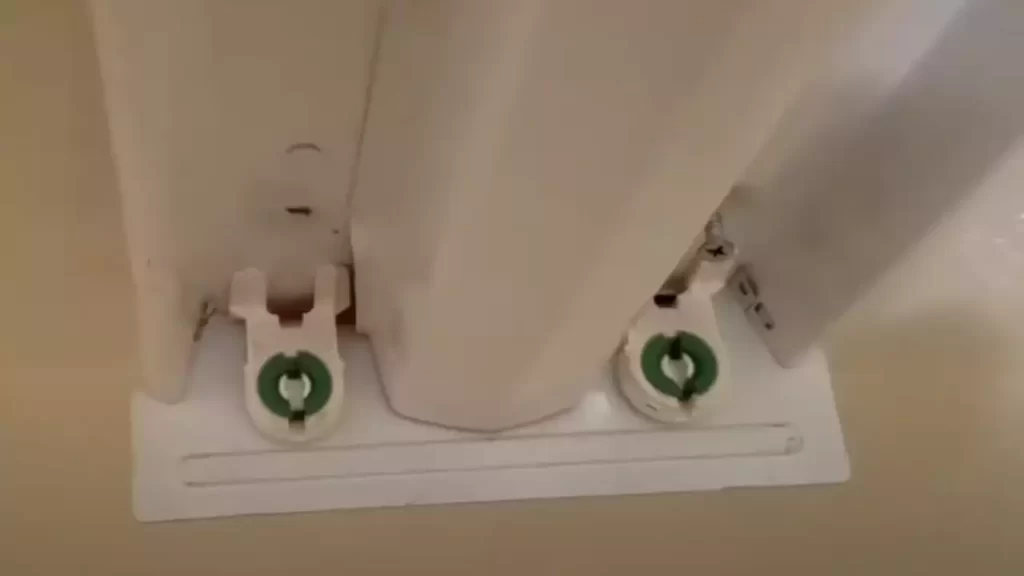
When it comes to installing a fluorescent light fixture, attaching the lamp holders and bulbs is a crucial step. The lamp holders are the components that hold the fluorescent bulbs, allowing the light to be emitted. Inserting and securing the fluorescent bulbs is also essential to ensure proper functioning of the light fixture. In this section, we will guide you through the process of attaching the lamp holders and bulbs.
Attaching the Lamp Holders
The first step is to securely attach the lamp holders to the fixture. To do this, follow these steps:
- Prepare the lamp holders: Before attaching them, ensure that the lamp holders are clean and free from any debris. This will ensure a tight and secure fit.
- Position the lamp holders: Determine the appropriate position for the lamp holders on the fixture. Measure and mark the locations to ensure they are evenly spaced.
- Secure the lamp holders: Use screws or clips provided with the fixture to firmly attach the lamp holders in place. Make sure they are aligned properly and tightly secured to prevent any movement.
- Verify the stability: Once attached, gently test the lamp holders to ensure they are securely fastened and will not move or come loose.
Inserting and Securing the Fluorescent Bulbs
After attaching the lamp holders, the next step is to insert and secure the fluorescent bulbs. Follow these steps:
- Select the correct bulbs: Check the fixture’s specifications to determine the appropriate size and type of fluorescent bulbs to use. Using the wrong bulbs can result in improper fit and potential hazards.
- Prepare the bulbs: Before inserting the bulbs, make sure they are free from any dirt or debris. Gently wipe them clean if necessary.
- Insert the bulbs: Carefully insert the fluorescent bulbs into the lamp holders, aligning the pins with the corresponding slots. Apply gentle pressure until the bulbs are fully seated.
- Secure the bulbs: Once inserted, rotate the fluorescent bulbs slightly until you feel them lock into place. This ensures a secure connection and prevents accidental dislodging.
- Test the bulbs: After securing the bulbs, switch on the power to test if they illuminate properly. If any bulbs do not light up, ensure they are correctly inserted and securely in place.
By following these steps to attach the lamp holders and bulbs, you can ensure a safe and functional fluorescent light fixture installation. Make sure to handle the bulbs with care and follow any additional instructions provided by the manufacturer for your specific fixture. With proper installation, you can enjoy bright and efficient lighting in your space.
Testing The Fixture And Powering On
Switching on the Power
Once you have successfully installed your fluorescent light fixture, the next step is to test it and power it on. This is an important part of the installation process as it ensures that everything is functioning properly and that you can safely start using your new light fixture.
Checking the Functionality of the Fixture
To check the functionality of the fixture, follow these steps:
- Make sure the wall switch or the switch on the fixture is in the ‘off’ position.
- Turn on the power at the circuit breaker or fuse box for the specific area where the light fixture is installed.
- Flip the wall switch or the switch on the fixture to the ‘on’ position.
- Observe the fluorescent tubes to see if they light up.
- If the tubes do not light up, switch off the power again and double-check all the connections, making sure they are secure and properly connected.
- Check if the starter is properly seated in the socket and if the tubes are securely fitted into the fixture.
- Replace any faulty tubes or starter if necessary.
- Switch on the power and test the fixture again.
Troubleshooting Common Issues
If you encounter any issues during the testing phase, here are some common problems and troubleshooting tips:
| Issue | Troubleshooting Steps |
|---|---|
| No light or flickering light |
|
| Light turns on but then immediately turns off |
|
| Dim or uneven lighting |
|
By following these steps and troubleshooting tips, you can ensure that your fluorescent light fixture is properly installed and functioning optimally. Remember to always refer to the manufacturer’s instructions for specific guidance related to your specific fixture model.
Power Safety Precautions
Before tackling any electrical project, it is crucial to prioritize your safety. Handling power can be dangerous if not done properly. In this section, we will discuss the essential power safety precautions you should follow when installing a fluorescent light fixture.
Shutting off the Circuit
The first step in ensuring your safety is to shut off the circuit that supplies power to the area where you will be working. This will prevent any accidental electric shock. Follow these steps to shut off the circuit:
- Identify the correct circuit breaker in your breaker box that controls the area you will be working in.
- Flip the switch on the breaker to the ‘off’ position. You will hear a click, and the power to the designated area will be cut off.
- For added safety, place a piece of electrical tape over the switch to prevent anyone from accidentally turning it back on while you are working.
- Use a voltage tester to confirm that the power is indeed turned off. This brings us to our next important step: testing the power.
Testing the Power
It is crucial to verify that the power has been disabled after shutting off the circuit. This additional step will provide an extra layer of safety. Here’s how you can test the power:
- Plug in a lamp or another small electronic device into an outlet in the area where you will be working.
- Turn on the lamp or device to ensure that it is functioning correctly.
- If the lamp or device remains off or does not work, it indicates that the power to the area has been successfully turned off. You can proceed with confidence. If the device turns on, return to the breaker box and verify that you have turned off the correct breaker.
Safe Handling of Electrical Components
When working with electrical components, it is crucial to handle them safely to prevent accidents. Follow these precautions to ensure safe handling:
- Never handle electrical components with wet hands or in wet conditions.
- Avoid using tools with worn-out or damaged insulation.
- Make sure to use insulated screwdrivers or pliers when dealing with live wires.
- Always hold electrical components by their insulated part rather than the exposed metal.
- Do not force connections or wires; use gentle pressure to avoid damage.
By strictly adhering to these power safety precautions, you can minimize the risks associated with working with electricity and carry out the installation of your fluorescent light fixture safely.
Fixture Installation Best Practices
When it comes to installing a fluorescent light fixture, following best practices is essential to ensure a seamless installation and optimal performance. Fixture Installation Best Practices encompass various considerations, including properly securing the fixture, ensuring even distribution of light, and regular maintenance and cleaning. By adhering to these practices, you can ensure that your fluorescent light fixture functions effectively while providing bright, energy-efficient lighting for your space.
Properly Securing the Fixture
To ensure the stability and safety of your fluorescent light fixture, it is crucial to properly secure it. This involves the use of appropriate mounting hardware, such as screws or brackets, to firmly attach the fixture to the ceiling or wall. Additionally, you should ensure that the mounting surface is strong enough to support the weight of the fixture.
Ensuring Even Distribution of Light
One of the key advantages of fluorescent lighting is its ability to provide even and consistent light distribution. To achieve this, it is important to position the fixture correctly. For larger areas, multiple fixtures may be required to ensure uniform lighting. Furthermore, utilizing diffusers or lens covers can help to distribute light evenly and reduce glare.
Regular Maintenance and Cleaning
Maintaining your fluorescent light fixture is vital for optimal performance and longevity. Regularly clean the fixture and remove any dust or debris that may accumulate on the surface or the diffuser. This helps to maximize light output and maintain a bright atmosphere. Additionally, inspect the fixture periodically to ensure that all components are in good condition and replace any worn-out or damaged parts promptly.
Frequently Asked Questions
How Is A Fluorescent Light Attached To The Ceiling?
A fluorescent light is attached to the ceiling using brackets or clips. These fixtures secure the light in place, allowing it to hang from the ceiling. The light is then connected to the electrical wiring for power.
Do Fluorescent Fixtures Require A Ballast?
Yes, fluorescent fixtures require a ballast. It is a device that helps regulate the flow of electric current to the bulbs, ensuring they work properly and efficiently. Without a ballast, the fluorescent bulbs will not operate.
How Do You Replace An Old Fluorescent Light Fixture?
To replace an old fluorescent light fixture, turn off the power, remove the cover, and unscrew the fixture. Disconnect the wires and remove the old fixture from the ceiling. Install the new fixture by connecting the wires, attaching it to the ceiling, and securing the cover.
Test the new fixture by turning on the power.
Do You Need An Electrician To Change A Fluorescent Light Bulb?
No, you do not need an electrician to change a fluorescent light bulb. It is a simple task that can be done by anyone. Just follow the instructions provided with the bulb and ensure the power is turned off before replacing it.
Conclusion
Installing a fluorescent light fixture might seem daunting, but with a few simple steps, you can easily accomplish the task. By following proper safety precautions and understanding the wiring process, you can successfully brighten up any space in your home.
Remember to turn off the power, assemble the fixture, connect the wiring, and secure the fixture properly. With these tips in mind, you’ll be able to confidently install a fluorescent light fixture and enjoy the benefits of efficient and eco-friendly lighting.