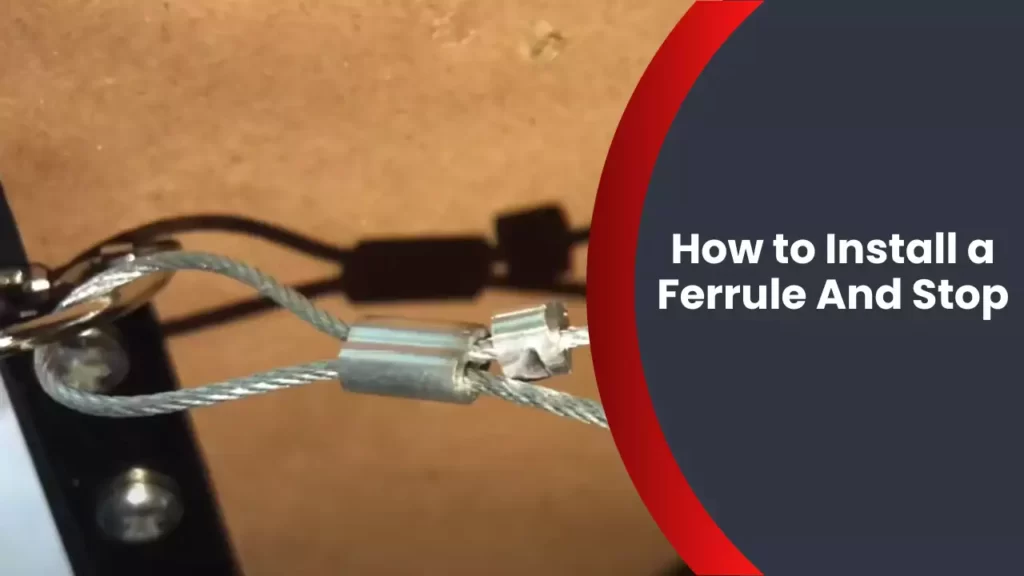
To install a ferrule and stop, follow these steps: slide the ferrule onto the cable, then insert the stop into the ferrule and crimp using pliers. Installing a ferrule and stop is a quick and easy process that ensures secure cable connections.
By correctly following these steps, you can ensure that your cables are properly secured and will not come loose during use. Properly installed ferrules and stops also help maintain the integrity of your cables, prolonging their lifespan and preventing damage.
Whether you are working on electrical wiring or cable assemblies, mastering the installation of ferrules and stops is an essential skill for any DIY enthusiast or professional technician.
Definition And Purpose Of A Ferrule And Stop
Components of a ferrule and stop
A ferrule and stop is a crucial component used in various applications such as plumbing, electrical work, and automotive industries. It serves as a protective barrier between two or more objects, preventing them from coming into direct contact with each other. This dynamic duo, consisting of a ferrule and stop, work hand in hand to ensure optimal function and longevity of the installed equipment.
A ferrule, typically made of metal or plastic, is a small cylindrical tube with the ability to grip, seal, or connect various materials together. It acts as a compression fitting, securing and aligning components within a larger structure. The primary purpose of a ferrule is to provide stability, prevent leaks, and improve the overall integrity of the joined parts.
On the other hand, a stop, usually made of rubber or a similar resilient material, is placed on the end of the ferrule. Its purpose is to limit the depth of insertion and create a reliable, sealed connection. The stop prevents the ferrule from being inserted too far, ensuring that the components stay in place and preventing any damage that may arise from excessive pressure or movement.
Components of a ferrule and stop
To fully grasp the importance and functionality of a ferrule and stop, it is essential to understand the individual components that make up this ingenious system:
1. Ferrule: This cylindrical tube is the main body of the fitting. It is designed to create a secure connection by compressing onto the inserted materials. Ferrules can come in various sizes and materials to accommodate the specific application requirements.
2. Stop: Positioned at the end of the ferrule, the stop acts as a physical barrier to limit the depth of insertion. It helps ensure that the ferrule is not inserted too far into the connecting material, preventing any potential damage or misalignment.
3. Compression nut: The compression nut, commonly made of metal, is responsible for securing the ferrule and stop in place. It is tightened onto the ferrule, compressing it onto the inserted material and creating a tight seal.
4. Connector: The connector serves as the interface between the ferrule assembly and the existing system or component. It can be a pipe, valve, or any other fitting that connects to the ferrule assembly to complete the desired connection.
By understanding the purpose and components of a ferrule and stop, you can ensure a successful installation and utilization of this vital fitting. Whether you’re working on a plumbing project, electrical installation, or any other application that requires a secure connection, incorporating a ferrule and stop system can greatly enhance the overall efficiency and durability of the structure.
Importance Of Installing A Ferrule And Stop
When it comes to ensuring the smooth operation and efficiency of a system, installing a ferrule and stop is of utmost importance. A ferrule and stop, also known as a compression sleeve or compression fitting, is an essential component in many industries, including plumbing, HVAC, and automotive. Its primary function is to create a secure connection between two components, such as pipes or tubes, and prevent leaks or disconnections that could lead to significant issues. In this post, we will discuss the importance of installing a ferrule and stop, as well as how it enhances the efficiency of a system.
Enhancing the efficiency of a system
Installing a ferrule and stop plays a crucial role in enhancing the efficiency of a system. There are several key reasons why it is important to use this component:
- Leak prevention: One of the primary functions of a ferrule and stop is to create a tight seal between pipes or tubes. By compressing the ferrule onto the tubing, it forms a secure connection that minimizes the risk of leaks. This is especially important in systems that operate under high pressure, as even a small leak can lead to significant energy loss or damage.
- Pressure resistance: A properly installed ferrule and stop can withstand high pressure conditions. This is essential in systems where pressure fluctuations are common, as it ensures the components remain intact and prevents any potential damage or breakage that could occur under excessive pressure.
- Enhanced durability: The use of a ferrule and stop ensures the durability of the connected components. By creating a stable connection, it reduces the chances of wear and tear, extending the lifespan of the system. This not only reduces the need for frequent maintenance and replacements but also saves costs in the long run.
- Easy installation: Installing a ferrule and stop is a relatively simple process. It requires minimal tools and expertise, making it accessible for both professionals and DIY enthusiasts. With easy installation, any necessary repairs or modifications can be completed quickly, minimizing downtime and ensuring the system operates efficiently.
In conclusion, the importance of installing a ferrule and stop cannot be underestimated. It not only enhances the efficiency of a system by preventing leaks and ensuring pressure resistance but also contributes to the durability and ease of installation. By understanding the significance of this component, individuals and businesses can make informed decisions when it comes to maintaining and optimizing their systems.
List Of Tools Needed For Installing A Ferrule And Stop
When it comes to installing a ferrule and stop, having the right tools is crucial for a successful installation. These tools not only help you achieve a secure and tight connection, but they also make the installation process a breeze. Here is a list of essential tools you will need:
Tool 1: Cable Cutter
A cable cutter is an indispensable tool for any DIYer or professional looking to install a ferrule and stop. This tool is designed to cut through cables and wires with precision and ease, ensuring a clean and neat cut every time. Whether you are working with steel cables or stainless steel wires, a high-quality cable cutter is a must-have for this installation.
Tool 2: Swaging Tool
A swaging tool is essential for creating a secure and tight connection between the ferrule and the cable. This tool is specifically designed to compress the ferrule onto the cable, ensuring a strong and reliable bond. With a swaging tool, you can apply the necessary pressure to create a permanent connection that will withstand any load or pressure.
Tool 3: Crimping Tool
A crimping tool is another invaluable tool for installing a ferrule and stop. This tool is used to squeeze the ferrule onto the cable, creating a secure grip. With a crimping tool, you can ensure that the ferrule is firmly attached to the cable, preventing any slippage or loosening over time. It is important to choose a crimping tool that is suitable for the size and type of ferrule you are working with to achieve optimal results.
With these essential tools at your disposal, you are well-equipped to install a ferrule and stop. These tools not only simplify the installation process but also ensure a secure and reliable connection. Make sure to invest in high-quality tools to achieve professional-grade results.
List Of Materials Needed For Installing A Ferrule And Stop
Properly installing a ferrule and stop is essential for the functionality and aesthetics of your project. To ensure a successful installation, you will need the following materials:
Material 1
One of the most important materials you’ll need is a high-quality ferrule. This small metal or plastic sleeve is used to secure and protect the end of a wire or cable, preventing fraying or damage. It also provides a neat and professional finish to your project.
Material 2
In addition to the ferrule, you will need a suitable crimping tool. This tool is specifically designed to apply pressure and create a secure connection between the ferrule and the wire. Look for a crimping tool that is compatible with the size and type of ferrule you are using.
Material 3
Lastly, you will need a wire stripper. This tool is used to remove the insulation from the end of the wire, allowing for a clean and reliable connection with the ferrule. A wire stripper typically has different-sized notches to accommodate various wire gauges, so be sure to select the appropriate one for your project.
By gathering these necessary materials, you’ll be well-prepared to install a ferrule and stop with confidence and precision. A successful installation will not only ensure the longevity of your project but also showcase your attention to detail and commitment to excellence.

Step 1: Preparing The Pipe
Before installing a ferrule and stop on a pipe, it’s important to prepare the pipe properly to ensure a secure and leak-free connection. The pipe preparation process involves a few key steps that need to be followed carefully. In this section, we will walk you through each step, explaining the process in detail.
Explanation of pipe preparation process
The pipe preparation process involves cleaning and deburring the pipe to ensure smooth and even surfaces for a proper seal. Here’s an outline of the steps involved:
- Clean the pipe: Start by thoroughly cleaning the pipe using a suitable cleaning agent. This will help remove any dirt, debris, or grease that could affect the bonding of the ferrule and stop.
- Inspect the pipe: Carefully inspect the pipe for any visible imperfections, such as dents or cracks. It’s crucial to identify any issues with the pipe before proceeding, as they can compromise the installation and lead to leaks.
- Deburr the pipe: Using a deburring tool, remove any burrs or rough edges from both the inner and outer surfaces of the pipe. Burrs can interfere with the proper seating of the ferrule and stop, resulting in leaks or reduced performance.
- Measure and mark: Measure the length of the pipe and mark the desired location for the ferrule and stop. Accurate marking ensures a precise installation and avoids any unnecessary rework.
Remember, the pipe preparation process is a critical step to ensure the success of your ferrule and stop installation. Take your time to clean, inspect, deburr, and measure the pipe accurately. This will save you from potential issues and help you achieve a secure and leak-free connection.
Step 2: Applying The Ferrule
Step 2: Applying the ferrule
Once you have prepared your copper pipe by cleaning and deburring it, the next step is to apply the ferrule. The ferrule is a small ring-shaped piece that fits around the pipe and helps create a watertight seal when compressed. In this section, we will provide detailed instructions for applying the ferrule, ensuring a secure and leak-free connection.
Detailed instructions for applying the ferrule:
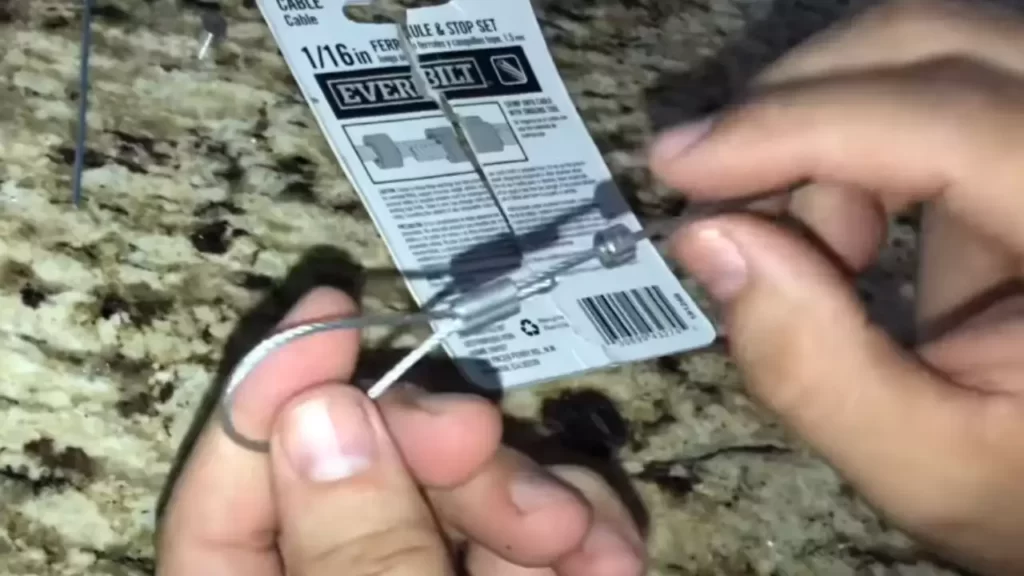
1. Slide the ferrule onto the copper pipe: Start by sliding the ferrule onto the pipe, ensuring it is positioned close to the end where the fitting will be installed. Make sure the ferrule is facing the correct way, with its tapered end facing the fitting.
2. Insert the fitting onto the pipe: With the ferrule in place, carefully insert the fitting onto the pipe until it reaches the desired position. Ensure that the fitting is aligned correctly with the pipe and sits flush against it.
3. Tighten the nut: Once the fitting is properly positioned, take the nut and begin to tighten it onto the fitting. Use adjustable pliers or a wrench to turn the nut clockwise. As you tighten the nut, the ferrule will compress against the pipe and create a tight seal.
4. Avoid over-tightening: Be cautious not to over-tighten the nut, as this can damage the fitting or cause the pipe to crack. As a general guideline, tighten the nut until it is snug, then give it an additional quarter turn. This should be sufficient to create a secure connection without risking any damage.
5. Check for leaks: Once the nut is tightened, turn on the water supply to check for any leaks. Inspect the area around the ferrule and fitting for any signs of water drips or seepage. If you notice any leaks, tighten the nut slightly further until the leakage stops.
By following these detailed instructions, you can effectively apply the ferrule and ensure a reliable and leak-free connection in your plumbing projects. Taking the time to properly apply the ferrule will contribute to the longevity and efficiency of your plumbing system.
Step 3: Inserting The Stop
Step 3: Inserting the Stop
Once you have successfully attached the ferrule to your pipe in the previous step, it’s time to move on to the next crucial step of the installation process: inserting the stop. The stop is an essential component that prevents the ferrule from sliding off the pipe and ensures a secure and leak-proof connection. In this step-by-step guide, we will walk you through the instructions for inserting the stop into the pipe, ensuring a hassle-free installation process.
Instructions for Inserting the Stop into the Pipe
To insert the stop into the pipe, follow these simple instructions:
- Before starting, make sure you have the appropriate size and type of stop that matches your pipe and ferrule.
- Inspect the inside of the pipe to ensure it is clean and free from any debris or obstructions. Clean it if necessary, using a pipe cleaner or a soft cloth.
- Take the stop and position it at one end of the pipe.
- Gently push the stop into the pipe, ensuring it fits snugly and is fully inserted.
- If necessary, use a mallet or a soft hammer to firmly tap the stop into place. Be cautious to exert enough force to secure the stop but avoid damaging the pipe.
- Verify that the stop is securely in place by giving it a gentle tug. If it doesn’t move or come out easily, you have successfully inserted the stop.
- Repeat the same process for the other end of the pipe if required.
By following these instructions, you can confidently insert the stop into the pipe, ensuring a secure connection for your ferrule. Remember, proper installation is key to avoiding leaks and ensuring the longevity of your plumbing system. Now that the stop is in place, it’s time to move on to the final step: tightening the ferrule. Stay tuned for the next section, where we’ll cover the crucial step of tightening the ferrule to complete your installation process.
Step 4: Securing The Ferrule And Stop
Now that you have successfully inserted the ferrule and stop into your project, it is crucial to secure them in place. This step ensures that the ferrule and stop do not come loose or move out of position, which can affect the overall functionality of your project. In this section, we will discuss the various methods for securing the ferrule and stop to ensure a secure and reliable installation.
Methods for Securing the Ferrule and Stop in Place
When it comes to securing the ferrule and stop, there are several methods you can choose from. Each method offers its own unique advantages and is suitable for different applications. Let’s explore some of the most commonly used methods:
1. Friction Fit
The friction fit method involves using the tightness of the connection between the ferrule and stop to secure them in place. This is achieved by ensuring a snug fit between the components, allowing friction to hold them together. The friction fit method is simple and effective, making it a popular choice for many DIY projects and small-scale installations.
2. Adhesive Bonding
Adhesive bonding involves using a specialized adhesive or glue to secure the ferrule and stop together. This method provides a strong and permanent bond between the components, making it suitable for projects that require extra stability. Before applying the adhesive, ensure that the surfaces are clean and free from any dirt or debris. Apply a thin layer of adhesive to both the ferrule and stop, then press them together firmly and allow the adhesive to cure as per the manufacturer’s instructions.
3. Compression Fittings
Compression fittings are an excellent choice for projects that require a secure and leak-proof connection. This method involves using a compression nut and an olive (or ferrule) to secure the ferrule and stop in place. The nut is tightened onto the fitting, compressing the olive against the stop, creating a tight seal. Compression fittings are commonly used in plumbing applications and are known for their reliability and ease of installation.
4. Crimping
Crimping is a method that involves using a crimping tool to deform the ferrule and stop, creating a permanent connection. This method is commonly used in applications that require a high level of security and durability. To crimp the components, place the ferrule and stop in position and use the crimping tool to apply pressure, deforming the ferrule and creating a tight and secure connection.
Remember to choose the method that best suits your project requirements and ensure that you follow the manufacturer’s recommendations for securing the ferrule and stop. By securing your ferrule and stop effectively, you can ensure the long-term stability and reliability of your project.
Issue 1: Ferrule And Stop Not Fitting Correctly
One common issue that can arise when installing a ferrule and stop is that they may not fit correctly. This can be frustrating and potentially lead to leaks or other problems down the line. In this section, we will explore the possible causes of this issue and provide solutions to ensure a proper fit.
Possible Causes and Solutions for This Issue
There are several potential reasons why a ferrule and stop might not fit correctly. It’s important to identify the cause in order to find an appropriate solution. Here are a few possible causes and their corresponding remedies:
1. Incorrect Size
If the ferrule and stop are not the correct size for your pipe or fitting, they won’t fit properly. It’s crucial to ensure that you have the right size components before attempting installation. Here’s what you can do:
- Measure the diameter of your pipe or fitting accurately.
- Consult a sizing chart or guide to determine the appropriate size for your ferrule and stop.
- Double-check that the components you have match the required measurements.
- If there is a mismatch, obtain the correct size ferrule and stop before proceeding with the installation.
2. Misaligned Parts
Sometimes, the ferrule and stop may not align properly, causing difficulty in fitting them together. This misalignment can be due to several factors. To address this issue:
- Inspect each component for any visible damage or irregularities.
- Ensure that the ends of the pipe or fitting are clean and free from debris or obstructions.
- Align the ferrule and stop carefully, making sure that they are both oriented in the correct direction.
- Apply gentle pressure while fitting the components together, ensuring that they slide into place smoothly.
3. Improper Lubrication
If the ferrule and stop are not adequately lubricated, they may not slide together smoothly, resulting in a poor fit. To resolve this issue:
- Apply a thin layer of lubricant to the surfaces of the ferrule and stop.
- Ensure that the lubricant is compatible with the materials of the components.
- Using your fingers, spread the lubricant evenly on the mating surfaces.
- Fit the components together, ensuring that they slide into place without resistance.
By addressing these possible causes and implementing the suggested solutions, you can ensure a proper fit when installing a ferrule and stop. Taking the time to resolve any issues before completion will help prevent future problems and ensure the stability and longevity of your installation.
Issue 2: Leakage After Installation
Typical Reasons for Leakage and How to Resolve Them
Issue 2: Leakage after installation
One of the common concerns faced after the installation of a ferrule and stop is leakage. This can be quite frustrating, especially after all the effort you have put into the installation. However, there are several typical reasons for leakage that can be easily addressed. By understanding these reasons and implementing the necessary fixes, you can eliminate the chances of leakage and enjoy a leak-free installation.
1. Insufficient tightening of the ferrule
One of the primary causes of leakage is the insufficient tightening of the ferrule. When the ferrule is not adequately tightened, it results in a loose connection between the pipe and the fitting, leading to leaks. To resolve this issue, follow these steps:
- Use a wrench or pliers to firmly tighten the ferrule onto the pipe.
- Ensure that the ferrule makes a secure seal by checking for any gaps or spaces between the ferrule and the pipe.
- If necessary, apply Teflon tape around the pipe threads to provide an additional layer of sealing.
2. Damaged or worn-out ferrule
Another reason for leakage can be a damaged or worn-out ferrule. Over time, the ferrule may develop cracks or deformations, which compromises its ability to create a tight seal. To address this issue:
- Inspect the ferrule for any signs of damage, such as cracks or deformations.
- If a damaged ferrule is identified, remove it and replace it with a new one.
- Ensure that the new ferrule is of the correct size and material for the pipe and fitting.
3. Poor alignment of the ferrule and stop
In some cases, leakage may occur due to poor alignment between the ferrule and the stop. When these two components are not aligned properly, it can create gaps that allow water or fluid to leak out. To fix this issue:
- Remove the ferrule and stop from the pipe.
- Realign the ferrule and stop, ensuring they are correctly positioned.
- Tighten the ferrule onto the pipe, taking care to maintain the alignment.
4. Incorrect installation of compression fitting
Leakage can also occur if the compression fitting is not installed correctly. Improper installation can result in loose connections or damaged components, leading to leaks. Here’s how you can resolve this issue:
- Ensure that the compression fitting is the correct size for the pipe and ferrule.
- Carefully follow the manufacturer’s instructions for installation.
- Make sure that all components are properly aligned and tightened.
- Double-check the fitting for any signs of damage or defects.
By addressing these common reasons for leakage and following the suggested fixes, you can resolve the issue of leakage after installing a ferrule and stop. Remember to always tighten the ferrule securely, inspect for any damage, align the components correctly, and install the compression fitting accurately. Taking these precautions will ensure a reliable and leak-free installation.
Maintenance Techniques For A Ferrule And Stop
Maintenance techniques for a ferrule and stop play a crucial role in ensuring the longevity and performance of these components. Regular cleaning and inspection are necessary to prevent any potential issues that may arise from wear and tear or accumulation of debris. In this section, we will explore the best practices for maintaining a ferrule and stop, including cleaning and inspection recommendations.
Cleaning and inspection recommendations:
1. Regular cleaning:
– Clean the ferrule and stop using a mild detergent and warm water solution.
– Gently scrub the surface with a soft brush or cloth to remove any dirt, grease, or grime.
– Rinse thoroughly with clean water and ensure no residue is left behind.
– Dry the ferrule and stop completely before reinstalling.
2. Periodic inspection:
– Inspect the ferrule and stop for any signs of wear or damage.
– Look for cracks, scratches, or corrosion on the surface.
– Check the alignment and fitment of the ferrule and stop.
– Verify that the stop is secure and does not allow any unwanted movement.
3. Lubrication:
– Apply a suitable lubricant, especially if the ferrule and stop are made of metal.
– Lubrication helps reduce friction and minimizes the chance of rust or corrosion.
– Use a lubricant that is compatible with the material of the ferrule and stop, such as silicone or graphite-based lubricants.
4. Protection from harsh conditions:
– If the ferrule and stop are exposed to harsh environmental conditions, consider using protective coatings or sealants.
– These coatings act as a barrier against moisture, UV radiation, and other elements that could deteriorate the components.
– Follow the manufacturer’s recommendations to ensure compatibility and optimal protection.
5. Regular testing:
– Perform occasional stress tests to assess the strength and stability of the ferrule and stop.
– This can help identify any potential weaknesses or limitations that may require corrective measures.
Remember, regular maintenance of a ferrule and stop is essential to ensure optimal performance and prevent any potential issues. By following these cleaning and inspection recommendations, you can extend the lifespan of these components and ensure their reliable functionality.
Tips For Successful Installation
When it comes to installing a ferrule and stop on your cable, it’s important to follow the proper steps for a secure and efficient installation. With the right tips and tricks, you can ensure that your ferrule and stop are properly installed, providing a reliable solution for your cable management needs. Read on to discover additional tips and tricks for a seamless installation process.
Additional tips and tricks for a seamless installation process
Tighten the ferrule properly
One of the most crucial steps in installing a ferrule and stop is to tighten it properly. Make sure to use a properly sized wrench or tool to ensure a secure fit. Applying too much force can damage the ferrule or the cable, while not tightening it enough can result in a loose connection. Find the right balance and make sure the ferrule is securely tightened.
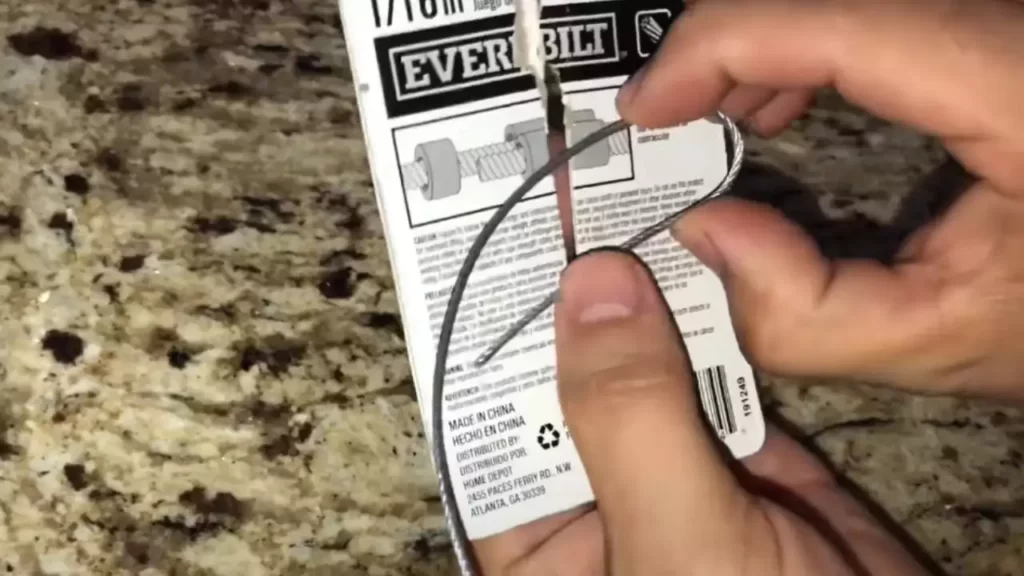
Trim excess cable before installing the ferrule
Prior to installing the ferrule and stop, it’s important to trim any excess cable that extends beyond the desired termination point. This will ensure a cleaner and more professional-looking installation. Use a cable cutter or sharp knife to trim the cable to the appropriate length, allowing for a snug fit of the ferrule.
Use the right type of ferrule
When installing a ferrule and stop, it’s essential to select the right type of ferrule for your specific application. Ferrules come in various materials, such as aluminum, copper, or stainless steel, and choosing the right material is important to ensure the longevity and performance of your cable assembly. Consider factors such as the environment, temperature, and mechanical stresses the cable will be subjected to when selecting the appropriate ferrule.
Clean the cable properly
Prior to installing the ferrule, it’s crucial to clean the cable thoroughly. Any dirt, oil, or contaminants present on the cable can affect the adhesion and performance of the ferrule. Use a recommended cable cleaner or solvent to remove any debris and ensure a clean and smooth surface for the ferrule to adhere to.
Inspect for proper alignment
After installing the ferrule and stop, it’s important to inspect the assembly for proper alignment. Ensure that the ferrule is aligned correctly with the cable and that there are no signs of misalignment or damage. This will prevent any potential issues or failures in the future.
Perform a pull-test
Once the ferrule and stop are installed, it’s recommended to perform a pull-test to ensure the assembly’s strength and reliability. Apply a steady and controlled force to determine if the ferrule is securely attached to the cable. If any slips, movement, or disconnection occurs, recheck the installation and tighten as necessary.
By following these additional tips and tricks, you can have a smooth and successful installation process for your ferrule and stop. Remember to tighten the ferrule properly, trim excess cable, choose the right type of ferrule, clean the cable, inspect for proper alignment, and perform a pull-test to ensure a secure and lasting connection.
Frequently Asked Questions
What Is The Stop For With A Ferrule?
A stop is used with a ferrule to secure and align two pieces of tubing or pipe. It acts as a barrier, preventing the tube from sliding out of position.
How Do You Install A Ferrule?
To install a ferrule: 1. Slide the ferrule onto the cable or wire. 2. Use crimping pliers to compress the ferrule around the cable, ensuring a secure connection. 3. Check that the ferrule is tightly attached and doesn’t slip. 4. Ensure the ferrule fits snugly into the connector or terminal.
5. Double-check all connections before use to ensure proper installation.
Can You Hammer A Ferrule?
No, you should not hammer a ferrule. Hammering may damage the ferrule and affect its performance. It’s best to use the appropriate tools and techniques to install or repair a ferrule without using a hammer.
Where Do You Crimp A Ferrule?
You crimp a ferrule at the end of a wire to secure it in a connector or terminal.
Conclusion
Installing a ferrule and stop may seem daunting at first, but with the right tools and steps, it can be a simple and rewarding DIY project. By following the instructions carefully and taking necessary precautions, you can ensure a secure and functional installation.
Whether you’re a seasoned DIY enthusiast or a beginner, this guide has provided you with the necessary information and tips to successfully complete the task. So, go ahead and give it a try – you’ll be amazed at the difference it can make in your plumbing system.