To install a dryer vent through a brick wall, you’ll need to make a hole in the brick, insert the vent pipe, and secure it in place. Here are the steps to help you get started.
Installing a dryer vent through a brick wall is a relatively straightforward process that requires careful planning and precise execution. A properly installed vent ensures the efficient removal of lint and moisture from your clothes dryer, reducing the risk of fire and improving the overall performance of your appliance.
Whether you’re replacing an old vent or installing a new one, this guide will walk you through the necessary steps to complete the task effectively. By following these instructions, you can ensure a smooth installation while maintaining the structural integrity of your brick wall. So, let’s dive into the details of how to install a dryer vent through a brick wall.
Understanding The Risks Of Incorrect Vent Installation
Installing a dryer vent through a brick wall may seem like a daunting task, but it is essential to avoid the risks associated with an incorrect installation. While many DIY enthusiasts might be tempted to tackle this project themselves, understanding the potential hazards of improper dryer vent installation is crucial. This blog post will shed light on three major risks you should be aware of: potential fire hazards, increased energy consumption, and reduced appliance lifespan.
Potential fire hazards
A dryer vent that is not installed correctly can pose a serious fire hazard. When lint accumulates in the vent system, it can block the airflow, causing heat to build up. This heat can ignite the highly flammable lint, resulting in a potentially catastrophic fire. In fact, according to the U.S. Fire Administration, an estimated 2,900 dryer fires occur annually, with failure to clean the dryer vent being a leading cause. Therefore, ensuring proper installation is essential to prevent the risk of fire in your home.
Increased energy consumption
Another consequence of a poorly installed dryer vent is increased energy consumption. When the vent is obstructed or improperly installed, it creates a restriction in the airflow, causing the dryer to work harder to expel the moist air. This additional strain on the appliance leads to longer drying times and ultimately increases your energy usage. By installing the vent correctly, you can ensure efficient airflow and reduce energy waste.
Reduced appliance lifespan
An incorrectly installed dryer vent can also shorten the lifespan of your appliance. When the vent is obstructed, the hot, moist air has nowhere to go, leading to excessive heat buildup within the dryer. This can accelerate the wear and tear on important components, such as the heating element and motor, causing them to malfunction or fail prematurely. By properly installing the vent, you can help prolong the life of your dryer and avoid the expense of frequent repairs or premature replacement.
Ensuring that your dryer vent is installed correctly through a brick wall is vital to avoid potential fire hazards, increased energy consumption, and reduced appliance lifespan. By understanding these risks, you can take the necessary steps to ensure the safety, efficiency, and longevity of your dryer system.
Assessing The Wall And Choosing The Right Location
When it comes to installing a dryer vent through a brick wall, it is important to carefully assess the structural integrity of the wall and choose the optimal location for the vent. By taking these factors into consideration, you can ensure a successful installation that promotes efficient airflow and minimizes any potential damage to the brickwork.
Evaluating the Structural Integrity of the Wall
Before proceeding with any installation, it is crucial to evaluate the structural integrity of the brick wall to ensure it can safely accommodate a dryer vent. Inspect the brickwork for any signs of cracks, loose bricks, or other damage that may compromise its stability. If you notice any concerns, it is recommended to consult a professional to assess and potentially reinforce the wall before proceeding.
Identifying an Optimal Location for the Vent
Once you have determined the wall is structurally sound, it’s time to identify the best location for your dryer vent. Consider the following factors:
- Proximity to the dryer: Ideally, the vent should be located as close to the dryer exhaust outlet as possible. This will minimize the length of the venting system, improving airflow efficiency and reducing the risk of lint buildup.
- Accessibility: Choose a location that allows for easy access to the vent for regular cleaning and maintenance. This will ensure the vent remains free from debris and blockages that can impede airflow.
- Avoid obstructions: Select a location that is free from any obstructions such as windows, doors, or outdoor fixtures. This will prevent any interference with the vent’s functionality and keep the exterior appearance of your home intact.
Considering Proximity to Electrical Outlets and Plumbing
In addition to determining the optimal location for the dryer vent, it is important to consider the proximity to electrical outlets and plumbing. Ensure that the chosen location does not interfere with any electrical components or plumbing lines. This will prevent potential damage and ensure the venting system operates safely and efficiently.
By carefully evaluating the structural integrity of the wall, choosing the optimal location, and considering proximity to electrical outlets and plumbing, you can successfully install a dryer vent through a brick wall. Follow the guidelines in the upcoming sections to proceed with the installation process smoothly.
Gathering The Necessary Tools And Materials
Before you begin installing a dryer vent through a brick wall, you need to gather all the necessary tools and materials. Ensure that you have everything on hand to make the installation process smoother and more efficient. Here are the key items you will need:
Vent Kit
The first item you will need is a vent kit. This kit usually includes a vent hood, wall sleeve, and mounting hardware. Make sure you purchase a high-quality vent kit that is suitable for brick wall installation. This will ensure a secure and long-lasting dryer vent.
Measuring Tape
Next, you will require a measuring tape. Accurate measurements are crucial when installing a dryer vent. Use the measuring tape to determine the distance between the dryer location and the desired exit point on the brick wall. Take precise measurements to avoid any issues during the installation process.
Drill with Masonry Bit
A drill with a masonry bit is essential for drilling through the brick wall. The masonry bit is designed to penetrate hard surfaces like bricks effectively. It is recommended to use a drill with variable speeds and a hammer function to ensure a clean and smooth hole.
Vent Hose
Another essential item you need is a vent hose. The vent hose connects the dryer’s exhaust outlet to the exterior vent hood. Make sure to choose a high-quality vent hose that is durable and fire-resistant. Proper ventilation is crucial, as it prevents lint buildup and reduces the risk of fires.
Duct Tape
Having duct tape on hand is essential for securing the connection between the vent hose and the dryer and the exterior vent hood. Ensure you use high-quality duct tape that can withstand high temperatures and provide a strong, airtight seal.
Screwdriver
Lastly, you will need a screwdriver for securing the vent hood to the exterior wall. Choose the appropriate type and size of screwdriver based on the mounting hardware provided in the vent kit. A screwdriver with a comfortable grip will make the installation process easier and more efficient.
Preparing The Wall For Installation
Before you can install a dryer vent through a brick wall, it is important to properly prepare the wall to ensure a smooth and successful installation. This involves marking the center point for the vent hole, drilling a pilot hole, and finally enlarging the hole with a core drill. By following these steps, you can ensure that your dryer vent is properly installed and functioning efficiently.
Marking the center point for the vent hole
The first step in preparing the wall for installation is to mark the center point where the vent hole will be located. This is crucial to ensure that the vent is properly aligned and allows for efficient airflow. To mark the center point, follow these steps:
- Measure the distance from the floor to the desired location of the vent on the interior wall.
- Use a measuring tape to find the center of the wall horizontally and mark it with a pencil.
- Measure the distance from the center point to the floor and mark it with a pencil.
- This intersection point will be the center point for the vent hole.
Drilling a pilot hole
Once you have marked the center point for the vent hole, the next step is to drill a pilot hole. This will serve as a guide for the core drill and ensure accurate placement of the vent hole. Follow these steps to drill a pilot hole:
- Attach a masonry drill bit to your power drill.
- Position the drill bit at the center point you marked on the wall.
- Apply steady pressure and drill a hole through the brick. Be sure to drill straight to maintain alignment.
- Remove any debris from the hole to ensure a clear path for the core drill.
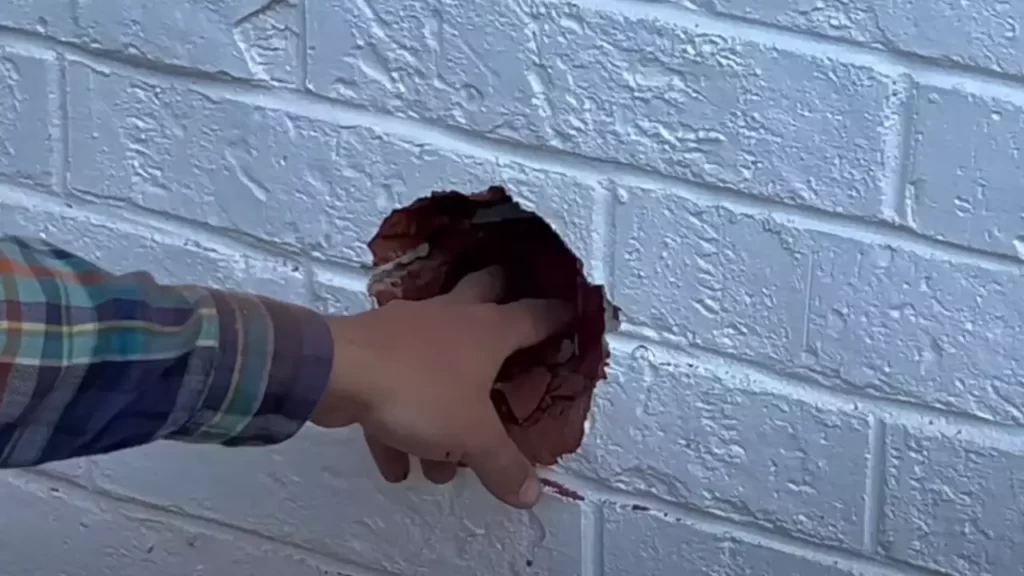
Enlarging the hole with a core drill
With the pilot hole in place, it’s time to enlarge the hole using a core drill. This will create a suitable opening for the dryer vent to pass through. Follow these steps to enlarge the hole:
- Attach a core drill bit to your power drill, ensuring it is the appropriate size for your dryer vent.
- Position the core drill bit at the pilot hole.
- Apply steady pressure and slowly drill into the brick. Be sure to maintain alignment and keep the drill level.
- Continue drilling until the hole is large enough to accommodate the dryer vent.
- Remove any debris from the hole to ensure proper installation.
By following these steps and preparing the wall properly, you can ensure a successful installation of your dryer vent through a brick wall. This will not only ensure efficient airflow but also prevent any potential damage to the wall. Now that the wall is ready, you can proceed with the installation of the dryer vent, connecting it to the interior ductwork and securing it firmly in place.
Installing The Dryer Vent
Installing a dryer vent through a brick wall may seem like a daunting task, but with the right tools and steps, it can be a relatively straightforward process. In this post, we will guide you through each step, from assembling the vent kit components to securing the vent in place. Let’s get started and ensure proper installation of your dryer vent for efficient and safe operation.
Assembling the Vent Kit Components
The first step in installing a dryer vent through a brick wall is to assemble the vent kit components. These typically include a vent hood, a length of vent hose, and various clamps and connectors. Follow these steps to assemble the kit:
- Start by attaching the vent hood to the vent hose, ensuring a secure fit. This is usually done using screws or clamps provided in the kit.
- Next, check the vent hose for any kinks or obstructions, as these can hinder proper airflow. Straighten out the hose if needed.
- Inspect the connectors and clamps included in the kit. Ensure they are in good condition and adjust them as necessary to fit the vent hose and the wall opening.
Connecting the Vent Hose to the Dryer
Once you have assembled the vent kit components, it’s time to connect the vent hose to the dryer. Follow these steps:
- Position the dryer near the wall and locate the dryer’s vent opening.
- Slide one end of the vent hose onto the dryer’s vent opening, ensuring a snug fit.
- Secure the connection with a clamp, tightening it with a screwdriver to prevent any leaks or disconnections.
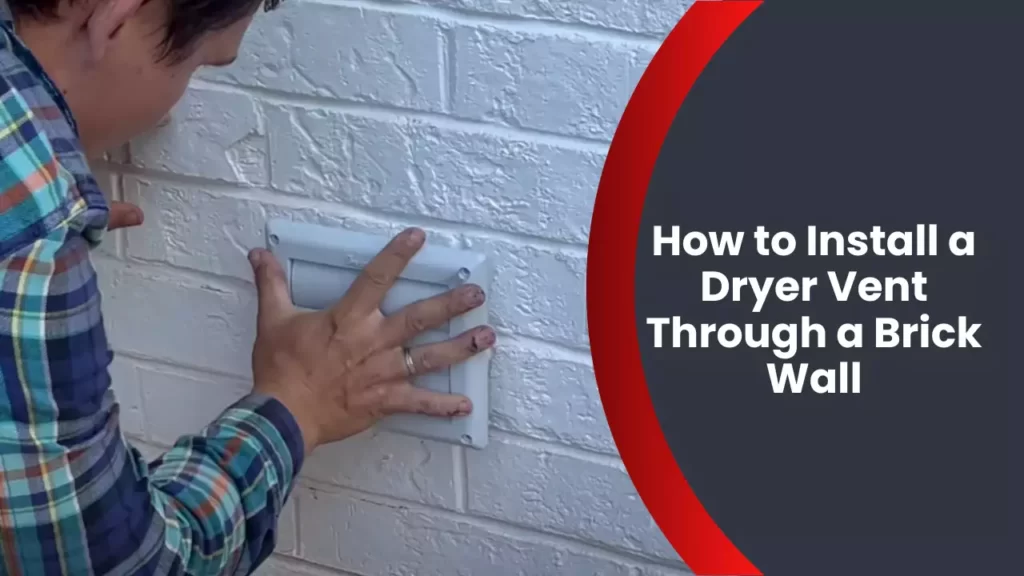
Inserting the Vent Through the Hole in the Wall
With the vent hose connected to the dryer, the next step is to insert the vent through the hole in the brick wall. Follow these steps:
- Locate the hole in the wall where the vent will be installed. If there isn’t a pre-existing hole, you will need to drill one.
- Carefully insert the vent into the hole, ensuring it fits securely and snugly. Adjust the position of the vent if necessary.
- Inspect the area around the vent for any gaps or spaces. These should be sealed with appropriate weatherproof adhesive or caulk to prevent air leaks.
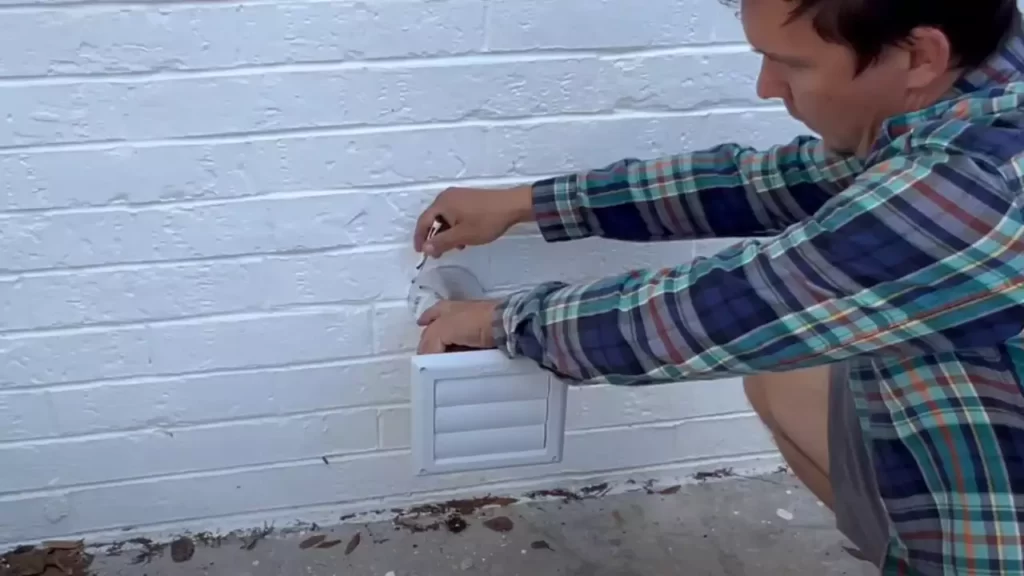
Securing the Vent in Place with Screws or Adhesive
Once the vent is properly inserted through the wall, it’s important to secure it in place to prevent it from coming loose. Here’s how:
- If the vent kit includes screws or brackets, use them to secure the vent to the wall. Ensure the screws penetrate through the brick and into a sturdy section of the wall for a secure attachment.
- If screws are not provided or if you prefer not to use them, you can opt to use weatherproof adhesive instead. Apply the adhesive around the vent’s outer edges and press it firmly against the wall, ensuring a strong bond.
- Allow the adhesive to dry according to the manufacturer’s instructions before testing the vent for stability.
Following these steps will help you install a dryer vent through a brick wall successfully. Remember to select a location for the vent that promotes proper airflow and allows for easy maintenance and cleaning. Regularly check the vent for any blockages or damage to ensure optimal performance and safety. With a properly installed dryer vent, you can enjoy efficient and trouble-free drying cycles while minimizing the risk of fire hazards.
Sealing And Insulating The Vent
Properly sealing and insulating the dryer vent is crucial to prevent air leakage and improve energy efficiency. By following these steps, you can ensure that your dryer vent is properly sealed and insulated through a brick wall.
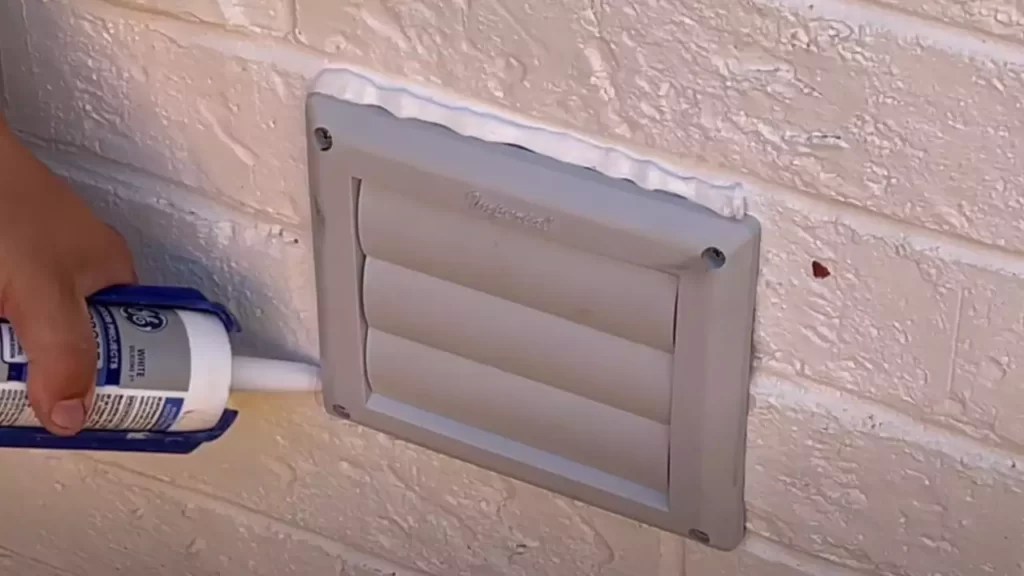
Applying caulk around the vent to prevent air leakage
The first step in sealing the dryer vent is to apply caulk around the vent opening. This will help to create an airtight seal and prevent any air leakage. To do this, follow these simple steps:
- Clean the area around the vent opening using a brush or a cloth to remove any dust or debris. This will ensure good adhesion of the caulk.
- Apply a bead of caulk around the edges of the vent opening, ensuring that it covers any gaps or cracks. Use a caulk gun for better control.
- Smooth out the caulk using your finger or a caulk smoothing tool. This will help to create a neat and even seal.
Remember to check the caulk periodically and reapply if necessary, as it may deteriorate over time due to weather conditions.
Insulating the vent for improved energy efficiency
Insulating the dryer vent can help improve energy efficiency by reducing heat loss and preventing cold air from entering your home. Follow these steps to insulate the vent:
- Measure the length of the dryer vent that needs insulation. Use a tape measure to ensure accuracy.
- Choose an appropriate insulation material, such as foil-faced fiberglass insulation or duct insulation wrap.
- Wrap the insulation material around the dryer vent, making sure to cover the entire length. Use duct tape or metal foil tape to secure the insulation in place.
- Ensure that the insulation is tight and secure, with no gaps or loose areas. This will help to maximize its effectiveness.
Insulating the dryer vent not only improves energy efficiency but also helps to reduce the risk of condensation forming inside the vent, which can lead to mold and mildew growth.
By properly sealing and insulating the dryer vent through a brick wall, you can ensure that your dryer operates efficiently and safely. Remember to regularly inspect and maintain the vent to ensure optimal performance.
Checking For Proper Ventilation
Ensuring proper airflow through the vent
Proper ventilation is crucial for the efficient operation of your dryer. Not only does it help remove hot air, but it also prevents the buildup of excess moisture and lint, thereby reducing the risk of fire hazards. In this section, we will discuss how to check for proper ventilation and ensure a smooth airflow through the dryer vent.
Using a dryer vent cleaning brush to remove lint buildup
Lint buildup is a common problem in dryer vents and can significantly hinder proper airflow. Over time, lint accumulates in the vent, reducing its diameter and causing the dryer to work harder to expel air. To prevent this from happening, it is essential to clean the vent regularly using a dryer vent cleaning brush.
Here are the steps to follow:
- Disconnect the dryer from the power source and pull it away from the wall.
- Locate the dryer vent opening on the back of the appliance.
- Attach the dryer vent cleaning brush to a drill or an extendable rod, depending on the type of brush you have.
- Insert the brush into the vent opening and push it gently but firmly towards the exterior vent.
- Rotate the brush while pushing it back and forth to remove any lint or debris buildup.
- Repeat the process until you no longer see significant lint coming out of the vent opening.
- Once the cleaning is complete, reattach the dryer vent to the appliance and plug it back in.
Regularly cleaning the dryer vent using a brush not only improves airflow but also reduces the risk of lint buildup and potential fire hazards.
Remember, ensuring proper ventilation and removing lint buildup are essential for the safe and efficient operation of your dryer. By following these steps, you can maintain a clean and functional dryer vent, allowing your appliance to perform at its best.
Regular Maintenance And Cleaning
Cleaning the vent and hose annually to prevent clogs and improve efficiency
Maintaining a clean dryer vent is crucial for the efficient operation of your dryer and the safety of your home. Over time, lint and debris can build up in the vent and hose, leading to decreased airflow and potential fire hazards. By incorporating regular maintenance and cleaning into your routine, you can ensure that your dryer is performing optimally. Here are some steps to help you clean the vent and hose through a brick wall:
- Disconnect the dryer: Before beginning the cleaning process, make sure to unplug your dryer from the power source to avoid any accidents.
- Remove the exterior vent cover: Locate the exterior vent cover on the brick wall and remove the screws holding it in place. Carefully pull the cover away from the wall.
- Clean the vent cover: Using a soft cloth or brush, remove any dirt or debris from the exterior vent cover. This will help maintain proper airflow.
- Insert the vent cleaning brush: Attach the vent cleaning brush to a flexible rod or cable. Insert the brush into the vent opening and gently scrub the walls of the vent to dislodge any lint or buildup.
- Vacuum the vent: Once you have thoroughly scrubbed the vent with the brush, use a vacuum cleaner to remove the loosened debris. Be sure to reach as far into the vent as possible to remove all the accumulated lint.
- Clean the vent hose: Disconnect the vent hose from the back of the dryer and remove any lint or debris trapped inside. You can use a vacuum or a brush to clean the hose thoroughly.
- Reconnect the vent hose and exterior vent cover: After cleaning the vent and hose, reattach the vent hose securely to the back of the dryer. Then, position the exterior vent cover back onto the brick wall and secure it with the screws.
- Test the airflow: Plug in your dryer and turn it on. Stand outside and ensure that the air is flowing freely through the exterior vent. If you notice any weak airflow or obstructions, double-check the connections and clean the vent and hose again if necessary.
Regularly cleaning your dryer vent and hose is a simple yet effective way to prevent clogs, maximize efficiency, and maintain the safety of your home. By following these steps annually, you can ensure that your dryer continues to perform its best and avoid any potential hazards. Don’t overlook the importance of regular maintenance and cleaning, as it can make a significant difference in the performance and longevity of your dryer.
Frequently Asked Questions
How Do You Install A Dryer Vent Through A Brick Wall?
To install a dryer vent through a brick wall, you need to drill a hole using a masonry drill bit, insert the vent pipe through the hole, and seal it using silicone caulking or mortar. Make sure to properly secure the vent pipe in place and connect it to your dryer for efficient ventilation.
What Tools Do You Need To Install A Dryer Vent Through A Brick Wall?
To install a dryer vent through a brick wall, you will need the following tools: a masonry drill bit, a hammer drill, a screwdriver, a vent pipe, a vent cap, silicone caulking or mortar, and a measuring tape. It is important to have the right tools to ensure a proper and secure installation.
Can You Install A Dryer Vent Through Any Part Of A Brick Wall?
No, you cannot install a dryer vent through any part of a brick wall. It is important to locate an area that is structurally sound and does not interfere with any wiring or plumbing. Ideally, the vent should be installed near the dryer’s location to minimize the distance and ensure proper airflow.
Always consult a professional if you are unsure about the ideal location for your dryer vent.
Conclusion
Installing a dryer vent through a brick wall may seem intimidating, but with the right steps, it can be done easily. By following this guide, you can ensure proper ventilation for your dryer, reducing the risk of lint buildup and potential fire hazards.
Remember to measure accurately, use the appropriate tools, and seal any gaps for a secure installation. With some patience and careful work, you can successfully install a dryer vent through a brick wall and enjoy a safe and efficient laundry experience.