To install a dryer vent, start by locating the exit point on the exterior wall and mark the center. Next, measure the distance from the vent hood to the exit point and cut a hole through the wall.
Then, attach the vent hood and seal the edges with silicone caulk. Finally, connect the vent duct to the dryer and secure it with clamps.
Choosing The Right Dryer Vent Kit
When it comes to installing a dryer vent, one of the most crucial steps is selecting the right dryer vent kit. This may seem like a simple task, but choosing the wrong kit can lead to serious issues, such as lint buildup, decreased efficiency, and even potential fire hazards.
To ensure the safety and efficiency of your dryer, it’s essential to adhere to the importance of selecting the correct dryer vent kit and consider the relevant factors before making your decision. In this article, we will provide an overview of the different types of dryer vent kits available on the market, allowing you to make an informed choice for your needs.
Importance of selecting the correct dryer vent kit
Choosing the correct dryer vent kit is essential for several reasons. Firstly, a properly installed and high-quality vent kit will ensure that the hot air and moisture from your dryer are effectively expelled from your home. This helps to prevent mold growth, moisture damage, and indoor air pollution.
Secondly, a correctly chosen vent kit will minimize lint buildup, ensuring that your dryer operates efficiently and prolonging its lifespan. Additionally, selecting the right vent kit is critical for maintaining the safety of your home, as a poorly installed or faulty vent can pose a fire hazard. It’s important not to overlook the significance of this decision and take the time to consider the factors that will help you make the best choice for your specific situation.
Factors to consider when choosing a dryer vent kit
When selecting a dryer vent kit, there are several factors you should take into consideration:
- Ventilation requirements: Consider the layout of your laundry room and the location of your dryer. Determine if you need a kit that vents through the wall, ceiling, or floor. Understanding your ventilation requirements will help you choose the kit that is compatible with your dryer and your home’s infrastructure.
- Duct material: Dryer vent kits are available in various materials, including aluminum, flex foil, and vinyl. Each material has its pros and cons in terms of durability, flexibility, and resistance to heat and condensation. Assess the advantages and disadvantages of each material to make an informed decision.
- Vent hood design: The vent hood is the exterior component of the dryer vent kit that is responsible for preventing pests, debris, and water from entering the vent system. Consider the design of the vent hood and ensure it has features like a bird guard and a flap that opens easily when the dryer is in use.
- Length and flexibility: Take into account the length and flexibility of the vent kit. Depending on the distance between your dryer and the exterior vent, you may require a longer and more flexible kit to ensure proper airflow.
- Budget: Finally, consider your budget when choosing a dryer vent kit. While it’s important not to compromise on quality and safety, there are options available at different price points that can meet your needs.
Overview of different types of dryer vent kits
Dryer vent kits come in various configurations to accommodate different installation needs. Here are a few common types you might encounter:
| Type | Description |
|---|---|
| Standard vent kit | This is the most common type of dryer vent kit, consisting of a rigid or flexible metal duct, a vent hood, and necessary accessories for installation. It is suitable for most residential setups. |
| Periscope vent kit | Periscope vent kits are designed for tight spaces where the dryer needs to be pushed closer to the wall. They feature an adjustable metal duct that allows the dryer to be placed closer to the wall without blocking the airflow. |
| Indoor vent kit | If you have limited access to outdoor venting or live in an apartment or condo, an indoor vent kit may be an option. These kits use a filter and a small container of water to collect lint and moisture, preventing them from entering your living space. |
| Heat recovery vent kit | For those who want to conserve energy, a heat recovery vent kit may be worth considering. This type of kit recovers heat from the dryer exhaust and uses it to pre-condition incoming air, resulting in energy savings. |
Before making a purchase, assess your specific requirements, consider the factors mentioned above, and choose the dryer vent kit that best suits your needs. Taking the time to select the right kit ensures optimal performance, energy efficiency, and the safety of your home and family.
Tools And Materials Needed
When it comes to installing a dryer vent, having the right tools and materials is essential for a successful installation. In this section, we will discuss the tools, materials, and safety equipment required to ensure a smooth and efficient process. By having all the necessary equipment at hand, you can complete the installation without any hassle.
Essential tools for installing a dryer vent:
Having the following tools handy will make the installation process much easier:
- Measuring tape – to accurately measure the distance for the vent and ensure proper placement.
- Screwdriver – for loosening and tightening screws during the installation.
- Utility knife – to cut through materials such as ductwork or insulation.
- Drill – for creating holes in the wall or floor, allowing for the vent’s connection.
- Pliers – to secure connections and tighten clamps.
- Level – to ensure the vent is installed correctly and straight.
Recommended materials for a successful installation:
Using high-quality materials will contribute to a successful dryer vent installation. Here are the recommended materials you should consider:
- Ductwork – opt for rigid metal or flexible aluminum ducts to ensure proper ventilation and durability.
- Elbows and connectors – these will help you navigate corners and connect different sections of the vent.
- Tape or screws – depending on the type of ductwork you choose, you may need either foil tape or screws to secure the connections.
- Vent hood – consider getting a vent hood with a built-in damper to prevent backdrafts and keep rodents and debris out.
- Clamps – use clamps to secure the connections between the vent and the dryer or wall.
Safety equipment required for the installation process:
While installing a dryer vent, it’s crucial to prioritize safety. Make sure you have the following safety equipment:
- Gloves – protect your hands from sharp edges or any potential debris.
- Safety glasses – shield your eyes from dust or debris that may be stirred up during the installation.
- Dust mask – prevent inhalation of dust or insulation particles while working in confined spaces.
- Flashlight – if the installation area is poorly lit, a flashlight will help you see clearly.
By having all the necessary tools, materials, and safety equipment, you are well-prepared to tackle the installation of a dryer vent. Remember to follow the manufacturer’s instructions and guidelines throughout the process to ensure a successful and efficient installation.
Pre-Installation Steps
Before you dive into the installation process of a dryer vent, it’s important to take several pre-installation steps to ensure seamless and efficient functionality. These steps involve assessing the location for dryer vent installation, taking measurements for vent placement, and clearing the area.
Assessing the location for dryer vent installation
In order to determine the ideal location for installing your dryer vent, you need to consider a few factors:
- Locate a space on an external wall that is close to the dryer. This will minimize the length of the vent pipe needed.
- Ensure there is ample space around the chosen location to accommodate the vent pipe.
- Check for any obstacles, such as electrical wiring or plumbing, that may hinder the installation process.
Taking measurements for the vent placement
Accurate measurements are crucial to ensure a proper and secure installation of your dryer vent. Here’s what you need to do:
- Measure the diameter of your dryer’s exhaust port using a measuring tape. Most dryer vents have a standard diameter of 4 inches.
- Mark the desired location for the vent on the external wall, ensuring it aligns with the dryer’s exhaust port.
- Measure the distance from the ground to the mark on the wall. This will determine the height at which the vent should be installed.
Clearing the area and preparing it for the installation process
To ensure a smooth and hassle-free installation, you’ll need to clear the area and prepare it properly. Follow these steps:
- Remove any obstacles, such as furniture or decorations, from the vicinity of the installation area.
- Use a stud finder to locate the studs within the wall. This will help you identify the most secure points for attaching the vent pipe.
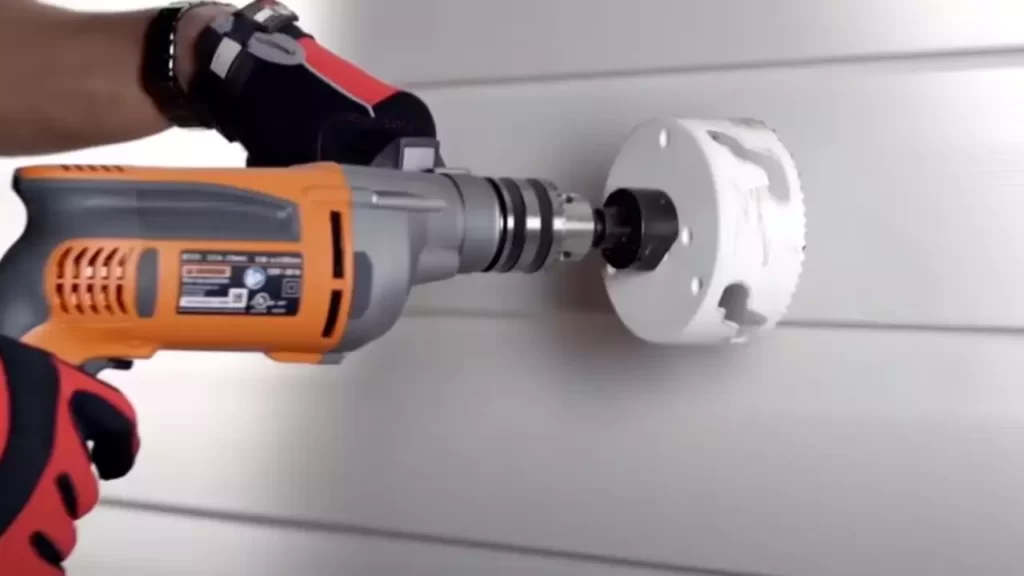
- If necessary, cut a hole in the external wall using a jigsaw or reciprocating saw, ensuring it matches the diameter of the vent pipe.
- Clear away any debris or obstructions from the hole to allow the vent pipe to fit securely.
By following these pre-installation steps, you’ll be well-prepared to tackle the dryer vent installation process with ease. Taking the time to properly assess the location, take accurate measurements, and clear the area will set the stage for a successful and efficient installation.
Planning The Vent Route
When installing a dryer vent, careful planning is essential to ensure optimal efficiency and compliance with local building codes and regulations. Planning the vent route involves determining the most efficient path, evaluating potential obstacles, and finding solutions. In this section, we will guide you through these crucial steps to help you successfully plan your dryer vent installation.
Determining the most efficient path for the vent
The first step in planning your dryer vent route is to determine the most efficient path for the vent. This involves finding the shortest and straightest route from your dryer to the exterior wall or roof where the vent will terminate. A direct path will minimize airflow restrictions and reduce the risk of lint buildup, ensuring your dryer functions optimally and dries your clothes efficiently.
To determine the most efficient path:
- Measure the distance between your dryer and the intended vent termination location.
- Identify any existing ductwork or obstructions that may affect the path.
- Consider the layout of your home and choose the route that requires the fewest bends and turns.
By carefully considering these factors and selecting the best route, you can ensure smooth airflow and maximize the performance of your dryer vent system.
Evaluating potential obstacles and finding solutions
During the planning stage, it is important to assess any potential obstacles that may hinder the installation of your dryer vent. These could include existing structures, electrical wiring, plumbing, or other obstructions. Evaluating these obstacles will help you identify solutions and ensure a successful installation.
To evaluate potential obstacles and find solutions:
- Inspect the area where the vent will pass through, both inside and outside your home, for any potential barriers.
- If you encounter an obstacle, such as a stud or wall, consider using a stud finder or consulting with a professional to find an alternate route.
- If there are electrical or plumbing components in the way, carefully reroute them to allow for the vent installation.
- Always prioritize safety and consult with professionals if you are unsure about how to overcome specific obstacles.
By evaluating potential obstacles and finding suitable solutions, you can ensure a smooth installation process and avoid unnecessary complications.
Ensuring compliance with local building codes and regulations
When installing a dryer vent, it is crucial to adhere to local building codes and regulations. These codes are in place to ensure safety and prevent fire hazards. Before starting your installation, familiarize yourself with the specific codes and regulations in your area to ensure compliance.
To ensure compliance with local building codes and regulations:
- Research and understand the applicable codes related to dryer vent installation in your area.
- Ensure the vent termination location meets the required distance from windows, doors, and other openings.
- Check if any permits or inspections are necessary before proceeding with the installation.
- Confirm that the materials and components you are using meet the specified standards.
By following local building codes and regulations, you can ensure the safety and quality of your dryer vent installation.
Planning the vent route is a crucial step in installing a dryer vent. By determining the most efficient path, evaluating potential obstacles, and ensuring compliance with building codes, you can achieve a well-designed and functional dryer vent system.
Selecting An Exit Point
Finding the right exit point for your dryer vent is an important step in the installation process. The exit point determines where the hot air from your dryer will be expelled outside of your home. This section will guide you through the process of selecting an appropriate exit point for your dryer vent.
Finding an appropriate location for the vent to exit the house
When it comes to finding an appropriate location for the vent to exit your house, there are a few factors to consider. Below, we will outline some key factors that you should take into account:
Factors to consider when choosing an exit point
- Proximity to the dryer: It’s important to choose an exit point that is located near your dryer. This will minimize the length of the vent pipe needed and improve the efficiency of your dryer.
- Accessibility: The exit point should be easily accessible for maintenance and cleaning. You don’t want the vent to be located in a hard-to-reach area, as it will make it difficult to clear any potential blockages.
- Exterior obstacles: Take into consideration any exterior obstacles such as trees, bushes, or structural elements that may obstruct the vent’s airflow. It’s essential to ensure that the hot air can easily be expelled without any hindrance.
- Building codes and regulations: Check with your local building codes and regulations to ensure that the chosen exit point complies with the guidelines. This will ensure that your installation meets the required safety standards.
-
Location Pros Cons Side of the house - Easier access for installation and maintenance
- Can be more aesthetically pleasing
- Possibility of recirculating exhaust if too close to windows or doors
- May require longer vent pipe if the dryer is located far from the side of the house
Roof - Shorter vent pipe needed if the dryer is near the roof
- No risk of recirculating exhaust
- Might be more challenging to access for maintenance and cleaning
- Potential for leaks if not properly sealed
Creating a properly sized hole for the vent in the selected area
Once you have selected the ideal exit point, the next step is to create a properly sized hole to accommodate the vent. This hole should fit snugly around the vent to prevent air leaks and ensure efficient airflow. Use a hole saw or a reciprocating saw to create the hole in the selected area.
Make sure to follow the manufacturer’s instructions for the diameter of the hole, as it can vary depending on the size of your vent. Additionally, it’s crucial to use a suitable sealant to prevent any potential leaks around the hole.
By taking into account the factors mentioned above and creating a properly sized hole in the selected area, you will be on your way to a successful dryer vent installation.
Installation Process
Installing a dryer vent is a crucial step in ensuring the proper functioning and safety of your dryer. In this section, we will guide you through the process of installing a dryer vent in your home. Follow the steps below to get started.
Assembling the dryer vent kit components
The first step in installing a dryer vent is to assemble all the necessary components. You will need a dryer vent kit, which typically includes a vent pipe, clamps, and duct tape. Make sure to check the manufacturer’s instructions to ensure that the kit contains all the necessary components.
To assemble the vent kit, follow these steps:
- Unpack the vent kit and lay out all the components.
- Inspect each component for any damages or defects.
- Connect the vent pipe sections together using the provided connectors.
- Ensure a tight fit by applying duct tape around the joints.
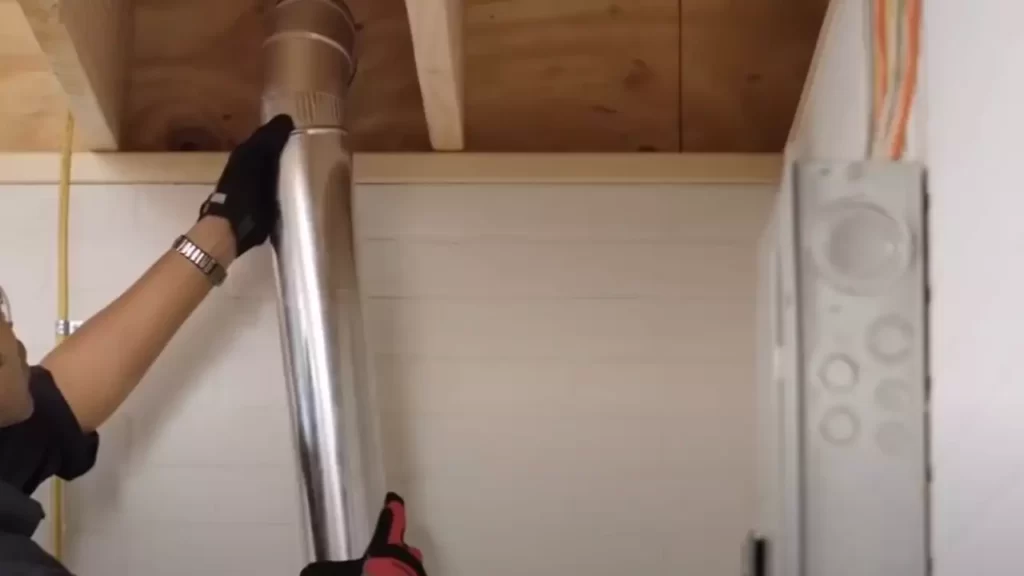
Connecting the vent pipe to the dryer and the wall
Once you have assembled the dryer vent kit, it’s time to connect the vent pipe to both the dryer and the wall. Follow these steps:
- Position the dryer near the desired installation location.
- Attach one end of the vent pipe to the dryer’s exhaust outlet.
- Secure the connection using a clamp and ensure it is tight.
- Measure the distance between the dryer and the wall.
- Cut the vent pipe to the appropriate length, leaving a slight overlap for connection to the wall.
- Attach the other end of the vent pipe to the wall using a vent hood or wall cap.
- Again, secure the connection with a clamp to ensure a tight fit.
Securing the vent pipe with appropriate fasteners
Once the vent pipe is connected to both the dryer and the wall, it is important to secure it properly to prevent any leaks or disconnections. Follow these steps to ensure a secure installation:
- Inspect the connections to ensure they are tight and secure.
- Use appropriate fasteners, such as screws or brackets, to secure the vent pipe to the wall or floor.
- Ensure that the vent pipe is properly aligned to allow for efficient airflow.
- Inspect the entire length of the vent pipe for any gaps or loose connections.
- Fix any loose connections or gaps by applying duct tape or using additional clamps.
By following these steps, you can successfully install a dryer vent in your home. Remember, proper installation is essential for the safe and efficient operation of your dryer. If you are unsure about any step of the installation process, it is recommended to consult a professional for assistance.
Sealing And Insulating
One of the most important aspects of installing a dryer vent is properly sealing and insulating it. This ensures that no air leaks occur, preventing energy loss and potential damage to your home. In this section, we will discuss the importance of sealing and insulating the vent, proper techniques for sealing gaps and joints, as well as insulation options to prevent heat loss and condensation.
Importance of Sealing and Insulating the Vent
When it comes to dryer vents, a properly sealed and insulated installation is crucial. Without proper sealing, air can escape through gaps and joints, leading to energy inefficiency and increased utility bills. Additionally, unsealed vents are more susceptible to pest infiltration, moisture buildup, and potential damage to the vent system.
Proper Techniques for Sealing Gaps and Joints
Sealing gaps and joints in a dryer vent is relatively straightforward. The key is to use the right materials and techniques to ensure a tight seal. Here are a few methods:
- Use foil tape or metal-backed tape to seal gaps and joints effectively. This type of tape is specially designed for dryer vents and provides a durable and long-lasting seal.
- Apply the tape over any gaps or joints, ensuring it covers the entire area. Be sure to press it firmly to create a tight seal and prevent any air leakage.
- Inspect the vent regularly and reapply tape if any gaps or openings appear.
By following these proper sealing techniques, you can ensure that your dryer vent remains airtight and free from any leaks or gaps.
Insulation Options to Prevent Heat Loss and Condensation
Proper insulation is essential for preventing heat loss and condensation in the dryer vent. Here are some insulation options to consider:
| Insulation Type | Description |
|---|---|
| Fiberglass insulation | This type of insulation is commonly used and works by trapping air in tiny glass fibers. It provides excellent insulation and helps prevent heat loss. |
| Foam insulation | Foam insulation is another option, providing superior insulation properties. It comes in two forms: spray foam or rigid foam boards. Both options are effective in preventing heat loss and condensation. |
When applying insulation, ensure that it covers the entire length of the vent, including any bends or elbows. This will help maintain an even temperature inside the vent, preventing any potential condensation issues.
By sealing gaps and joints properly and incorporating proper insulation techniques, you can optimize the performance of your dryer vent, prevent energy loss, and minimize condensation buildup. Remember to inspect your vent regularly and make any necessary adjustments to maintain an efficient and well-sealed dryer vent system.
Testing And Final Adjustments
Testing and Final Adjustments
After successfully installing the dryer vent, it’s crucial to conduct a series of tests to ensure its proper functioning. These tests will not only help verify that the vent is working efficiently but will also allow you to make any necessary adjustments for optimal ventilation. Here are the key steps to take when testing and making final adjustments to your dryer vent installation.
Conducting Airflow and Pressure Tests to Ensure Proper Functioning
The first step in testing your dryer vent is to conduct airflow and pressure tests. These tests will help determine if there are any restrictions or blockages in the vent system that could affect its overall performance. To conduct these tests, follow these simple steps:
- Run your dryer on the highest heat setting for a few minutes to generate airflow through the vent.
- While the dryer is running, carefully feel around the vent exterior for any air leaks. If you feel any warm air escaping, it’s a sign that there might be loose connections or gaps that need to be addressed.
- Check the dryer’s exhaust hood outside your home. It should be securely attached and have flaps that open when the dryer is running, allowing for proper ventilation. If the flaps are stuck or not opening fully, adjustments might be necessary.
- If you suspect any airflow restrictions, such as low air pressure or weak airflow, you can use a vent air pressure gauge to measure the pressure. Ensure that the pressure falls within the manufacturer’s recommended range for your specific dryer model.
Adjusting the Vent Flaps for Proper Ventilation
Once you have conducted the necessary airflow and pressure tests, it’s time to make any adjustments to the vent flaps for proper ventilation. The vent flaps are crucial as they ensure that the outside air flows in and the exhaust air flows out efficiently. Follow these steps to adjust the vent flaps:
- Inspect the vent hood flaps for any blockages or obstructions that might prevent them from opening or closing properly. Remove any debris or lint buildup that you find.
- Make sure that the vent flaps are aligned correctly and able to move freely. If they are misaligned or stuck, adjust them to ensure smooth opening and closing.
- Consider installing a vent cover or screen to prevent critters, birds, or leaves from entering the vent system.
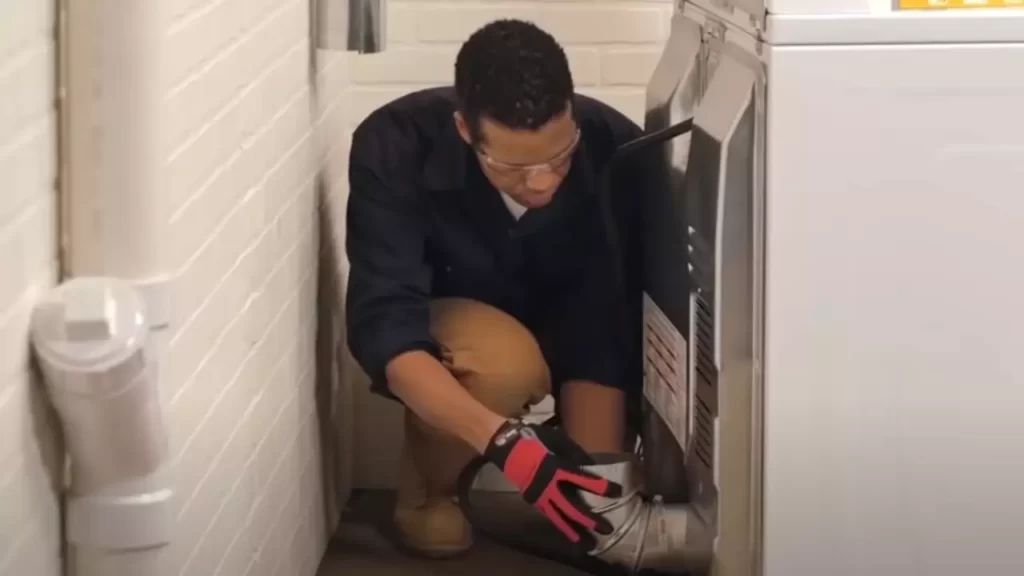
Double-Checking the Installation for Any Loose Connections or Issues
Before considering your dryer vent installation complete, it’s important to double-check for any loose connections or issues that might affect its functionality. Follow these steps to ensure a secure and long-lasting dryer vent installation:
- Inspect all the connections, including the ones between the dryer and the vent pipe, as well as the vent pipe and the exterior vent hood.
- Tighten any loose connections using the appropriate tools, ensuring a snug fit without over-tightening.
- Check for any signs of condensation or moisture buildup, as this could indicate an improper installation or ventilation issue.
- Verify that the vent pipe is securely attached and properly insulated to prevent heat loss and condensation.
By conducting airflow and pressure tests, adjusting the vent flaps, and double-checking for any loose connections or issues, you can ensure that your dryer vent is installed correctly and functioning efficiently. These final adjustments will not only enhance the performance of your dryer but also contribute to a safer and healthier indoor environment.
Maintenance And Safety Tips
Regular maintenance and following safety precautions are crucial when it comes to installing a dryer vent. With proper maintenance and care, you can ensure that your dryer vent remains clean, efficient, and safe. Here are some important tips to keep in mind:
Regular maintenance practices to keep the dryer vent clean and efficient
To maintain a clean and efficient dryer vent, there are a few simple practices you can follow:
- Clean the lint trap after every use: Removing lint from the lint trap before or after each load not only reduces the risk of potential fire hazards but also helps your dryer perform better.
- Inspect and clean the vent line regularly: Over time, lint can build up inside the dryer vent line, leading to decreased airflow and efficiency. Inspect the vent line periodically and remove any lint or blockages. Consider using a vent cleaning brush to reach areas that are difficult to access.
- Check the exterior vent cap: Ensure that the exterior vent cap is free from any obstructions such as debris, bird nests, or accumulated lint. This allows proper airflow and prevents backdrafts.
- Ensure proper vent installation: If you are installing a new dryer vent, make sure it is installed as per the manufacturer’s instructions and local building codes. Keep the vent line as short and straight as possible to avoid lint buildup.
Common issues to watch out for and how to troubleshoot them
While regular maintenance can prevent most issues, it’s important to be aware of common problems that may arise with dryer vents:
- Poor airflow: If you notice decreased airflow or longer drying times, it might indicate a blockage in the vent line. Check for any obstructions and clean the vent line accordingly.
- Burning smell or excessive heat: If you smell something burning or notice excessive heat around your dryer, it may signify lint buildup within the dryer or vent line. Immediately turn off the dryer, unplug it, and clean both the lint trap and vent line before using it again.
- Unusual noise: Strange noises like rattling or banging noises can indicate that the dryer vent is loose or disconnected. Check the connection between the dryer and the vent line, ensuring they are secure and properly connected.
- Moisture or mold: Excessive moisture or the presence of mold near the dryer vent can indicate poor ventilation. Make sure the vent line is free from obstructions and properly sealed to prevent moisture buildup.
Important safety precautions to prevent fire hazards and other risks
When it comes to dryer vent safety, following these precautions can help minimize fire hazards and other risks:
- Regularly clean the lint trap and vent line to prevent lint buildup that can ignite and cause a fire.
- Keep the area around the dryer clear of flammable items such as boxes, clothing, or cleaning supplies.
- Avoid using plastic or foil accordion-style ducts as they can easily trap lint and increase the risk of fire.
- Monitor the dryer while it’s in operation and never leave it running unattended or overnight.
- Install a smoke detector near the laundry area and regularly test its functionality.
- Consider installing a carbon monoxide detector if your dryer is powered by natural gas.
- Consult a professional if you suspect a problem with your dryer vent system or if you’re unsure about the installation process.
By following these maintenance practices and safety tips, you can ensure your dryer vent operates smoothly, efficiently, and most importantly, safely!
Frequently Asked Questions
How Do I Install A Dryer Vent In My Home?
To install a dryer vent in your home, start by measuring the distance from the dryer to the exterior wall. Then, purchase a vent kit that includes all the necessary materials. Next, connect the vent to the dryer using the provided clamps.
Finally, use a hole saw to cut a hole in the exterior wall and attach the vent cover.
What Tools Do I Need To Install A Dryer Vent?
To install a dryer vent, you will need a few tools including a tape measure, screwdriver, drill, hole saw, and a pair of pliers. Additionally, you may need a ladder to access the exterior of your home if the vent needs to be installed on an upper level.
Can I Install A Dryer Vent Myself?
Yes, you can install a dryer vent yourself if you have the basic tools and are comfortable with home improvement projects. However, if you are unsure or inexperienced, it may be best to hire a professional to ensure the vent is installed correctly and safely.
Conclusion
Installing a dryer vent may seem like a daunting task, but with the right steps, it can be a straightforward process. By following our guide, you can ensure the proper installation of your dryer vent, which is crucial for the efficient and safe operation of your dryer.
Remember to prioritize safety, use the necessary tools, and carefully follow the instructions provided by the manufacturer. With a well-installed dryer vent, you can enjoy effective drying and peace of mind knowing that your home is protected from potential hazards.