To install a dryer power cord, first, detach the old cord from the dryer’s electrical terminal. Then, connect the new power cord by matching the wire colors to their respective terminals and securing them tightly.
Installing a dryer power cord correctly is crucial for the safe and efficient operation of your dryer. Whether you’re replacing an old cord or installing a new one, following the right steps is essential. In this guide, we will walk you through the process of installing a dryer power cord in a simple and easy-to-understand manner.
By the end of this article, you will have all the necessary knowledge to install a dryer power cord properly and without any hassle. So let’s dive in and get started!
Understanding The Dryer Power Cord
The dryer power cord is an essential component of any dryer setup. It is the link that connects your dryer to the power source, allowing it to function properly. Without a functioning power cord, your dryer won’t be able to dry your clothes effectively, making it imperative to understand the importance of this crucial piece of equipment.
What is a dryer power cord and why is it important?
A dryer power cord is a flexible cord that connects your dryer to the electrical outlet in your home. It is responsible for transmitting the electric current from the power source to the dryer, enabling it to operate.
Having a properly installed and functional power cord is crucial for several reasons. Firstly, it ensures the safe and efficient operation of your dryer. A faulty or improperly installed power cord can lead to electrical hazards, including electrical shocks or fires. Therefore, it is essential to handle and install the power cord correctly to prevent any potential accidents.
Additionally, the power cord provides the necessary power for your dryer to function effectively. Without a reliable electrical connection, your dryer won’t be able to generate and distribute the heat required to dry your clothes efficiently. This can result in longer drying times, increased energy consumption, and reduced overall performance of your dryer.
Different types of dryer power cords available in the market
When it comes to choosing a dryer power cord, there are typically three types available in the market, namely:
- 3-prong power cord: This type of power cord consists of three wires, including two hot wires and a neutral wire. It is commonly used in older homes that still have three-prong outlets. However, since 2000, the National Electrical Code has required four-prong outlets in new homes, making this type of power cord less common.
- 4-prong power cord: The four-prong power cord has four wires, including two hot wires, a neutral wire, and a separate ground wire. It is the current standard for most dryers, as it provides an added level of safety by grounding the dryer’s metal frame.
- Universal power cord: As the name suggests, the universal power cord is designed to be compatible with both three-prong and four-prong outlets. It comes equipped with a removable grounding strap, allowing you to adapt the cord to the type of outlet available in your home.
Before purchasing a dryer power cord, it is crucial to determine the type of outlet in your home and ensure compatibility with your dryer model. Using the wrong power cord can be dangerous and may damage your dryer or pose electrical hazards.
Now that we have explored the importance of the dryer power cord and the different types available, it’s time to move on to the installation process. In the next section, we will provide a step-by-step guide on how to install a dryer power cord safely and effectively.
Tools And Materials Required
Tools and Materials Required
Installing a dryer power cord may seem daunting, but with the right tools and materials, it can be a straightforward process. To ensure a successful installation, you’ll need essential tools and materials on hand. Let’s take a closer look at what you’ll need:
Essential tools for installing a dryer power cord
Before you get started, make sure you have these essential tools available:
- A screwdriver, preferably the appropriate size for the dryer’s terminal block screws.
- Needle nose pliers to help with securing wires and removing old terminal connections if needed.
- Wire strippers to strip off the insulation from the tips of the wires.
- A wire cutter to trim any excess wire length.
- A level to ensure the dryer is properly balanced after installation.
Materials needed for a successful installation
In addition to the necessary tools, you’ll need the following materials:
- A dryer power cord that matches the electrical requirements of your dryer and household.
- A strain relief clamp, typically provided with the new power cord or available for purchase separately.
- An outlet cover plate compatible with the size and style of your electrical outlet box.
By making sure you have these tools and materials readily available, you’ll be well-equipped to confidently install a dryer power cord. Now that you know what you need, let’s move on to the next step: understanding the intricacies of connecting the power cord to the dryer. Stay tuned for our next section!
Safety Precautions
When it comes to installing a dryer power cord, it is crucial to prioritize safety to avoid any potential accidents or hazards. Following proper safety measures is essential to ensure a smooth and risk-free installation process. In this section, we will discuss the importance of safety measures during the installation and provide you with a helpful checklist of safety guidelines to follow.
Importance of safety measures during the installation process
Installing a dryer power cord requires working with electricity, which can be dangerous if not handled with care. Adhering to the necessary safety precautions is of utmost importance to prevent electrical shocks, fires, or any other potential harm. Taking the time to understand and implement these measures will not only safeguard your well-being but also contribute to the longevity and efficient functioning of your dryer.
Checklist of safety guidelines to follow
Before you begin installing the dryer power cord, make sure to go through this checklist of safety guidelines:
- Ensure the power is fully turned off and the dryer is unplugged before starting the installation process.
- Wear protective gloves to minimize the risk of electrical shock.
- Inspect the power cord and ensure it is in good condition without any visible damages or frayed wires.
- Verify that the dryer power cord matches the outlet type to avoid compatibility issues.
- Follow the manufacturer’s instructions carefully, as they provide specific guidelines for your dryer model.
- Never force the power cord into the outlet – it should fit smoothly without any resistance.
- Use proper tools, such as a screwdriver, that are suitable for the installation process.
Remember, if you are uncertain about any step of the installation process, it is always wise to consult a professional electrician. Your safety should never be compromised when working with electricity.
By adhering to these safety precautions throughout the installation process, you can install your dryer power cord securely and with peace of mind. Making safety a priority ensures a hassle-free experience while safeguarding yourself and your home.
Step 1: Preparation
Before you begin installing a dryer power cord, it is crucial to ensure proper preparation. This will not only make the process smoother but also reduce any potential risks or complications. In this step, we will focus on gathering all the necessary tools and materials and identifying the power supply requirements of your dryer.
Gathering all necessary tools and materials
Before you start the installation process, make sure you have all the required tools and materials at your disposal. This will save you time and frustration as you won’t have to interrupt the installation to search for missing items. Here’s a list of everything you will need:
| Tools | Materials | Additional |
|---|---|---|
|
|
|
Identifying the power supply requirements of your dryer
It is important to check and understand the power supply requirements of your specific dryer model. Different dryers can have different power needs, so it is essential to ensure compatibility before installing the power cord. Here’s how you can identify the power supply requirements:
- Refer to the owner’s manual: Every dryer comes with an owner’s manual that provides detailed information about its power requirements. Look for the electrical specifications section or the power supply requirements section in the manual.
- Check the back of the dryer: In some cases, the power supply requirements can be found on a label located on the back of the dryer. This label will typically mention the voltage, amperage, and frequency.
- Research online: If you don’t have access to the owner’s manual or cannot find the label on the dryer, you can search for the model number of your dryer online. Manufacturers often provide specifications and power supply requirements on their websites.
Once you have gathered all the necessary tools and materials and identified the power supply requirements of your dryer, you are ready to move on to the next step of installing the dryer power cord.
Step 2: Disconnecting The Old Power Cord
Before you begin disconnecting the old power cord from your dryer, it is crucial to prioritize safety to avoid any accidents or injuries. By following these safety precautions, you can ensure a smooth and secure disconnection process:
Safety Precautions Before Unplugging the Dryer
- Turn off the power: Locate the breaker box in your home and switch off the circuit breaker that supplies power to your dryer. This step will prevent any electrical shocks while working with the power cord.
- Unplug the dryer: After turning off the power, unplug the dryer from the electrical outlet. This additional step further guarantees that you won’t come in contact with live electricity during the cord disconnection.
- Wear protective gear: Before proceeding, equip yourself with safety gloves to protect your hands from any potential hazards. Safety goggles are also recommended to shield your eyes from debris that might dislodge during the process.
Step-by-Step Instructions for Safely Disconnecting the Old Power Cord
Now that you’ve taken the necessary safety precautions, it’s time to walk you through the step-by-step process of disconnecting the old power cord:
- Locate the access panel: On the back of your dryer, you’ll find an access panel held in place with screws. Grab a screwdriver and carefully remove these screws to reveal the wiring connections.
- Identify the power cord terminals: Inspect the terminal block where the power cord is connected. Typically, you’ll find three terminals: the center terminal (neutral), the ground terminal, and the outer terminals (hot wires). It’s essential to identify these terminals correctly.
- Loosen the terminal connections: Using a screwdriver, loosen the terminal screws to disconnect the old power cord. Start with the outer terminals, followed by the center terminal and ground terminal.
- Remove the old power cord: Once the terminal screws are loosened, you can now remove the old power cord from the terminal block. Carefully detach each wire from its respective terminal, ensuring not to damage the wires or pull them excessively.
- Discard the old power cord: Safely dispose of the old power cord, as you won’t need it anymore. Make sure to handle it responsibly, considering recycling options if available in your area.
By meticulously following these step-by-step instructions and adhering to the specified safety precautions, you can now proceed to the next stage of installing the new power cord for your dryer.
Step 3: Examination And Preparation Of New Power Cord
To ensure a safe and effective installation of your dryer power cord, the third step involves examining the new power cord for any damage or defects and preparing it for installation. By carefully inspecting the cord and preparing it adequately, you can ensure seamless connectivity and maximum performance from your dryer.
Inspecting the new power cord for any damage or defects
Prior to installation, it is essential to thoroughly inspect the new power cord for any signs of damage or defects. Even a small flaw in the cord can pose a safety risk and may lead to electrical issues in the future. Here’s how you can inspect the power cord effectively:
- Start by visually examining the cord from end to end. Look for any visible signs of fraying, damage, or exposed wires.
- Run your fingers along the entire length of the cord to check for any irregularities or inconsistencies in the insulation.
- If you come across any damage or defects, it is crucial to replace the cord with a new one before continuing with the installation process.
Preparing the new power cord for installation
Once you have confirmed that the power cord is free from any damage or defects, it’s time to prepare it for installation. Proper preparation ensures a secure and efficient connection to your dryer. Follow these steps to prepare the new power cord:
- Gather the necessary tools for the job, including a screwdriver and wire stripper.
- Identify the end of the power cord that connects to the dryer. Most cords have a plastic covering over the wire ends, which you will need to remove using a wire stripper.
- Expose approximately one inch of the individual wire ends by carefully stripping the plastic covering.
- Once the wires are exposed, inspect them to ensure they are clean and free from any debris or damage.
- If necessary, trim the wire ends to remove any frayed or damaged sections, ensuring they are neatly trimmed.
- Now, carefully separate the individual wires, making sure they are not tangled or twisted.
- Lastly, double-check that each wire is properly identified for connection to the appropriate terminal on the dryer. Most power cords have color-coded wires (commonly red, black, and white), which correspond to specific functions on the dryer.
By meticulously examining the new power cord for any damage or defects and adequately preparing it for installation, you can ensure a smooth and secure connection. These steps will not only promote the efficient operation of your dryer but also prioritize safety. Now that you have your power cord ready, it’s time to move on to the next step of the installation process.
Step 4: Connecting The New Power Cord
Now that you have identified the specific connections on the dryer and power cord, it’s time to connect them properly. Ensuring the wires are connected to the corresponding terminals is crucial for the safe and efficient operation of your dryer.
Identifying the specific connections on the dryer and power cord
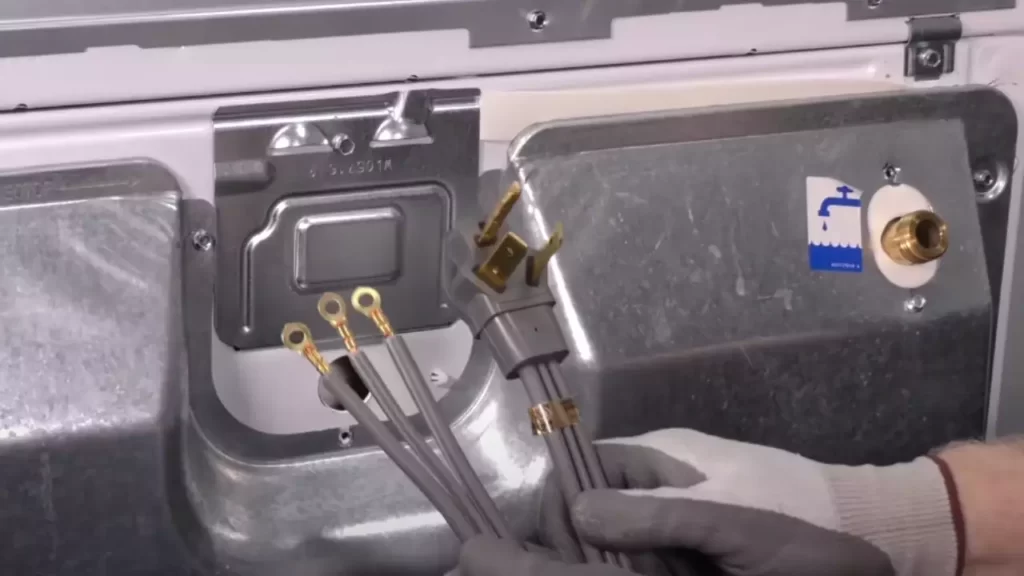
Before connecting the power cord, it’s important to know which wires go where. The dryer usually has three main terminals: a green grounding screw, a neutral terminal, and two hot terminals. On the other hand, the new power cord will have three or four prongs with corresponding colors.
To properly identify the connections, refer to the dryer’s user manual or look for labels near the terminals. The green grounding screw is typically located at the top, while the neutral and hot terminals are positioned at the bottom. The power cord will usually have a green wire for grounding, a white wire for the neutral terminal, and two or three colored wires for the hot terminals.
Properly connecting the wires to the corresponding terminals
Once you have identified the specific connections, follow these steps to connect the new power cord:
- Start by unplugging the dryer from the electrical outlet and ensure it is completely powered off.
- Locate the terminal block at the back of the dryer. This is where the power cord connects to the dryer.
- Remove the access panel covering the terminal block, if necessary.
- Take the power cord and separate the wires, ensuring they are not tangled or crossed.
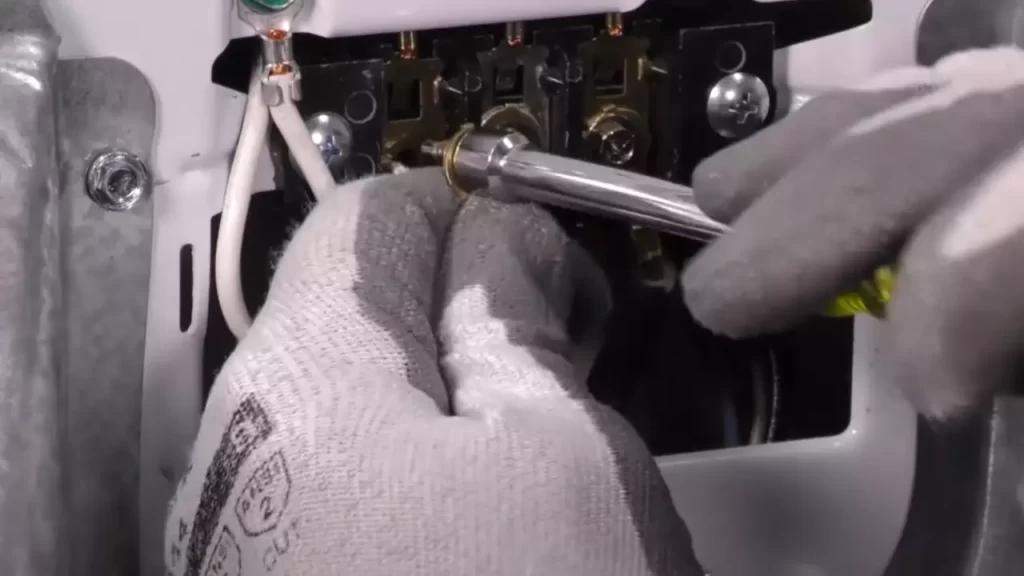
- Take the green grounding wire and attach it to the green grounding screw on the dryer. Use a screwdriver to secure it tightly.
- Next, take the white wire from the power cord and connect it to the neutral terminal on the dryer. This terminal is usually labeled with the letter “N” or the word “neutral.”
- Lastly, take the colored wires from the power cord and connect each one to its corresponding hot terminal on the dryer. The hot terminals are typically labeled with the letters “L1” and “L2” or different colors. Ensure each wire is securely fastened using a screwdriver.
Once you have connected all the wires, double-check each connection to ensure they are tight and secure. This will minimize the risk of electrical issues and ensure your dryer operates safely. After verifying the connections, replace the access panel on the terminal block and plug in your dryer.
Congratulations! You have successfully connected the new power cord to your dryer. Before using the dryer, make sure to test it to ensure proper functioning. Should you encounter any issues or have doubts during the installation process, it’s always recommended to consult a professional electrician.
Step 5: Securing The Power Cord
Using Strain Relief to Secure the Power Cord in Place
Installing a dryer power cord is an essential step in setting up your appliance for optimal performance and safety. Once you have connected the wires correctly, it’s time to secure the power cord in place using strain relief. The strain relief mechanism helps in preventing tension or twisting of the wires, ensuring a stable and secure connection. Here’s how you can go about it:
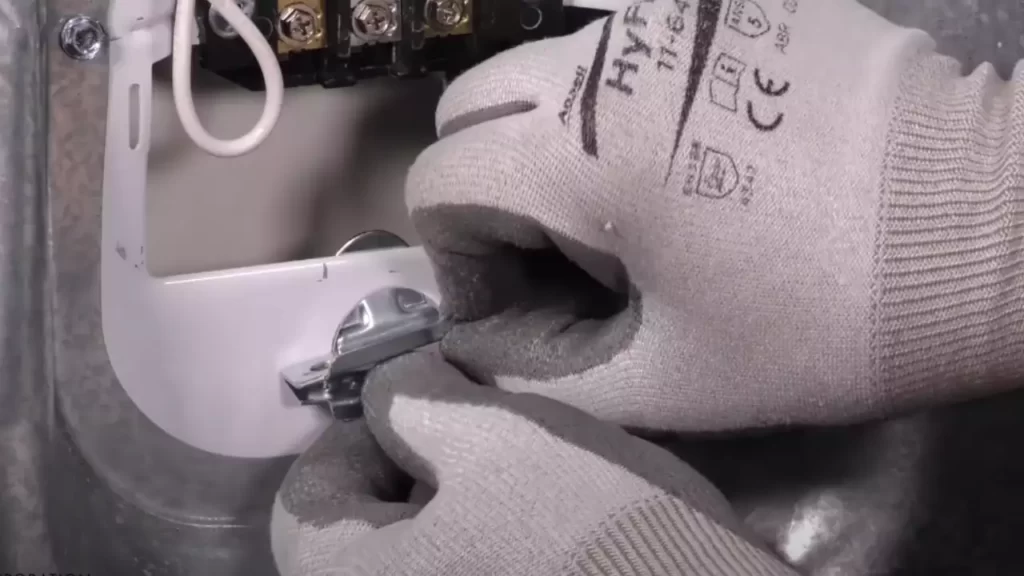
- Start by locating the strain relief bracket or clamp that came with your dryer. This bracket is designed to hold the power cord firmly and prevent it from being accidentally pulled out.
- Position the strain relief bracket over the opening on the back of the dryer where the power cord enters. Make sure the screws are lined up with the holes on the bracket.
- Insert the screws through the bracket and into the holes on the dryer’s back panel. Use a screwdriver to tighten them securely, but be careful not to overtighten and damage the threads.
- Note: Some dryers may have a different type of strain relief mechanism, such as a clamp instead of a bracket. In such cases, follow the manufacturer’s instructions for securing the power cord.
- Once the strain relief is securely in place, gently pull the power cord out from the back of the dryer to remove any excess slack. However, make sure not to pull it too tight as it might strain the wiring connections.
- With the power cord properly aligned and tightened, reattach the access panel or cover on the back of the dryer and secure it with the screws or clips provided.
Ensuring
proper positioning for optimal performance and safety
is crucial during this step. Improperly secured power cords can lead to voltage fluctuations, wire damage, and potential electrical hazards. By using strain relief, you are not only maintaining a neat and tidy setup but also safeguarding the longevity and efficiency of your dryer.
Take a moment to double-check your work. Ensure that each connection is secure, and there are no loose wires or exposed conductors. Additionally, verify that the power cord is correctly aligned and securely held in place by the strain relief mechanism. Any loose connections or mispositioned cords can compromise the safety of your dryer and affect its performance.
Now that you have successfully installed your dryer power cord and securely fastened it with strain relief, you can confidently move on to the next steps in setting up your appliance. Stay tuned for the final steps, where we will cover connecting the dryer vent, testing the electrical connection, and ensuring everything is in top-notch condition for your laundry needs.
Step 6: Final Checks And Testing
Step 6: Final Checks and Testing
Now that you’ve successfully connected your dryer power cord, it’s crucial to double-check all connections for accuracy before testing the dryer. By ensuring each connection is secure, you can avoid potential issues and guarantee optimal performance.
Double-checking all connections for accuracy
Take a moment to carefully inspect each connection point and verify that it aligns with the manufacturer’s instructions. Any loose or improperly connected wires could lead to electrical malfunctions or even fires, so it’s essential to be thorough in your examination. Pay particular attention to:
- Matching wire colors and connecting them properly. Refer to the manufacturer’s guide or wiring diagram if needed.
- Ensuring each wire is tightly secured within its respective terminal. Use a screwdriver to firmly tighten any loose connections.
- Inspecting the power cord plug to ensure the prongs are not damaged or bent. If they are, replace the plug before proceeding.
By taking these precautious measures, you can safeguard against any potential electrical issues once the dryer is in use.
Testing the dryer to ensure proper power supply
With all the connections double-checked and secured, it’s time to test your dryer to ensure it’s receiving the appropriate power supply. Follow these steps:
- Ensure the dryer’s power switch is turned off before plugging it in.
- Insert the power cord plug into the appropriate power outlet, ensuring a snug fit. If the plug is loose or doesn’t securely fit, do not proceed with the test.
- Turn on the dryer’s power switch, and listen for any unusual sounds. If you hear any strange noises, immediately turn off the dryer and check the connections once more.
- Set the dryer to a preferred drying cycle and let it run for a few minutes. Observe its operation and make sure it’s functioning correctly.
- If the dryer operates normally without any issues, congratulations! You have successfully installed the power cord. If there are any problems during the testing, make sure to review the connections and consult the manufacturer’s support if necessary.
By performing these final checks and conducting a thorough test, you can have peace of mind knowing your dryer is properly powered and ready to provide efficient drying for your laundry needs.
Troubleshooting Common Issues
Addressing Common Problems Encountered During Installation
Installing a dryer power cord may seem like a straightforward task, but sometimes unexpected issues can arise. From wiring problems to compatibility concerns, troubleshooting these common problems is crucial to ensure a successful installation. In this section, we will explore the most common issues that people encounter when installing a dryer power cord and provide practical solutions to address them.
Troubleshooting Tips and Solutions for a Successful Installation
Proper troubleshooting can save you time, money, and frustration when it comes to installing a dryer power cord. By following these tips and solutions, you can ensure a smooth and trouble-free installation process:
1. Checking the Power Cord Compatibility
First and foremost, it is important to check if the power cord you have purchased is compatible with your dryer model. Make sure the prong configuration matches the outlet, and the power cord’s amperage rating is suitable for your dryer’s requirements. Refer to your dryer’s manual or consult the manufacturer’s website for specific compatibility information.
2. Verifying the Outlet Wiring
Before installing the power cord, ensure the outlet’s wiring is correct. In many cases, improper wiring can cause the dryer to malfunction or even pose a safety hazard. Use a voltage tester to check if the outlet is receiving the correct voltage, typically 240 volts. If you have any doubts or notice any irregularities, consult a professional electrician for assistance.
3. Handling Wiring Connections Correctly
During the installation process, properly connecting the wires is vital to ensure the dryer operates efficiently and safely. Double-check that the wiring connections correspond to the manufacturer’s instructions. For example, use the appropriate colored wires for each connection and tighten them securely. Loose connections can lead to overheating and potential damage to the dryer or even fire hazards.
4. Testing the Dryer After Installation
Once the power cord is installed, it is essential to test the dryer to ensure everything is functioning correctly. Plug the dryer into the outlet and turn it on to confirm that it powers on and runs smoothly. Additionally, confirm that all the dryer’s features, such as the heating element and control panel, are working as expected. If you encounter any issues during the testing phase, refer back to the installation instructions or contact the manufacturer or a professional for further assistance.
In conclusion, troubleshooting common issues during the installation of a dryer power cord is crucial to ensure a successful and safe installation. By addressing compatibility concerns, verifying outlet wiring, handling wiring connections correctly, and testing the dryer after installation, you can avoid potential problems and enjoy the efficiency of your properly functioning dryer.
Safety Tips For Regular Maintenance
In order to ensure the longevity and safety of your dryer power cord, regular maintenance is essential. By following the proper safety measures, you can prevent potential hazards and increase the efficiency of your dryer. This section will highlight the importance of ongoing maintenance for the dryer power cord as well as provide detailed safety tips to follow. Let’s dive in!
Importance of ongoing maintenance for the dryer power cord
Regular maintenance of your dryer power cord is crucial as it helps in preventing any potential dangers and ensuring the seamless functioning of your appliance. Neglecting the maintenance can lead to electrical faults, overheating, and even fire hazards. By conducting routine checks, you can identify any signs of wear and tear, loose connections, or damage, and address them promptly. This not only enhances the safety of your household but also extends the lifespan of your dryer. It’s worth the effort to devote some time to maintain your dryer power cord regularly.
Safety measures to follow when performing routine checks and maintenance
When it comes to performing routine checks and maintenance on your dryer power cord, prioritizing safety should always be your top concern. By following the safety measures listed below, you can ensure a safe environment while inspecting and maintaining your dryer power cord:
- Turn off the power: Before attempting any maintenance tasks, switch off the power supply to the dryer. This can be done by unplugging the cord from the electrical outlet or turning off the circuit breaker connected to the dryer. This precautionary step eliminates the risk of electric shock.
- Inspect the power cord: Carefully examine the power cord for any signs of fraying, cracking, or exposed wires. Worn-out or damaged cords pose a serious risk and should be replaced immediately to avoid potential electrical hazards. If you find any damage, consider hiring a professional electrician to replace it.
- Check the connections: Ensure that all connections between the power cord and the dryer are secure. Gently tug on the cord to check for any loose connections or plugs. Loose connections can lead to heat buildup and cause fires. Tighten any loose connections properly.
- Clean the area: Dust and lint accumulation in and around the dryer can increase the risk of overheating. Regularly clean the lint trap and remove any debris that may obstruct airflow. Additionally, vacuum the area behind the dryer to prevent lint buildup and potential fire hazards.
By adhering to these safety measures during your routine checks and maintenance, you can ensure the safety and smooth operation of your dryer power cord. Remember, a little maintenance goes a long way in maintaining a safe and efficient laundry routine!
Frequently Asked Questions
How Do You Install A Dryer Cord?
To install a dryer cord, follow these steps: 1. Unplug the dryer and remove the access panel. 2. Connect the cord’s center wire to the center terminal and the remaining wires to their respective terminals. 3. Tighten the screws to secure the wires.
4. Replace the access panel and plug in the dryer. 5. Test the dryer to ensure it’s working properly.
How Do You Wire A Dryer Power Cord?
To wire a dryer power cord, follow these steps: 1. Disconnect power from the electrical panel. 2. Remove the cover plate on the back of the dryer. 3. Attach the cord wires to the terminal block, matching the colors. 4.
Tighten the screws securely. 5. Replace the cover plate and connect the power.
How Do You Install A 4 Prong Dryer Cord?
To install a 4 prong dryer cord: 1. Unplug the dryer 2. Remove the old cord 3. Connect the green wire to the dryer’s grounding screw 4. Connect the white wire to the center terminal 5. Connect the black and red wires to the outer terminals.
Ensure a tight connection and voila! Your 4 prong dryer cord is installed.
Which Wires Go Where On Dryer Cord?
The dryer cord has three wires: a black one, a white one, and a green one. The black wire goes to the terminal labeled “L1,” the white wire goes to the terminal labeled “N,” and the green wire goes to the terminal labeled “GND” or “GRD.
“
Conclusion
Installing a dryer power cord may seem intimidating, but with the right guidance, it can be a straightforward process. By following the steps outlined in this post, you can ensure a safe and efficient installation. Remember to turn off the power before beginning and to consult the dryer’s manual for specific instructions.
With these tips, you’ll be able to confidently install your dryer power cord and enjoy the benefits of a properly functioning dryer. Happy drying!