To install a dryer outlet with a three-prong configuration, follow these steps: turn off the power supply, remove the cover plate, attach the green wire to the grounding screw, connect the black and red wires to the appropriate terminals, and secure the outlet to the wall. Installing a dryer outlet with three prongs is a simple process that ensures proper electrical connections and safety for your appliance.
By following these steps and adhering to safety precautions, you can quickly and easily install a properly functioning 3-prong dryer outlet.
Understanding The Importance Of A Proper Dryer Outlet Installation
Installing a dryer outlet may seem like a straightforward task, but it is crucial to understand the importance of a proper installation. A dryer outlet is not just a simple plug; it plays a significant role in ensuring the safety and performance of your dryer. In this section, we will explore the reasons why a properly installed dryer outlet is essential and the consequences that can arise from using an incorrect or damaged outlet.
Why a properly installed dryer outlet is crucial for safety and performance
Bold <b>Safety</b> should always be the top priority when it comes to installing electrical devices. A dryer outlet is designed to handle the high power consumption of a dryer and is equipped with specific safety features to prevent electrical hazards. A properly installed outlet ensures that the dryer is receiving the correct amount of power and that the electrical connection is secure, reducing the risk of accidents such as electrical shock, overheating, or fires.
Bold <b>Performance</b> is another crucial aspect to consider when installing a dryer outlet. A proper connection allows the dryer to operate at its optimal performance level. It ensures that the dryer can efficiently draw the necessary power to run its heating elements and other components, resulting in faster drying times and more consistent results. When the outlet is correctly installed, you can expect your dryer to function reliably and efficiently, saving you time and energy.
Consequences of using an incorrect or damaged outlet
Using an incorrect or damaged outlet can have severe consequences. It can compromise both the safety and performance of your dryer, putting you and your property at risk. Here are some potential issues that can arise:
- Electrical hazards: An incorrect or damaged outlet may not provide proper grounding or insulation, increasing the risk of electrical shock or short circuits.
- Overheating: A faulty connection can cause the outlet to heat up, leading to potential damage to the outlet, nearby wiring, and even the dryer itself. In worst-case scenarios, this can result in a fire hazard.
- Inefficient operation: Using an outlet that is not designed for the high power consumption of a dryer can lead to decreased performance and longer drying times. This can be frustrating and may result in higher energy bills in the long run.
Overview of the different types of dryer outlets
There are several types of dryer outlets, and it is important to ensure you have the correct one for your specific dryer model. The most common types include:
| Type | Plug Configuration | Voltage |
|---|---|---|
| 3-Prong Outlet (NEMA 10-30) | Three flat blades | 220-240V |
| 4-Prong Outlet (NEMA 14-30) | Four prongs (two flat blades and two angled blades) | 220-240V |
It is crucial to check the specifications of your dryer and follow the manufacturer’s instructions to ensure you have the correct outlet installed. Using the wrong outlet type can lead to compatibility issues, safety hazards, and even damage to your dryer. If you are unsure about the type of outlet required, it is recommended to consult a qualified electrician.
By understanding the importance of a proper dryer outlet installation, you can ensure the safety and optimal performance of your dryer. It is always best to prioritize safety and consult a professional if you have any doubts or concerns regarding the installation process. Taking the time to do it right will provide peace of mind and extend the lifespan of your dryer.

Gathering The Necessary Tools And Materials
Installing a dryer outlet yourself can save you both time and money. Before you begin, it’s important to gather all the necessary tools and materials to ensure a smooth installation process. This will help you avoid any last-minute trips to the hardware store and allow you to complete the job efficiently. Here’s a breakdown of what you’ll need:
List of tools required for the installation
Before you dive into the installation process, make sure you have the following tools on hand:
- Screwdriver
- Adjustable wrench
- Wire stripper
- Needle-nose pliers
- Utility knife
- Measuring tape
- Wire cutters
- Electric drill
Having these tools readily available will make the installation process much smoother.
Understanding the electrical materials needed
Along with the tools, you will also need specific electrical materials for the installation. These include:
- 3-prong dryer cord
- Wire connectors
- Electrical tape
- Outlet cover plate
- Dryer outlet box
- Mounting screws
- Strain relief clamp
- Wire nuts
Make sure to have these materials ready before you begin, as they are essential for a successful installation.
Tips for purchasing the right outlet for your dryer
When it comes to purchasing the right outlet for your dryer, it’s important to keep a few factors in mind. Here are some key tips:
- Check the manufacturer’s specifications: Before purchasing an outlet, consult your dryer’s user manual or check the manufacturer’s specifications online. This will ensure that you select an outlet that is compatible with your specific dryer model.
- Consider the voltage and amperage requirements: Dryers typically require a 220-volt outlet with a specific amperage rating. Make sure to choose an outlet that matches these requirements to avoid any electrical issues.
- Choose an outlet style: Dryer outlets come in different styles, such as 3-prong and 4-prong. Determine the type of outlet your dryer needs based on its age and model specifications.
- Ensure proper grounding: The outlet you choose should have a grounding feature to ensure the safety of your dryer. This will protect against electrical shocks and potential fires.
By following these tips, you can confidently select the right outlet for your dryer, ensuring a secure and efficient installation.

Ensuring Safety Precautions Before Starting
Before diving into the installation process of a dryer outlet 3 prong, it is crucial to prioritize safety. Working with electricity can be hazardous if proper precautions are not taken. By following some essential safety measures, you can ensure a safe and accident-free installation experience. In this section, we will explore the importance of turning off the power supply, using a voltage tester to verify that the power is off, and tips for working with electricity safely.
Importance of turning off the power supply
Turning off the power supply is a critical step in ensuring safety before starting any electrical work. It prevents electrical shock and reduces the risk of accidents. Here’s why you should never skip this step:
- Power to the outlet must be completely shut off to avoid potential electric shocks.
- Working on live electrical circuits increases the likelihood of short circuits and may cause damage to your appliance or even start a fire.
- Turning off the power supply guarantees that you have a safe working environment free from any potential electrical hazard.
Using a voltage tester to ensure the power is off
Using a voltage tester is a reliable way to ensure that the power supply is indeed off. A voltage tester is an essential tool for any electrical work. Here’s how you can use it to ensure safety:
- Plug the voltage tester into a live outlet in a different room to confirm that it is functioning correctly.
- Turn off the circuit breaker that supplies power to the dryer outlet you are going to work on.
- Remove the outlet cover and carefully place the voltage tester within the outlet box.
- Check the voltage tester to ensure it shows no indication of live power.
Always double-check with a voltage tester to be absolutely certain that the power is off before proceeding with any electrical work. This step is crucial to maintain your safety throughout the installation process.
Tips for working with electricity safely
Working with electricity can be intimidating if you are not familiar with proper safety measures. Here are some essential tips to follow while working with electricity:
- Always wear safety goggles to protect your eyes from any potential electrical sparks or debris.
- Avoid wearing loose clothing or jewelry that could accidentally come into contact with live wires.
- Make sure your hands are dry before handling any electrical components or tools.
- Use insulated tools specifically designed for electrical work to reduce the risk of electrical shock.
- Never touch exposed wires or terminals with your bare hands. Use insulated gloves or tools for any necessary tasks involving live wires.
Following these tips will significantly reduce the risk of accidents and ensure your safety throughout the installation process.

Removing The Old Outlet
Removing the old outlet is the first step in installing a new dryer outlet. It’s essential to do this safely and correctly to ensure a smooth installation process. Here are the steps to safely disconnect the old outlet:
How to safely disconnect the old outlet
1. Begin by shutting off the power supply to the outlet. Locate the circuit breaker that controls the electrical circuit for the dryer and switch it off. This step is crucial for your safety.
2. Once the power is turned off, use a voltage tester to confirm that no electricity is running through the outlet. Insert the tester into all the slots of the outlet and ensure that there is no reading. If the tester indicates there is still power flowing, double-check the circuit breaker and try again until you get a negative reading.
3. After ensuring the power is off, remove the cover plate of the outlet using a flat-head screwdriver. Keep the screws safely aside as they’ll be needed later.
4. Once the cover plate is removed, unscrew the screws securing the outlet to the electrical box. Carefully pull the outlet out of the box, exposing the wiring connections.
5. Before disconnecting the wiring, take a photograph or make a diagram of the current setup. This will serve as a helpful reference when connecting the new outlet.
Steps for removing the outlet from the wall
Now that the wiring is exposed, follow these steps to remove the old outlet from the wall:
1. Start by unscrewing the terminal screws that connect the outlet to the wires. Loosen the screws enough to release the wires, but be careful not to tug on them excessively.
2. As you remove the wires from the outlet, identify their corresponding locations. Typically, there are two hot wires (black and red), one neutral wire (white), and one ground wire (green or bare copper). Make sure each wire is clearly marked or labeled.
3. Once all the wires are detached from the old outlet, gently pull the outlet out of the electrical box. Be cautious not to damage any surrounding wires or other electrical components.
4. Carefully inspect the wiring for any signs of damage, such as frayed or exposed wires. If you notice any issues, it’s essential to fix them before proceeding with the installation of the new outlet.
Checking the wiring and ensuring it is in good condition
It’s crucial to ensure that the wiring is in good condition. Follow these steps to check the wiring:
1. Examine the insulation around each wire for any cracks, breaks, or signs of wear. If you find any damage, it’s important to replace the affected section of wire.
2. Check that the wires are securely connected to their respective terminals in the electrical box.
3. Inspect the grounding wire to ensure it is properly connected or bonded to the electrical box.
4. If you have any doubts about the condition of the wiring or how it is connected, consult a qualified electrician for further assistance. It’s better to take the necessary precautions than risk an electrical hazard.
By safely disconnecting the old outlet and checking the condition of the wiring, you are now ready to proceed with the installation of the new dryer outlet. Remember to double-check all safety measures and seek professional help if needed.
Preparing The Installation Area
Before installing a dryer outlet, it is important to properly prepare the installation area to ensure a safe and efficient setup. This involves choosing the appropriate location for the new outlet, determining the correct height and distance from other objects, and ensuring proper ventilation for the dryer. By following these steps, you can create a well-prepared installation area for your dryer outlet.
Choosing the Appropriate Location for the New Outlet
When choosing the location for the new dryer outlet, it is essential to consider accessibility and convenience. Here are a few important points to keep in mind:
- Locate the outlet near the dryer’s intended position to minimize the length of the electrical cord required.
- Ensure that the outlet is easily accessible for maintenance or repairs.
- Keep the outlet away from potential sources of water, such as sinks or outdoor areas, to prevent electrical hazards.
- Check local codes and regulations to determine any specific requirements for outlet placement.
Determining the Correct Height and Distance from Other Objects
Proper placement of the dryer outlet in terms of height and distance from other objects is crucial for safety and functionality. Here are a few guidelines to follow:
- Ensure the outlet is mounted at a height that allows for easy connection and disconnection of the dryer’s power cord.
- Keep the outlet high enough to prevent water or other liquids from coming into contact with it.
- Verify the recommended height requirements in the dryer’s installation manual or consult a professional electrician.
- Leave sufficient space around the outlet to accommodate the dryer’s plug and any necessary clearance for ventilation purposes.
Ensuring Proper Ventilation for the Dryer
Proper ventilation is essential for the safe and efficient operation of a dryer. Here are some key considerations:
- Ensure that the outlet is located near an exterior wall, allowing for easy installation of the ventilation duct.
- Check that the ventilation duct is clear of any debris or obstructions to maintain proper airflow.
- Make sure the duct is securely attached and sealed to both the dryer outlet and the exterior vent to prevent air leaks.
- Regularly clean the lint trap and duct to minimize the risk of lint buildup and potential fire hazards.
By taking the time to choose the appropriate location, determine the correct height and distance, and ensure proper ventilation, you can create an ideal installation area for your dryer outlet. Remember to follow safety guidelines and consult a professional if you have any doubts or questions throughout the process.
Wiring The New Outlet
Understanding the Wiring Diagram and Instructions Provided
Before taking on the task of wiring the new dryer outlet, it is essential to carefully read and comprehend the wiring diagram and instructions provided by the manufacturer. A wiring diagram is a visual representation of the electrical connections required for the outlet, ensuring that you connect the wires correctly and avoid potential hazards. The instructions will guide you through the step-by-step process, highlighting any specific considerations or safety precautions.
Connecting the Wires According to the Color Codes
Once you have a clear understanding of the wiring diagram and instructions, you can proceed to connect the wires to the new dryer outlet. Adhering to the color codes is crucial to ensure proper electrical connections. Each wire, whether it be the black (hot), white (neutral), or green (ground), has a specific purpose and must be connected correctly.
Here is a breakdown of the color codes and their corresponding functions:
| Wire Color | Function |
|---|---|
| Black (Hot) | Carries the electrical current to power the dryer |
| White (Neutral) | Provides the return path for the current |
| Green (Ground) | Prevents electrical shock by providing a path for stray electrical current |
When connecting the wires, ensure you match the corresponding colors. For example, the black wire should be connected to the black terminal, the white wire to the white terminal, and the green wire to the green terminal. This correct wiring ensures the safe and efficient functioning of your dryer.
Securing the Wires Properly to Avoid Loosening in the Future
Once the wires are connected, it is essential to secure them properly to avoid any loosening or disconnection in the future. Properly securing the wires not only ensures the longevity of the electrical connections but also eliminates the risk of electrical hazards caused by loose wires. Here are a few tips to securely fasten the wires:
- Trim the wires to an appropriate length so that they comfortably reach the terminals without excessive slack.
- Strip off a small portion of the wire insulation using wire strippers, exposing just enough wire to wrap around the terminal.
- Pull the wire tightly around the terminal and use a screwdriver to fasten the terminal screw securely.
- Double-check each wire to ensure they are tightly secured and cannot be easily pulled out.
- Finally, organize the wires neatly and use electrical tape or wire ties to bundle them together, preventing any strain on the connections.
By following these steps and securing the wires properly, you can be confident in the durability and safety of your newly installed dryer outlet.
Mounting And Securing The Outlet Box
When it comes to installing a dryer outlet with a 3-prong configuration, one of the crucial steps is mounting and securing the outlet box. This ensures that the outlet is properly positioned, aligned, and stable, providing a safe and reliable connection for your dryer. In this section, we will guide you through the process of installing the outlet box in the wall, achieving the correct positioning and alignment, and securing it tightly for maximum stability.
Installing the outlet box in the wall
To start, locate the area on the wall where you want to install the outlet box for your dryer. It should be within reach of the electrical wiring and away from any water sources or flammable materials. Once you have identified the ideal location, follow these steps:
- Measure and mark the dimensions of the outlet box on the wall, ensuring it meets the local electrical code requirements.
- Use a stud finder to locate the nearby wall studs. This will help you determine the best placement for the outlet box.
- Using a keyhole saw or reciprocating saw, carefully cut a hole in the marked area to accommodate the outlet box. Take caution not to damage the electrical wires within the wall.
- Insert the outlet box into the hole, ensuring it is flush with the wall surface. Use a level to ensure the box is straight both horizontally and vertically.
Proper positioning and alignment of the box
Once the outlet box is installed in the wall, it’s essential to ensure its proper positioning and alignment. This will prevent any issues with connecting the dryer later on. Follow these steps:
- Check that the outlet box is positioned at the correct height, allowing easy access for plugging and unplugging the dryer.
- Ensure the outlet box is centered within the cutout hole, maintaining a uniform gap around the edges.
Securing the box tightly for stability
To guarantee the stability of the outlet box and prevent any movement or loosening over time, proper securing is crucial. Follow these steps:
- Insert screws through the provided holes in the outlet box and into the adjacent wall studs. This will ensure a secure attachment.
- Tighten the screws using a screwdriver or drill, but be careful not to overtighten and damage the box or the surrounding wall.
- Once all screws are tightened, double-check the stability of the outlet box by gently testing its firmness. It should not wiggle or move when pushed.
By following these steps to mount and secure the outlet box for your dryer, you can rest assured that your electrical connection is safe and reliable. This ensures optimal functionality and longevity for your dryer, making laundry tasks a breeze.
Attaching The Outlet And Finalizing The Installation
Now that you have successfully prepared the electrical wires, it’s time to attach the outlet and finalize the installation of your dryer outlet 3 prong. This crucial step ensures a secure and efficient connection for your dryer to receive the necessary power supply. Follow the steps below to complete the installation process:
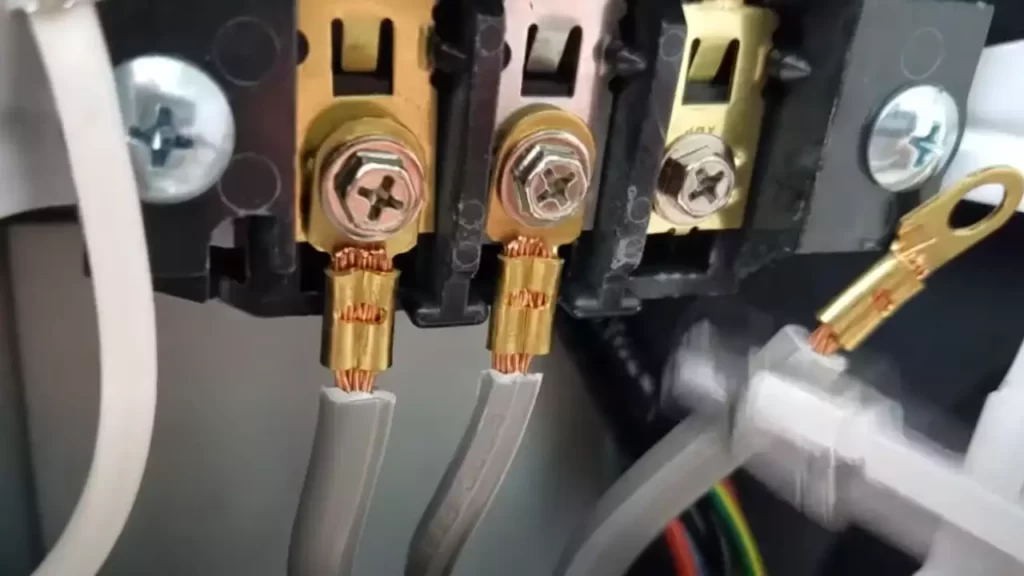
Connecting the Outlet to the Wires
Boldly connect the wires to the corresponding terminals on the dryer outlet. Refer to the manufacturer’s instructions or the wiring diagram for your specific model to ensure accuracy. It is essential to connect each wire securely to the appropriate terminal to prevent loose connections or potential electrical hazards.
If you’re unsure about which wire goes to which terminal, use a marker or a label to identify each wire. This simple precaution can help you avoid any confusion and ensure you connect the wires correctly.
| Wire Color | Terminal Label |
|---|---|
| Red or Black | Hot wire (X) |
| White | Neutral wire (N) |
| Green or Bare | Ground wire (G) |
Double-Checking the Wiring Connections for Accuracy
After connecting the wires, it is crucial to double-check the wiring connections for accuracy. Ensure that each wire is securely fastened to its corresponding terminal on the outlet. Loose connections can lead to power interruptions or even electrical fires. Take a few extra moments to examine and wiggle the wires gently to confirm their stability.
- Verify that the hot wire (red or black) is connected to the terminal labeled “X”.
- Confirm that the neutral wire (white) is attached to the terminal labeled “N”.
- Ensure the ground wire (green or bare) is securely connected to the terminal labeled “G”.
Remember, accuracy is key! By performing this double-check, you minimize the risk of any electrical problems and ensure a safe and reliable installation.
Testing the Newly Installed Dryer Outlet for Functionality
With the wiring connections complete, it’s time to test the functionality of your newly installed dryer outlet. This step ensures that the outlet is providing the necessary power to your dryer for optimal performance.
Follow these steps to effectively test your dryer outlet:
- Plug your dryer into the newly installed outlet.
- Switch on the power supply.
- Turn on your dryer and select a short drying program.
- If your dryer operates normally, with no power interruptions or strange noises, congratulations! Your newly installed dryer outlet is functioning as it should. You can now enjoy the convenience of a properly connected and efficient dryer.
- If you encounter any issues, such as power fluctuations or unusual sounds, switch off the power supply immediately and consult a qualified electrician to rectify the problem.
Testing your newly installed dryer outlet ensures that all your efforts and careful steps have resulted in a successful installation. Don’t skip this crucial final step!
Troubleshooting Common Issues
Troubleshooting steps for potential problems
If you have recently installed a dryer outlet and are experiencing issues with its performance, there are a few common problems that you may encounter. By following these troubleshooting steps, you can identify and resolve these issues quickly and efficiently. Keep in mind that electrical work can be dangerous, so always take necessary precautions and consult a professional if you are unsure.
How to identify and fix electrical faults
Electrical faults can cause a variety of problems with your dryer outlet. To identify and fix these faults, follow these steps:
- Check the power supply: Ensure that the outlet is receiving power by checking the circuit breaker or fuse box. If the breaker has been tripped, reset it, and if the fuse has blown, replace it with a new one.
- Inspect the wiring: Examine the wiring connections at the outlet, making sure they are secure and properly connected. If you notice any loose or damaged wires, tighten or replace them as necessary.
- Test the voltage: Use a multimeter to measure the voltage at the outlet. It should be within the specified range for your dryer (usually 120/240 volts). If the voltage is not correct, you may need to contact an electrician to troubleshoot further.
- Examine the outlet: Inspect the outlet itself for any signs of damage or wear. If you notice any charred or melted parts, it may indicate a faulty outlet that needs to be replaced.
- Look for loose connections: Check all the connections at the outlet, including the grounding wire, to ensure they are tight and securely fastened. Loose connections can cause power interruptions or equipment malfunction.
Seeking professional help if necessary
If you have followed the troubleshooting steps above and are still experiencing issues with your dryer outlet, it may be time to seek professional help. Electrical problems can be complex, and attempting to fix them without the proper knowledge and expertise can be dangerous. Contact a licensed electrician to diagnose and address the problem to ensure the safety of your home and appliances. Remember, it’s always better to be safe than sorry when dealing with electrical issues.
Regular Maintenance And Safety Checks
Importance of regular inspection and maintenance of the outlet
Regular inspection and maintenance of your dryer outlet are crucial for ensuring its safe and efficient operation. Over time, electrical connections may become loose or frayed, posing a potential fire hazard. By performing regular inspections, you can identify and address any issues before they become major problems.
During your inspection, first, ensure that the outlet is securely mounted to the wall and that there are no signs of physical damage. Check the prongs and receptacle for any signs of wear or corrosion, as this could lead to poor conductivity and potential overheating.
In addition, pay close attention to the wiring connections behind the outlet. Loose or improperly connected wires can cause sparks or arcs, which can be extremely dangerous. Tighten any loose connections and make sure that all wires are properly secured.
To perform a basic safety check:
- Turn off the power to the outlet by flipping the breaker that controls it.
- Remove the faceplate from the outlet to expose the wiring connections.
- Inspect each wire for signs of damage, such as fraying or burns. Replace any damaged wires.
- Check the tightness of all the wire connections, ensuring they are secure and free from corrosion.
- Look for any signs of overheating, such as discoloration or a burnt smell.
- Finally, replace the faceplate and turn the power back on to the outlet.
Tips for ensuring the outlet remains safe and functional
To keep your dryer outlet in optimal condition, follow these tips:
- Clean the outlet regularly to remove any lint or debris buildup. This will prevent obstructions and ensure proper airflow.
- Keep the area around the outlet clear of any flammable materials to reduce the risk of fire.
- Do not overload the outlet by plugging in too many appliances at once. This can cause overheating and damage to the outlet.
- Avoid using extension cords or adapters with the outlet. These can pose a fire hazard and should be avoided.
- If you notice any signs of damage or malfunction, such as sparking or unusual noises, immediately disconnect the dryer and contact a qualified electrician for repairs.
When to consider upgrading to a four-prong dryer outlet
In some cases, it may be necessary to upgrade your dryer outlet from a three-prong to a four-prong configuration. This is typically required when purchasing a new dryer that is designed to be used with a four-prong power cord.
Upgrading to a four-prong outlet ensures compatibility with modern dryers and provides additional safety features. The fourth prong, known as the grounding wire, helps to prevent electrical shock in the event of a fault or power surge.
If you’re unsure whether your dryer outlet needs upgrading, consult the manufacturer’s instructions or contact a licensed electrician for expert advice.
Frequently Asked Questions
How Do You Wire A 3 Prong Dryer Plug?
To wire a 3 prong dryer plug, follow these steps: 1. Disconnect the dryer’s power. 2. Remove the old cord from the terminal block. 3. Connect the green wire to the dryer’s chassis. 4. Connect the black wire to the left terminal.
5. Connect the white wire to the middle terminal. 6. Connect the red wire to the right terminal. 7. Tighten all screws securely. 8. Plug in the dryer and test it.
Does A 3 Prong Dryer Outlet Have To Be Grounded?
Yes, a 3 prong dryer outlet must be grounded. Grounding helps prevent electrical shock and protects appliances. It ensures safety and compliance with electrical codes.
Are 3 Prong Dryer Outlets Legal?
Yes, 3 prong dryer outlets are legal. However, it is recommended to upgrade to 4 prong outlets for safety reasons as they provide a ground wire for added protection against electric shocks. This is especially important for newer dryer models that require a 4 prong outlet.
Can You Plug A 3 Prong Dryer Into A 4 Prong Outlet?
Yes, you can plug a 3 prong dryer into a 4 prong outlet. However, it is recommended to properly install a 4 prong outlet for safety purposes. Consult an electrician before making any changes.
Conclusion
Installing a 3-prong dryer outlet is a simple process that requires some basic electrical knowledge. By following the steps outlined in this guide, you can ensure a safe and efficient connection for your dryer. Remember to always turn off the power before working on any electrical installation and consult a professional if you are unsure.
With the right tools and precautions, you’ll have your dryer up and running in no time.