To install a dryer cord, follow these steps: first, detach the old cord by disconnecting it from the dryer’s electrical connection panel; next, attach the new cord by connecting the cord’s center wire to the center terminal and the outer wires to the outer terminals, securing them with terminal screws. Finally, tighten the strain relief clamp to ensure the cord is secure and plug the dryer into the electrical outlet.
Is your old dryer cord worn out or damaged? Are you a DIY enthusiast looking to save some money on appliance repairs? If so, replacing a dryer cord is a straightforward and relatively easy task that you can do yourself.
We will guide you through the step-by-step process of installing a new dryer cord, allowing you to safely and efficiently power up your dryer in no time. So, dust off your tools and let’s get started!
Gathering The Necessary Tools And Supplies
Before you start the process of installing a dryer cord, it’s crucial to gather all the necessary tools and supplies. Having everything you need on hand will ensure a smooth installation and help you complete the task efficiently. In this section, we will discuss the safety precautions to take before beginning the installation process, the required tools and materials, and how to ensure compatibility between the dryer cord and the electrical outlet.
Safety first: Inspecting the electrical outlet
Prior to installing the dryer cord, it’s essential to inspect the electrical outlet to ensure it is in good condition and meets the necessary safety standards. Here are the steps to follow:
- Switch off the power supply to the outlet by shutting off the breaker in the electrical panel. This will prevent any accidental electric shock during the installation process.
- Visually inspect the outlet to check for any visible damage, such as cracks or burn marks. If you notice any issues, it is crucial to contact a qualified electrician to fix the problem before proceeding with the installation.
- Using a voltage tester, test the outlet to ensure that there is no live current flowing through it. This step is crucial for your safety as it verifies that the power supply has been effectively cut off.
Required tools and materials for the installation process
Having the right tools and materials at hand will make the installation process much easier. Here is a list of the essentials:
| Tools | Materials |
|---|---|
|
|
Ensuring compatibility between the dryer cord and outlet
It’s crucial to ensure that the dryer cord you have is compatible with the electrical outlet in your home. Here’s how you can do that:
- Check the type of outlet your home has. It can be either a 3-wire or 4-wire outlet. Make sure to purchase a dryer cord that matches the outlet type.
- Confirm the amperage rating of the circuit breaker in your electrical panel. The dryer cord you choose should have a matching amperage rating to prevent any electrical overload.
- Refer to the dryer manufacturer’s instructions to determine which color wire corresponds to each terminal on the dryer. This will help ensure you connect the wires correctly and avoid any potential electrical hazards.
By following these steps and gathering the necessary tools and supplies, you’ll be well-prepared to tackle the installation of a dryer cord. Remember, if you are unsure about any electrical work, it’s always best to consult a professional to ensure your safety and the proper functioning of your dryer.
Preparing The Dryer For Cord Installation
Before you can install a dryer cord, there are a few crucial steps you need to take to ensure the safety and efficiency of the installation process. By preparing the dryer properly, you can minimize the risk of electrical accidents and ensure that your new dryer cord is installed correctly. In this section, we will walk you through the necessary steps to prepare your dryer for cord installation.
Unplugging the dryer and shutting off the power supply
The first and most essential step in preparing your dryer for cord installation is to unplug the appliance and shut off its power supply. This precautionary measure guarantees the safety of both you and the appliance during the installation process.
To unplug the dryer, simply disconnect it from the power outlet or wall socket. Once unplugged, you need to locate the circuit breaker or fuse that supplies power to the dryer. Turn off the power by flipping the corresponding breaker switch or removing the fuse. This step ensures that there is no electricity flowing to the dryer.
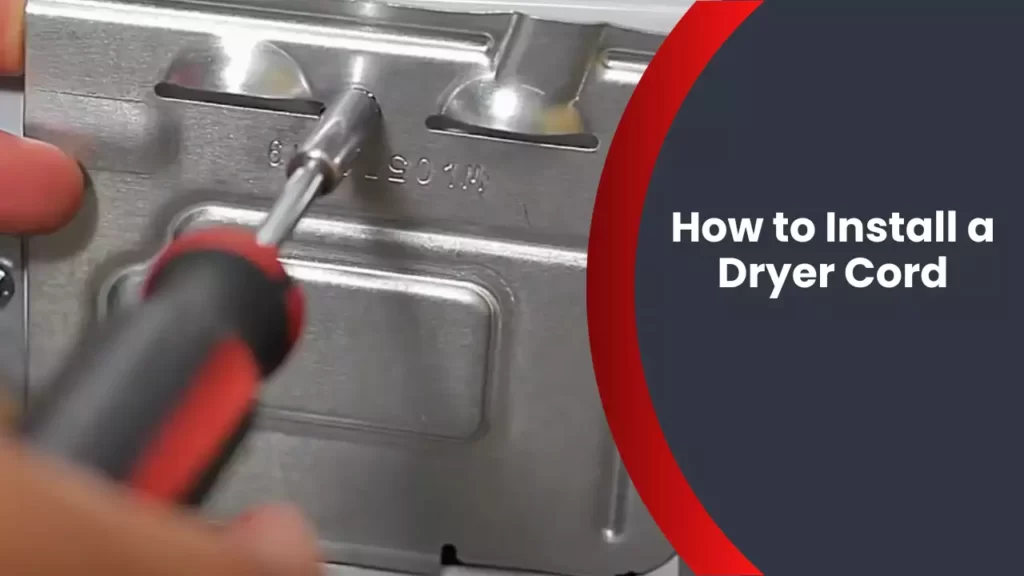
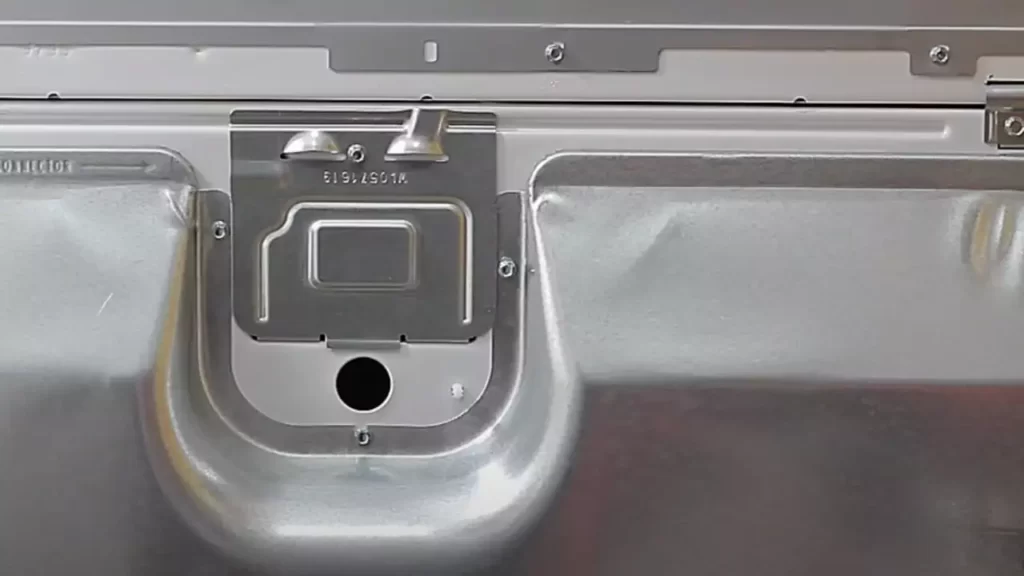
Accessing the terminal block or connection panel
The next step in preparing your dryer for cord installation is to access the terminal block or connection panel. This is where the electrical wires will connect to the dryer. The location of the terminal block varies depending on the dryer model, but it is typically found at the rear of the appliance.
To access the terminal block, you may need to remove a panel using a screwdriver or other suitable tools. Refer to your dryer’s user manual to find specific instructions for your model. It’s important to note that some dryers may have a connection panel located on the back or side instead of a terminal block.
Identifying the wire configuration and understanding the wire colors
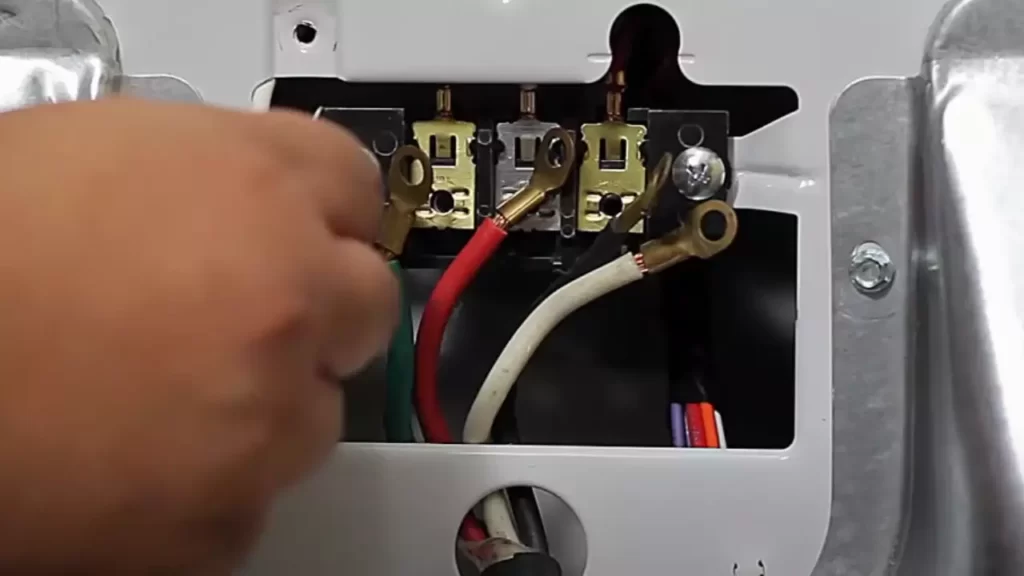
Once you have accessed the terminal block or connection panel, it’s crucial to identify the wire configuration and understand the wire colors. This step ensures that you connect the dryer cord correctly.
The wire configuration consists of three wires – two hot wires and one neutral wire, along with an additional ground wire for safety. These wires are color-coded: black for the hot wires, white or gray for the neutral wire, and green or bare copper for the ground wire.
Important: Always remember that wire colors can vary, especially if your dryer is an older model. Therefore, it’s essential to check the wire labels or consult your dryer’s user manual to determine the correct wire configuration for your specific model.
By identifying the wire configuration and understanding the wire colors, you will be well-prepared for the next step of installing a dryer cord. This knowledge ensures that you connect the wires correctly and avoid any electrical mishaps.
Removing The Old Cord
When it comes to installing a new dryer cord, the first step is to remove the old one safely and properly. This involves evaluating the existing cord for wear or damage, disconnecting it from the terminal block, and disposing of it in accordance with local regulations. In this section, we will discuss each of these steps in detail.
Evaluating the Existing Cord for Wear or Damage
Before removing the old dryer cord, it is essential to evaluate its condition. Start by examining the power plug for any signs of wear, such as frayed or exposed wires. If you notice any damage, replacement is necessary to avoid electrical hazards. Additionally, inspect the cord itself, checking for any visible signs of wear or insulation deterioration. If the cord appears to be damaged, it should be replaced as well.
Safely Disconnecting the Old Cord from the Terminal Block
Once you have determined that the old cord is in good condition, it is time to safely disconnect it from the terminal block. To do this, you will need a few tools, including a screwdriver and pliers. Start by turning off the power to the dryer from the main electrical panel. It is also a good idea to unplug the dryer from the power outlet for added safety.
After ensuring the dryer is no longer receiving power, locate the terminal block where the cord is connected to the appliance. Remove the access panel or cover to gain access to the terminal block. Take note of the configuration of the wires before disconnecting them. Use your pliers or screwdriver to loosen the screws securing the cord wires to the terminal block. Carefully remove each wire from the screws, ensuring not to damage the terminals or wires in the process.
Proper Disposal of the Old Cord According to Local Regulations
Proper disposal of the old dryer cord is crucial to minimize environmental impact and ensure compliance with local regulations. In many areas, the old cord can’t be thrown in the regular trash due to the potential hazards associated with its materials. Contact your local waste management or recycling center to find out the specific guidelines for disposing of old electrical cords.
In some cases, the recycling center may accept the cord along with other electronic waste materials. Alternatively, they might have a designated drop-off location for electrical cords and cables. Make sure to follow the instructions provided by the recycling center to ensure the proper and environmentally friendly disposal of your old dryer cord.
By following these steps, you can safely remove the old dryer cord and prepare for the installation of a new one. Make sure to handle the cord with care, follow safety precautions, and adhere to local regulations for disposal. Stay tuned for the next section where we will cover the process of installing the new dryer cord.
Selecting And Preparing The New Dryer Cord
When installing a new dryer or replacing the power cord of your existing one, it is crucial to select the appropriate type of dryer cord for your specific model and ensure that it is properly prepared for installation. This step is essential for the safe and efficient operation of your dryer.
Choosing the Appropriate Type of Dryer Cord for Your Specific Model
Before embarking on the installation process, it is important to determine the appropriate type of dryer cord for your specific model. Different dryer models often require specific types of cords to ensure compatibility and safety.
To choose the appropriate cord, start by checking your user manual or contacting the manufacturer. They will provide specific information regarding the type of cord that is compatible with your dryer model. The most common types of dryer cords include three-wire cords and four-wire cords.
| Wire Configuration | Usage |
|---|---|
| Three-wire cord | Used in older dryer models |
| Four-wire cord | Recommended for newer dryer models |
Checking the Amperage Rating and Plug Configuration
After determining the appropriate cord type, it is crucial to check the amperage rating and plug configuration. The amperage rating indicates the maximum amount of electrical current the cord can handle, ensuring safe operation without the risk of overheating or electrical hazards.
Refer to your user manual or the specifications provided by the manufacturer to identify the correct amperage rating for your dryer. It is essential to choose a cord with a similar or higher amperage rating to that of your dryer.
In addition to the amperage rating, also consider the plug configuration. Dryers typically have either a three-pronged plug or a four-pronged plug. Ensure that the cord you select matches the plug configuration of your dryer.
Preparing the New Cord for Installation
Before proceeding with the actual installation, it is necessary to prepare the new cord by removing any packaging materials or protective covers that may be present. These covers are often included to prevent damage during shipping and storage.
Inspect the cord thoroughly to ensure there are no visible damages or defects. If you notice any issues, contact the manufacturer or the seller for a replacement.
Make sure to familiarize yourself with the wiring instructions provided with the cord. Each wire should be clearly labeled to identify the appropriate connection point on the dryer.
Note: Before attempting any electrical work, always disconnect the dryer from the power source to avoid any risk of electrical shock.
Connecting The New Dryer Cord
Properly aligning the prongs with the terminal block slots
Connecting a new dryer cord is a crucial step when installing or replacing a dryer. Properly aligning the prongs with the terminal block slots is essential to ensure a secure and reliable connection. Follow these steps to align the prongs correctly:
- Before you start, make sure the dryer is unplugged to ensure safety.
- Locate the terminal block on the back of the dryer. It is usually at the bottom, behind a removable metal cover.
- Identify the three prongs on the dryer cord; they should match the three slots on the terminal block. The prongs are typically color-coded: red (hot), black (hot), and white (neutral).
- Carefully align each prong with its corresponding terminal block slot, ensuring a snug fit.
- Check the alignment of the prongs one more time to ensure they are correctly positioned.
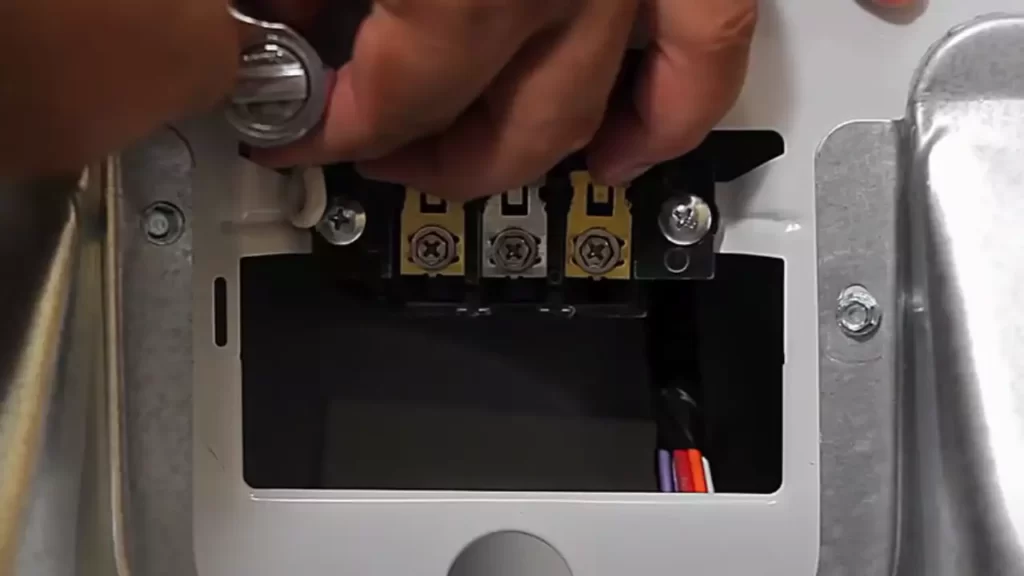
Securing the cord to the terminal block with the appropriate screws or fasteners
Once you have aligned the prongs with the terminal block slots, it’s time to secure the cord to the block. Following these steps will help ensure a stable and safe connection:
- Apply gentle pressure to push the prongs into the terminal block slots, making sure they fit securely.
- Use the appropriate screws or fasteners provided with the dryer cord to secure the cord to the terminal block. These screws are normally included in the packaging.
- Using a screwdriver or a nut driver, tighten the screws or fasteners until they are firmly in place. Be careful not to overtighten, as it may damage the terminal block or the cord.
- Verify that the cord is securely fastened by gently tugging on it. If it doesn’t move, you have successfully secured the dryer cord to the terminal block.
Double-checking the connections for tightness and ensuring no loose wires
After connecting the dryer cord and securing it to the terminal block, it’s essential to double-check the connections for tightness and ensure there are no loose wires. These steps will help you verify the integrity of the connection:
- Inspect each screw or fastener on the terminal block to make sure they are tightly secured.
- Gently tug on the dryer cord to ensure there is no movement or play. If you notice any looseness, go back and tighten the screws or fasteners accordingly.
- Check that each wire is properly seated within its respective terminal block slot. If you find any loose wires, gently push them back into place.
- Ensure there are no exposed wires or frayed insulation. If you notice any damage, replace the cord immediately to avoid any safety hazards.
By properly aligning the prongs, securing the cord with the appropriate screws, and double-checking the connections, you can confidently install a new dryer cord. These steps ensure a reliable and safe electrical connection, allowing your dryer to function efficiently.
Testing The Newly Installed Dryer Cord
Once you have successfully installed the dryer cord, it is crucial to test its functionality and ensure that it is properly connected. This will allow you to troubleshoot any potential problems before actually using the dryer. In this section, we will cover two important steps in testing the newly installed dryer cord: turning on the power supply and checking for any electrical issues, as well as running a test cycle to verify the dryer’s functionality.
Turning on the power supply and checking for any electrical issues
Before running the test cycle, it is essential to turn on the power supply and check for any electrical issues. Follow these steps to accomplish this:
- Make sure the dryer is unplugged from the power outlet to prevent any electrical shock.
- Locate the circuit breaker box in your house.
- Find the switch corresponding to the dryer and ensure it is in the “off” position.
- Now, plug the dryer into the power outlet.
- Go back to the circuit breaker box and switch the dryer’s circuit breaker to the “on” position.
- If the breaker immediately trips back to the “off” position, there might be an electrical issue which needs to be addressed by a professional electrician. Do not attempt to use the dryer.
- If the breaker stays in the “on” position without any issues, proceed to the next step.
Running a test cycle to verify the dryer’s functionality
Now that you have ensured the power supply is properly connected, it’s time to run a test cycle and make sure the dryer is functioning as expected. Follow these steps:
- Close the dryer door securely.
- Set the dryer to a “timed dry” cycle, ideally for about 30 minutes.
- Adjust the temperature setting according to your preference.
- Press the “start” button to begin the test cycle.
- Observe the dryer’s operation during the test cycle.
- Listen for any unusual noises or vibrations, which might indicate a problem with the dryer.
- Check if the dryer is producing heat appropriately if you selected a heated drying cycle.
- If the dryer functions properly, including heating and tumbling the clothes, congratulations! Your newly installed dryer cord is working correctly. If you encounter any issues, continue to the next section for troubleshooting tips.
Identifying and troubleshooting any potential problems with the cord installation
If you encounter problems during the test cycle, it’s important to identify and troubleshoot the issues with the cord installation. Here are some common problems and their possible solutions:
| Problem | Solution |
|---|---|
| The dryer doesn’t start or respond when the start button is pressed. |
|
| The dryer doesn’t produce heat during a heated drying cycle. |
|
| The dryer produces excessive noise or vibrations. |
|
By following these troubleshooting steps, you should be able to identify and resolve any issues with the cord installation. Remember, it’s always recommended to consult a professional if the problem persists or if you are unsure about performing any electrical maintenance tasks.
Ensuring Safety And Compliance
Reviewing the cord installation for potential safety hazards
Before installing a dryer cord, it is crucial to review the installation process for potential safety hazards. This step ensures the safety of both your home and the individuals using the dryer. By taking a proactive approach and identifying potential risks, you can prevent accidents and mishaps down the line.
One important aspect to consider is the condition of the cord itself. Inspect it closely to ensure there are no frayed or damaged wires. Damaged cords can pose a significant electrical hazard and should be replaced immediately. Additionally, check the prongs on the cord to ensure they are not bent or broken as this can affect the connection and potentially lead to electrical issues.
Furthermore, examine the area where the cord will be installed. Make sure there are no exposed wires or electrical components that could interfere with the installation process. Clear away any debris or obstructions to create a safe and accessible workspace.
Checking for proper grounding and insulation
A crucial step in installing a dryer cord is to check for proper grounding and insulation. This ensures the electrical system is safe and minimizes the risk of electric shocks or fires.
Firstly, ensure that your dryer has a dedicated ground wire. This wire should be securely connected to the grounding terminal of both the dryer and the power outlet. Without proper grounding, electrical currents can flow into the dryer chassis, potentially causing harm to individuals or damaging the appliance.
Secondly, verify that the insulation on the wires is intact. Any signs of damage or wear, such as exposed wires or fraying insulation, should be addressed promptly. Use electrical tape or replace the damaged wires to maintain optimal insulation and prevent electrical accidents.
Remember, proper grounding and insulation play a critical role in protecting your home, appliances, and most importantly, the safety of your loved ones.
Complying with local electrical codes and regulations
Complying with local electrical codes and regulations is essential to ensure the safe installation of a dryer cord. These codes and regulations are put in place to maintain uniform standards and prevent electrical hazards.
When installing a dryer cord, it is essential to understand the specific requirements set by your local authorities. Familiarize yourself with the necessary guidelines, including the maximum amperage rating, wire size, and specific installation procedures.
If you are unsure about the regulations in your area, consult a qualified electrician or refer to the National Electrical Code (NEC). Adhering to these codes will not only ensure the safety and compliance of your installation but will also provide peace of mind knowing that your electrical setup meets industry standards.
Tips And Best Practices
When it comes to installing a dryer cord, there are a few tips and best practices you should keep in mind. Following these guidelines will help ensure a safe and effective installation process. Read on to learn more about using cable ties or cord clamps to organize and secure the cord, regularly inspecting the cord for any signs of damage or wear, and consulting a professional electrician if you’re unsure about the installation process.
Using Cable Ties or Cord Clamps to Organize and Secure the Cord
Organizing and securing the dryer cord is essential for both safety and aesthetics. You don’t want the cord hanging loosely, as it can pose a tripping hazard or become entangled with other objects. Luckily, there are two popular methods for keeping the cord tidy: using cable ties or cord clamps.
Cable ties: These are flexible and durable straps that you can use to bundle the cord together. Simply wrap a cable tie tightly around the cord at regular intervals, ensuring that it holds the cord in place without causing any damage. This method is particularly useful if you have a long cord that needs to be managed.
Cord clamps: These specialized devices are designed to hold the cord securely in place. Cord clamps usually consist of a plastic or metal bracket and screws. You can attach the clamp to the wall or the back of the dryer, and then secure the cord within the clamp using the screws. Cord clamps are a great choice if you want a more permanent and secure solution.
Regularly Inspecting the Cord for Any Signs of Damage or Wear
It’s important to inspect the dryer cord regularly for any signs of damage or wear. Over time, the cord may get frayed or develop cracks, potentially exposing the wires inside. This can lead to electrical hazards and should be addressed immediately. Here are a few steps to follow when inspecting the cord:
- Unplug the dryer from the power source.
- Visually inspect the entire length of the cord, looking for any visible damage, such as cuts or frayed ends.
- Run your fingers along the cord, feeling for any bumps or irregularities that could indicate internal damage.
- If you notice any signs of damage or wear, replace the cord with a new one before using the dryer again.
Regular inspections not only contribute to the safety of your home but also help prevent potential electrical issues in the future.
Consulting a Professional Electrician If Unsure about the Installation Process
If you have any doubts or concerns about installing a dryer cord, it’s always best to consult a professional electrician. They have the knowledge and expertise to ensure that the installation is done correctly and safely. Attempting to install the cord yourself, especially if you’re unsure of the process, can lead to serious electrical problems or even accidents. It’s better to spend a little extra money on professional help than to risk your safety and the well-being of your home.
By following these tips and best practices, you’ll be well-equipped to install a dryer cord safely and efficiently. Remember to organize and secure the cord using cable ties or cord clamps, regularly inspect the cord for damage or wear, and consult a professional electrician if you need assistance. Stay safe and enjoy the convenience of your new dryer!
Frequently Asked Questions
How Do You Attach A 4 Prong Dryer Cord?
To attach a 4 prong dryer cord, follow these steps: 1. Unplug the dryer. 2. Remove the three-wire cord by disconnecting the dryer from the electrical outlet. 3. Connect the green wire from the new four-wire cord to the dryer’s grounding screw.
4. Connect the other wires based on their color (white to white, black to black, red to red). 5. Tighten all connections securely. Plug in the dryer and you’re done!
Which Wires Go Where On Dryer Cord?
The wires on a dryer cord go into specific slots. Match the wires to the corresponding colors: red goes to red, black goes to black, white goes to white or green, and green goes to the ground. Ensure the connections are secure for safe operation.
Does A 3 Prong Dryer Cord Need A Ground?
Yes, a 3 prong dryer cord needs a ground. The ground wire is necessary for safety purposes, as it helps protect against electrical shocks and prevents fires. Make sure to always use a grounded dryer cord and connect it properly to the grounding terminal on both the dryer and the outlet.
Is 3 Prong Dryer Cord Safe?
Yes, a 3 prong dryer cord is safe to use. It is designed to provide a secure connection for your dryer and protect against electrical hazards. Always ensure that the cord is properly installed and the outlet is compatible with the appliance to ensure safety.
Conclusion
Installing a dryer cord can be a simple and straightforward process with the right guidance. By following the steps outlined in this blog post, you can ensure a safe and efficient installation. Remember to always prioritize your safety and consult the manufacturer’s instructions for your specific dryer model.
With a little patience and attention to detail, you’ll have your dryer up and running in no time. Happy drying!