To install a dowel screw, align the screw hole with the surface, then twist and tighten it using pliers or a socket wrench. Installing a dowel screw involves aligning the screw hole with the desired surface and securely fastening it using pliers or a socket wrench.
Dowel screws are commonly used for joining materials such as wood, metal, or plastic. They are versatile, providing a strong and stable connection point. Whether you are assembling furniture, creating wooden joints, or building a structure, understanding how to properly install a dowel screw is essential for a successful project.
We will guide you through the step-by-step process of installing a dowel screw, ensuring a secure and durable connection. Follow our instructions and gain the skills needed to confidently use dowel screws in your projects.
Gathering The Tools And Materials
Before you begin installing a dowel screw, it’s crucial to gather all the necessary tools and materials. Having everything ready beforehand will save you time and ensure a smooth installation process. In this section, we’ll discuss the key elements you need to consider, such as choosing the right dowel screw size and length, essential tools for installation, and safety precautions to keep in mind.
Choosing the Right Dowel Screw Size and Length
When it comes to selecting the right dowel screw for your project, size and length play a significant role. The dowel screw should fit snugly and securely into the materials you are joining together. Choosing the wrong size could result in weak joint connections or damage to the materials.
Consider the thickness of the materials you are working with and choose a dowel screw whose diameter matches it. Additionally, pay attention to the desired length, ensuring it accommodates the thickness of the materials and allows for proper penetration without protruding excessively.
Essential Tools for Installation
Equipping yourself with the necessary tools will make the dowel screw installation process much more manageable. Here’s a list of the essential tools that you’ll need:
| Tools | Materials Needed |
|---|---|
| Screwdriver | Dowel screw |
| Drill | Drill bit |
| Wrench | Depth gauge |
| Sandpaper | Wood glue |
These tools will help you drive the dowel screw into the materials securely, ensuring a tight and durable connection.
Safety Precautions to Keep in Mind
Before you begin installing the dowel screw, it’s crucial to prioritize safety. By following these safety precautions, you can minimize the risk of accidents or injuries:
- Wear protective goggles to shield your eyes from any flying debris during drilling.
- Use a stable workbench or surface to secure the materials and prevent them from slipping during installation.
- Ensure your work area is well-ventilated to minimize inhaling dust or fumes.
- Keep your hands and fingers away from the drill bit or any moving parts to avoid accidents.
- Dispose of any cuttings or waste material properly to prevent slips or trips.
By adhering to these safety precautions, you can ensure a safe and successful dowel screw installation process.

Preparing The Work Area
Before you start installing a dowel screw, it is imperative to prepare the work area properly. This will ensure a smooth and successful installation process. In this section, we will look at the key steps involved in preparing the work area, including clearing the surface for installation, measuring and marking the drilling points, and securing the workpiece to prevent movement.
Clearing the surface for installation
The first step in preparing the work area is to clear the surface where you will be installing the dowel screw. Make sure the area is clean and free from any debris or obstructions that could hinder the installation process. Remove any dust, dirt, or loose material from the surface.
Measuring and marking the drilling points
Accurate measurements and precise marking are crucial for proper dowel screw installation. Before you start drilling, measure and mark the drilling points on the surface. Use a tape measure and pencil to ensure accurate and consistent measurements.
If you are installing multiple dowel screws, you can use a template or guide to mark the drilling points uniformly. This will help maintain alignment and ensure a professional-looking result. Double-check your measurements and marks before proceeding to the next step.
Securing the workpiece to prevent movement
Securing the workpiece is essential to prevent any movement during the installation process. This ensures that the dowel screws are installed in the correct position and alignment. Use clamps or a vice to hold the workpiece firmly in place.
If clamps or a vice are not available, you can use weights or other objects to keep the workpiece steady. Just be sure that the workpiece is secure and does not move while drilling or screwing in the dowel screws.
By following these steps to prepare the work area, you are setting yourself up for a successful dowel screw installation. Taking the time to clear the surface, measure and mark accurately, and secure the workpiece will make the installation process easier and ensure a strong and durable connection.
Drilling The Pilot Holes
Once you have selected the appropriate drill bit size and marked the points on the material where the dowel screw will be inserted, the next step is drilling the pilot holes. This crucial step ensures that the dowel screw will be inserted securely and correctly. In this section, we will guide you through the process of drilling the pilot holes to achieve optimal results.
Selecting the appropriate drill bit size
To begin, it is crucial to select the right drill bit size for your dowel screw and material. Using the wrong size may result in the pilot holes being too loose or too tight, compromising the stability of your project. Whether you are working with wood, metal, or another material, refer to the manufacturer’s guidelines or consult a professional for the correct drill bit size. Remember, accuracy is key to a successful installation.
Aligning the drill bit with the marked points
Once you have the correct drill bit size, align it with the marked points on the material where you want to insert the dowel screw. Take your time to ensure the drill bit is perfectly aligned, as any deviation may result in improperly positioned pilot holes. Paying attention to this detail will help ensure a secure and strong connection when the dowel screw is installed.
Drilling the pilot holes to the correct depth
With the drill bit properly aligned, it’s time to start drilling the pilot holes. Start the drill at a slow speed to prevent any sudden movements or damage to the material. Apply steady and even pressure as you drill, directing the drill bit straight into the material. It is crucial to drill the pilot holes to the correct depth, which is typically the same length as the dowel screw’s threaded portion. This depth ensures a tight fit and prevents the screw from extending beyond the material’s surface.
Ensuring each H3 heading adheres to HTML syntax
HTML syntax is essential for structuring your content correctly. Each H3 heading in this section adheres to HTML syntax, ensuring proper formatting for WordPress:
<h3>Selecting the appropriate drill bit size</h3>
<h3>Aligning the drill bit with the marked points</h3>
<h3>Drilling the pilot holes to the correct depth</h3>
<h3>Ensuring each H3 heading adheres to HTML syntax</h3>
By following these guidelines, you are well on your way to successfully drilling the pilot holes before installing a dowel screw. This crucial step sets the foundation for a strong and secure connection in your woodworking or DIY project. Take your time, follow the instructions carefully, and enjoy the satisfaction of a job well done!
Inserting The Dowel Screw
Applying a lubricant to ease installation
Before inserting the dowel screw, it’s essential to apply a lubricant to make the installation process smoother. Using a lubricant helps reduce friction, making it easier to drive the screw into place. A suitable lubricant for this task is beeswax or a silicone-based lube.
Here’s how you can apply the lubricant to ease the installation of the dowel screw:
- Take a small amount of lubricant on your finger or a cloth.
- Apply the lubricant to the threads of the dowel screw.
- Make sure to cover the entire length of the screw with a thin layer of lubricant.
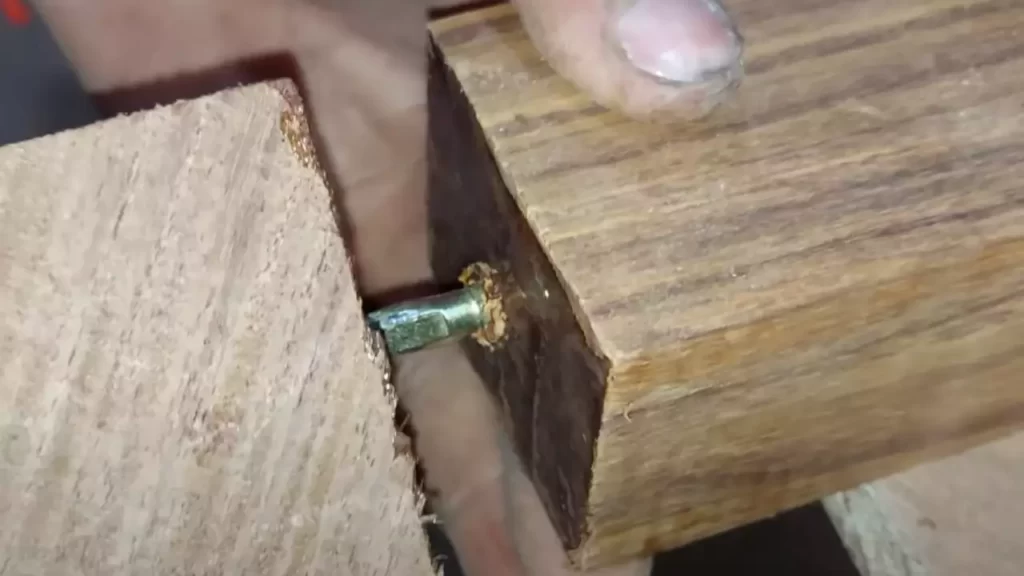
Aligning the screw with the pilot holes
Aligning the dowel screw with the pilot holes is crucial to ensure a secure and sturdy installation. The pilot holes act as guides for the screw, helping it go in straight and minimizing the risk of splitting the material.
Follow these steps to align the screw with the pilot holes:
- Position the dowel screw above the pilot holes, lining it up with the center of the holes.
- Gently lower the screw into the pilot holes, making sure it fits snugly without any wobbling.
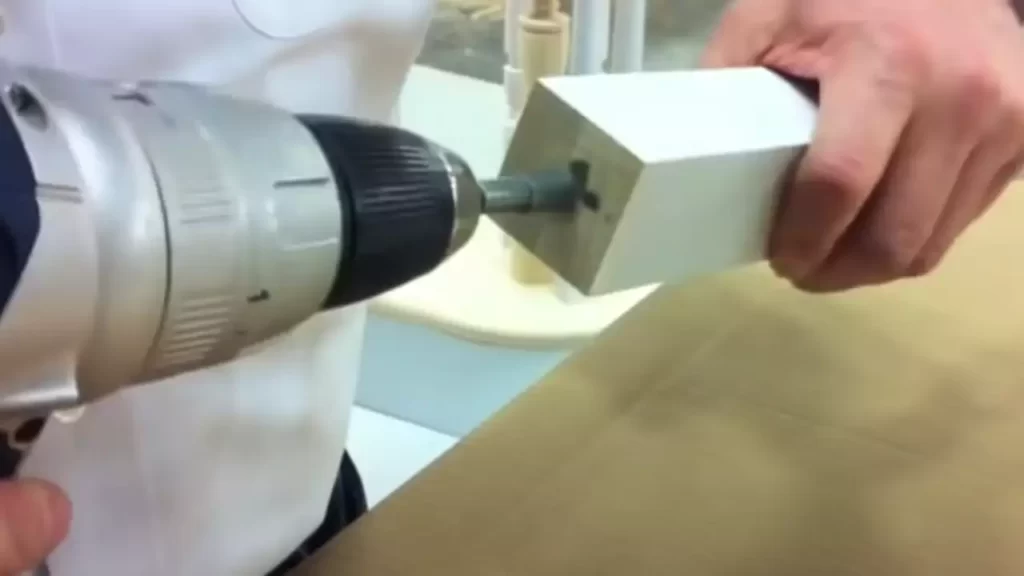
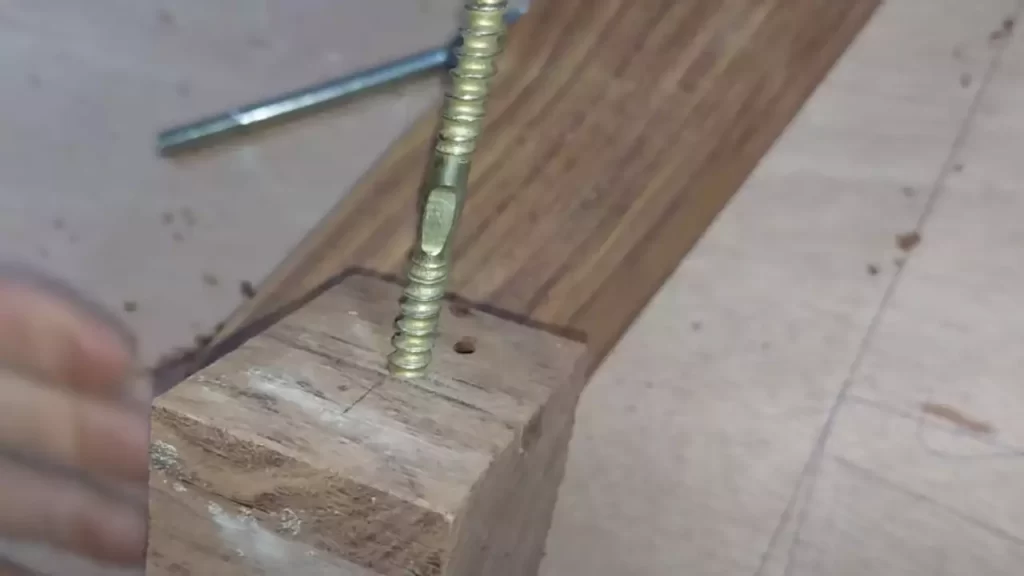
Slowly and carefully driving the screw into place
Once the dowel screw is aligned with the pilot holes, it’s time to drive it into place. Proceed with caution and take your time to avoid any mishaps during the installation process.
Follow these guidelines for driving the screw into place:
- Place the appropriate size screwdriver or drill bit into the screw’s head.
- Hold the screwdriver or drill securely and apply gentle pressure.
- Slowly rotate the screwdriver or drill in a clockwise motion to drive the screw into the material.
- Continue driving the screw until it is fully seated in the material, being careful not to overtighten.
By following these steps and taking the time to properly insert the dowel screw, you’ll ensure a successful and secure installation. Remember to apply lubricant, align the screw with the pilot holes, and proceed with caution as you drive the screw into place.
Ensuring A Secure Installation
Ensuring a secure installation is crucial when it comes to installing a dowel screw. Taking the time to properly test the stability, tighten any loose connections, and verify the alignment and positioning of the screw will help prevent any future issues. In this section, we will explore these three steps in detail to help you achieve a secure and lasting installation.
Testing the stability of the dowel screw
Before proceeding with the installation, it’s essential to test the stability of the dowel screw. This will ensure that it can bear the weight or withstand any pulling or twisting forces it may encounter. One way to test the stability is by gently applying pressure to the screw and checking for any wobbling or movement. If you notice any instability, it’s important to identify the underlying cause before proceeding.
Tightening any loose connections
A loose connection can compromise the stability of the dowel screw. Therefore, it’s crucial to thoroughly check for any loose connections and tighten them before finalizing the installation. Start by inspecting the fasteners or fastening points, such as nuts, bolts, or screws, associated with the dowel screw. Use the appropriate tools, such as a wrench or screwdriver, to tighten them securely. Pay close attention to the torque specifications to avoid over-tightening, which can lead to damage.
Verifying the alignment and positioning of the screw
The alignment and positioning of the dowel screw play a significant role in its stability. Improper alignment or positioning can result in the screw not being able to function effectively or securely. Begin by visually inspecting and confirming that the screw is positioned correctly and flush with the surface. If necessary, make adjustments to ensure the screw is straight and aligned with the intended direction. You can use a level or measuring tools to verify the accuracy of its alignment.
Additionally, double-check the depth at which the dowel screw is inserted. It should be inserted securely and to the correct depth to provide adequate stability. In some cases, it may be helpful to mark the desired depth on the screw or use a stop-collar to ensure consistent and accurate placement.
Finishing Touches And Applications
After successfully installing a dowel screw, there are a few final steps you can take to ensure a polished and professional finish. Trimming any excess screw length, sanding and smoothing the surface if needed, and exploring the practical applications and usage of dowel screws are important aspects to consider.
Trimming any excess screw length
To achieve a clean and seamless appearance, it is crucial to trim any excess screw length protruding from the surface. Ensure you measure the desired length accurately before using a saw or a pair of pliers to carefully cut off the excess. Take caution to prevent damage to the surrounding material during this process.
Sanding and smoothing the surface if needed
To achieve a smooth and polished finish, sanding the surface may be necessary. Begin by using coarse-grit sandpaper to remove any rough patches or splinters. Then, gradually progress to finer-grit sandpaper to achieve a silky and even surface texture. Take care to maintain the integrity of the surrounding material and sand only the necessary areas.
If the surface requires additional smoothing, consider using a wood filler or putty to fill in any gaps or imperfections. Once the filler has dried, sand it down to create a seamless surface. Remember, ensuring a smooth surface is not only visually appealing but also helps prevent potential injuries or damage.
Practical applications and usage of dowel screws
Dowel screws have various practical applications in woodworking and furniture construction. They are commonly used to join wood pieces together securely, adding strength and stability to the overall structure. One prominent application is in the assembly of chairs, tables, and cabinets, where dowel screws enable the secure attachment of legs, arms, and other components.
Additionally, dowel screws are often utilized in the creation of custom-made furniture, allowing for disassembly and reassembly as needed. This feature proves particularly useful when moving or transporting large pieces, as it reduces the risk of damage and streamlines the process.
Moreover, dowel screws can also be employed in crafting wooden jigs, fixtures, and templates, where precise alignment and stable connections are essential. Their versatility and reliability make them invaluable in carpentry work and various DIY projects.
To conclude, the finishing touches of trimming any excess screw length and sanding the surface enhance the overall appearance and functionality of a dowel screw installation. Understanding the practical applications of dowel screws expands their potential usage in woodworking projects. So, whether you are assembling furniture or embarking on a creative endeavor, mastering the installation and finishing techniques will ensure long-lasting, secure, and visually pleasing results.
Troubleshooting And Tips
Installing a dowel screw may seem like a simple task, but sometimes you may encounter common problems along the way. To ensure a smooth installation process, it’s important to know how to troubleshoot these issues and have some tips up your sleeve. In this section, we will explore the common problems you may encounter during installation, provide solutions to these problems, and share some valuable tips for a successful installation.
Common problems and solutions during installation
While installing a dowel screw, you may come across a few hurdles that can make the process a bit challenging. Here are some common problems you may encounter and their solutions:
| Problem | Solution |
|---|---|
| The dowel screw doesn’t fit snugly | Ensure that the pilot holes in both materials are drilled accurately and appropriately sized. A loose fit may require a larger pilot hole or using a different dowel screw size. |
| The dowel screw gets stuck or refuses to go in | Apply lubrication, such as wax or soap, to the threads of the dowel screw to reduce friction. You can also try using a screwdriver or an adjustable wrench for better leverage. |
| The dowel screw breaks while being driven | Use a dowel screw made from a stronger material or consider using a longer dowel screw for better stability and strength. Additionally, make sure you are not applying excessive force while driving the screw. |
Tips for ensuring a successful installation
Installing a dowel screw can be a breeze if you keep these helpful tips in mind:
- Measure accurately: Take precise measurements before drilling pilot holes to ensure a proper fit. This will minimize the chances of encountering any alignment issues.
- Use the right tools: Select the appropriate tools, such as the right drill bit and screwdriver, for your dowel screw installation. This will help you achieve a more precise and secure fit.
- Test fit before final installation: Before driving the dowel screw all the way in, test the fit by inserting and aligning the two materials. This allows you to make any necessary adjustments without damaging the dowel screw or the materials.
- Apply adhesive if needed: If you require extra strength and stability, consider applying adhesive to the threads of the dowel screw before installation. This will create a stronger bond between the materials.
Maintenance and care for dowel screws
Proper maintenance and care are essential to ensure the longevity and functionality of your dowel screws. Consider these tips:
- Regularly check for loose screws and tighten them if needed. This will prevent any wobbling or instability.
- Inspect the dowel screws for any signs of damage or corrosion. If you notice any issues, replace the screws to maintain the structural integrity of your project.
- Keep the dowel screws clean by wiping them with a damp cloth to remove any dirt or debris. This will prevent any buildup that could potentially affect their performance.
By troubleshooting common installation problems, following helpful tips, and providing proper maintenance, you can ensure that your dowel screws are installed securely and will continue to serve their purpose for years to come.
Frequently Asked Questions
How Do You Install Dowel Screws?
To install dowel screws, follow these steps: 1. Drill pilot holes in both pieces of wood that you want to connect. 2. Screw in the dowel screw into one of the pilot holes until it is secure. 3. Apply wood glue to the other pilot hole.
4. Align the second piece of wood with the dowel screw and twist it onto the screw until tight. 5. Allow the glue to dry completely before using the connection.
How Do You Put In A Double Sided Screw?
To put in a double-sided screw, align the screw with the pre-drilled holes on both surfaces. Use a screwdriver or power drill to drive the screw in, alternating between the two sides until fully tightened. Ensure both sides are securely fastened for maximum strength and stability.
What Is The Difference Between A Dowel Screw And A Hanger Bolt?
A dowel screw is a threaded screw on both ends used to join two pieces of wood, while a hanger bolt has a wood screw on one end and a machine screw on the other, allowing attachment to both wood and metal surfaces.
What Is The Purpose Of A Dowel Screw?
A dowel screw is used to join two pieces of wood together securely. It has a threaded screw on one end and a pointed end on the other, allowing it to be inserted into one piece of wood and screwed into another piece, creating a strong connection.
So, it improves the stability and strength of wood joints.
Conclusion
Installing a dowel screw may seem daunting at first, but with the right guidance, it can be a simple task. By following the step-by-step instructions provided in this blog post, you’ll be able to successfully install a dowel screw without any hassle.
Remember to measure accurately, choose the right size and type of screw, and use the proper tools for a secure installation. With practice and patience, you’ll become a pro at installing dowel screws in no time. Happy DIY-ing!