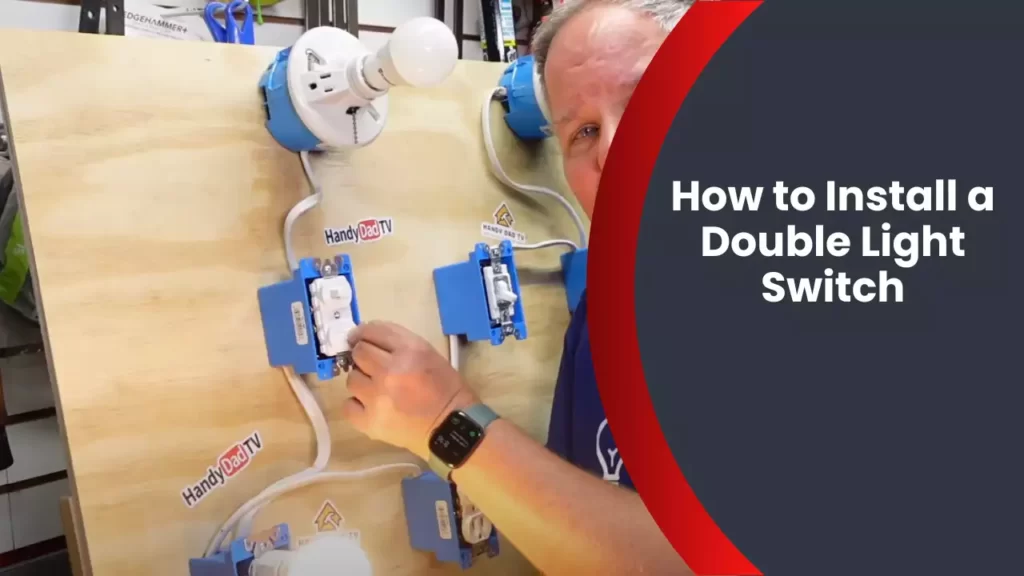
To install a double light switch, turn off the power, remove the old switch, connect the wires to the new switch, and screw it into place. Installing a double light switch is a relatively simple process that can be completed in just a few steps.
Before you begin, make sure to turn off the power to the switch at the breaker box to avoid any accidents. Next, remove the old switch from the wall by unscrewing the screws that secure it in place. Once the old switch is removed, connect the wires to the corresponding terminals on the new switch.
Finally, screw the new switch back into the wall and turn the power back on. By following these steps, you’ll have a new double light switch installed and ready to use in no time.
Preparing For Installation
Gather the necessary tools and materials
Before you begin installing a double light switch, it’s important to gather all the necessary tools and materials. This ensures a smooth and efficient installation process. Here’s a list of what you’ll need:
- Double light switch: Purchase a double light switch from your local hardware store.
- Screwdriver: A flathead or Phillips screwdriver, depending on the type of screws used.
- Wire strippers: These will be useful for removing the insulation from the wires.
- Electrical tape: This helps secure and insulate the connections.
- Voltage tester: This tool allows you to check if the power supply is off.
- Wire connectors: These will be used to connect the wires securely.
Turn off the power supply
Ensuring your safety should always be a top priority when working with electricity. Before proceeding with the installation, take the following steps to turn off the power supply:
- Locate the electrical panel in your home.
- Open the panel cover using a screwdriver.
- Identify the circuit breaker that controls the power to the light switch.
- Flip the designated circuit breaker to the “off” position.
- Confirm that the power is off by using a voltage tester on the light switch.
Remove the existing switch
Now that you’ve made sure the power supply is off, you can proceed to remove the existing switch. Follow these steps:
- Use a screwdriver to remove the switch cover plate.
- Loosen the screws holding the switch in place.
- Gently pull the switch out from the electrical box.
- Note the position of the wires connected to the switch for easier installation later.
- Disconnect the wires from the switch by removing the wire connectors.
By preparing for the installation in these steps, you’ll ensure that you have all the necessary tools, turn off the power supply correctly, and safely remove the existing switch. These steps set the foundation for a successful installation of your double light switch.
Wiring And Installation
When it comes to installing a double light switch, proper wiring and installation are crucial to ensure the switch functions correctly. In this section, we will guide you through the step-by-step process of wiring and installing a double light switch. Pay close attention to each step to ensure a successful installation.
Identify the incoming power source wire
Before beginning the wiring process, it is important to identify the incoming power source wire. This wire is typically black and carries the electric current from the main electrical panel. To confirm if the wire is live, we recommend using a voltage tester. Once you have identified the incoming power source wire, you can proceed to the next step.
Connect the power source wire to the new switch
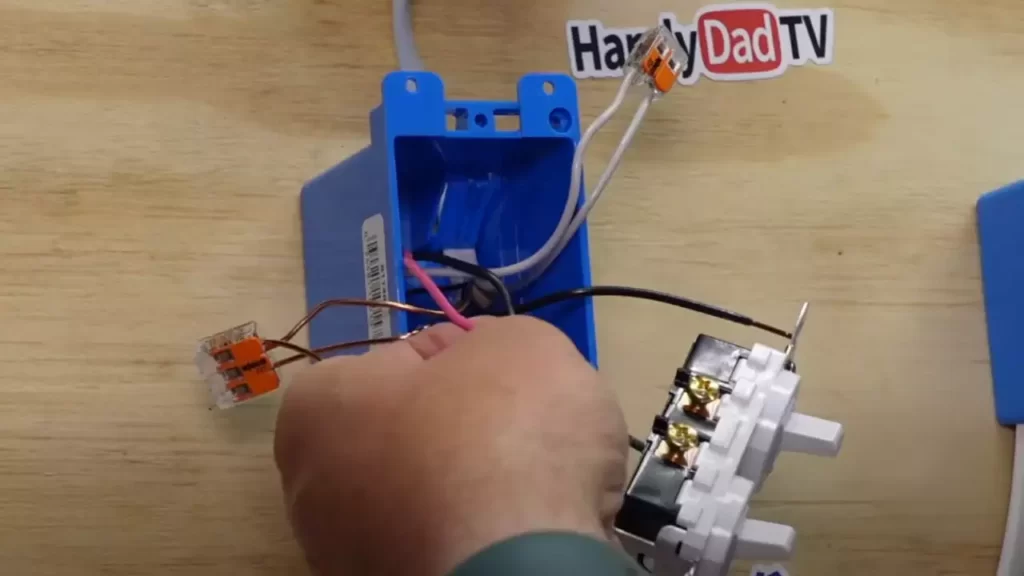
Start by turning off the power supply to the circuit at the main electrical panel to ensure safety. Once the power is turned off, remove the cover plate and switch from the electrical box. Identify the power source wire connected to the existing switch, usually a black wire. To connect the power source wire to the new switch, strip the end of the wire insulation using wire strippers and then connect it to the corresponding terminal on the new switch, securing it tightly with a screwdriver.
Connect the load wires to the new switch
After connecting the power source wire, you will need to connect the load wires to the new switch. The load wires carry the electrical current to the light fixtures. To do this, locate the load wires connected to the existing switch, usually two black wires. Strip the end of the wire insulation and connect each load wire to the corresponding terminal on the new switch, ensuring a tight connection. It’s important to note that sometimes the load wires may be connected using wire nuts. In this case, remove the wire nuts, strip the end of the wires, and connect them to the new switch.
Install and secure the new switch in the electrical box
Once all the wires are connected properly, carefully tuck them into the electrical box. Position the new switch in the electrical box, making sure it sits flush against the wall. Align the screw holes on the switch with the holes on the electrical box and secure the switch in place using the provided screws. Ensure the switch is stable and securely mounted.
Test the connections for proper functionality
With the installation complete, it’s important to test the connections for proper functionality before restoring power. Turn on the power supply to the circuit at the main electrical panel and then flip the switches to test the lights. Verify that each switch independently controls the intended light fixture. If there are any issues, double-check the connections to ensure they are secure and properly attached. Repeat the testing process until all switches and lights are functioning as desired.
In conclusion, proper wiring and installation are vital when installing a double light switch. By following these steps and ensuring all connections are secure, you can confidently complete this task. Take your time, exercise caution, and always consult a professional if you are unsure of any step. Now you are ready to enjoy the convenience of a double light switch in your home!
Installing The Faceplate
Installing the faceplate is the final step in the process of installing a double light switch. The faceplate not only adds a professional finishing touch to the switch, but it also protects the wiring behind it. In this section, we’ll guide you through the steps of choosing a suitable faceplate, attaching it to the switch, and ensuring proper alignment.
Choose a suitable faceplate for the double light switch
The first step in installing the faceplate is to choose one that suits your double light switch. Faceplates come in various materials, colors, and designs, allowing you to match them to your home decor. When selecting a faceplate, make sure it is specifically designed for a double switch. This will ensure a perfect fit and proper alignment with the switch itself.
Attach the faceplate to the switch
Once you have chosen the suitable faceplate, it’s time to attach it to the switch. This step is relatively simple and requires just a few basic tools. Start by removing the screws that come with the faceplate, then align the faceplate with the switch and insert the screws into the designated holes. Tighten the screws using a screwdriver, but be careful not to overtighten them as it may damage the faceplate or the switch.
Ensure the switch is properly aligned with the faceplate
To ensure a neat and professional finish, it is crucial to properly align the switch with the faceplate. Start by checking if the switch is level with the faceplate. If needed, adjust the position of the switch by loosening the screws slightly and repositioning it. Once you have achieved the desired alignment, tighten the screws securely.
Remember, the alignment is not just about aesthetics; it also ensures that the switch operates smoothly and without any sticking or jamming issues. Take your time to make small adjustments until you are satisfied with the alignment.
In conclusion, installing the faceplate is the final step in the process of installing a double light switch. Choose a suitable faceplate, attach it to the switch using the provided screws, and ensure proper alignment for a professional-looking and functional installation. With these steps, you’ll be able to complete the installation of your double light switch with ease.
Frequently Asked Questions
How Do You Wire A Two Switch Light?
To wire a two switch light, you’ll need two switches, a power source, and the light fixture. Connect the power source to both switches. Then, run separate wires from each switch to the light fixture. Finally, connect the wires from the switches to the appropriate terminals on the light fixture.
How Does A Double Switch Work?
A double switch is a type of electrical switch that controls two separate light fixtures or appliances. It has two switches positioned side by side, allowing you to independently turn on or off each fixture or appliance. One switch controls one fixture, while the other controls the other.
What Is A 2 Way Light Switch?
A 2-way light switch is a type of switch that can control a light fixture from two separate locations. It allows you to turn the light on or off from either switch, providing convenience and flexibility. It is commonly used in staircases, hallways, and large rooms with multiple entrances.
What Is A Double Two Way Switch?
A double two way switch is a type of switch that enables you to control the same light or device from two different locations. It offers the convenience of turning the light on/off from either switch, making it ideal for staircases and long hallways.
Conclusion
Installing a double light switch may seem daunting, but with the right steps, it can be a simple task. By following the instructions provided in this blog post, you can successfully install a double light switch and enhance the functionality of your lighting system.
Remember to turn off the power before starting the installation process for safety. With a little patience and attention to detail, you’ll have a double light switch up and running in no time. Happy DIY-ing!