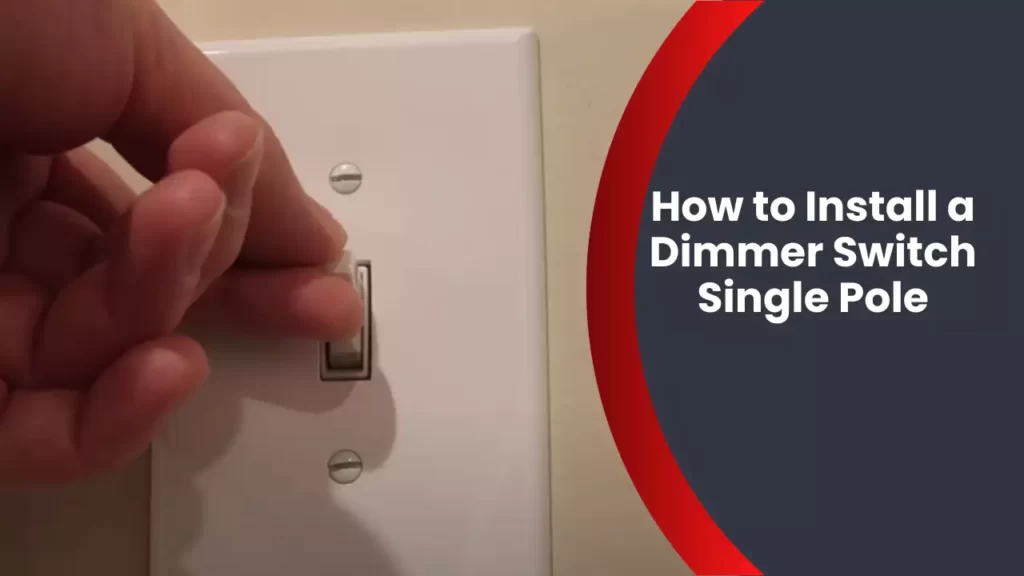
To install a dimmer switch single pole, first, turn off the power at the circuit breaker. Then, remove the existing switch and connect the neutral wire to the dimmer switch, followed by connecting the hot wire.
Finally, attach the ground wire and secure the dimmer switch in place before restoring power. Installing a dimmer switch single pole is a straightforward process that allows for easy control of lighting intensity. By following the steps outlined below, you can quickly and safely install a dimmer switch single pole in your home or office.
Enjoy the convenience of adjusting your lighting levels to create the perfect ambiance for any occasion.
Understanding Dimmer Switches
Understanding Dimmer Switches: Installing a dimmer switch is an excellent way to enhance the ambiance and functionality of a room. By allowing you to adjust the brightness of your lights, dimmer switches provide a customizable lighting experience that can create the perfect atmosphere for any occasion. In this blog post, we will cover the basics of dimmer switches, including what they are, the benefits of installing one, and the importance of choosing the right dimmer switch.
What is a dimmer switch?
A dimmer switch is a device that enables you to control the brightness of your lights. Unlike traditional on/off switches, dimmer switches allow you to adjust the light output by altering the voltage supplied to the bulbs. By doing so, they provide a range of lighting options, from bright and energetic to soft and relaxing, depending on your preference. Dimmer switches are commonly used in living rooms, dining areas, bedrooms, and other spaces where versatile lighting is desired.
Benefits of installing a dimmer switch
- Enhanced ambiance: With a dimmer switch, you can create a cozy and inviting atmosphere for entertaining guests or a calm and soothing environment for winding down at the end of the day.
- Energy savings: By dimming your lights, you can reduce energy consumption and extend the lifespan of your light bulbs, saving both money and resources.
- Personalized lighting: Whether you prefer bright lighting for focused tasks or a softer glow for relaxation, a dimmer switch allows you to tailor the lighting to suit your needs and preferences.
- Increased control: Adjusting the brightness of your lights gives you greater control over the mood and functionality of a space, allowing you to easily adapt the lighting to any situation or time of day.
Importance of choosing the right dimmer switch for your needs
Choosing the right dimmer switch is crucial to ensure optimal performance and compatibility with your lights. Here are a few reasons why selecting the appropriate dimmer switch for your specific lighting setup is important:
- Compatibility: Different types of lights (incandescent, LED, CFL) require specific types of dimmer switches. Choosing the wrong switch may result in flickering lights, reduced functionality, or even damage to the switch itself.
- Wattage suitability: Dimmer switches have different wattage ratings, indicating the maximum load they can handle. It is essential to choose a dimmer switch that can support the total wattage of the lights you plan to control.
- Dimming range: Some dimmer switches offer a wider range of dimming capabilities than others. If you want precise control over light levels, ensure that the dimmer switch you choose provides the desired dimming range.
When installing a dimmer switch, always refer to the manufacturer’s instructions and consult a qualified electrician if you are unsure about any aspect of the installation process.
Preparing For Installation
Before installing a dimmer switch single pole, it is crucial to make the necessary preparations to ensure a smooth and safe process. This section will guide you through the tools and materials needed, safety precautions to take, and the important step of shutting off the power supply.
Tools and materials needed
Gather the following tools and materials before embarking on the dimmer switch installation:
- Flathead screwdriver
- Phillips head screwdriver
- Wire stripper/cutter
- Voltage tester
- Dimmer switch (compatible with single pole wiring)
- Wire nuts
- Electrical tape
- Marker or labeling tape (optional)
Safety precautions to take
Safety should always be a top priority when working with electrical wiring:
- Ensure you are familiar with and understand the electrical codes and regulations in your area.
- Wear necessary safety gear, such as gloves and safety glasses, to protect yourself from any accidents or injuries.
- Do not attempt to install a dimmer switch if you are unsure or uncomfortable with electrical work. In such cases, it is best to hire a professional electrician.
- Turn off the power supply at the circuit breaker or fuse box before starting any work.
- Test the circuit to confirm that the power is indeed turned off using a voltage tester.
Shutting off the power supply
Before beginning the installation, it is critical to shut off the power supply to the switch you will be working on. Following these steps will help ensure your safety:
- Locate your circuit breaker or fuse box. These are usually found in basements, utility rooms, or garages.
- Identify the circuit breaker or fuse that controls the power to the switch you will be working on.
- Flip the designated circuit breaker to the “off” position or remove the appropriate fuse from its socket.
- To double-check that the power is off, use a voltage tester to test the wires connected to the switch.
- If the voltage tester indicates no power, you can proceed with confidence. If there is still power detected, recheck the circuit breaker or fuse and consult a professional if needed.
Remember, safety is paramount when working with electrical systems. Take all necessary precautions and do not hesitate to seek professional help if needed.
Step 1: Remove Existing Switch
Before you can install a dimmer switch, you need to start by removing the existing switch. This process involves a few simple steps to ensure the safety of the electrical circuit and make way for the new dimmer switch. Follow these easy guidelines to complete this initial step:
Locate and turn off the circuit breaker
The first and most crucial step is to locate and turn off the circuit breaker that supplies power to the switch you want to remove. This will prevent any electrical shocks or accidents while working on the switch. To do this, follow these steps:
- Locate your home’s electrical panel or breaker box.
- Identify the circuit breaker that controls the specific switch you are removing.
- Switch the breaker to the “Off” position to cut off power to that specific circuit.
Remove the switch cover plate
Once the power is turned off, you can proceed to remove the switch cover plate:
- Use a flathead screwdriver or an appropriate tool to unscrew the screws securing the switch cover plate in place.
- Gently pull the cover plate away from the electrical box to expose the switch and wiring inside.
Unscrew the existing switch from the electrical box
With the cover plate removed, you can now unscrew the existing switch from the electrical box:
- Use a screwdriver to loosen the screws holding the switch in place.
- Once the screws are loose, carefully pull the switch out of the electrical box.
By following these steps, you have successfully completed the first step of installing a dimmer switch. With the existing switch removed, you can now proceed to the next step of the installation process and replace it with the dimmer switch of your choice.
Step 2: Wiring The Dimmer Switch
Now that you have successfully identified the wires in the electrical box, it’s time to move on to the next step – wiring the dimmer switch. The wiring process is crucial to ensure the dimmer switch functions properly and safely. Understanding the purpose of each wire and connecting the dimmer switch wires correctly are important aspects of this step. Let’s dive right in!
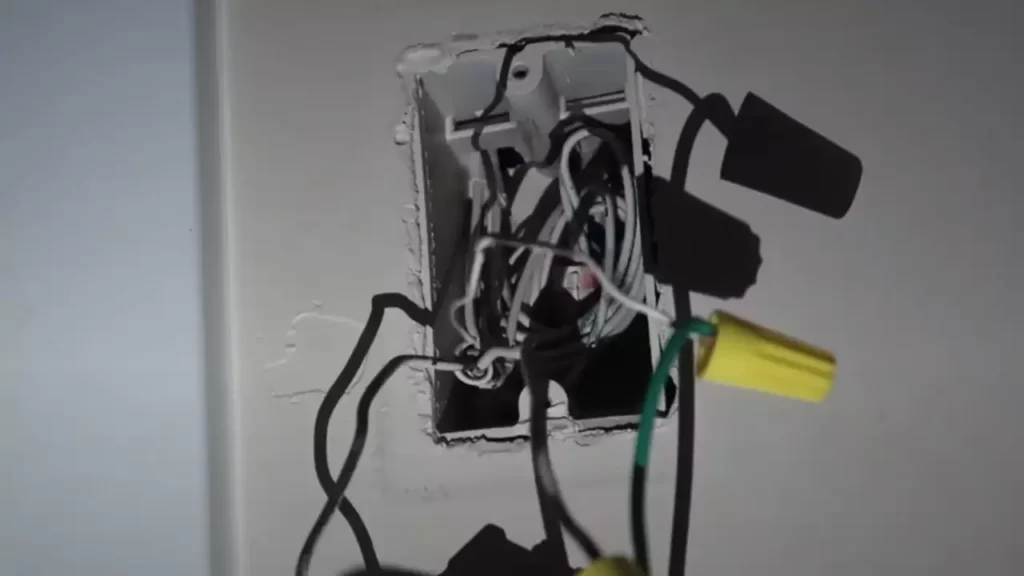
Identify the different wires in the electrical box
Before you start connecting the dimmer switch wires, it’s essential to identify the different wires present in the electrical box. These wires include the hot wire, neutral wire, and ground wire. Each wire serves a specific purpose and needs to be correctly identified to avoid any mishaps.
Understand the purpose of each wire
To successfully wire the dimmer switch, it’s important to understand the purpose of each wire. Here’s a brief overview:
– Hot wire: The hot wire, typically black in color, carries the electrical current from the power source to the dimmer switch. It is responsible for providing the necessary electrical power to the switch.
– Neutral wire: The neutral wire, usually white or gray in color, completes the electrical circuit and provides a return path for the current. It is crucial for the overall functioning of the dimmer switch.
– Ground wire: The ground wire, usually green or bare copper in color, ensures electrical safety by providing a path for electrical current to safely dissipate in the event of a fault or short circuit.
Connect the dimmer switch wires to the corresponding wires in the box
Once you have identified and understood the purpose of each wire, it’s time to connect the dimmer switch wires to the corresponding wires in the electrical box. Here’s a step-by-step guide:
- Begin by matching the color-coded wires. Connect the hot wire from the electrical box to the hot wire terminal on the dimmer switch.
- Next, connect the neutral wire from the electrical box to the neutral wire terminal on the dimmer switch.
- Finally, connect the ground wire from the electrical box to the ground wire terminal on the dimmer switch.
- Ensure all wire connections are secure and tightly fastened to prevent any potential electrical hazards.
Following these steps will help you properly wire the dimmer switch, ensuring it functions effectively and safely. Once you have completed the wiring process, you can move on to the next step in installing your dimmer switch.
Step 3: Installing The Dimmer Switch
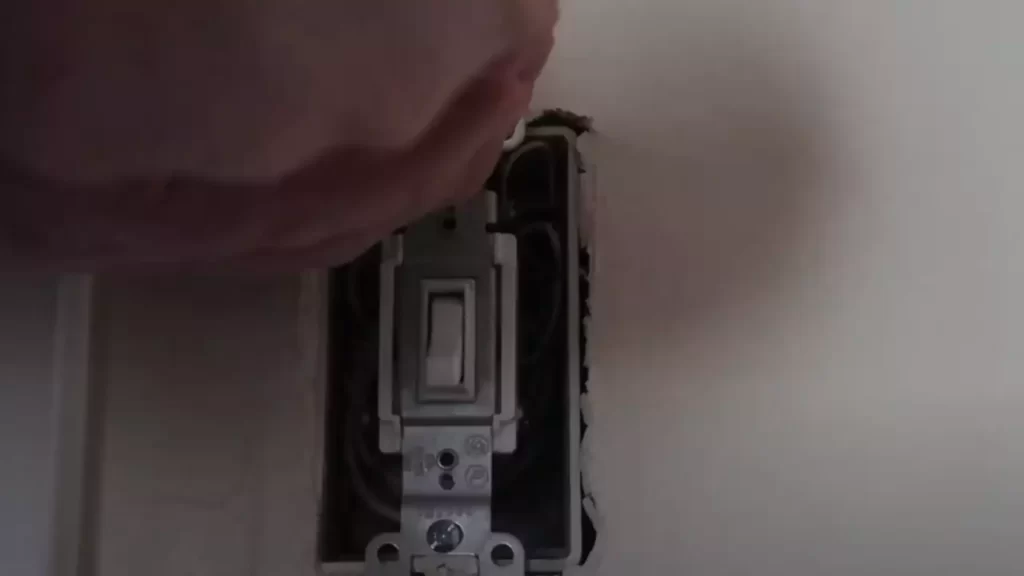
Properly position the dimmer switch in the electrical box
When it comes to installing a dimmer switch, positioning it correctly in the electrical box is crucial. This ensures the switch functions properly and is easily accessible. Here’s how you can properly position the dimmer switch:
- Turn off the power to the circuit at the main electrical panel.
- Remove the switch cover plate and the existing switch.
- Take the dimmer switch and carefully feed the wires through the opening in the electrical box.
- Hold the dimmer switch against the electrical box, making sure it aligns with the screw holes or mounting brackets.
Secure the switch using screws or mounting brackets
To ensure the dimmer switch stays securely in place, it is important to use screws or mounting brackets. This step helps keep the switch stable and prevents any accidental disruptions. Follow these steps to securely attach the dimmer switch:
- If your dimmer switch comes with mounting brackets, align them with the screw holes in the electrical box.
- Insert the screws through the dimmer switch and into the screw holes or mounting brackets.
- Tighten the screws using a screwdriver until the dimmer switch is firmly secured.
- Double-check to ensure the switch is stable and doesn’t move around.
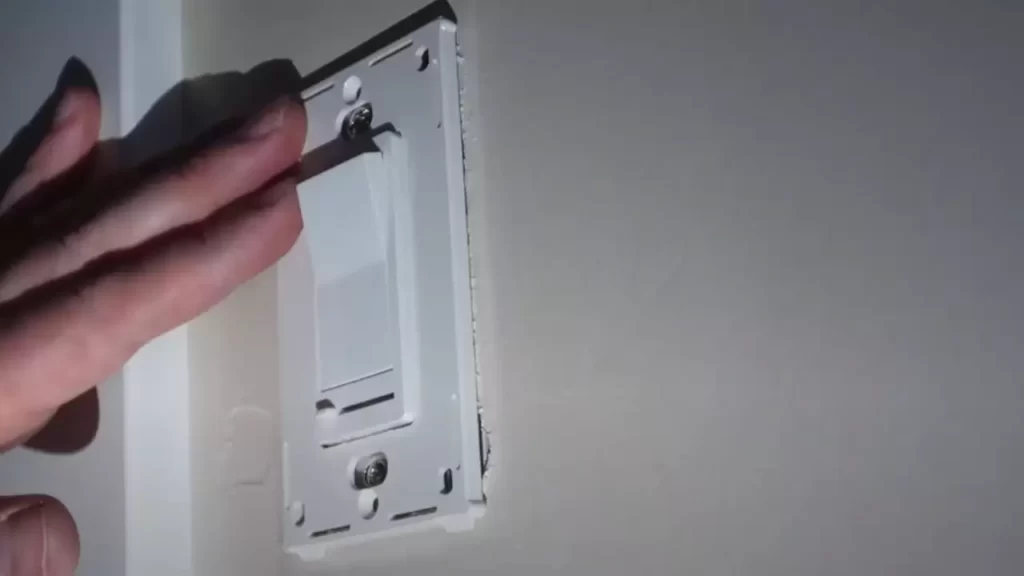
Reattach the switch cover plate
Lastly, it is essential to reattach the switch cover plate to provide a finished look and protect the switch from dust or accidental contact. Here’s how you can reattach the switch cover plate:
- Position the cover plate over the dimmer switch, aligning it with the screw holes.
- Insert the screws through the cover plate and into the dimmer switch.
- Tighten the screws until the cover plate is securely attached.
- Ensure the cover plate sits flush against the wall, with no gaps or misalignment.
By properly positioning the dimmer switch, securing it with screws or mounting brackets, and reattaching the switch cover plate, you’ll have successfully installed your dimmer switch. This step brings you one step closer to enjoying enhanced lighting control in your space.
Step 4: Testing And Adjusting The Dimmer Switch
Step 4: Testing and Adjusting the Dimmer Switch
Now that you have successfully installed the dimmer switch on your single pole, it’s time to test and adjust its functionality to ensure optimal performance. Follow the steps below to complete this important phase of the installation process.
Turn on the power supply
Before testing the dimmer switch, make sure to turn on the power supply. Go to your circuit breaker panel and locate the switch that controls the power to the specific area where you installed the dimmer switch. Flip the switch back to the “on” position, ensuring that the power is flowing to the switch.
Test the dimmer switch functionality
With the power turned on, it’s time to test the functionality of your newly installed dimmer switch. To do this, follow these steps:
1. Turn on the lights controlled by the dimmer switch using the switch itself or the wall switch if applicable.
2. Gradually adjust the dimmer switch to increase or decrease the brightness of the lights. Observe whether the lights respond accordingly, smoothly transitioning from brighter to dimmer and vice versa.
3. Repeat this process a few times, testing different levels of dimming to ensure consistency and smooth operation.
If you notice any issues during this testing phase, such as flickering lights, buzzing sounds, or inconsistent dimming levels, it may indicate a problem with the wiring or the dimmer switch itself. In such cases, it’s best to consult a professional electrician to address the issue before proceeding.
Adjust the dimming level according to your preference
Now that you have tested the functionality of the dimmer switch, it’s time to adjust the dimming level according to your preference. Follow these steps to customize the lighting to suit your needs:
1. Choose a level of brightness that feels comfortable to you. Some people prefer a soft ambient light, while others may prefer a brighter setting for specific tasks.
2. Gradually adjust the dimmer switch to achieve the desired brightness level. Take your time to find the perfect balance that suits your needs.
3. Remember to consider the specific lighting fixture and bulb type you are using, as different combinations may have varying dimming capabilities.
By adjusting the dimming level according to your preference, you can create the ideal lighting atmosphere for any occasion, enhance energy efficiency, and even extend the lifespan of your light bulbs.
In conclusion, testing and adjusting the dimmer switch is crucial to ensure proper functionality and optimal performance. By following these steps, you can verify that the dimmer switch is working as intended and fine-tune the lighting to suit your personal preferences. Enjoy the flexibility and control that a dimmer switch brings to your home!
Troubleshooting Common Issues
In this section, we will discuss some common issues you may encounter when installing a dimmer switch and provide you with solutions to troubleshoot these problems. Proper installation and understanding of these issues will help you ensure that your dimmer switch operates smoothly and effectively.
Dimmer switch not working properly
If you find that your dimmer switch is not functioning as expected, it can be frustrating. These troubleshooting tips can help you identify and fix the problem:
- Check the wiring connections: Ensure that all the wires are securely connected to the correct terminals. Loose or incorrect connections can cause the dimmer switch to malfunction. Refer to the manufacturer’s instructions for proper wiring guidance.
- Verify the dimmer switch compatibility: Dimmer switches are designed for specific types of lighting fixtures. Make sure the dimmer switch you are using is compatible with the type of lights you have installed. Using an incompatible switch can lead to issues such as flickering or buzzing.
- Test the dimmer switch in another location: If the dimmer switch still does not work properly, try installing it in a different location to determine if the issue is with the switch or the wiring in your current setup. This can help identify if the problem lies in the switch itself or the electrical wiring connection.
- Replace the dimmer switch: If none of the above steps resolve the issue, it may be necessary to replace the dimmer switch. Faulty switches can occur, and replacing it with a new one could solve the problem.
Lights flickering or buzzing
If you notice that your lights flicker or buzz when using a dimmer switch, it can be bothersome and affect the overall ambiance of your space. Thankfully, here are some solutions you can try to rectify this issue:
- Check the bulb compatibility: Certain bulbs may not be compatible with dimmer switches, causing flickering or buzzing. Ensure that the bulbs you are using are recommended for dimming.
- Consider using a dimmable LED or CFL bulb: Traditional incandescent bulbs are not always the best choice for dimmer switches. Using dimmable LED or CFL bulbs specifically designed for dimming can alleviate flickering and buzzing issues.
- Replace the switch: If the flickering or buzzing persists, it may indicate a problem with the dimmer switch itself. Consider replacing it with a high-quality switch that is compatible with the type of lights you have installed.
By following these troubleshooting steps, you can address common issues that may arise when installing a dimmer switch. Remember to always refer to the manufacturer’s instructions and seek professional assistance if needed. With the right troubleshooting techniques, you can enjoy the benefits of dimmable lighting throughout your home without any inconvenience.
Safety Tips And Best Practices
When it comes to installing a dimmer switch single pole, it is essential to prioritize safety to protect yourself and your home from potential electrical hazards. By following these safety tips and best practices, you can ensure a smooth and secure installation process.
Regular Maintenance and Inspection of Dimmer Switches
Regular maintenance and inspection of dimmer switches are crucial to keep them in proper working condition and prevent potential issues. Here are some key points to consider:
- Inspect the dimmer switch regularly for any visible damages or loose parts.
- Tighten any loose screws or connections to ensure a secure fit.
- Check for any signs of overheating, such as discoloration or burning smells, and if found, discontinue use immediately.
- Replace any faulty or malfunctioning dimmer switches promptly with a new one.
- Ensure the dimmer switch is compatible with the type of light bulbs being used.
Dealing with Electrical Issues or Complications
While installing a dimmer switch single pole, you may encounter certain electrical issues or complications. It is important to address these problems cautiously. Here are some tips to handle electrical issues:
- Shut off the power at the circuit breaker before working on the dimmer switch.
- Use a non-contact voltage tester to confirm that the power is indeed off.
- Avoid touching bare wires or exposed electrical parts.
- If you discover any damaged or frayed wires, repair or replace them immediately.
Consulting a Professional Electrician if Needed
Installing a dimmer switch single pole can be a relatively straightforward process, but if you are uncertain or uncomfortable working with electrical components, it is always advisable to consult a professional electrician. They have the expertise and experience to ensure a safe and successful installation. Here are some instances when consulting an electrician might be necessary:
- If you are unsure about the electrical wiring in your home.
- If the dimmer switch is for a complex lighting setup, such as multiple switches controlling the same set of lights.
- If you encounter any unexpected electrical complications during the installation process.
By following these safety tips and best practices, you can confidently install a dimmer switch single pole and enjoy the benefits of customized lighting in your home.
Frequently Asked Questions
How Do You Hook Up A Single Pole Dimmer Switch?
To hook up a single pole dimmer switch: 1. Turn off power to the circuit. 2. Remove the switch cover plate. 3. Disconnect the old switch wiring. 4. Connect the dimmer switch wiring. 5. Attach the dimmer switch to the electrical box and replace the cover plate.
Test the switch.
Can You Wire A Single Pole Dimmer Switch?
Yes, you can wire a single pole dimmer switch.
How To Wire A Lutron Single Pole Dimmer Switch?
To wire a Lutron single pole dimmer switch, follow these steps: 1. Turn off the power to the switch at the circuit breaker. 2. Remove the existing switch. 3. Connect the wires from the switch to the dimmer according to the manufacturer’s instructions.
4. Attach the dimmer to the electrical box and secure it. 5. Turn the power back on and test the dimmer switch for proper operation.
Are Dimmer Switches Single Pole?
Yes, dimmer switches can be single pole. They allow you to control the intensity of the lights from a single switch.
Conclusion
Installing a dimmer switch in your home is a simple yet impactful upgrade that can enhance your lighting experience. By following the steps outlined in this guide, you can easily replace a single pole switch with a dimmer switch. Remember to always prioritize safety and turn off the power before starting the installation process.
So, go ahead and transform your lighting ambiance with a dimmer switch today!