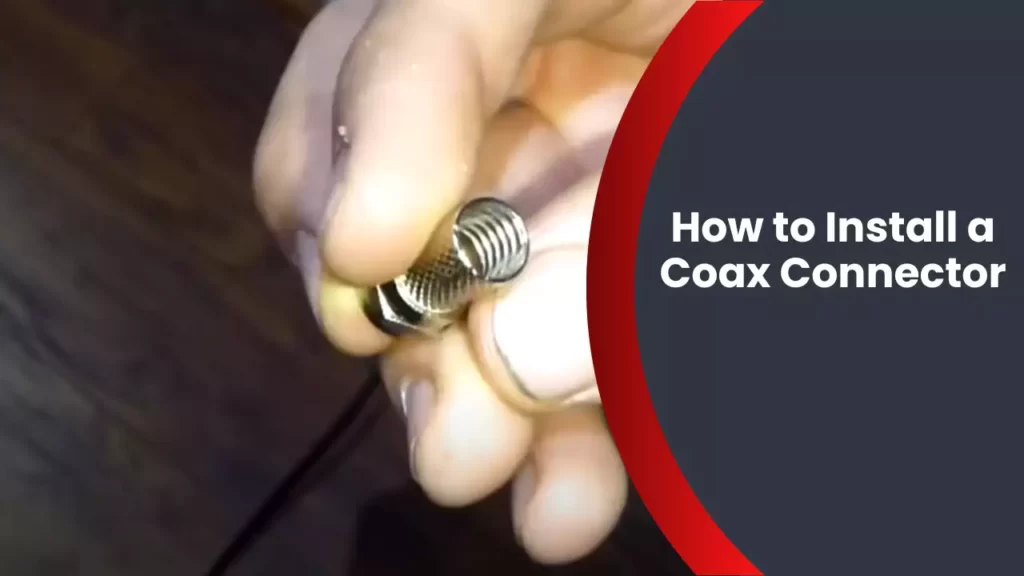
To install a coax connector, strip the cable’s outer insulation, insert the cable into the connector, and secure it with a crimping tool. This guide will provide step-by-step instructions to help you install a coax connector on your own.
Whether you are setting up a television or an internet connection, having a properly installed coax connector is crucial for a reliable signal transmission. By following these simple steps, you can ensure a secure and efficient connection without the need for professional assistance.
So, let’s get started and learn how to install a coax connector in a few easy steps.
Understanding Coax Connectors
Different types of coax connectors
When it comes to installing a coax connector, it is crucial to understand the different types available. The right coax connector is vital for ensuring a reliable, high-quality connection. Here are some commonly used coax connectors:
- F-type connector: This is the most popular connector for coaxial cables and is commonly used for cable TV, satellite television, and internet connections. It is easy to install and provides excellent signal quality.
- BNC connector: The BNC (Bayonet Neill-Concelman) connector is widely used in professional video and surveillance systems. It features a bayonet-style connection that provides a secure fit and is easily removable.
- N-type connector: The N-type connector is commonly used in high-frequency applications, such as cellular antennas and radio communications. It offers low signal loss and excellent durability.
- SMA connector: SMA (SubMiniature version A) connectors are widely used in wireless applications and offer good electrical performance in compact sizes. They are commonly found in Wi-Fi routers, Bluetooth devices, and GPS systems.
Importance of choosing the right connector
Choosing the right coax connector is vital for maintaining strong and stable signal transmission. Each connector is designed for specific applications and frequencies, ensuring optimal performance. Here’s why it’s important to choose the right coax connector:
- Prevents signal loss: Using the wrong coax connector can lead to signal loss, resulting in poor picture quality and reduced data transfer speeds.
- Ensures compatibility: Different devices and systems require specific coax connectors for compatibility. Using the appropriate connector ensures seamless communication between equipment.
- Maximizes signal integrity: The right connector ensures maximum signal integrity, minimizing interference and distortion. This leads to clearer audio and video quality.
- Promotes longevity: By choosing the correct connector, you ensure the longevity of your coaxial cables and devices. It prevents damage caused by improper fittings or loose connections.
Basics of coaxial cables and connectors
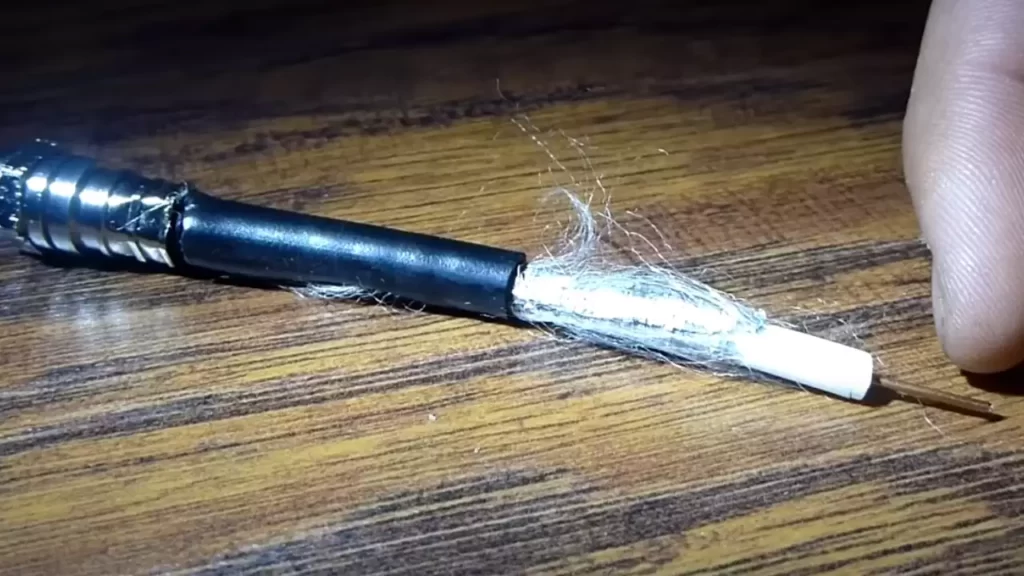
Coaxial cables consist of three basic components: a center conductor, an insulating layer, and an outer conductor (shield). Understanding the basics of coaxial cables and connectors is essential for successful installation. Here’s what you need to know:
- Center conductor: The center conductor carries the signal and is typically made of copper or copper-clad steel. It is surrounded by an insulating layer to prevent signal interference.
- Insulating layer: The insulating layer, also known as the dielectric, keeps the center conductor isolated from the outer conductor. It ensures that the signal remains focused and minimizes signal loss.
- Outer conductor: The outer conductor, also known as the shield, surrounds the insulating layer. It provides protection against external interference and helps maintain a strong signal.
- Installation process: To install a coax connector, you need to strip the outer coating, expose the center conductor, and attach the connector securely. This can be achieved using a coaxial cable stripper, crimping tool, or compression tool.
By understanding these basics, you can ensure a proper and secure coax connector installation, leading to reliable signal transmission and optimal performance.
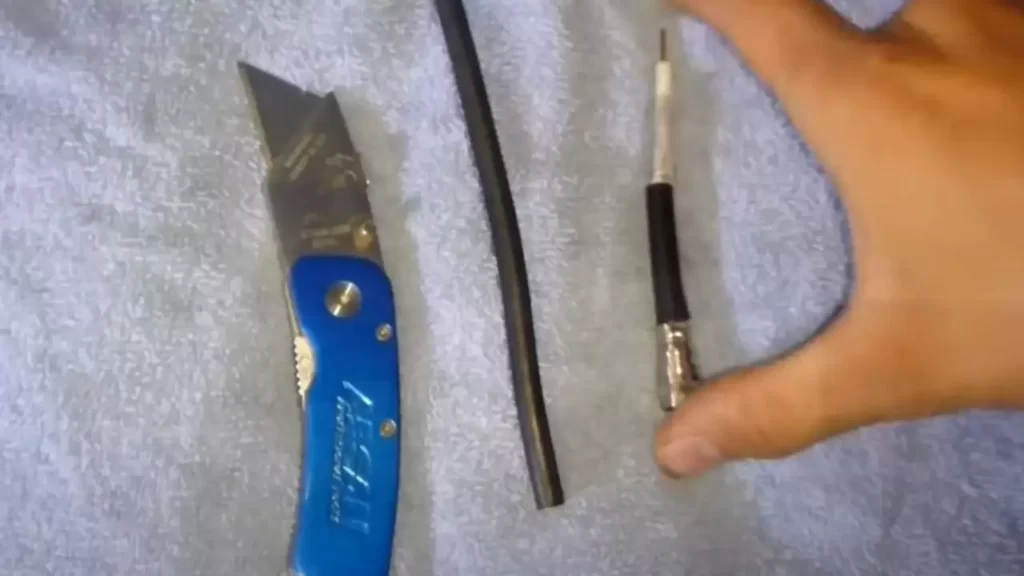
Tools And Materials Required
Installing a coax connector doesn’t have to be a daunting task, especially if you have the right tools and materials on hand. Whether you’re setting up a new television or planning to improve your cable connection, having the necessary tools and materials will make the installation process smoother. In this section, we’ll outline the list of tools and materials you’ll need to successfully install a coax connector.
List of tools required for installation
Before you begin installing a coax connector, make sure you have the following tools:
- A coaxial cable cutter – This tool is essential for cleanly cutting the coaxial cable and ensuring a proper connection.
- A coaxial cable stripper – This tool will help you remove the outer insulation from the coaxial cable.
- A coaxial cable crimper – This tool is used to attach the coaxial connector securely to the cable.
- A small screwdriver – This will be needed to tighten the screw-on connectors.
- A multimeter – This handy tool will help you test the continuity and signal strength of the coaxial cable.
- A cable compression tool (optional) – If you’re using compression connectors, you’ll need this tool to ensure a tight and secure connection.
List of materials required for installation
In addition to the tools mentioned above, you’ll need the following materials:
- Coaxial cable – Choose a high-quality coaxial cable that is appropriate for your setup.
- Coaxial connectors – Depending on your needs, you can choose between screw-on connectors or compression connectors. Make sure they are compatible with the coaxial cable you have.
- Electrical tape – This will help secure the coaxial connectors and protect the connections from moisture.
Having these tools and materials ready before you start the installation process will save you time and ensure a successful connection. Situating yourself with the right equipment will help you achieve a reliable and strong signal. Now that you’re armed with the necessary knowledge, you’re ready to move on to the next step: installing the coax connector.
Step-By-Step Installation Process
Installing a coax connector may seem complicated, but with the right tools and a clear understanding of the process, it can be a straightforward task. In this guide, we will walk you through each step of the installation process to ensure a successful connection.
Troubleshooting Tips
Properly installing a coax connector is essential for maintaining a reliable connection for your cable or satellite TV. However, it’s not uncommon to encounter some issues along the way. In this section, we will discuss common problems that may arise during the installation process and provide solutions to help you troubleshoot and fix these issues.
Common problems and their solutions
When installing a coax connector, there are a few common problems that you might encounter. Understanding these issues and their solutions can help you complete the installation process smoothly. Here are some tips to help you troubleshoot:
- No signal: If you’re not getting any signal on your TV, make sure the coax connector is tightly secured to the cable. Loose connections can cause signal loss. Additionally, check if the cable is damaged or frayed. If it is, you may need to replace the cable.
- Picture quality issues: If you’re experiencing poor picture quality, it could be due to a weak signal. Check if the cable is properly connected to both the TV and the wall outlet. You can also try replacing the coax connector to ensure a tight connection. If the issue persists, it might be worth contacting your service provider for further assistance.
- Interference: Sometimes, interference from other devices can disrupt your TV signal. Keep your coaxial cable away from sources of electromagnetic interference, such as power cords, routers, and microwaves. If necessary, consider using cable clips or ties to organize and separate cables to minimize interference.
How to identify and fix connection issues
Identifying and fixing connection issues can save you from frustrating TV signal problems. Follow these steps to troubleshoot and resolve common connection issues:
- Check the physical connection: Ensure that the coax connector is securely attached to both the TV and the wall outlet. Verify that the cable is not damaged or bent, as this can affect the signal.
- Inspect the cable ends: Examine the cable ends for any visible damage or corrosion. If necessary, use a clean cloth to wipe away any dirt or debris. Replace the coax connector if it appears worn or damaged.
- Test different devices: Connect a different device, such as another TV or a cable tester, to the coaxial cable. This helps determine if the issue is with the cable or the device you initially intended to connect. If the problem persists, the cable may need to be replaced.
- Consider signal amplification: If you’re experiencing weak signals, you can try using a signal amplifier. These devices boost the signal strength, resulting in better reception and improved picture quality.
Tips for ensuring a reliable connection
To maintain a reliable connection with your coax connector, consider these tips:
- Use high-quality cables and connectors: Investing in quality coaxial cables and connectors can significantly improve signal transmission and minimize signal loss.
- Proper cable management: Keep your cables organized and away from potential sources of interference. Use cable clips or ties to secure and separate cables to prevent signal degradation.
- Regularly check for damage: Periodically inspect your coaxial cables and connectors for any signs of damage or wear. Replace any worn-out components to maintain optimal signal quality.
- Avoid tight bends: Excessive bending and twisting of coaxial cables can lead to signal loss. Minimize tight bends and ensure the cable remains smooth to maintain signal integrity.
By following these troubleshooting tips and implementing best practices for connection maintenance, you can enjoy a reliable and uninterrupted TV viewing experience.
Best Practices For Coax Connector Installation
Installing a coax connector is an essential step in setting up a reliable and high-quality television or internet connection. To ensure a successful installation that reduces signal loss and interference, it is crucial to follow some best practices. In this guide, we will explore pro tips for a successful installation, the importance of proper grounding, and cable management techniques for a clean and organized setup.
Pro Tips for a Successful Installation
1. Use high-quality coax connectors: Opt for connectors that are specifically designed for coaxial cables. These connectors are made with precision to ensure a secure and reliable connection.
2. Strip the cable properly: Before attaching the connector, strip the outer jacket of the coaxial cable carefully. Use a coaxial cable stripper to remove the appropriate length of the jacket without damaging the inner conductors.
3. Prepare the connector correctly: Carefully read the instructions provided with the connector. Follow the steps to prepare the connector, which may involve folding back the braid shield and trimming the dielectric insulation.
4. Use a compression tool: Consider investing in a compression tool for installing coax connectors. Compression connectors offer a tighter and more secure connection compared to crimp connectors.
5. Test the connection: After installing the connector, it is essential to test the connection for signal strength and quality. Use a signal meter or a cable tester to ensure proper installation and optimal performance.
Ensuring Proper Grounding
Proper grounding is crucial for coaxial cable installations to protect your equipment from damage caused by power surges and lightning strikes. Here’s how to ensure proper grounding:
- Connect to a grounding block: Install a grounding block at the point where the coaxial cable enters your home. This block should be properly grounded to a metal rod or another grounding point.
- Use a grounding wire: Connect a grounding wire between the grounding block and a proper ground, such as a grounding rod or the electrical ground of your building.
- Check for tight connections: Ensure that all connections to the grounding block and grounding wire are tight and secure, as loose connections can cause signal loss or electrical hazards.
Cable Management Techniques for a Clean and Organized Setup
A neat and organized coaxial cable setup not only enhances the aesthetics of your space but also helps to prevent signal degradation and interference. Here are some cable management techniques to consider:
- Use cable clips or clamps: Secure the coaxial cables along the wall or baseboards using cable clips or clamps. This prevents tripping hazards and keeps the cables in place.
- Label your cables: Use cable labels or tags to identify each coaxial cable, making it easier to trace and troubleshoot connections in the future.
- Bundle cables together: For a more organized appearance, consider bundling the coaxial cables together using cable ties or Velcro straps. This reduces cable clutter and makes it easier to manage.
- Keep cables away from power sources: To avoid interference, ensure that the coaxial cables are separated from electrical wires or power sources. Crossings should be kept at a right angle to minimize interference.
By following these best practices for coax connector installation, you can ensure a reliable and optimized television or internet connection without compromising signal quality or risking electrical hazards. Take your time, be meticulous, and enjoy a seamless viewing or browsing experience!
Maintenance And Care
A coax connector is a crucial component for ensuring a strong and reliable cable connection. However, just like any other electronic device, coax connectors also require regular maintenance and care to guarantee optimal performance and longevity. By following a few simple steps, you can keep your coax connectors in top shape and extend their lifespan.
Cleaning and maintaining coax connectors
Cleaning and maintaining your coax connectors is essential for keeping them free from dirt, dust, and corrosion. Regular cleaning not only helps to maintain optimal signal quality but also prevents any potential damage to the connectors. Here are some steps to follow to clean your coax connectors properly:
- Start by disconnecting the cable from any power source. This will ensure your safety during the cleaning process.
- Inspect the connector for any visible dirt, dust, or corrosion. If you notice any debris, gently remove it using a soft, dry cloth.
- For stubborn dirt or corrosion, you can use a specially designed contact cleaner. Apply a small amount to a clean cloth and gently wipe the connector, making sure not to apply too much pressure that could damage the connector.
- After cleaning, let the connector air dry completely before reconnecting the cable. This will ensure that no moisture remains on the connectors, which could lead to corrosion.
Regular cleaning and maintenance of your coax connectors will not only improve the signal quality but also extend their lifespan.
Protecting connectors from environmental factors
Environmental factors, such as moisture, heat, and dust, can significantly impact the performance of your coax connectors. To ensure the longevity of your connectors, it is essential to protect them from these elements. Here are some steps you can take to shield your connectors:
- Use weatherproofing materials: Apply weatherproofing materials, such as silicone grease or self-amalgamating tape, to seal the connectors and prevent moisture ingress. Be sure to follow the manufacturer’s instructions when applying these materials.
- Keep connectors dry: Ensure that connectors are shielded from rain, snow, or any other sources of moisture. If necessary, consider using protective covers or enclosures to safeguard the connectors.
- Minimize exposure to extreme temperatures: Avoid exposing your connectors to extreme temperatures, as this can cause damage. If outdoor installation is unavoidable, choose connectors specifically designed for outdoor use and ensure they are properly sealed.
By taking these measures, you can protect your coax connectors from environmental factors and ensure their long-lasting performance.
Regular inspections and replacements
Regular inspections and replacements are vital for maintaining the optimal functionality of your coax connectors. Over time, connectors can wear out or become damaged, leading to signal degradation. Here are some best practices to follow:
- Regularly inspect connectors for any signs of damage, such as bent pins, cracks, or disconnections. If you notice any issues, replace the connectors immediately to prevent further signal loss.
- Prioritize quality connectors: Invest in high-quality coax connectors from reputable manufacturers. These connectors are often designed to withstand harsh conditions and offer better performance and durability.
- Follow the manufacturer’s guidelines: Always adhere to the manufacturer’s recommendations regarding connector lifespan and inspection intervals. Some connectors may require more frequent inspections or replacements.
By conducting regular inspections and timely replacements, you can ensure that your coax connectors continue to deliver optimal performance and minimize any potential signal loss.
Frequently Asked Questions
How Do You Install A Coaxial Connector?
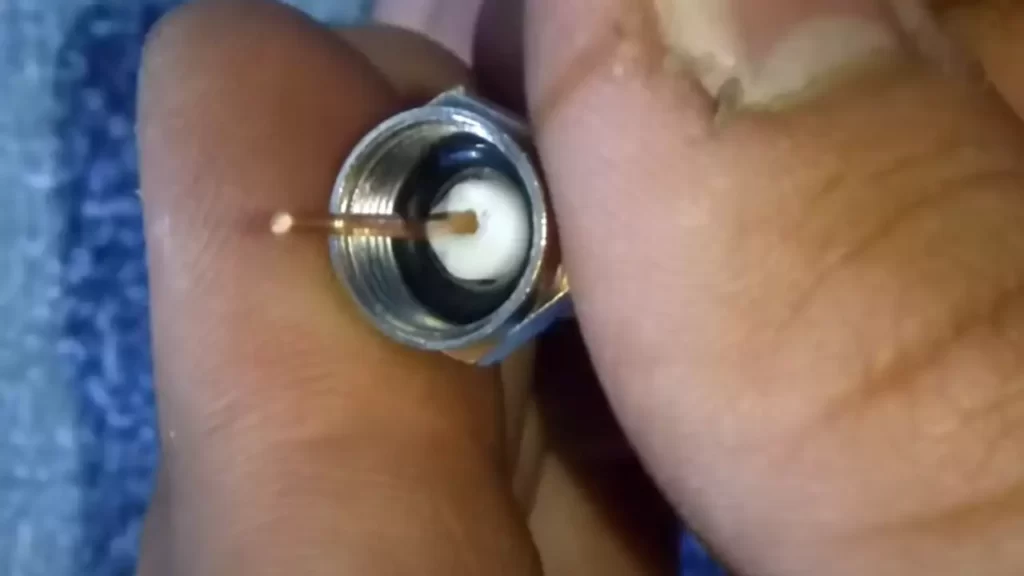
To install a coaxial connector, first strip about half an inch of the outer insulation using a coaxial cable stripper. Next, expose the inner conductor by stripping the insulation at the end. Then, slide the connector over the exposed inner conductor and push it onto the cable until it clicks.
Finally, tighten the connector using a wrench to ensure a secure connection.
How Do You Install A Crimp Coax Connector?
To install a crimp coax connector, follow these steps: 1. Strip the coax cable’s outer insulation and dielectric. 2. Slide the connector’s crimp sleeve onto the cable. 3. Insert the stripped end into the connector until the dielectric is flush with the connector’s end.
4. Use a crimping tool to secure the sleeve onto the cable. 5. Test the connection for proper signal transmission.
How Do You Install Coaxial Twist On Connectors?
To install coaxial twist-on connectors: 1. Strip the coax cable’s outer jacket, exposing the inner conductor. 2. Slide the connector over the cable, ensuring the stripped conductor is fully inserted. 3. Twist the connector clockwise until it is securely tightened on the cable.
4. Use a coaxial cable tester to check the connection’s continuity. 5. Trim any excess cable for a neat finish.
Can You Install A Coax Cable Yourself?
Yes, you can install a coax cable yourself. It is a simple process that doesn’t require professional help.
Conclusion
Installing a coax connector may seem intimidating at first, but with the right tools and a step-by-step approach, it can be a straightforward process. By following the instructions laid out in this blog post, you can confidently install a coax connector yourself.
Remember to take your time and double-check your connections for a secure and reliable installation. With this knowledge, you’ll be able to have a strong and stable coax connection in no time!