To install a ceiling fan switch, carefully follow the manufacturer’s instructions to ensure proper installation. In this guide, we will outline the steps needed to successfully install a ceiling fan switch in your home.
Installing a ceiling fan switch requires a few simple tools and can be completed by most homeowners with a basic understanding of electrical work. By following these steps, you can easily replace or upgrade the switch on your ceiling fan, providing you with increased control and convenience.
Take the time to read through the instructions, gather the necessary tools, and proceed with caution to ensure a safe and successful installation. With these instructions, you’ll be able to install a ceiling fan switch in no time.
Understanding The Basics Of Ceiling Fan Switches
Different types of switches used in ceiling fans
When it comes to installing a ceiling fan switch, it’s essential to understand the various types of switches used in ceiling fans. There are generally two types of ceiling fan switches: pull-chain switches and wall-mounted switches.
Pull-chain switches are the most common type of switch found in ceiling fans. They are typically mounted on the fan itself and feature a chain that can be pulled to control the fan’s speed and lighting options. These switches are straightforward to use, making them a popular choice for many homeowners.
Wall-mounted switches, on the other hand, provide a more convenient way to control your ceiling fan. They are installed on the wall, allowing you to adjust the fan’s speed and lighting with just a flip of a switch. Wall-mounted switches often come with additional features, such as timers and remote control compatibility, providing even more flexibility and convenience.
Overview of how a ceiling fan switch works
Understanding how a ceiling fan switch works can make the installation process much easier. The switch is responsible for controlling the fan’s speed and the lighting options it offers. It acts as a connection between the electrical power and the fan’s motor and lights.
A typical ceiling fan switch has multiple settings that allow you to adjust the fan’s speed. These settings are usually labeled as “low,” “medium,” and “high.” By moving the switch to one of these positions, you can regulate the amount of air circulation provided by the fan.
In addition to controlling the fan’s speed, the switch also manages the lighting options. Depending on the fan model, the switch may have separate controls for the fan and light functions. This allows you to operate the fan and lights independently, providing enhanced flexibility in creating the desired atmosphere in your space.
Importance of a properly functioning switch
Having a properly functioning ceiling fan switch is crucial for enjoying the full benefits of your ceiling fan. A faulty switch can lead to various issues that can disrupt the functionality and convenience of your fan.
One of the primary concerns with a malfunctioning switch is a loss of control over the fan’s speed and lighting options. Without a reliable switch, you may not be able to adjust the fan’s speed to your desired level or turn the lights on and off when needed.
A defective switch can also lead to electrical issues, posing a safety risk. It may cause the fan or lights to flicker, make strange noises, or even stop working altogether. Moreover, continuous usage of a faulty switch can lead to damage to the fan’s motor or electrical system, requiring costly repairs or replacements.
Ensuring that your ceiling fan switch is in proper working condition ensures that you can enjoy the comfort and functionality of your fan without any inconvenience or safety concerns.
Preparing For Installation
Gathering the necessary tools and materials
Before starting the installation process of a ceiling fan switch, it is crucial to gather all the necessary tools and materials. This ensures that you have everything you need within reach and can complete the task smoothly.
Here is a list of tools and materials you will need:
- A screwdriver (preferably a Phillips-head screwdriver)
- A voltage tester
- Wire strippers
- Electrical tape
- A wire nut
- A replacement ceiling fan switch
- The user manual or installation instructions provided with your new ceiling fan switch
Having these tools and materials ready allows you to work efficiently and helps avoid interruptions during the installation process.
Turning off the power supply to the ceiling fan
Before you begin any electrical work, it is essential to turn off the power supply to the ceiling fan. This ensures your safety and prevents any accidental electrical shocks.
To turn off the power supply:
- Locate your home’s electrical panel or circuit breaker box.
- Identify the corresponding breaker or fuse that controls the power supply to the ceiling fan.
- Flip the breaker switch to the “off” position or remove the fuse.
After turning off the power supply, it is recommended to use a voltage tester to double-check whether the wires are indeed not live. This step adds an extra layer of safety and gives you peace of mind before proceeding with the installation.
Identifying the wires and connections
Once the power supply is turned off, you can begin identifying the wires and connections of your ceiling fan and switch. This step is crucial to ensure a successful installation.
Consult the user manual or installation instructions provided with your new ceiling fan switch to understand the specific wire connections for your model. Additionally, you can follow these general guidelines:
Important:
Always refer to the instructions provided with your specific ceiling fan switch for accurate and up-to-date information.
-
Locate the electrical box housing the current switch and fan wiring. This box is typically found near the ceiling.
-
Identify the different colored wires, which often include black, white, green, and sometimes red. Each wire serves a specific purpose.
-
Use a wire stripper to remove about 3/4 inch of insulation from the end of each wire. This allows for proper connections.
Remember to double-check the wire connections and follow the provided instructions carefully to ensure a safe and secure installation of your new ceiling fan switch. Taking your time during this step pays off in the long run.
Removing The Old Ceiling Fan Switch
Removing the fan switch housing cover
Before you can replace your ceiling fan switch, you need to remove the fan switch housing cover. This cover is typically located just below the blades and is held in place by a few screws. Here’s how you can remove it:
- Make sure the ceiling fan is turned off to avoid any accidents.
- Use a screwdriver to unscrew the screws that secure the fan switch housing cover.
- Once the screws are removed, gently pull the cover away from the ceiling fan.
- Set aside the cover in a safe place where it won’t get damaged.
Disconnecting the wires from the old switch
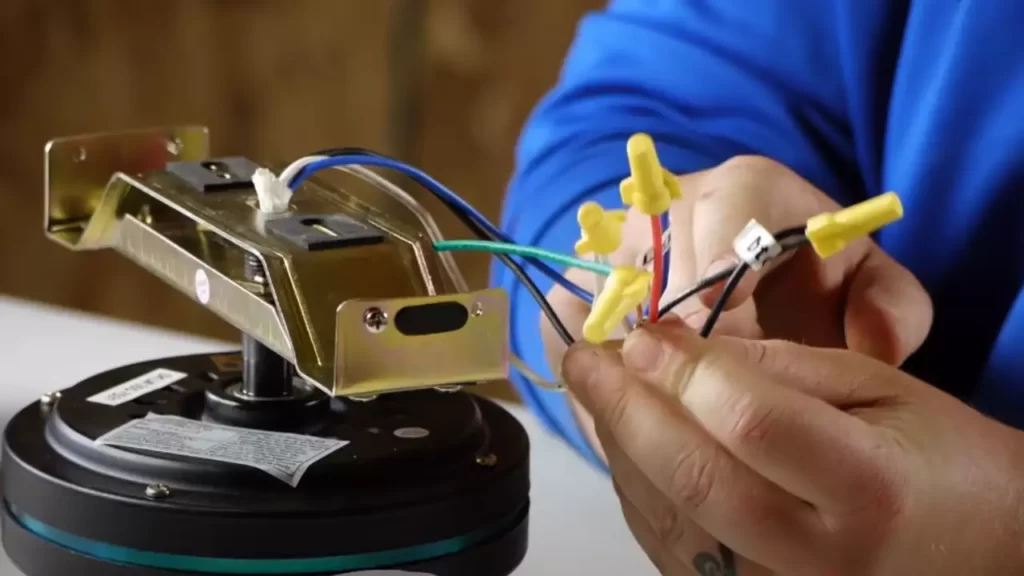
Now that the fan switch housing cover is removed, you can proceed to disconnect the wires from the old switch. Here’s what you need to do:
- Locate the wires connected to the old switch. These wires are typically color-coded, with black or red representing the hot wire, white representing the neutral wire, and green or bare copper representing the ground wire.
- Carefully loosen the wire nuts or screws that secure the wires to the switch.
- Once the wire nuts or screws are loosened, gently pull the wires away from the old switch.
- Take note of which wire is connected to which terminal on the switch. This will make it easier to connect the wires to the new switch later on.
Safely removing the old switch from the ceiling fan
With the wires disconnected, you’re now ready to safely remove the old switch from the ceiling fan. Follow these steps:
- Inspect the old switch for any additional screws or clips that secure it to the ceiling fan. If there are any, remove them using a screwdriver or pliers.
- Gently pull the old switch away from the ceiling fan, being careful not to damage the wires or any other components.
- Once the old switch is detached, set it aside for disposal or recycling.
Now that you have successfully removed the old ceiling fan switch, you can proceed to install a new one. Following these steps will help ensure a smooth and safe installation process.
Installing The New Ceiling Fan Switch
Once you have chosen a compatible replacement switch for your ceiling fan, it’s time to install it. This process involves connecting the wires to the new switch and securing it in place. In this section, we’ll walk you through each step, ensuring a smooth installation.
Choosing a Compatible Replacement Switch
Before you begin the installation process, it’s crucial to choose a compatible replacement switch for your ceiling fan. The switch you select should match the specifications of your existing switch in terms of voltage rating and switch type. Refer to your fan’s manual or consult a professional if you’re unsure about the specifications. Once you have the right replacement switch, you’re ready to move on to the next step.
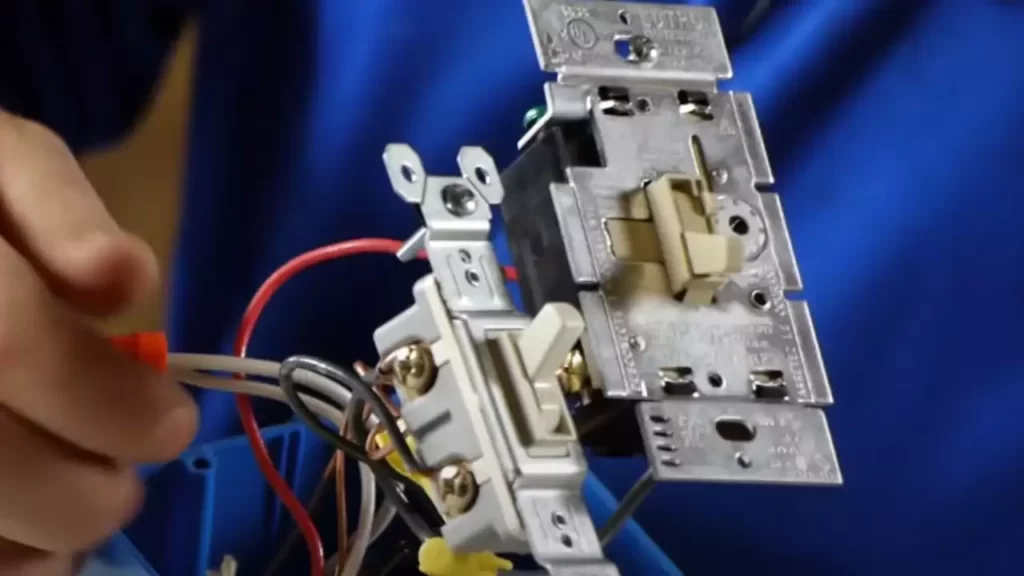
Connecting the Wires to the New Switch
Start by turning off the power to the ceiling fan at the circuit breaker. This ensures your safety during the installation process. Next, remove the cover plate of the existing switch and gently pull it out of the switch box. You’ll notice several wires connected to the switch, each of which serves a specific purpose.
To connect the wires to the new switch, you’ll need to identify the line, load, and ground wires. The line wire brings power from the source, the load wire connects to the fan, and the ground wire ensures proper grounding. Using wire connectors, join the corresponding wires from your new switch to the existing wires, making sure to match the colors appropriately. It’s always a good idea to double-check your connections before moving forward.
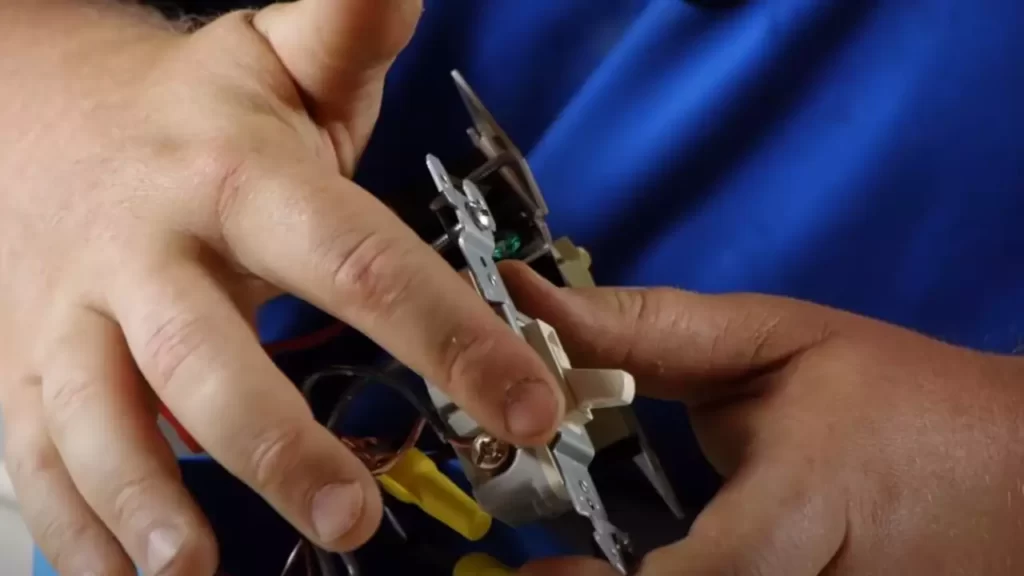
Securing the New Switch in Place
With the wires properly connected, it’s time to secure the new switch in place. Carefully push the switch back into the switch box, ensuring that it sits flush with the wall. Use the provided screws or mounting brackets to secure the switch, tightening them until the switch is firmly held in place.
Remember to restore the power at the circuit breaker once the switch is securely installed. Test the fan switch to verify that it functions correctly, allowing you to control the fan’s speed and light settings. If everything is in working order, you have successfully installed the new ceiling fan switch!
Testing The Ceiling Fan Switch
When it comes to installing a ceiling fan switch, testing its functionality is an essential step to ensure that it is working properly. In this section, we will guide you through reconnecting the power supply to the fan, testing the functionality of the new switch, and troubleshooting common issues that may arise. Let’s get started!
Reconnecting the Power Supply to the Fan
Before testing the ceiling fan switch, it is important to first reconnect the power supply to the fan. Follow the steps below:
- Switch off the power source to the fan at the circuit breaker.
- Locate the wires coming from the ceiling and those connected to the fan. These wires are typically color-coded.
- Using wire nuts, reconnect the corresponding wires: black to black, white to white, and green (or bare copper) to the grounding wire.
- Tightly secure the wire nuts and ensure that there are no exposed wires.
- Once the power supply is reconnected, turn on the circuit breaker to restore power to the fan.
Testing the Functionality of the New Switch
After reconnecting the power supply, it’s time to test the functionality of the new ceiling fan switch. Follow the steps below:
- Turn on the fan by pulling the chain or using the fan switch on the wall.
- Check if the fan starts spinning at the desired speed. If it does, you have successfully installed the ceiling fan switch. If not, proceed to troubleshooting common issues.
- Switch off the fan and ensure that it comes to a complete stop.
- Test the different speed settings of the fan by switching between low, medium, and high. Make sure the fan operates smoothly and without any unusual noises.
- If the fan functions properly at all speeds, you can consider the installation successful.
Troubleshooting Common Issues
If you encounter any problems during the testing process, there may be common issues that can be easily resolved. Consider the following troubleshooting tips:
- Check the wiring connections to ensure they are secure and properly matched.
- Inspect the fan blades for any signs of obstruction, as obstructions can affect the fan’s performance.
- Ensure that the circuit breaker hasn’t tripped or that the wall switch is powered on.
- If the fan still doesn’t function correctly, refer to the manufacturer’s instructions or consult a professional electrician for further assistance.
Additional Considerations For Ceiling Fan Switches
Choosing a switch with additional features (e.g., dimmer, speed control)
When it comes to selecting a ceiling fan switch, there are various options to consider. One of the additional features you might want to look for is a switch that offers more than just turning your fan on and off. Switches with advanced features like dimming capabilities and speed control can enhance your overall fan experience. With a dimmer switch, you can adjust the brightness of your fan’s light to create the perfect ambiance for any mood or occasion. Likewise, a switch with speed control allows you to easily adjust the fan’s speed, providing you with optimal comfort throughout the year.
Upgrading to a smart fan switch
If you’re looking to take your ceiling fan to the next level of convenience and efficiency, considering upgrading to a smart fan switch is a great option. Smart switches offer a range of features that can be controlled remotely through your smartphone or integrated with voice assistants like Amazon Alexa or Google Assistant. These switches allow you to effortlessly adjust the fan’s settings, such as speed and lighting, from anywhere in your home. Additionally, they often come with intelligent scheduling capabilities, so you can set your fan to turn on or off automatically at specific times, adding convenience and energy savings to your daily routine.
Maintaining and cleaning the switch for longevity
To ensure that your ceiling fan switch lasts for a long time and operates smoothly, regular maintenance and cleaning are essential. Over time, dust and debris can accumulate around the switch, affecting its performance. To clean the switch, start by turning off the power to the fan to avoid any electrical accidents. Then, gently remove the switch cover and use a soft cloth or brush to remove any dirt or dust. You can also use a mild cleaning solution to wipe the switch clean. After cleaning, make sure that the switch cover is securely fastened before restoring power to the fan. Taking these simple steps periodically will help maintain the longevity and functionality of your ceiling fan switch.
In conclusion, additional considerations for ceiling fan switches include choosing a switch with added features like dimming and speed control, upgrading to a smart fan switch for increased convenience, and regularly maintaining and cleaning the switch for long-lasting performance. By carefully considering these factors, you can make the most out of your ceiling fan switch and enhance your overall fan experience.
Safety Tips And Precautions
When it comes to installing a ceiling fan switch, safety should be your number one priority. Working with electricity can be dangerous, so it’s important to take proper safety measures throughout the installation process. Whether you’re an experienced DIYer or a novice, these safety tips and precautions will help ensure that the installation goes smoothly and without any accidents.
Ensuring proper safety measures while working with electricity
Working with electricity can be hazardous if not approached with caution. Before you begin installing a ceiling fan switch, make sure you adhere to the following safety measures:
- Turn off the power: Before you start any work, always switch off the power to the room or area where you’ll be working. This can be done by flipping the circuit breaker associated with that particular area or by turning off the main power switch.
- Use insulated tools: Insulated tools are designed to protect you from electric shock. Ensure that all the tools you’ll be using during the installation are insulated and in good condition.
- Wear protective gear: Protect yourself by wearing appropriate gear like rubber gloves, safety glasses, and non-conductive footwear. These precautions will provide an additional layer of safety while working with electricity.
- Check for exposed wires: Before you start handling any wires, make sure to check for any exposed or frayed wires. If you find any, repair or replace them before proceeding with the installation.
Seeking professional help if uncertain or uncomfortable
If you’re uncertain or uncomfortable with working with electricity, it’s always best to seek professional help. Electricians are trained and experienced in handling electrical installations, ensuring your safety and the proper functioning of the ceiling fan switch. Don’t hesitate to call a professional if you’re unsure about any aspect of the installation.
Remember, safety should always come first when it comes to working with electricity. By taking the proper precautions and seeking professional help when needed, you can have peace of mind throughout the installation process.
Frequently Asked Questions
How Many Wires Does A Ceiling Fan Switch Have?
A ceiling fan switch typically has three wires.
How To Wire A Ceiling Fan With One Switch?
To wire a ceiling fan with one switch, turn off the power supply, remove the old fixture, connect the fan’s black wire to the switch’s hot wire, and attach the fan’s white wire to the neutral wire. Securely mount the fan and turn the power back on.
Can You Install A Ceiling Fan With One Switch?
Yes, you can install a ceiling fan with just one switch.
What Does L 1 2 3 Mean On A Ceiling Fan Switch?
The L 1 2 3 on a ceiling fan switch refers to the different speed settings labeled on the switch. L stands for low, 1 denotes a low-medium speed, 2 indicates a medium-high speed, and 3 represents the highest speed setting.
Conclusion
Installing a ceiling fan switch can be a simple and cost-effective way to enhance your home’s comfort. By following the step-by-step instructions outlined in this blog post, anyone can successfully complete the installation process. Remember to prioritize safety, switch off the power source, and carefully follow the manufacturer’s guidelines.
With the right tools and a little patience, you’ll be enjoying the benefits of a new ceiling fan switch in no time. So, don’t hesitate to give it a try and upgrade your living space today.