To install a belt on a Kenmore dryer, first unplug the dryer and remove the lint trap. Then, take off the dryer’s top and front panels, and locate the old belt.
Loop the new belt around the dryer drum and hook it onto the motor pulley and idler pulley. Finally, reassemble the dryer by putting back the front and top panels, and plug it in. Installing a belt on a Kenmore dryer is a straightforward process that can be done by following a few simple steps.
Whether you are replacing a worn-out belt or installing a new one, this guide will walk you through the process. By taking the time to carefully follow these instructions, you can have your Kenmore dryer up and running again in no time. So, let’s get started and learn how to install a belt on a Kenmore dryer.
Understanding The Role Of The Belt In A Kenmore Dryer
Importance of the Belt for the Dryer’s Functioning
Understanding the role of the belt in a Kenmore dryer is crucial when it comes to ensuring the appliance operates efficiently. The belt serves a vital function in rotating the drum, allowing the dryer to perform its primary task of drying clothes effectively. Without a properly functioning belt, the drum would not be able to rotate, resulting in the clothes not drying evenly or taking much longer to dry. In addition to its role in rotation, the belt also helps to maintain the proper tension needed for smooth operation, preventing unnecessary wear and tear on other dryer components. So, it’s clear that the belt plays a significant role in the overall functioning of a Kenmore dryer and its importance cannot be overlooked.
Function of the Belt in Rotating the Drum
The primary function of the belt in a Kenmore dryer is to facilitate the rotation of the drum. When you start a drying cycle, the belt connects the motor to the drum, transmitting power to rotate the drum. As the drum rotates, it tumbles the clothes inside, allowing warm air to circulate and effectively dry the clothes. The belt’s grip on the drum, along with its ability to maintain tension, is crucial for ensuring the clothes inside the drum are properly dried. Additionally, the belt must be able to withstand the load of the drum and the clothes without slipping or breaking. This is why it is important to ensure the belt is in good condition and properly installed. A worn-out or damaged belt can result in inefficiency and poor drying performance of the Kenmore dryer.
In conclusion, the belt in a Kenmore dryer plays a vital role in its overall functioning by enabling the rotation of the drum. Without a properly functioning belt, the drying process can be compromised, leading to unevenly dried clothes or extended drying times. To ensure efficient operation and optimal drying performance, it is essential to understand the importance of the belt and its function in the Kenmore dryer. By regularly inspecting and maintaining the belt, you can ensure smooth drum rotation and enhance the longevity of your Kenmore dryer.
Assessing The Condition Of The Current Belt
The condition of the belt in your Kenmore dryer is crucial to its proper functioning. Assessing the condition of the current belt is the first step in determining whether it needs to be replaced. In this section, we will discuss the signs of a worn-out or broken belt and how to inspect the belt for any visible damage.
Signs of a worn out or broken belt
Before proceeding with the belt replacement, it is important to identify whether the belt is the cause of the issue. Here are some signs that indicate a worn-out or broken belt:
- The dryer drum is not spinning: One of the most obvious signs of a faulty belt is when the drum fails to rotate when the dryer is turned on. If you can hear the motor running but the drum remains stationary, the belt may be broken or slipped off the pulley.
- Loud noises or squealing sounds: Another indication of a worn-out belt is when the dryer emits loud noises or squealing sounds during operation. This can occur when the belt slips out of place or becomes frayed.
- Visible wear or damage: Inspect the belt for any visible signs of wear or damage. Look for fraying edges, cracks, or significant thinning. These are clear indicators that the belt needs to be replaced.
Inspecting the belt for any visible damage
Now that you are aware of the signs to look out for, it’s time to inspect the belt for any visible damage. Follow these steps:
- Unplug the dryer from the power source and ensure it is completely powered off.
- Locate the access panel on the rear of the dryer. This panel provides access to the drum and belt.
- Remove the screws or clips securing the access panel and set them aside.
- With the access panel removed, you will be able to see the belt. Carefully examine the entire length of the belt, paying close attention to the edges and surface.
- Look for fraying, cracking, or signs of significant wear.
- If you notice any visible damage to the belt, it is time to replace it. However, if the belt appears to be in good condition, it is unlikely to be the cause of the issue you are experiencing.
Assessing the condition of the current belt is an essential step in the process of installing a new belt on your Kenmore dryer. By identifying signs of damage and determining whether a replacement is necessary, you can ensure optimal performance and longevity for your appliance.

Gathering The Necessary Tools And Materials
Before you start the process of installing a new belt on your Kenmore dryer, it’s important to gather all the necessary tools and materials. This will ensure a smooth and efficient installation, saving you time and effort. In this section, we will discuss the tools required as well as the materials needed for the belt replacement.
Tools required for the installation process
Here are the tools you will need to have on hand:
- Phillips screwdriver: This tool will be used to remove any screws securing the dryer components.
- Flathead screwdriver: You may need this tool to pry off certain parts or release clips.
- Hex wrench set: This set will come in handy for loosening or tightening specific bolts.
- Pliers: Pliers will be necessary for disconnecting and reconnecting wires as needed.
- Putty knife: This tool can be used to gently pry apart any stubborn parts.
Having these tools readily available will make the installation process much easier and ensure that you have everything you need to complete the task.
Materials needed for the belt replacement
Now, let’s go over the materials you will need:
- Replacement belt: Make sure to purchase a belt that is compatible with your specific Kenmore dryer model. You can find the belt at a local appliance store or order it online.
- User manual: It’s always helpful to have the user manual for your specific dryer model, as it will provide step-by-step instructions and diagrams to guide you through the process.
- Safety gloves: Wearing safety gloves will protect your hands from any sharp edges or potential injuries during the installation.
- Pen and paper: It’s a good idea to have a pen and paper handy to take notes or sketch diagrams as you disassemble the dryer.
Having the right materials is essential to ensure a successful belt replacement. By gathering these items in advance, you’ll be prepared to tackle the installation process without any setbacks.
Disconnecting The Power Supply And Accessing The Dryer’S Interior
Importance of Safety Precautions
When it comes to working with household appliances, prioritizing safety is of utmost importance. The same goes for installing a new belt on your Kenmore dryer. By following proper safety precautions, you can ensure a smooth and accident-free process. Here, we will walk you through the steps to safely disconnect the power supply and access the dryer’s interior.
Steps to Safely Disconnect the Power Supply
Before diving into the installation process, it is crucial to disconnect the power supply to prevent any electrical mishaps. Here’s a step-by-step guide:
- Start by locating the power cord at the back of the dryer.
- Unplug the power cord from the electrical outlet or switch off the circuit breaker dedicated to the dryer.
- To be extra cautious, tape a note on the dryer to inform others not to plugin while you’re working on it.
Opening the Dryer to Access the Drum and Belt Area
Once you’ve disconnected the power supply, it’s time to access the interior of the dryer where the drum and belt are located. Follow these steps to proceed:
- Begin by removing any lint screen or lint trap located on the top or front of the dryer. This will vary depending on the model of your Kenmore dryer.
- Use a screwdriver or the necessary tool to remove any screws securing the front or top panel to the dryer.
- Gently pull the front or top panel away from the dryer’s main body, being careful not to damage any wires or connections.
- Set the panel aside in a safe place where it won’t get damaged.
- With the panel removed, you now have access to the drum and belt area of the Kenmore dryer.
Remember, throughout the process, it’s important to take your time and handle the dryer with caution. By following these steps, you can safely disconnect the power supply and access the interior of your Kenmore dryer, ensuring a smooth and hassle-free belt installation process.
Removing The Old Belt From The Kenmore Dryer
Locating the Belt Tensioner and Its Purpose
Before you can remove the old belt from your Kenmore dryer, you need to locate the belt tensioner and understand its purpose. The belt tensioner is a small metal component that helps keep the belt tight and secure. It is usually located near the motor pulley. The purpose of the belt tensioner is to ensure that the belt stays in place and maintains the necessary tension for proper drying performance. Without a functioning belt tensioner, the belt may slip or become loose, causing your dryer to malfunction. Therefore, it is crucial to identify and work with the belt tensioner during the belt removal process.
Releasing the Tension and Removing the Old Belt
Now that you know where the belt tensioner is and what it does, it’s time to release the tension and remove the old belt. Follow these steps:
- Disconnect the dryer from the power source to ensure your safety during the process.
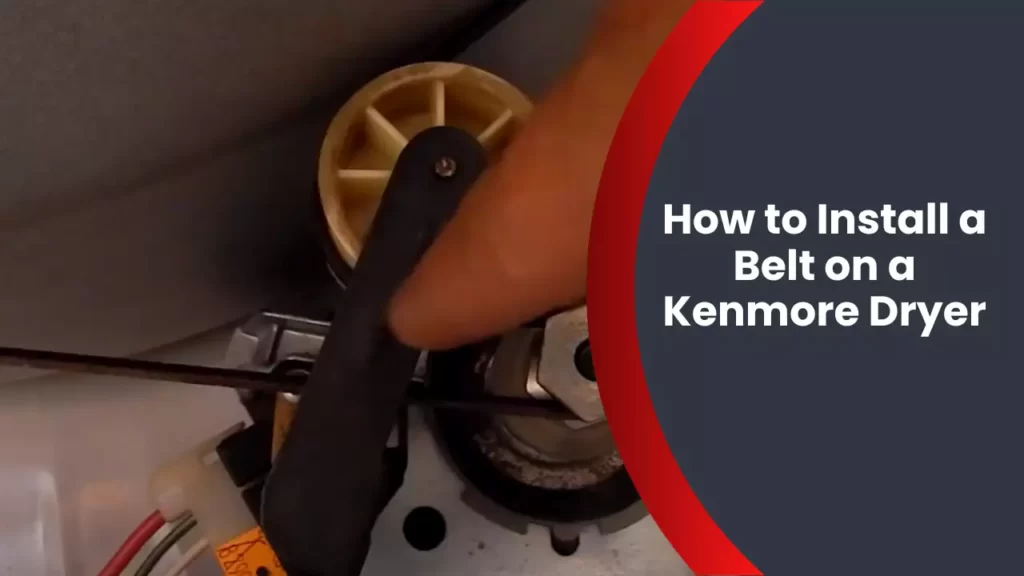
- Locate the belt tensioner near the motor pulley. It typically has a spring attached to it.
- Using a screwdriver or your hand, apply pressure to the belt tensioner to release the tension on the belt. This will loosen the belt and make it easier to remove.
- With the tension released, carefully slide the old belt off the motor pulley and drum. Make sure to pay attention to how the belt is looped around the other components, as you’ll need to install the new belt in the same manner.
Inspecting and Cleaning Other Components While the Dryer is Open
While your Kenmore dryer is open for belt replacement, take the opportunity to inspect and clean other components to ensure optimal performance and longevity. Here are some steps to follow:
- Inspect the drum support rollers, idler pulley, and motor pulley for any signs of wear or damage. If you notice any excessive wear or if the parts seem loose, consider replacing them.
- Clean the drum and the lint trap area using a soft brush or a vacuum cleaner. This will help improve airflow and prevent lint build-up, which can reduce drying efficiency and pose a fire hazard.
- Check the blower wheel for any obstructions or debris. Clear out any lint or foreign objects that may have accumulated and could potentially impact the dryer’s performance.
By inspecting and cleaning these components, you can extend the life of your Kenmore dryer and ensure it continues to function properly for years to come.
Choosing And Installing The New Belt
Selecting the Correct Replacement Belt for Your Kenmore Dryer
When it comes to choosing and installing a new belt for your Kenmore dryer, selecting the correct replacement belt is crucial. The wrong belt can lead to improper functioning and potential damage to your dryer. To ensure you find the right belt, follow these steps:
- Identify the model number of your Kenmore dryer. This information is typically located on a label inside the dryer door or on the back of the machine.
- Search for the model number on Kenmore’s official website or consult the owner’s manual. This will help you find the specific part number for the dryer belt.
- Alternatively, you can take the old belt to a local appliance store or contact a Kenmore authorized dealer to ensure you get the correct replacement.
Once you have obtained the correct replacement belt, it’s time to move on to the installation process.
Proper Positioning of the New Belt on the Drum
Now that you have the right replacement belt, it’s important to position it properly on the drum. Follow these steps to ensure correct placement:
- Unplug the dryer and remove the lint screen and filter.
- Next, locate the access panel on the back of the dryer. Remove any screws or clips holding it in place.
- With the access panel removed, you will have visibility of the dryer drum. Take note of the old belt’s positioning on the drum before removing it.
- Loop the new belt around the drum, keeping the smooth side facing towards the drum surface. Ensure the belt is positioned in the same manner as the old belt.
By properly positioning the new belt on the drum, you are ensuring optimal performance and longevity for your Kenmore dryer.
Engaging the Belt Tensioner and Ensuring Proper Tension
Engaging the belt tensioner and ensuring proper tension is the final step in the belt installation process. Follow these instructions:
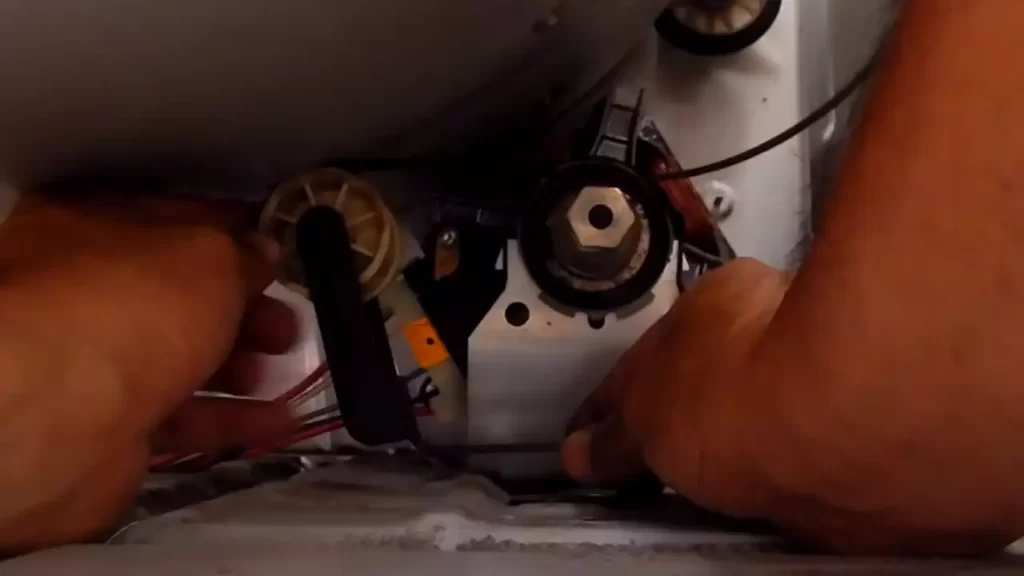
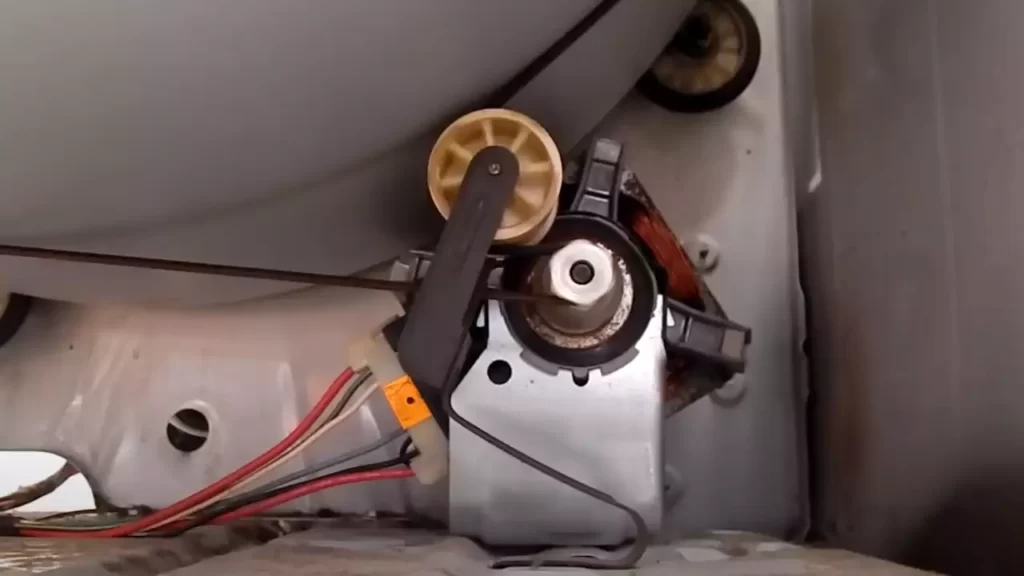
- Locate the belt tensioner, usually positioned near the motor pulley. Its purpose is to provide tension to the dryer belt, keeping it taut during operation.
- Rotate the tensioner so that it creates slack in the belt, allowing you to easily thread it through the motor pulley.
- With the belt threaded through the motor pulley, release the tensioner, allowing it to apply tension to the belt.
- Check the tension by gently pulling on the belt. It should feel taut, but still have a little give when pressed. A correctly tensioned belt is crucial for proper dryer functioning.
Ensuring each H3 heading adheres to HTML syntax allows for easy formatting and organization of the content. By following these steps for choosing and installing the new belt on your Kenmore dryer, you can ensure a smooth and successful installation process. Remember to always consult your owner’s manual or a professional if you encounter any difficulties or have any concerns. Proper installation will extend the lifespan of your Kenmore dryer and keep it running efficiently for years to come.
Closing The Dryer And Testing The New Belt
Closing the Dryer and Securing All Components
Now that you have successfully replaced the belt on your Kenmore dryer, it’s time to close the dryer and ensure that all components are securely in place. Follow these simple steps to complete the installation process:
- Position the dryer door back onto the front panel, making sure it aligns properly with the hinges.
- Carefully close the door and give it a firm push to ensure it latches securely.
- Check the rear access panel and ensure it is tightly screwed back into place.
- Give the drum inside the dryer a gentle spin to ensure it moves freely without any obstructions.
- Take a few moments to inspect the area around the dryer for any loose screws, nuts, or bolts. Tighten them if necessary.
- Double-check all the connections you had previously disconnected, ensuring they are properly reattached. This includes the grounding wire.
- Inspect the lint trap and clean out any accumulated lint to prevent future clogs and potential fire hazards.
- If you had temporarily removed any other components during the installation process, such as the front and side panels, secure them back into place.
Reconnecting the Power Supply and Checking for Any Abnormalities
Before powering on the dryer, ensure that you reconnect the power supply correctly to avoid any electrical issues. Follow these steps:
- Locate the power cord and plug it securely back into the electrical outlet.
- Ensure the power cord is not damaged or worn. If it appears to be in poor condition, consider replacing it to prevent potential hazards.
- Inspect the plug for any signs of damage or loose connections.
- Once the power cord is securely plugged in, switch on the electrical outlet to provide power to the dryer.
- Take a moment to visually inspect the dryer for any abnormalities, such as sparks, smoke, or unusual noises. If you notice any of these, immediately switch off the power supply and seek professional assistance.
- Check that the control panel of the dryer is functioning correctly and responding to commands.
- Ensure that the dryer is properly grounded by verifying the grounding wire is securely connected.
Running a Test Cycle to Ensure the Belt is Working Properly
Now that everything is properly connected, it’s time to put your dryer to the test and ensure that the new belt is working as it should:
- Close the dryer door completely and select a test cycle, such as a timed dry or normal drying cycle.
- Start the cycle and listen carefully for any unusual squeaking or grinding noises coming from the dryer.
- Observe the drum’s rotation and make sure it spins smoothly without any jerking or stalling. A properly installed belt should allow the drum to rotate evenly.
- Monitor the temperature inside the dryer during the test cycle to ensure it is reaching the appropriate levels for drying clothes effectively.
- If the test cycle completes without any issues or abnormalities, congratulations! You have successfully installed a new belt on your Kenmore dryer.
- If you notice any problems during the test cycle, such as excessive noise or the drum not spinning properly, switch off the dryer immediately and reassess the installation. It may be necessary to carefully disassemble and reassemble the dryer to ensure the belt is correctly installed.
By following these steps, you can ensure that the belt on your Kenmore dryer is installed correctly and functioning as it should. Now, you can look forward to uninterrupted drying cycles and fresh laundry!
Troubleshooting Tips And Common Issues
During the installation of a belt on a Kenmore dryer, it is common to encounter a few challenges. These troubleshooting tips will help you overcome any issues that may arise and ensure a smooth installation process. Whether you are a DIY enthusiast or a beginner, these tips will come in handy. Read on to find out how to troubleshoot common issues and resolve any challenges that may stand in your way.
Troubleshooting common issues that may arise during installation
When installing a belt on a Kenmore dryer, a few common issues may arise. Understanding these issues and their possible solutions will help you complete the installation successfully:
- The belt keeps sliding off the pulley
This issue can be caused by a misaligned drum or pulley. Check that the drum is in its correct position and ensure that the pulley is aligned properly. Adjust and tighten as necessary to prevent the belt from sliding off. - The belt is too loose or too tight
Achieving the right tension is crucial for proper functioning of the belt. If the belt is too loose, it may slip or come off during operation. If it’s too tight, it can put strain on the motor and other dryer components. Adjust the tension by loosening or tightening the belt tensioning spring or pulley, following the manufacturer’s instructions. Ensure the belt has just enough tension to prevent slipping, but not so tight that it strains the system. - The belt is worn or damaged
Over time, the belt on your Kenmore dryer may wear out or become damaged. If you notice signs of wear, such as fraying or cracking, it’s important to replace the belt before it completely fails. Inspect the belt carefully before installation and replace it if necessary. Using a worn or damaged belt can cause the dryer to malfunction and may lead to further damage.
Tips for resolving any challenges encountered during the process
Installing a belt on a Kenmore dryer can be a straightforward process, but occasionally, challenges might occur. Here are some tips to help you resolve any challenges you may encounter:
- Refer to the user manual or online resources
If you’re unsure about any step or facing a specific challenge, consult the user manual that came with your Kenmore dryer. Additionally, many manufacturers offer online resources, such as videos or detailed guides, to help users with installation. Take advantage of these resources for guidance and troubleshooting. - Double-check your measurements and alignment
It’s essential to measure and align the drum, pulley, and other components accurately. Before installing the belt, double-check your measurements and ensure everything is aligned properly. Even a minor misalignment can cause issues, so be meticulous in your preparations. - Seek assistance if needed
If you encounter persistent challenges or feel overwhelmed by the installation process, don’t hesitate to seek assistance. Calling a professional or seeking advice from experienced individuals can save you time, prevent further issues, and ensure a successful belt installation.
By following these troubleshooting tips and employing the suggested solutions, you can overcome common issues and navigate through any challenges that arise during the installation of a belt on your Kenmore dryer. Remember to prioritize safety, refer to the manufacturer’s instructions, and take your time to complete the process accurately. A well-installed belt will contribute to the smooth running and efficient performance of your Kenmore dryer.
Maintenance And Care Tips For The Kenmore Dryer Belt
Proper maintenance of the Kenmore dryer belt is essential for its longevity and smooth operation. By implementing a few best practices and regular maintenance tasks, you can prevent future issues, saving you time and money. In this section, we will explore the best practices for maintaining the longevity of the belt and the regular maintenance tasks you should perform.
Best practices for maintaining the longevity of the belt
Following these best practices will help extend the lifespan of your Kenmore dryer belt:
- Always operate the dryer within the recommended load capacity specified by the manufacturer. Overloading the dryer can put excessive strain on the belt, leading to premature wear and tear.
- Clean the lint screen before every load to prevent lint buildup. Lint accumulation can cause the dryer to work harder, potentially straining the belt.
- Inspect the drum and motor pulleys for any signs of damage or wear. Replace them if necessary to avoid excessive belt tension or misalignment.
- Ensure the drum spins freely, without any obstruction. Any objects caught in the drum can cause the belt to slip or break.
- Regularly check the tension of the belt. If it feels loose, too tight, or shows signs of fraying, it may need adjustment or replacement.
Regular maintenance tasks to prevent future issues with the belt
To keep your Kenmore dryer belt in optimal condition, regular maintenance tasks should be part of your routine:
| Maintenance Task | Frequency |
|---|---|
| Clean the dryer vent | Once every three months |
| Inspect and clean the idler pulley | Once every six months |
| Lubricate the rollers and idler pulley bearings | Once a year |
| Check the drive motor for proper functioning | Once a year |
Regularly cleaning the dryer vent ensures proper airflow, reducing strain on the belt and preventing lint buildup that could lead to overheating. Inspect and clean the idler pulley at least twice a year to remove any debris and ensure it moves smoothly. Lubricating the rollers and idler pulley bearings annually will help maintain their performance and prevent excess friction that can damage the belt. Lastly, check the drive motor yearly to ensure it is functioning correctly and not placing unnecessary strain on the belt.
By following these best practices and performing regular maintenance tasks, you can prolong the lifespan of your Kenmore dryer belt, avoid costly repairs, and enjoy uninterrupted drying cycles. Incorporating these tips into your maintenance routine will ensure optimal performance and efficiency from your dryer for years to come.
Frequently Asked Questions
How Do You Put A Dryer Belt Back On?
To put a dryer belt back on, follow these steps: 1. Unplug the dryer and access the drum. 2. Loop the belt around the drum, positioning it on the indentation. 3. Reach under the drum and pull the belt through the motor pulley and tensioner.
4. Rotate the drum by hand to ensure the belt is properly aligned. 5. Plug in the dryer and test its operation.
Is It Easy To Replace A Dryer Belt?
Replacing a dryer belt is relatively easy. Just follow the instructions in your dryer’s manual or find a tutorial online. Make sure to disconnect the power, remove the old belt, and carefully install the new one. It may require a little effort, but with the right guidance, you can do it!
How Do You Put A Belt Back On A Kenmore Stackable Dryer?
To put a belt back on a Kenmore stackable dryer, follow these steps: First, unplug the dryer and remove the front panel. Release the tension from the belt by pushing the idler pulley forward. Then, loop the belt around the drum and the motor pulley.
Finally, restore the tension and reassemble the dryer.
Which Way Round Does A Dryer Belt Go?
The dryer belt should be placed around the drum and motor pulley in a specific direction. Typically, the smooth side of the belt should face the drum, while the grooved side should face the motor pulley. Make sure to consult the dryer’s manual for specific instructions.
Conclusion
Installing a belt on your Kenmore dryer is a straightforward process that can be done with a few simple steps. By following our guide, you can quickly and easily replace the belt, ensuring your dryer operates efficiently. Remember to unplug your dryer before beginning and consult your manual for any specific instructions.
With a little patience and the right tools, you’ll have a properly functioning dryer in no time. Happy repairing!