To install a belt on a dryer, first, disconnect the power supply, remove the old belt from the drum, loop the new belt around the drum, and then thread it through the idler pulley and motor pulley. After that, reassemble the dryer and reconnect the power supply.
Dryers are an essential appliance in our homes, providing convenience and efficiency in laundry care. However, like any other machine, dryers sometimes require maintenance, including replacing the belt. If you’re facing the task of installing a belt on your dryer, it’s essential to do it correctly to ensure proper functioning.
We will guide you through the process of installing a belt on a dryer, providing step-by-step instructions to make your task easier. By following these instructions, you’ll be able to efficiently replace the belt on your dryer and restore its optimal performance, saving you from the hassle and expense of calling a repair person.
Gathering The Necessary Tools And Supplies
Before you start the process of installing a new belt on your dryer, it is essential to gather all the necessary tools and supplies. By having everything at hand, you will be able to complete the task efficiently and without any interruptions. In this section, we will cover the steps required to collect the appropriate tools and supplies for this task.
Check the dryer’s model number and search for the appropriate replacement belt
The first step in gathering the necessary tools and supplies is to identify the model number of your dryer. The model number is typically located on a label inside the dryer door or on the back panel. Once you have the model number, you can search online or visit your local appliance store to find the appropriate replacement belt. It is crucial to get the correct belt to ensure compatibility and optimal performance.
Gather a screwdriver, pliers, and a putty knife
Next, you will need to gather a few common tools that will come in handy during the installation process. A screwdriver will be necessary to remove any screws or panels that may be obstructing access to the dryer belt. Pliers will be useful for manipulating the tensioner and guiding the belt onto the right track. Finally, a putty knife can be used to carefully remove the old belt and scrape off any residue from the pulleys.
Ensure safety by disconnecting the dryer from the power source
Prior to starting any work on your dryer, it is absolutely crucial to prioritize safety. To avoid any electric shocks or accidents, make sure to disconnect the dryer from the power source. This can typically be done by unplugging the power cord from the wall socket or turning off the circuit breaker dedicated to the dryer. Safety should always be the top priority when working with electrical appliances.
By following these steps and gathering the necessary tools and supplies, you will be fully prepared to proceed with the installation of a new belt on your dryer. Taking the time to gather the correct tools and ensuring safety measures are in place will make the process smoother and more efficient.
Accessing The Dryer Belt
Remove the lint filter and unscrew the lint filter housing
To access the dryer belt and begin the installation process, the first step is to remove the lint filter. This is usually located near the dryer door on the top panel. Simply pull out the lint filter and set it aside.
Next, using a screwdriver, you need to unscrew the lint filter housing. This is often located beneath the lint filter and holds it in place. Carefully remove the screws, keeping them in a safe place as you will need them later to reassemble the dryer.

Use a putty knife to release the top panel and lift it up
Once the lint filter and housing are removed, it’s time to release the top panel of the dryer. This can be done using a putty knife or a similar flat tool. Locate the spring clips that are holding the top panel in place.
Insert the putty knife between the top panel and the dryer’s body, near the front corners. Apply gentle pressure while lifting the putty knife upward to release the spring clips. Repeat this process on both sides of the dryer until the top panel is free.
Remove the front panel by taking out the screws or unhooking the latches
With the top panel lifted, you can now proceed to remove the front panel of the dryer. This step may vary depending on the model, so refer to the manufacturer’s instructions if needed.
Typically, the front panel is held in place by screws or latches. If screws are present, use a screwdriver to carefully remove them. Make sure to keep the screws in a safe place as you will need them when reassembling the dryer.
If latches are used, locate them on either side of the front panel. To release the latches, simply push them inward or upward, depending on the design. Once the latches are disengaged, lift the front panel away from the dryer.

Now that you have successfully accessed the dryer belt by removing the lint filter, unscrewing the lint filter housing, releasing the top panel, and removing the front panel, you are ready to proceed with the belt installation process. Stay tuned for the next section on how to install the dryer belt and ensure proper alignment for optimal performance.
Removing The Old Belt
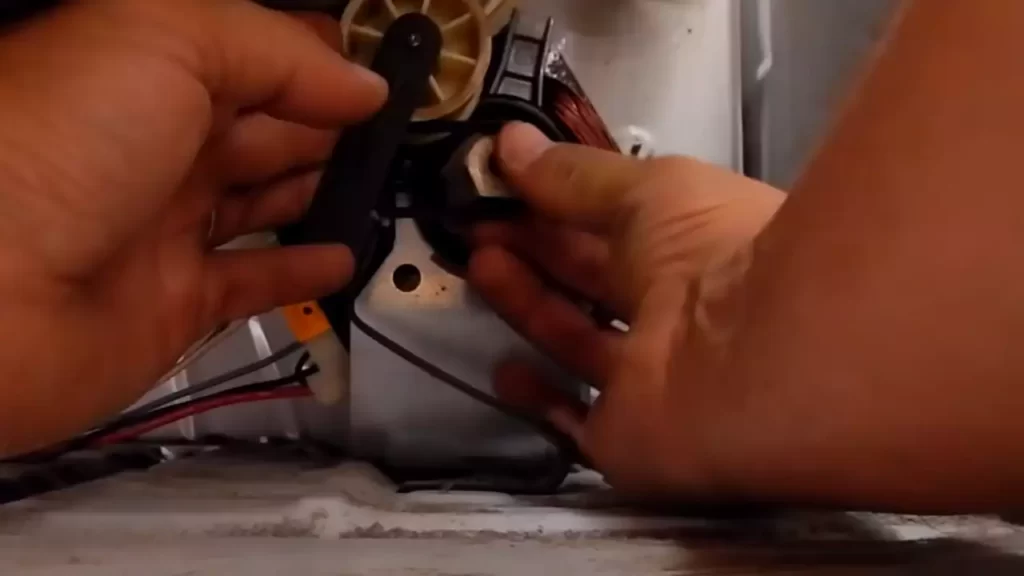
Locate the idler pulley and release the tension on the old belt
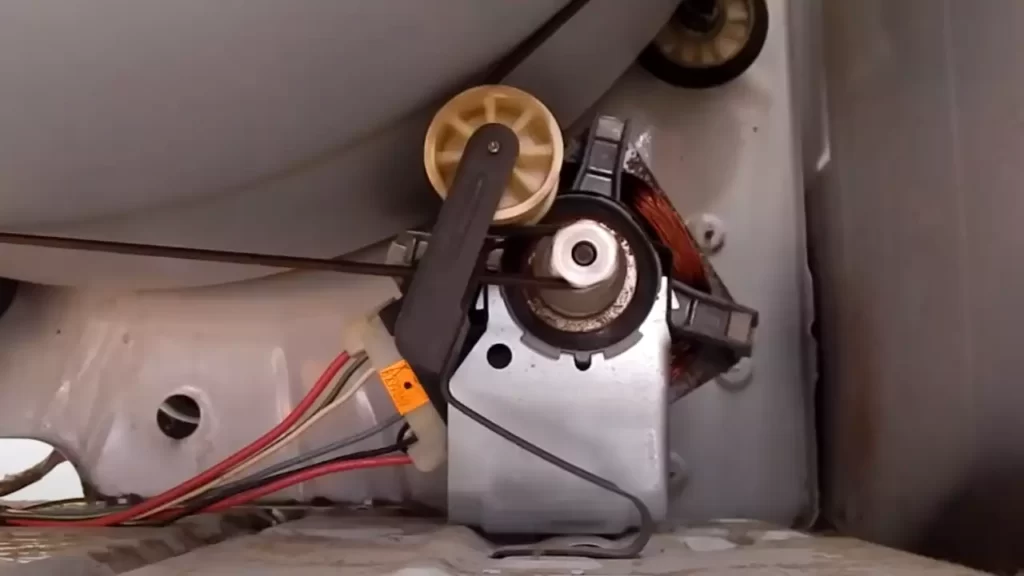
Before you can remove the old belt from your dryer, you need to locate the idler pulley. The idler pulley is responsible for keeping the belt tight and it is typically found near the motor. Once you have located the idler pulley, you will need to release the tension on the old belt.
To release the tension on the old belt, you can use a screwdriver or a wrench. Insert the screwdriver or wrench into the tensioner and push or pull it to release the tension. This will loosen the belt and allow you to remove it from the drum, motor pulley, and idler pulley.
Slide the old belt off the drum, motor pulley, and idler pulley
Now that you have released the tension on the old belt, it’s time to slide it off the drum, motor pulley, and idler pulley. Start by carefully lifting the drum slightly to create enough space to slide the belt off. Make sure to keep a firm grip on the drum to prevent it from moving too much.
Next, slide the old belt off the motor pulley and idler pulley. Take note of how the belt is routed around these components, as you will need to install the new belt in the same way. Inspect the drum, motor pulley, and idler pulley at this time to ensure they are clean and free of any debris or obstructions.
Inspect the old belt for any signs of damage or wear
Before you discard the old belt, it’s important to inspect it for any signs of damage or wear. Check for fraying, cracking, or stretching in the belt. If you notice any of these issues, it’s a good idea to replace the belt rather than reusing it.
A damaged or worn-out belt can cause issues with the dryer’s performance, such as excessive noise or the drum not turning properly. By inspecting the old belt, you can ensure that you are installing a new belt that is in good condition and will help your dryer function optimally.
Installing The New Belt
Now that you have successfully removed the old belt from your dryer, it’s time to install the new one. Follow these steps to ensure a proper and secure installation.
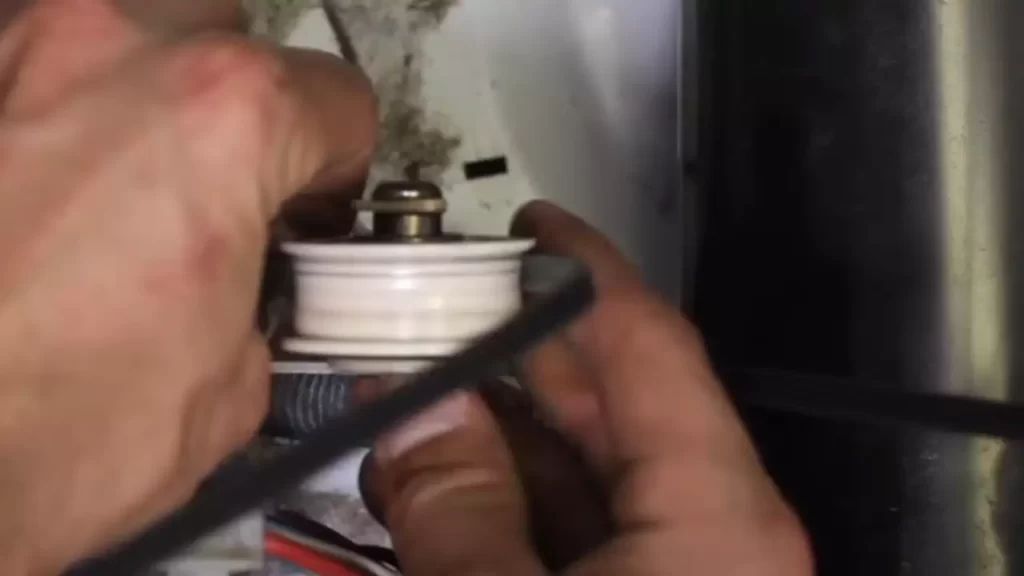
Place the new belt around the drum, ensuring it sits on the grooves correctly
Begin by placing the new dryer belt around the drum. It’s important to make sure that the belt sits on the grooves of the drum correctly. This will ensure that it rotates smoothly and efficiently during operation.
Loop the belt over the motor pulley and idler pulley, following the diagram if available
Next, loop the belt over the motor pulley and the idler pulley. These pulleys are responsible for moving the belt and providing tension. If there is a diagram available, be sure to follow it as it will show you the correct path for the belt. Securely loop the belt over both pulleys to ensure a proper fit.
Double-check that the belt is sitting properly on all the pulleys
Once you have looped the belt over the motor and idler pulleys, it’s important to double-check that it is sitting properly on all the pulleys. This will help prevent any future issues or malfunctions. Take a quick look at each pulley to ensure the belt is correctly aligned and positioned.
In conclusion, installing a new belt on your dryer is a relatively simple process. By following these steps, you can ensure that your dryer runs smoothly and efficiently. Remember to place the new belt around the drum, loop it over the motor and idler pulleys, and double-check its placement on all the pulleys. With the belt securely in place, you can now enjoy properly dried laundry!
Reassembling The Dryer
Reattach the front panel by securing the screws or rehooking the latches
After successfully replacing the broken belt on your dryer, it’s time to put everything back together. The first step is to reattach the front panel. Look for the screw holes or latches on the inside of the front panel and align them with the corresponding holes or hooks on the dryer body. Once aligned, insert the screws into the holes or rehook the latches securely. Use a screwdriver or the appropriate tool to tighten the screws, ensuring the front panel is firmly attached. This step is crucial as it holds the entire dryer together, so be sure to take your time and do it properly.
Lower the top panel back into place and secure it with the screws
With the front panel securely attached, the next step is to lower the top panel back onto the dryer. First, locate the hinges at the back of the top panel and align them with the corresponding slots on the dryer body. Carefully lower the top panel into place, ensuring the alignment is correct. Once in position, locate the screw holes on the inside of the top panel and insert the screws. Tighten the screws with a screwdriver or the appropriate tool, ensuring the top panel is securely fastened. This step completes the reassembly of the main body of the dryer and prepares it for the final touches.
Reinstall the lint filter housing and insert the lint filter
The last step in reassembling your dryer is to reinstall the lint filter housing. Locate the lint filter housing slot inside the dryer and carefully position the housing into place. Ensure the housing is aligned properly, then press it firmly to secure it in position. Once the housing is securely attached, insert the lint filter into the designated slot. Make sure the lint filter is clean and free from any lint or debris before inserting it. This will help optimize the dryer’s performance and prevent any potential issues. With the lint filter in place, you can now confidently close the dryer door and enjoy the benefits of a fully functioning dryer.
In conclusion, reassembling a dryer after installing a new belt is a straightforward process. By following these simple steps, you can easily reattach the front panel, lower the top panel, and reinstall the lint filter housing, completing the reassembly of your dryer. Taking your time and ensuring everything is securely fastened will guarantee the longevity and efficiency of your dryer. So, don’t rush the process and enjoy the satisfaction of fixing your dryer yourself!
Testing The Dryer
Once you have successfully installed the new belt on your dryer, the next step is to test the appliance to ensure everything is working properly. This step is crucial as it allows you to check if the belt is aligned correctly and if there are any potential issues or malfunctions. Here are the steps to follow when testing your dryer after installing a new belt:
Reconnect the dryer to the power source
The first thing you need to do is to reconnect the dryer to the power source. Make sure the plug is properly inserted into the outlet to ensure a secure connection. It’s important to note that working with electrical appliances can be dangerous, so always exercise caution and follow proper safety precautions.
Start the dryer on a low heat setting and observe the movement of the drum
Once you have reconnected the dryer to the power source, it’s time to turn it on. Start by selecting a low heat setting to avoid any potential damage to the dryer or the newly installed belt. As the dryer starts, pay attention to the movement of the drum. It should rotate smoothly and evenly without any jerking or excessive vibrations. This indicates that the belt is properly aligned and functioning as it should.
Listen for any unusual sounds or vibrations
While the dryer is running, listen carefully for any unusual sounds or vibrations. Unusual noises like squeaking, grinding, or scraping may indicate a problem with the belt or other components of the dryer. Similarly, excessive vibrations can be a sign of misalignment or an issue with the drum. If you notice any of these signs, it’s important to stop the dryer immediately and inspect the belt to ensure it’s properly installed.
By following these steps and carefully testing your dryer, you can ensure that the new belt installation has been successful. Don’t forget to perform regular maintenance on your dryer to keep it running smoothly and efficiently in the long run.
Troubleshooting Tips
When it comes to installing a belt on a dryer, it is important to ensure that everything is in proper working order before powering up the machine. However, sometimes issues can arise during operation that may cause the belt to slip or even come off. To help you troubleshoot these problems, here are some useful tips to keep in mind:
If the belt slips or comes off during operation, check for any misalignment or tension issues
In order for the dryer to function properly, the belt needs to be properly aligned and tensioned. If the belt slips or comes off during operation, it could be due to misalignment or tension problems. Start by checking if the belt is properly seated on the pulleys and drum. Look for any signs of wear or damage on the belt that may be causing it to slip. You should also inspect the tensioner pulley, idler pulley, and motor pulley to ensure they are all in good condition and functioning correctly. If you notice any issues, such as misaligned pulleys or a faulty tensioner, it is important to address and fix them before using the dryer again.
Ensure all parts are properly secured and aligned before operating the dryer
Before you start using the dryer, it is crucial to make sure that all the parts involved in the belt installation are properly secured and aligned. Check that the belt is correctly positioned on the drum and pulleys, with no twists or kinks. Ensure that the tensioner pulley is properly mounted and aligned with the belt. Double-check that the motor pulley is securely attached and aligned as well. It is also recommended to inspect other components, such as the drum support rollers and support roller shafts, for any signs of wear or damage that could affect the belt installation and operation. By taking the time to ensure everything is in order, you can avoid unnecessary complications and prolong the lifespan of your dryer.
Refer to the dryer’s manual or contact a professional if you encounter any difficulties
If you encounter any difficulties during the belt installation process or have concerns about the dryer’s operation, it is always a good idea to refer to the dryer’s manual or contact a professional for assistance. The manual will provide you with detailed instructions specific to your dryer model and may include troubleshooting tips for common issues. Professional help can be invaluable, especially if you lack experience or encounter complex problems. Remember, safety should always be a top priority, so don’t hesitate to seek professional guidance if needed.
Frequently Asked Questions
Can I Replace A Dryer Belt Myself?
Yes, you can replace a dryer belt yourself. It is a DIY task that requires some basic tools and following a few steps. By carefully removing the old belt and installing a new one, you can save money on hiring a repair service.
Just make sure to consult the appliance manual for guidance.
How Is A Dryer Belt Installed?
To install a dryer belt, start by unplugging the dryer and removing the front panel. Locate the old belt and release the tension by moving the pulley wheel. Slip the new belt onto the drum and loop it around the pulley and motor shaft.
Finally, reassemble the dryer and plug it back in.
How Does A Dryer Belt Go Back On?
To put a dryer belt back on, follow these steps: 1. Unplug the dryer and remove the front or top panel. 2. Locate the old belt and release tension by pulling on the idler pulley. 3. Slip the new belt over the drum and onto the motor and idler pulley.
4. Apply tension by pulling the idler pulley. 5. Reassemble the dryer, plug it in, and test it.
How Do You Stretch A Dryer Belt?
To stretch a dryer belt, start by unplugging the dryer and removing the front panel. Locate the tension roller and release the belt from it. Stretch the belt over the drum and around the motor and tension roller. Finally, reassemble the dryer and plug it back in.
Conclusion
To sum up, installing a belt on a dryer is a simple task that can help restore the efficiency of your appliance. By following the step-by-step instructions outlined in this guide, you can easily replace a worn-out belt and ensure smooth operation.
Remember to prioritize safety throughout the process and consult the manufacturer’s manual for any specific guidelines. With a little patience and care, you’ll have your dryer up and running in no time. Happy fixing!