To install a bathroom exhaust fan with light, follow these steps: start by turning off the power to the bathroom, remove the existing light fixture, connect the fan and light wires, secure the fan housing to the ceiling joists, attach the ductwork to the fan, install the exhaust vent and connect it to the ductwork, and finally, install the fan cover and light fixture.
Overview And Importance Of Bathroom Exhaust Fans
Proper ventilation is essential in any bathroom to maintain a clean and healthy environment. The accumulation of moisture, odors, and airborne pollutants can quickly become problematic, leading to mold growth, mildew, and poor indoor air quality. This is where bathroom exhaust fans come into play. By removing excess moisture and odors from the air, these fans create a more comfortable and hygienic space.
Importance of ventilation in the bathroom
A bathroom without proper ventilation can quickly become a breeding ground for mold and mildew. Every time you take a shower or use hot water, excess moisture is produced. If this moisture is not adequately removed, it can seep into the walls, floors, and ceilings, causing structural damage and promoting the growth of harmful mold spores.
Mold not only damages your bathroom surfaces but can also have serious health implications. It can cause respiratory problems, allergies, and even trigger asthma attacks. By installing a bathroom exhaust fan, you can effectively eliminate excess moisture, preventing mold growth and ensuring a healthier living environment.
Benefits of using a bathroom exhaust fan with light
A bathroom exhaust fan equipped with a light fixture serves a dual purpose, providing both ventilation and illumination. Here are some of the benefits of installing a bathroom exhaust fan with light:
- Improved air quality: The primary function of the fan is to remove stale air, moisture, and odors, improving the overall air quality in your bathroom. This is especially important in small, enclosed spaces where ventilation is limited.
- Reduced condensation: The presence of excessive moisture can lead to condensation on bathroom surfaces such as mirrors, windows, and walls. By quickly removing the moist air, an exhaust fan with light helps prevent condensation, keeping your bathroom clean and dry.
- Enhanced visibility: The built-in light in the exhaust fan provides additional illumination, making it easier to perform tasks such as shaving, applying makeup, or cleaning. It adds functionality to your bathroom and ensures you have adequate lighting at all times.
Introduction to the installation process
Installing a bathroom exhaust fan with light may seem like a daunting task, but with the right guidance, it can be a straightforward process. Before beginning, gather the necessary tools and materials, including a ladder, screwdriver, wire strippers, electrical tape, and the fan kit itself.
Start by turning off the power to the bathroom at the main electrical panel. Next, locate the ideal placement for the fan, ensuring it is towards the center of the room and away from any obstructions. Measure the dimensions of the fan and mark the installation area, ensuring it aligns with the joists in the ceiling. Cut the opening using a saw, following the marked lines.
Once the opening is ready, feed the wiring through the housing of the fan and connect it to the electrical supply. Secure the fan in place using screws or the provided brackets. Finally, attach the grille and the light fixture, and turn the power back on to enjoy your newly installed bathroom exhaust fan with light.
Remember, if you’re unsure about any step or lack experience with electrical work, it’s always advisable to hire a professional to ensure proper installation and safety.
Planning And Preparation
When it comes to installing a bathroom exhaust fan with light, proper planning and preparation is key to ensuring a successful installation. By taking the time to measure your bathroom, assess the electrical wiring, and select the right fan, you can create a comfortable and well-ventilated space. In this section, we will go over the important steps involved in the planning and preparation phase of installing a bathroom exhaust fan with light.
Measuring the bathroom and determining the fan size and capacity
Measuring your bathroom is the first step in determining the appropriate size and capacity for your exhaust fan with light. Proper air circulation is crucial for eliminating excess moisture, odors, and pollutants from your bathroom. To ensure optimal performance, consider the following factors when measuring your space:
- Bathroom size: Measure the length, width, and height of your bathroom to calculate the total cubic footage. This will help determine the necessary fan capacity.
- Fixture count: Take into account the number of fixtures in your bathroom, such as toilets, sinks, and showers. More fixtures may require a higher capacity fan to effectively remove moisture and odors.
- Installation location: Consider where you plan to install the fan. Is it near the shower or bathtub? If so, you may need to choose a fan specifically designed for high-moisture environments.
Assessing the existing electrical wiring and ensuring compatibility
Before installing a bathroom exhaust fan with light, it’s important to assess your existing electrical wiring to ensure compatibility with the new fixture. The following steps will help you determine if your wiring is suitable:
- Check the circuit: Identify the circuit that powers your current bathroom lighting. Make sure it has enough capacity to handle the additional load of the exhaust fan with light.
- Inspect wiring: Examine the wiring in the area where you plan to install the fan. Look for any signs of damage or wear and ensure the wires are in good condition.
- Consult a professional: If you’re unsure about the compatibility of your electrical wiring, it’s always best to consult a licensed electrician for advice and assistance.
Selecting the right type of exhaust fan with light
Choosing the right type of exhaust fan with light is crucial for achieving optimal ventilation and lighting in your bathroom. Consider the following factors when making your selection:
- Noise level: Look for a fan that operates quietly, especially if your bathroom is located near bedrooms or living spaces.
- Energy efficiency: Consider an exhaust fan with light that is ENERGY STAR certified, as this will help reduce energy consumption and save you money in the long run.
- Lighting options: Decide whether you prefer a fan with integrated lighting or if you want to retain your existing lighting setup and opt for a fan without built-in lights.
- Additional features: Some exhaust fans come with extra features like humidity sensors, timers, or motion detectors – consider if any of these features are important to you.
By taking the time to measure your bathroom, assess the electrical wiring, and select the right type of exhaust fan with light, you can ensure a successful installation that enhances both the ventilation and lighting of your bathroom space.
Gathering Tools And Materials
Before you start installing a bathroom exhaust fan with light, it’s important to gather all the necessary tools and materials. Having everything in one place will help you save time and ensure a smooth installation process. In this section, we will provide you with a comprehensive list of tools required and materials needed for proper installation.
List of tools required for installation
Here’s a list of essential tools you’ll need to successfully install a bathroom exhaust fan with light:
- Screwdriver (Phillips and Flathead)
- Drill
- Wire stripper
- Hammer
- Measuring tape
- Hacksaw
- Pliers
- Adjustable wrench
- Nose pliers
- Utility knife
- Wire connectors
- Stepladder
- Circuit tester
With these tools in your arsenal, you’ll be well-equipped to handle any challenges that may arise during the installation process.
Materials needed for proper installation
Ensuring you have the right materials is crucial for a proper and efficient installation of your bathroom exhaust fan with light. Here are the materials you’ll need:
| Materials | Quantity |
|---|---|
| Exhaust fan with light | 1 |
| Mounting brackets | 2 |
| Flex duct | 1 roll |
| Roof vent cap | 1 |
| Roofing nails | As required |
| Electrical wire | As required |
| Cable clamps | As required |
| Duct tape | 1 roll |
| Mounting screws | As required |
Make sure you have all these materials readily available before starting the installation process. Missing any item can cause delays and hinder progress.
Now that you have a clear understanding of the tools and materials required, you’re ready to move on to the next steps of installing your bathroom exhaust fan with light!
Safety Precautions
Importance of Turning Off the Power Before Starting the Installation
One of the most crucial safety precautions to take when installing a bathroom exhaust fan with light is to ensure that the power is turned off before beginning any work. This step may seem obvious, but it is often overlooked, leading to potentially dangerous situations. By turning off the power, you eliminate the risk of electric shock and mitigate the chances of causing damage to yourself or the electrical wiring.
To turn off the power, locate the circuit breaker or fuse box that controls the bathroom’s electrical supply. Once you have located the correct circuit, flip the corresponding breaker switch or remove the appropriate fuse. It’s essential to label the switch or fuse box accurately so that you can easily identify it in the future.
Using Personal Protective Equipment (PPE) for Safety
When undertaking any home improvement project, including installing a bathroom exhaust fan with light, it is essential to take appropriate safety precautions. Using personal protective equipment (PPE) is a crucial aspect of ensuring your well-being during the installation process.
Here’s a list of PPE that you should have on hand:
| Bulletproof Helmet | Protect your head from potential falling objects. |
| Protective Eyewear or Safety Glasses | Shield your eyes from debris or dust particles. |
| Dust Mask or Respirator | Prevent inhalation of harmful dust or particles. |
| Gloves | Protect your hands from sharp edges or electrical hazards. |
| Non-Slip Shoes | Ensure stability and reduce the risk of accidents on slippery surfaces. |
Wearing this protective gear will help minimize the risk of injury and provide an extra layer of security as you work.
Remember that safety should be your top priority throughout the installation process. By turning off the power and using PPE, you significantly reduce the chances of accidents or mishaps. Take the necessary precautions to protect yourself and ensure a successful installation of your bathroom exhaust fan with light.
Step-By-Step Installation Guide
Are you tired of dealing with excess humidity and unpleasant odors in your bathroom? Installing a bathroom exhaust fan with light can be the perfect solution to improve air circulation and provide better lighting. In this step-by-step installation guide, we will walk you through the process of installing a bathroom exhaust fan with light. By following these instructions, you’ll be able to enjoy a properly ventilated and well-illuminated bathroom in no time!
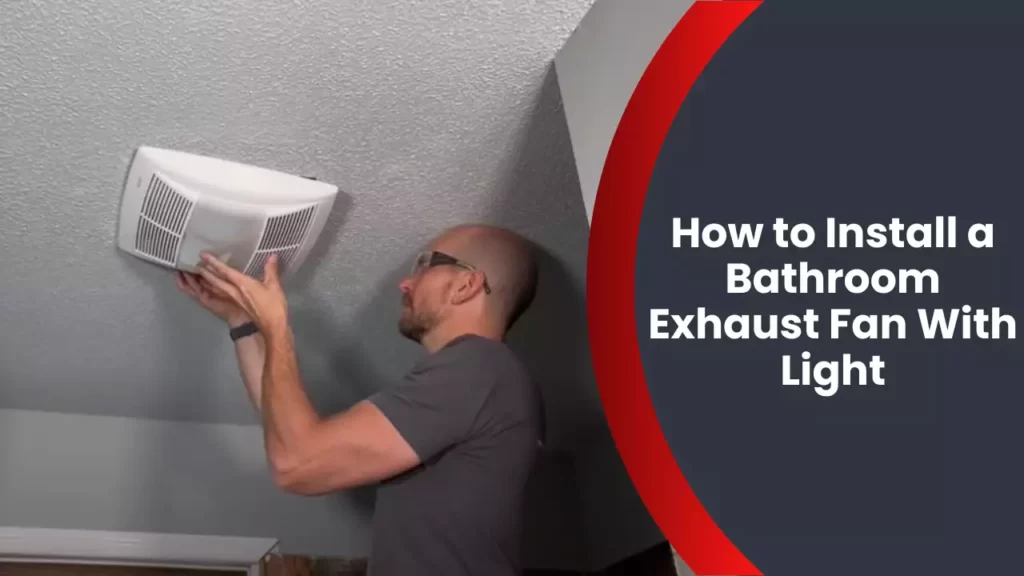
Installing the Fan Housing in the Desired Location
The first step in installing a bathroom exhaust fan with light is determining where to place the fan housing. Consider the size of your bathroom and locate a spot near the shower or bathtub where steam and moisture tend to accumulate. Once you have chosen the ideal location, follow these steps:
- Mark the exact position where the fan housing will be installed on the ceiling or wall.
- Using a stud finder, locate the nearest ceiling joist or wall stud that will provide support for the fan.
- Secure the fan housing to the ceiling joist or wall stud using screws, ensuring it is level and securely in place.
Connecting the Electrical Wiring Properly
Once the fan housing is securely installed, the next step is to connect the electrical wiring. Follow these steps carefully to ensure a safe and effective connection:
- Turn off the power to the bathroom at the circuit breaker.
- Remove the cover plate from the electrical junction box and disconnect any existing wiring.
- Connect the electrical wires from the fan housing to the corresponding wires in the electrical junction box, using wire connectors.
- Securely tighten the wire connectors and replace the cover plate on the electrical junction box.
- Turn on the power and test the fan to ensure it is functioning properly.
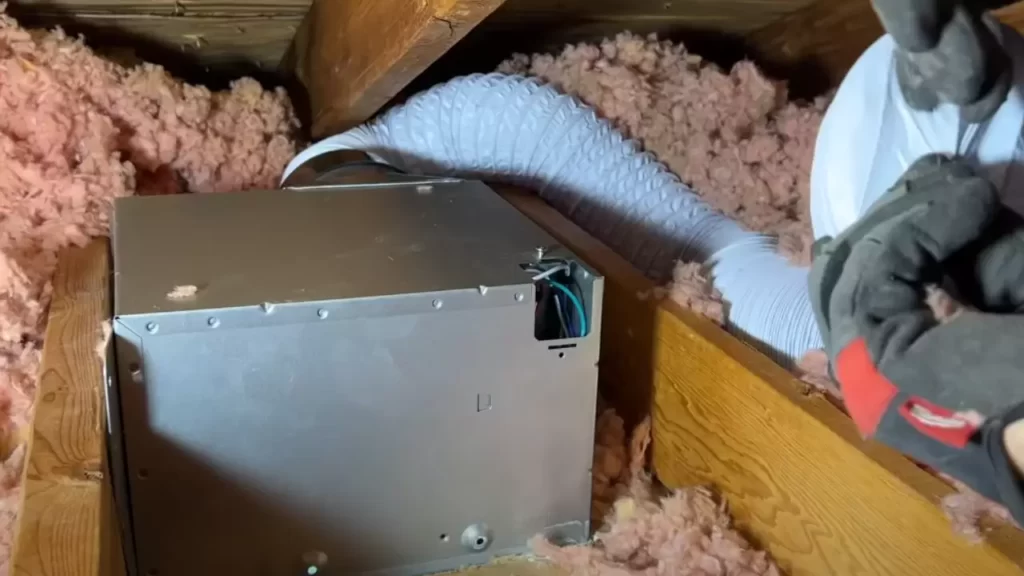
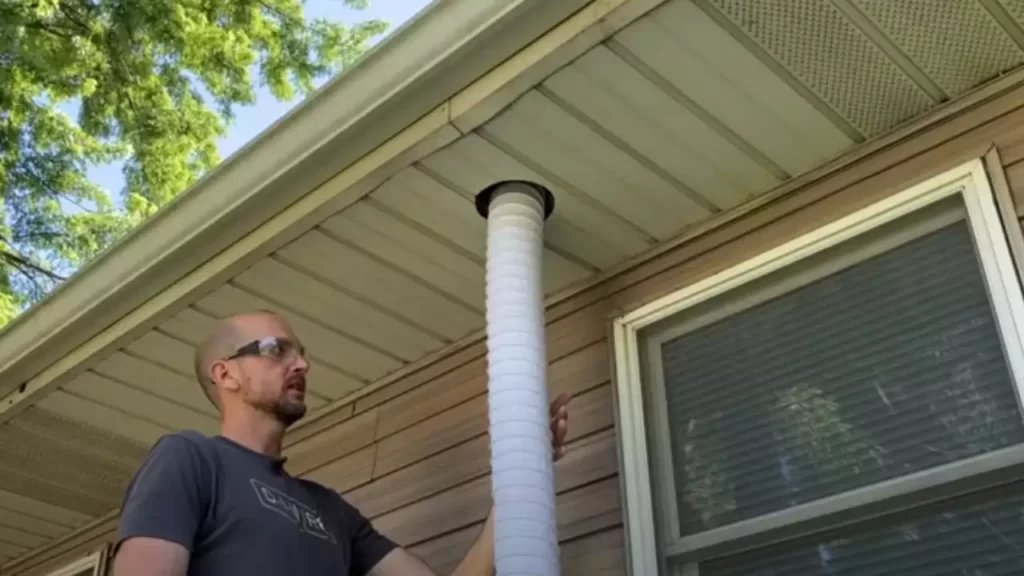
Mounting and Securing the Fan Exhaust Duct
Now that the fan housing is installed and the electrical wiring is connected, it’s time to mount and secure the fan exhaust duct. Follow these steps to ensure proper ventilation:
- Measure and cut the exhaust duct to the appropriate length, considering the distance between the fan housing and the exterior vent.
- Attach one end of the exhaust duct to the fan housing using duct tape or clamps.
- Extend the other end of the exhaust duct to the exterior vent and secure it in place using duct tape or clamps.
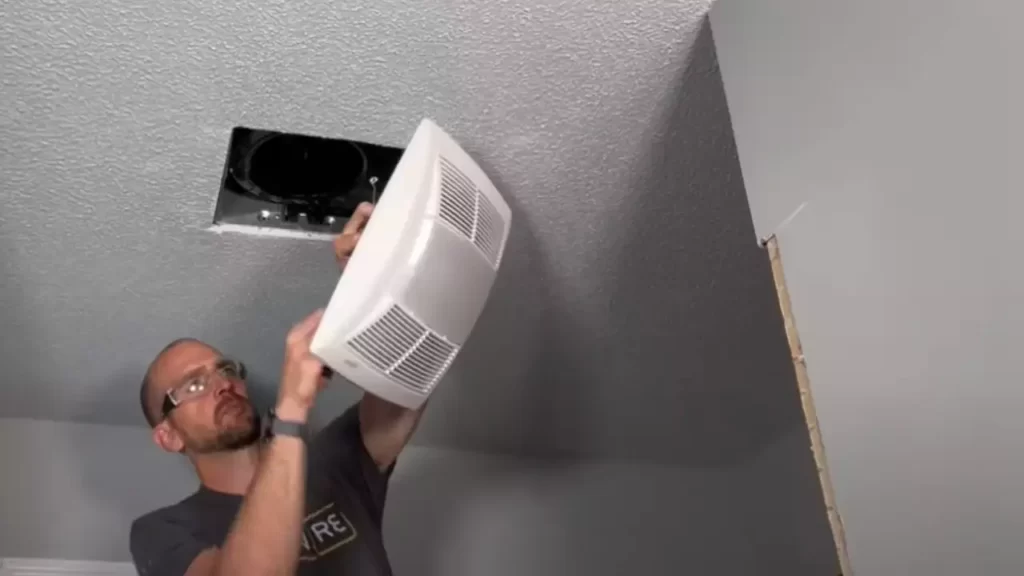
Attaching the Fan Unit and Light Fixture
With the fan housing and exhaust duct properly installed, it’s time to attach the fan unit and light fixture. Follow these steps to complete the installation:
- Attach the fan unit to the fan housing, following the manufacturer’s instructions.
- Securely fasten the light fixture to the fan unit.
- Connect the electrical wiring for the light fixture, ensuring the proper connections.
- Tighten any screws or brackets to securely hold the fan unit and light fixture in place.
Testing and Adjusting the Fan Settings
Before you conclude the installation process, it’s important to test and adjust the fan settings to ensure optimal performance. Follow these steps:
- Turn on the fan and check that it is operating smoothly.
- Adjust the fan settings, such as speed or humidity sensors, according to your preferences and the manufacturer’s instructions.
- Test the light fixture to ensure it is working correctly.
- Make any necessary adjustments to the fan and light settings for optimal performance.
Congratulations! You have successfully installed a bathroom exhaust fan with light, improving the ventilation and lighting in your bathroom. Remember to regularly clean and maintain the fan to ensure its efficiency and longevity. Now you can enjoy a fresh and well-lit bathroom every day!
Common Challenges And Troubleshooting
Dealing with Existing Ventilation Challenges in Older Homes
Installing a bathroom exhaust fan with light in older homes can pose unique challenges due to outdated ventilation systems. Some common issues you may encounter include:
- No existing ductwork: In older homes, you might find that there is no ductwork in place for proper ventilation. This means you will need to install new ducts to ensure the effective operation of the exhaust fan.
- Inadequate ventilation: Historical buildings often have insufficient or poorly designed ventilation systems that do not effectively remove excess moisture or odors. You may need to upgrade or modify the existing ventilation system to meet current standards.
- Tight spaces: Older homes often have limited space available for installing a bathroom exhaust fan. You may need to explore creative solutions or consider smaller, compact fan models that can fit into tight spaces.
Addressing Electrical Wiring Issues or Complexities
When it comes to bathroom exhaust fan installation, dealing with electrical wiring can be a tricky task. Here are some considerations to keep in mind:
- Testing existing wiring: Before installation, it is important to assess the condition of the existing wiring and ensure it meets the necessary electrical standards. You may need to hire a professional electrician to inspect and make any required modifications.
- Upgrading electrical capacity: Older homes may have outdated electrical systems that are not adequately equipped to handle the additional power requirements of a bathroom exhaust fan with light. In such cases, you might need to upgrade your electrical panel or wiring to support the new fixture.
- Navigating complex wiring layouts: If your home has complex wiring layouts, it can be challenging to identify the appropriate wires for your new exhaust fan. Careful attention and expertise are necessary to ensure proper wiring connections are made to avoid any electrical issues.
Troubleshooting Common Problems During Installation
Even with careful planning, you may still encounter a few hiccups during the installation process. Here are some common problems and troubleshooting tips:
- Motor not working: If the fan motor fails to operate, check the electrical connections to ensure they are secure and properly connected. Additionally, inspect the circuit breaker or fuse to ensure it has not tripped or blown.
- Inadequate airflow: If you notice weak airflow from the exhaust fan, check for obstructions in the ductwork or fan blades. Accumulated dust or debris can hinder performance. Clean these areas to restore optimal airflow.
- Excessive noise: Noisy exhaust fans can be a nuisance. Ensure that the fan is securely mounted and aligned properly. Additionally, check for loose or damaged components that may be causing the noise.
- Ineffective odor removal: If odors persist after installation, consider installing a charcoal filter or adding an inline fan to enhance air purification and odor removal.
By being aware of these common challenges and troubleshooting methods, you can better prepare yourself for the installation of a bathroom exhaust fan with light. Remember, if you encounter any difficulties beyond your expertise, it is always wise to consult a qualified professional to ensure a safe and successful installation.
Tips For Maintenance And Usage
Regular cleaning and maintenance of the exhaust fan
Regular cleaning and maintenance of your bathroom exhaust fan is essential to ensure it functions properly and efficiently. Neglecting this aspect can lead to a buildup of dust, dirt, and even mold, which can impact the performance of the fan and compromise the air quality in your bathroom. Follow these simple steps to keep your exhaust fan clean and well-maintained:
- Start by turning off the power to the fan. Locate the circuit breaker or switch that controls the fan and turn it off to avoid any accidents.
- Remove the fan cover or grille. This can usually be done by gently pulling or twisting it, but you may need to consult the fan’s manual for specific instructions.
- Use a soft brush or vacuum cleaner attachment to remove any visible dust or debris from the fan blades and surrounding area. Be careful not to cause any damage or displace any wires during this process.
- For a more thorough cleaning, you can dampen a cloth with a mixture of mild soap and water and gently wipe down the fan blades and grille. Avoid using abrasive cleaners or excessive water, as this can damage the fan.
- Once you have finished cleaning, allow the fan to dry completely before reinstalling the cover or grille.
- Lastly, remember to clean or replace the fan’s filter if it has one. This will help to maintain optimal airflow and prevent any clogs.
Using the fan and light features efficiently
To get the most out of your bathroom exhaust fan with light, it’s important to use both features efficiently. Not only will this ensure effective ventilation and lighting, but it can also help to save energy and prolong the lifespan of the fan. Follow these tips to maximize the efficiency of your fan and light:
- Utilize the fan during and after showering or bathing to eliminate excess moisture and prevent the growth of mold and mildew. Remember to leave the fan running for at least 10-15 minutes after you finish to allow proper ventilation.
- Make sure to turn off the fan and lights when not in use. This simple habit can significantly reduce energy consumption and prolong the lifespan of the fan.
- If your fan has adjustable settings, choose the appropriate airflow level for each use. For quick ventilation, use a higher speed, and for less intensive needs, opt for a lower setting.
- Consider using LED light bulbs for the fan to improve energy efficiency and durability. LED bulbs last longer and consume less power compared to traditional incandescent bulbs.
Extending the lifespan of the fan
Proper maintenance and usage practices can help to extend the lifespan of your bathroom exhaust fan, ensuring it continues to operate effectively for years to come. Alongside regular cleaning and efficient usage, consider these additional tips:
- Check and tighten any loose screws or connections periodically. Vibration and movement can cause them to come loose over time, affecting the performance of the fan.
- Inspect the fan for any signs of wear or damage such as cracks or excessive noise. Address any issues promptly to prevent further damage.
- Engage a professional for annual inspections and servicing if you’re unsure about undertaking repairs or maintenance yourself.
- Refer to the manufacturer’s manual for specific instructions and guidelines on maintenance and troubleshooting.
- Keep the surrounding area of the fan clean and free from obstructions. This will aid in proper airflow and prevent any debris from compromising the fan’s performance.
By following these tips for maintenance and usage, you can ensure that your bathroom exhaust fan with light remains in optimal condition, providing you with efficient ventilation and lighting for many years.
Additional Considerations For Specific Scenarios
Installing a bathroom exhaust fan with light may require different considerations based on the specific scenario you are dealing with. Whether you have a small bathroom or you are upgrading an existing exhaust fan without light, these scenarios come with their unique challenges and requirements. In this section, we will explore the additional considerations for each of these situations to ensure a successful installation.
Installing a Bathroom Exhaust Fan with Light in a Small Bathroom
Small bathrooms can often present challenges when it comes to ventilation. Limited space and ventilation options can make the installation process a bit more complex. Here are some key factors to consider when installing a bathroom exhaust fan with light in a small bathroom:
- Size matters: Opt for a compact exhaust fan that is designed specifically for small spaces. This will ensure that the fan fits seamlessly into the limited space available in your bathroom.
- Noise level: In a small bathroom, excessive noise from the exhaust fan can be particularly bothersome. Look for a fan that offers a quiet operation, so it doesn’t become a source of annoyance.
- Lighting: To maximize the functionality of your small bathroom, choose a fan with integrated lighting. This will help save space by combining two essential features into one.
- Installation location: Determine the best location for your fan, considering the available space and proximity to the shower or bathtub. Ensure proper clearance and follow local building codes for installation placement.
By taking these considerations into account, you can ensure efficient ventilation and lighting in your small bathroom without compromising on space.
Upgrading an Existing Exhaust Fan without Light
If you already have an exhaust fan installed in your bathroom but want to upgrade it to include a light, there are a few additional considerations to keep in mind:
- Compatibility: Confirm that the new exhaust fan with light is compatible with your existing wiring and ventilation system. Check the specifications of the fan and consult a professional if needed.
- Ductwork modifications: You may need to make modifications to the existing ductwork to accommodate the new fan. Ensure that the new fan’s duct size matches the existing ductwork, or plan for necessary modifications.
- Electrical work: Upgrading an exhaust fan to include a light requires electrical work. If you are unfamiliar with electrical systems, it is recommended to hire a licensed electrician to ensure a safe and proper installation.
- Switching configuration: Consider how you want to control the fan and light, whether through separate switches or a single switch. Plan the necessary wiring and switches accordingly.
By addressing these additional considerations, you can successfully upgrade your existing exhaust fan to incorporate a light, enhancing both the ventilation and lighting in your bathroom.
https://www.youtube.com/watch?v=AXP4uhIbmyQ&pp=ygUwSG93IHRvIEluc3RhbGwgYSBCYXRocm9vbSBFeGhhdXN0IEZhbiBXaXRoIExpZ2h0
Frequently Asked Questions
Do Bathroom Exhaust Fans Need To Be Vented Outside?
Yes, bathroom exhaust fans need to be vented outside. This is essential to remove moisture, odors, and pollutants from the bathroom, preventing damage and improving air quality. Proper ventilation also helps prevent mold growth and maintain a comfortable environment.
Can I Install A Bathroom Exhaust Fan Myself?
Yes, you can install a bathroom exhaust fan yourself. Just make sure to follow the installation instructions carefully and use the necessary tools. It is a relatively simple process that can improve ventilation and prevent moisture and mold buildup in your bathroom.
How Much Does It Cost To Install A Bathroom Exhaust Fan With Light?
Installing a bathroom exhaust fan with light typically costs around $100 to $400, depending on factors like the type of fan and the complexity of the installation.
Can A Bathroom Fan And Light Be On The Same Circuit?
Yes, a bathroom fan and light can be on the same circuit. It is common for them to be connected to a single switch, making it convenient for users. This setup ensures both the fan and light can be controlled simultaneously without requiring multiple switches.
Conclusion
Installing a bathroom exhaust fan with light is a simple yet essential home improvement task. By effectively removing excess moisture and odors from your bathroom, this installation ensures a clean and fresh environment. Additionally, the added light feature provides convenience and enhances the overall appeal of your space.
By following the step-by-step instructions outlined in this blog post, you can confidently tackle this project and enjoy a well-ventilated and well-lit bathroom for years to come.