To install a basketball hoop in the ground, dig a hole according to the hoop’s specifications, insert the pole, and secure it with concrete. Then, attach the backboard, rim, and net.
Basketball is a popular sport worldwide, and having a basketball hoop in your own backyard can provide endless fun and opportunities for exercise. Installing a basketball hoop in the ground requires some planning and effort, but with the right steps, you can have a sturdy and durable setup that will last for years.
We will walk you through the process of installing a basketball hoop in the ground, from digging the hole to attaching the backboard and rim. So grab your tools and let’s get started on creating your own home basketball court.
Choosing The Right Location
Choosing the right location for installing a basketball hoop in the ground is crucial to ensure optimal functionality and safety. Several key considerations must be kept in mind when selecting the perfect spot. In this section, we will discuss the important factors to consider when choosing the right location for your basketball hoop installation.
Considerations for Placement
Before we dive into analyzing the surface area and evaluating the proximity to other structures, let’s first discuss the general considerations for placing your basketball hoop. These factors will help you make an informed decision based on your specific needs and preferences.
1. Visibility: Choose an area with good visibility, ideally away from obstructions such as trees or other outdoor elements. This will ensure clear sightlines and a better playing experience.
2. Accessibility: Consider the accessibility of the location. Ensure that it is easily approachable without any obstacles like stairs or tight spaces that may hinder players’ movement.
3. Safety: Safety should be a priority when selecting the location. Avoid areas near sharp objects, electrical lines, or slopes that may pose a risk to players during the game.
Analyzing the Surface Area
Now that we have discussed the general considerations, let’s focus on analyzing the surface area of the chosen location. A level and even surface significantly impact the stability and performance of your basketball hoop.
1. Level Ground: It is important to choose a location with a level ground. While minor slopes can be manageable, excessive slopes can affect the stability and functionality of the hoop. Ensure the surface is flat and free from bumps or depressions.
2. Hard Surface: Although many basketball hoop systems can be installed on various surfaces, it is advisable to select a location with a hard surface such as concrete or asphalt. Soft surfaces like grass or soil may not provide the necessary stability and can lead to wobbling during gameplay.
Evaluating the Proximity to Other Structures
The last aspect to consider when choosing the right location for your basketball hoop installation is the proximity to other structures in your yard or surroundings. This evaluation helps ensure safety, convenience, and minimal disruption during the game.
1. Property Boundary: Check the property boundary lines to ensure that the chosen location falls within the permissible limits. Installing the hoop too close to the boundary may raise concerns with neighbors or violate local regulations.
2. Overhead Clearances: Consider any potential overhead encumbrances such as tree branches, utility lines, or roofs of nearby structures. Make sure there is enough clearance above the playing area to prevent any interference that could hinder gameplay or jeopardize safety.
3. Distance from Other Structures: Take into account the proximity of the basketball hoop to other structures like fences, outdoor furniture, or vehicles. Maintaining ample space around the hoop allows for better movement, reduces the risk of collisions, and prevents damage to surrounding objects.
By carefully considering these factors and evaluating the surface area and proximity to other structures, you can confidently choose the best location for installing your basketball hoop in the ground. This thoughtful decision will ensure an enjoyable and safe basketball experience for players of all ages.
Preparing The Equipment And Materials
Before you can install a basketball hoop in the ground, it is essential to properly prepare the necessary equipment and materials. This step is crucial to ensure a smooth and efficient installation process. Here, we will discuss the essential tools needed, gathering the necessary materials, and checking the condition of the basketball hoop.
Essential tools needed
In order to install a basketball hoop in the ground, there are several essential tools that you will need:
- Post hole digger (link anchor text to a relevant product)
- Shovel
- Tape measure
- Spirit level
- Concrete mix
- Wheelbarrow
- Water source
- Wrench or adjustable spanner
These tools will allow you to dig the hole for the basketball hoop, ensure its levelness, mix and pour the concrete, and secure the hoop in place.
Gathering the necessary materials
In addition to the tools, there are a few materials that you will need:
- Basketball hoop and pole system (link anchor text to a relevant product)
- Concrete mix
- Water
- Rebar or anchor bolts, depending on the specific installation requirements of your hoop
- Optional: sand or gravel for additional stability
Ensure that you have all of these materials gathered before starting the installation process. This will save you time and prevent interruptions.
Checking the condition of the basketball hoop
Before commencing the installation, it is crucial to check the condition of the basketball hoop. This step will ensure that the hoop is safe to use and in good working condition. Pay attention to the following aspects:
- Check the pole and backboard for any signs of damage or wear (e.g., cracks, rust, loose parts, or missing hardware).
- Inspect the hoop’s net for any tears or fraying (link anchor text to a relevant product).
- Make sure any adjustable mechanisms, such as height adjustments, are functioning properly.
- Verify that the rim is securely attached to the backboard.
If you notice any issues or concerns during this inspection, it is essential to address them before proceeding with the installation. Repair or replace any damaged parts to ensure a safe and enjoyable basketball experience.
Digging The Hole
Installing a basketball hoop in the ground is a great way to enhance your outdoor sports activities. Properly digging the hole is the first step in ensuring the stability and functionality of your basketball hoop. In this guide, we will walk you through the process of digging the hole, including marking the position, determining the hole depth and diameter, and using the right tools. Let’s get started!
Marking the Position of the Hole
Before you start digging, it’s essential to mark the position of the hole to ensure accurate placement of the basketball hoop. Here are the steps to follow:
- Choose a suitable location for the basketball hoop. Consider factors such as space availability, desired playing area, and proximity to other objects.
- Use a measuring tape to find the center point of the playing area where you want the hoop to be installed.
- Mark the center point by driving a stake or placing a marker.
By marking the position, you create a reference point for aligning the basketball hoop during installation.
Determining the Hole Depth and Diameter
The depth and diameter of the hole are crucial factors in providing a stable foundation for the basketball hoop. Here’s how to determine these measurements:
- Check the manufacturer’s instructions for the recommended hole depth and diameter specific to the basketball hoop you are installing. Following these instructions ensures proper installation and safety.
- As a general guideline, the hole depth should be around 48 to 60 inches to provide sufficient support.
- The diameter of the hole should be slightly wider than the pole of the basketball hoop to allow for stability and easy installation.
By determining the appropriate hole depth and diameter, you can ensure that your basketball hoop will be securely anchored in the ground.
Using the Right Tools for Digging
Having the right tools for the job will make the process of digging the hole much easier and smoother. Here are the tools you will need:
| Tools | Description |
|---|---|
| Shovel | A sturdy shovel with a sharp edge for breaking through the ground. |
| Post hole digger | A specialized tool designed for digging deep holes with minimal effort. |
| Measuring tape | To accurately measure the hole depth and position. |
| Level | To ensure the hole is dug evenly and the basketball hoop will be installed straight. |
Using these tools will not only make the digging process efficient but also maintain the structural integrity of the hole.
Now that you know how to dig the hole for your basketball hoop, you are one step closer to enjoying endless hours of basketball fun. The next steps involve pouring concrete and installing the basketball hoop, which we’ll cover in our upcoming guide. Stay tuned!
Pouring The Concrete Base
Creating a stable foundation
Before installing a basketball hoop in the ground, creating a stable foundation is crucial to ensure that the hoop remains secure and steady during use. The first step in this process is pouring the concrete base, which will provide a solid anchor for the hoop. Follow these steps to create a stable foundation for your basketball hoop:
Mixing the concrete correctly
Once you have prepared the hole for the concrete, it’s time to mix the concrete correctly. Mixing the concrete properly will ensure that it sets correctly and provides the necessary strength and stability for your basketball hoop. Here’s how to mix the concrete:
- Gather the necessary materials: concrete mix, water, and a mixing container.
- Read the instructions on the concrete mix bag to determine the correct ratio of water to mix.
- Pour the concrete mix into the mixing container.
- Add the recommended amount of water to the mix.
- Using a shovel or a mixing trowel, thoroughly mix the concrete and water together. Make sure there are no dry pockets of mix left.
Pouring the concrete into the hole
Now that you have mixed the concrete correctly, it’s time to pour it into the hole. Follow these steps to ensure the proper pouring of the concrete:
- Position a wheelbarrow or another container near the hole to hold the mixed concrete.
- Using a shovel, transfer the mixed concrete into the wheelbarrow.
- Slowly pour the concrete into the hole, starting at the bottom and working your way up.
- As you pour, use a stick or a rod to agitate the concrete and remove any air bubbles.
- Continue pouring until the hole is filled to the desired level. It’s recommended to pour the concrete slightly above ground level to allow for settling.
Once you have poured the concrete, use a level to ensure that the hoop post is perfectly vertical. Allow the concrete to cure according to the manufacturer’s instructions before attaching the basketball hoop. This typically takes around 24-48 hours. Once the concrete has cured, you can enjoy playing basketball on your new, stable hoop!
Installing The Pole And Backboard
When it comes to installing a basketball hoop in the ground, the process of assembling the pole components, attaching the pole to the concrete base, and mounting the basketball backboard securely is crucial. Following these steps correctly will ensure a sturdy and durable basketball hoop that will withstand the rigors of intense playing. Let’s dive into each step in detail:
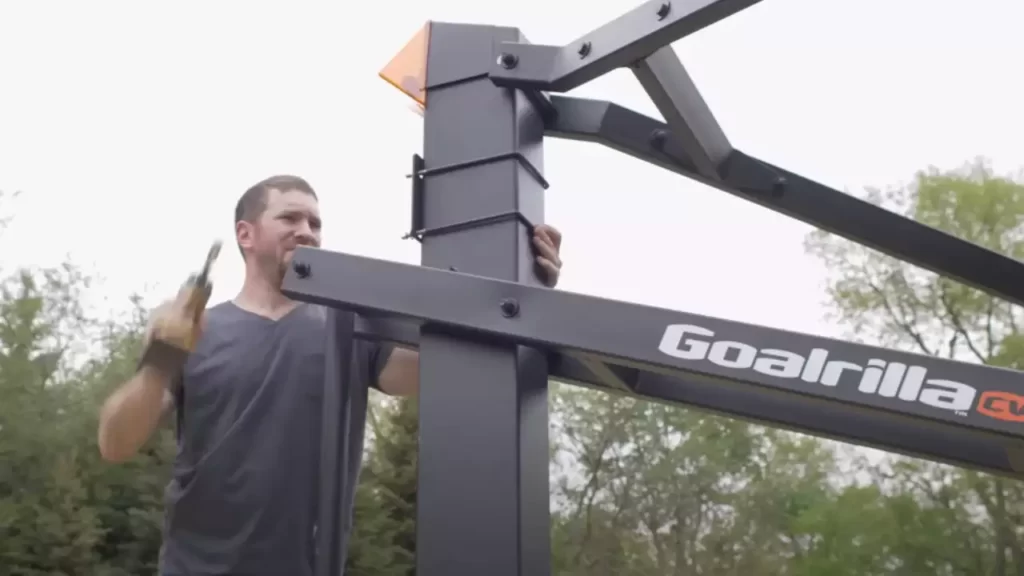
Assembling the pole components
Before you can start installing the pole, it’s essential to assemble the various components of the pole. These components typically include the pole itself, extension arms, brackets, and attachment hardware. Refer to the manufacturer’s instructions for the specific pole you have purchased, as assembly procedures may vary. Take your time to carefully follow each step of the assembly process and ensure each component is securely attached, forming a solid foundation for the basketball hoop structure.
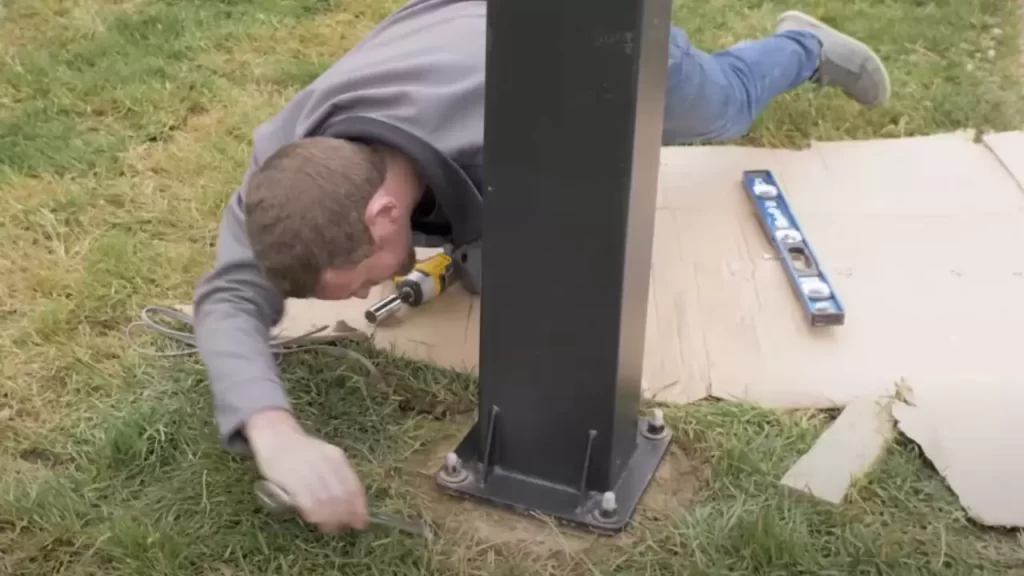
Attaching the pole to the concrete base
The next step in installing your basketball hoop is attaching the pole to the concrete base. This base provides stability and support for the entire structure. Here’s a step-by-step guide on how to securely attach the pole:
- Position the pole on top of the concrete base, aligning it with the pre-drilled holes.
- Insert the anchor bolts through the holes in the base and pole.
- Tighten the nuts on the anchor bolts using a wrench or socket set, ensuring a secure connection.
- Check the pole for stability by gently shaking it. If there is any wobbling, tighten the nuts further until the pole is firmly fixed to the concrete base.
Remember to allow sufficient curing time for the concrete to set before proceeding to the next step. This will ensure maximum stability and durability for your basketball hoop.
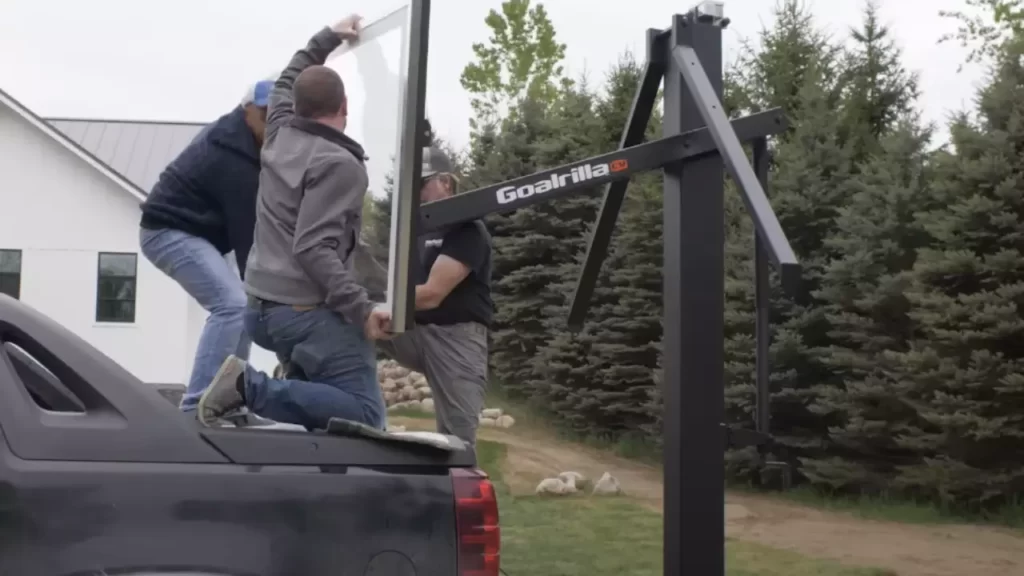
Mounting the basketball backboard securely
The final step in installing your basketball hoop is mounting the backboard to the pole securely. Follow these guidelines to ensure a proper and stable attachment:
- Position the backboard against the pole, aligning the mounting holes.
- Insert the provided bolts through the holes, securing the backboard to the pole.
- Use a wrench or socket set to tighten the bolts, making sure the backboard is firmly attached without any looseness.
- Gently shake the backboard to test its stability. If there is any movement, tighten the bolts further until the backboard is securely in place.
By following these steps and ensuring a secure installation, you can enjoy countless hours of basketball fun with confidence in the durability and stability of your basketball hoop.
Attaching The Rim And Net
Selecting the Appropriate Rim
Before you can attach the rim to your basketball hoop, it’s important to select the right one. There are different types of rims available, each with its own set of features and benefits. Take these factors into consideration:
- Standard rims: These are commonly used in recreational settings and are suitable for most players.
- Heavy-duty rims: If you have aggressive players who enjoy dunking, opt for a heavy-duty rim that can withstand the extra pressure.
- Breakaway rims: These rims have a flex mechanism that allows for more give when players dunk or hang on them, reducing the risk of damage to the backboard or hoop.
- Adjustable rims: If you want to change the height of your hoop, consider an adjustable rim that allows you to easily modify the height settings.
Installing the Rim onto the Backboard
Now that you’ve chosen the right rim for your basketball hoop, it’s time to install it onto the backboard. Follow these steps:
- Align the holes: Match the pre-drilled holes on the rim with those on the backboard, ensuring they’re properly aligned.
- Secure the rim: Insert the bolts through the holes and tighten them using a wrench or socket set. Make sure the rim is firmly attached to the backboard, but be careful not to overtighten and damage the backboard.
- Double-check: Give the rim a gentle tug to ensure it’s securely fastened. You don’t want any surprises during a game!
Attaching the Net Properly
No basketball hoop is complete without a net. Here’s how to attach it properly to your rim:
- Select a net: Choose a net made of durable materials like nylon or polyethylene. These nets are weather-resistant and can endure regular use.
- Hold the net: Position yourself under the rim, holding the net with one hand.
- Attach the net: Using your other hand, take one end of the net and thread it through the top of the rim. Continue doing this until all loops of the net are through the rim, ensuring it hangs evenly.
- Tie the bottom: Gather the loose ends of the net and tie them together at the bottom using a secure knot. This will prevent the net from coming loose during play.
Your basketball hoop is now complete with a securely attached rim and net. It’s time to grab a ball and start shooting some hoops!
Testing And Adjusting
Once you have successfully installed your basketball hoop in the ground, it’s time to move on to the next crucial step: testing and adjusting. This step is essential to ensure that your hoop is stable, balanced, and at the correct height. Let’s dive into the details.
Checking for stability and balance
Before you start testing your hoop, it’s important to check that it is stable and well-balanced. A shaky or unsteady hoop can be dangerous and affect your game experience. To ensure stability, follow these steps:
- First, test the hoop by giving it a gentle push from different directions. If it wobbles excessively, you may need to strengthen the installation by adding more concrete around the base or tightening any loose bolts.
- Take a close look at the hoop’s pole and make sure it is perfectly vertical. Use a level to ensure that it is not leaning to one side. If it’s not straight, adjust it by loosening the bolts and realigning the pole. Then, retighten the bolts to secure the pole in its correct position.
- After checking the stability of the hoop, examine the backboard to make sure it is securely attached. Ensure that all attachment points are tight, and there are no loose screws or brackets.
Making any necessary adjustments
After verifying the stability and balance of your hoop, it’s time to make any necessary adjustments. This step is crucial to ensure optimal playing conditions. Follow these guidelines:
- If you find that the hoop is too low or too high, loosen the height adjustment mechanism, if available, and raise or lower the hoop to your desired height. Remember, for regulation play, the rim should be set at a height of 10 feet.
- If you notice that the backboard is not centered or aligned correctly, adjust it accordingly. Loosen the attachment screws and gently reposition the backboard until it is visually centered. Once adjusted, tighten the screws to secure the backboard in place.
- Take a step back and visually inspect the hoop from different angles. Ensure that it is set at a height and position that feels comfortable and appropriate for your playing style.
Ensuring the hoop is at the correct height
The final step in testing and adjusting is to ensure that your basketball hoop is set at the correct height. This is crucial for fair play and allows you to practice under regulation conditions. Here’s how to ensure the hoop is at the correct height:
- Use a measuring tape to check the distance between the ground and the center of the rim. It should measure exactly 10 feet.
- If you find that the hoop is not at the correct height, make any necessary adjustments using the height adjustment mechanism, if available. Ensure that the hoop is set at the regulation height for accurate shot practice.
- Once you have made the necessary adjustments, double-check the height using the measuring tape to ensure it is accurate and meets the regulation standard.
By following these testing and adjusting steps, you can ensure that your basketball hoop is safe, stable, and ready for an enjoyable playing experience.
Maintaining The Basketball Hoop
Maintaining your basketball hoop is essential to ensure its longevity and optimal performance. Regular cleaning and maintenance, inspecting for any signs of wear, and addressing any repairs or replacements are important steps in keeping your hoop in top shape. Let’s explore each of these aspects in detail.
Regular Cleaning and Maintenance
Regular cleaning helps to keep your basketball hoop free from dirt, dust, and debris, ensuring that it performs smoothly. Here are some simple steps to clean and maintain your hoop:
- Use a soft cloth or sponge and mild detergent to wipe down the hoop and backboard. Avoid using abrasive cleaners that may damage the surface.
- Rinse with clean water to remove any residue.
- Dry the hoop thoroughly to prevent the accumulation of moisture.
- Inspect the net for any signs of wear or damage. Replace it if necessary.
- Check the hardware, such as bolts and screws, to ensure they are secure. Tighten any loose hardware as needed.
Inspecting for Any Signs of Wear
Regular inspections are vital to catch any signs of wear and tear on your basketball hoop before they worsen. Here’s what you should look for:
- Check the backboard for any cracks or chips. If you notice any damage, consider replacing the backboard to maintain optimal playing conditions.
- Inspect the rim for deformation or signs of rust. A damaged rim can affect the bounce and performance of the basketball. Replace it if necessary.
- Examine the pole and base for any signs of instability or corrosion. If you notice any issues, take the necessary steps to address them promptly.
Addressing Any Repairs or Replacements
If you identify any issues during your inspections, it’s important to address them promptly. Here are some common repairs or replacements you may encounter:
- Net Replacement: If the net becomes worn out or damaged, it’s best to replace it with a new one. A sturdy net ensures consistent play.
- Backboard Replacement: If the backboard has significant cracks or damage, it may be necessary to replace it to maintain the safety and integrity of the hoop.
- Rim Replacement: If the rim is bent, rusted, or no longer provides a proper bounce, it’s crucial to replace it to ensure an enjoyable basketball experience.
- Pole or Base Repair/Replacement: If the pole or base shows signs of instability or damage, it’s important to repair or replace them to maintain the hoop’s stability and safety.
Conclusion
Maintaining your basketball hoop through regular cleaning, inspections, and addressing any necessary repairs or replacements will help keep it in excellent condition for years to come. By investing a little time and effort into maintaining your hoop, you can ensure optimal performance and a long-lasting basketball experience.
Frequently Asked Questions
How Do You Anchor A Basketball Hoop To The Ground?
To anchor a basketball hoop to the ground, start by digging a hole that is deep enough to accommodate the anchor. Then, place the anchor in the hole and secure it with concrete. Attach the hoop to the anchor and ensure it is stable before use.
How Much Does It Cost To Install An Inground Basketball Hoop?
The cost of installing an inground basketball hoop can vary depending on factors like materials, location, and additional features. Generally, the average installation cost can range between $500 to $2,500, including equipment and labor fees.
Can I Put A Basketball Hoop On Grass?
Yes, you can put a basketball hoop on grass. Just make sure the ground is level and sturdy enough to support the hoop.
Can You Install A Basketball Hoop On Existing Concrete?
Yes, you can install a basketball hoop on existing concrete. It is a straightforward process that requires drilling holes into the concrete and securing the hoop with anchor bolts. Make sure to choose a sturdy spot and follow the manufacturer’s instructions for proper installation.
Conclusion
Installing a basketball hoop in the ground can seem like a daunting task, but with the right tools and guidance, it can be a manageable project. By following the step-by-step instructions provided in this blog post, you’ll be well-equipped to create your own basketball court at home.
Remember to prioritize safety and ensure a sturdy installation for enjoyable games ahead. Happy basketball playing!