To install a 4-way switch, you need to follow these steps accurately. First, turn off the power from the electrical panel and remove the existing switch.
Then, connect the necessary wires to the new 4-way switch, ensuring the appropriate color-coded connections. Lastly, install the switch in the electrical box and test its functionality before restoring power. Installing a 4-way switch is a straightforward process that allows you to control a single light fixture from multiple locations.
Whether you’re upgrading an existing switch or adding a new one, this guide will provide you with concise instructions to successfully complete the installation. By following these steps carefully, you can ensure a safe and efficient installation process, enabling you to conveniently control your lighting system. Let’s explore the process of installing a 4-way switch in detail, ensuring a smooth transition from start to finish.
Understanding The Basics Of A 4 Way Switch
A 4-way switch is an essential component in controlling the lighting setup of your home. Unlike a standard switch that can only be used for on and off functionality, a 4-way switch allows you to control a single light fixture from multiple locations. This means you can turn the lights on or off from any of the connected switches, providing convenience and flexibility.
What is a 4-Way Switch and How Does it Work?
Before delving into the installation process, it’s crucial to understand what a 4-way switch actually is and how it functions. Essentially, a 4-way switch is a special type of electrical switch that offers an intermediate position between “on” and “off”. This intermediate position allows you to control the flow of electricity within a lighting circuit from multiple switches, without having to travel back to the original switch.
Here’s a simplified explanation of how a 4-way switch works:
- When the switch is in the “off” position, the circuit is open, and no electricity flows through.
- When the switch is in the “on” position, the circuit is closed, and electricity flows through, powering the connected light fixture or fixtures.
- When the switch is in the intermediate position, the circuit allows for alternative paths for the electricity, depending on the position of other switches in the setup.
Differentiating between 3-Way and 4-Way Switches
Now that we have covered the functionality of a 4-way switch, it’s important to distinguish it from a 3-way switch. While they both serve the purpose of controlling lighting circuits from multiple locations, the main difference lies in the number of switches that can be installed in a setup.
- A 3-way switch setup involves two switches (a pair of three-way switches) that work together to control a light fixture from two different locations.
- On the other hand, a 4-way switch setup requires an additional switch (a four-way switch) in conjunction with two three-way switches, enabling control from three or more locations.
Understanding this difference is vital, as it ensures you have the correct switches and wiring configuration for your specific lighting needs.
The Importance of a 4-Way Switch in Home Lighting Setups
Having a 4-way switch in your home lighting setup offers significant advantages in terms of convenience and versatility. With a 4-way switch, you can effortlessly control the same light fixture from multiple locations, eliminating the need to run back and forth to a single switch.
Some benefits of using a 4-way switch include:
- Improved accessibility: By placing switches in various locations, you can easily control the lights without having to navigate the room to reach a specific switch.
- Enhanced functionality: With a 4-way switch, you can adjust the lighting according to your needs, making it suitable for various scenarios or personal preferences.
- Expanded lighting options: Using a 4-way switch allows you to connect multiple light fixtures or even different types of lighting setups to the same switch system, giving you more flexibility in your home lighting design.
Therefore, a 4-way switch is an essential component for creating a convenient and efficient lighting setup in your home.

Gathering The Necessary Tools And Materials
Before you start the installation process for your 4-way switch, it is crucial to gather all the necessary tools and materials. Having everything you need at hand will not only save you time but also ensure a smooth and hassle-free installation. In this section, we will discuss the list of tools required for the installation process, essential materials needed, and the importance of double-checking the compatibility of the 4-way switch with your current setup.
List of tools required for the installation process
Here is a comprehensive list of tools that you will need:
- Screwdriver (flathead and Phillips)
- Wire stripper
- Wire cutter
- Needle-nose pliers
- Voltage tester
- Electrical tape
- Wire connectors
These tools are essential for safely and effectively installing the 4-way switch in your electrical system. Ensure that you have all the required tools before you begin the installation.
Essential materials needed for the installation
In addition to the tools, it is important to have the necessary materials on hand:
- 4-way switch
- Electrical wires (preferably color-coded)
- Faceplate
- Mounting screws
These materials are vital for the proper functioning and stability of your 4-way switch. Make sure you have them ready so that you can complete the installation seamlessly.
Double-checking the compatibility of the 4-way switch with your current setup
Before proceeding with the installation, it is crucial to ensure that the 4-way switch is compatible with your current electrical setup. Incompatible switches can lead to malfunctioning circuits and potential safety hazards.
To double-check compatibility:
- Identify the voltage of your current electrical system (120V or 240V).
- Check the specifications of the 4-way switch to ensure it is rated for the same voltage.
- Verify if the switch supports the number and type of wire connections you have in your existing setup.
By performing these checks, you can be confident that the 4-way switch is suitable for your electrical system, allowing for a secure and reliable installation.
With all the necessary tools and materials gathered, and compatibility confirmed, you are now ready to proceed with the installation process. In the next section, we will guide you through the step-by-step instructions to successfully install your 4-way switch.
Step 1: Turning Off The Power And Ensuring Safety
Installing a 4-way switch can be a simple and effective way to control the lighting in your home. However, before you begin the installation process, it is crucial to prioritize safety by turning off the power. Taking this essential step will protect you from potential hazards and ensure a smooth installation process. In this step-by-step guide, we will walk you through the importance of turning off the power, identifying the correct circuit, and using a voltage tester to confirm the absence of electricity.
Importance of Turning Off the Power Before Starting the Installation Process
Turning off the power before you begin the installation process is of utmost importance for your safety. Electricity can be dangerous, and attempting to install a 4-way switch while the power is still on could lead to electric shock or injury. By disconnecting the power, you eliminate the risk of accidental contact with live wires, providing a safe environment for your installation.
Identifying the Correct Circuit to Turn Off
Identifying the correct circuit to turn off will ensure you are working on the right electrical supply. To locate the correct circuit, refer to your circuit breaker panel. Each circuit breaker should be labeled to identify which area of your home it corresponds to. Locate the circuit that powers the lighting circuit you intend to install the 4-way switch on. Once you have identified the correct circuit, proceed to switch it off.
Using a Voltage Tester to Confirm the Absence of Electricity
After turning off the circuit breaker, it is important to use a voltage tester to confirm the absence of electricity. A voltage tester is a simple yet effective tool that allows you to determine if there is any electrical current flowing in the circuit. By using this handy device, you can double-check that the circuit is indeed disconnected, providing an extra layer of safety and peace of mind before you begin your installation.
In conclusion, turning off the power and ensuring safety is a critical step in installing a 4-way switch. By prioritizing safety, you can protect yourself from potential harm and create a secure environment to carry out the installation process. Remember to always use a voltage tester to confirm the absence of electricity after turning off the power, as an additional precautionary measure. With safety in mind, you can proceed confidently to the next step of installing your 4-way switch.
Step 2: Removing The Old Switches
Once you have assessed the existing wiring and switch configuration, it’s time to move on to the next step: removing the old switches. Properly labeling the wires is crucial to avoid any confusion during the reinstallation process. This step requires careful handling to ensure the safe and efficient removal of the old switches.
Assessing the existing wiring and switch configuration
Before you begin removing the old switches, it is important to assess the existing wiring and switch configuration. This will help you understand how the switches are connected and ensure that you follow the correct steps during the removal process. It’s important to take note of any unique wiring patterns or unconventional setups that may require special attention.
Properly labeling the wires to avoid confusion during reinstallation
In order to avoid confusion during the reinstallation process, it is crucial to properly label the wires. This will help you easily identify which wire goes where when it comes time to install the new switches. By using labels or markers, you can assign clear identifiers to each wire, such as “top left,” “bottom right,” or by color-coding them. This step is essential to ensure a smooth and hassle-free installation process.
Removing the old switches safely and efficiently
Removing the old switches should be done safely and efficiently to prevent any damage to the existing wiring or other components. Here’s a step-by-step guide on how to remove the old switches:
- Make sure the power is turned off from the circuit breaker that controls the switches you are working on.
- Remove the switch cover plate using a screwdriver.
- Loosen the screws holding the old switches in place.
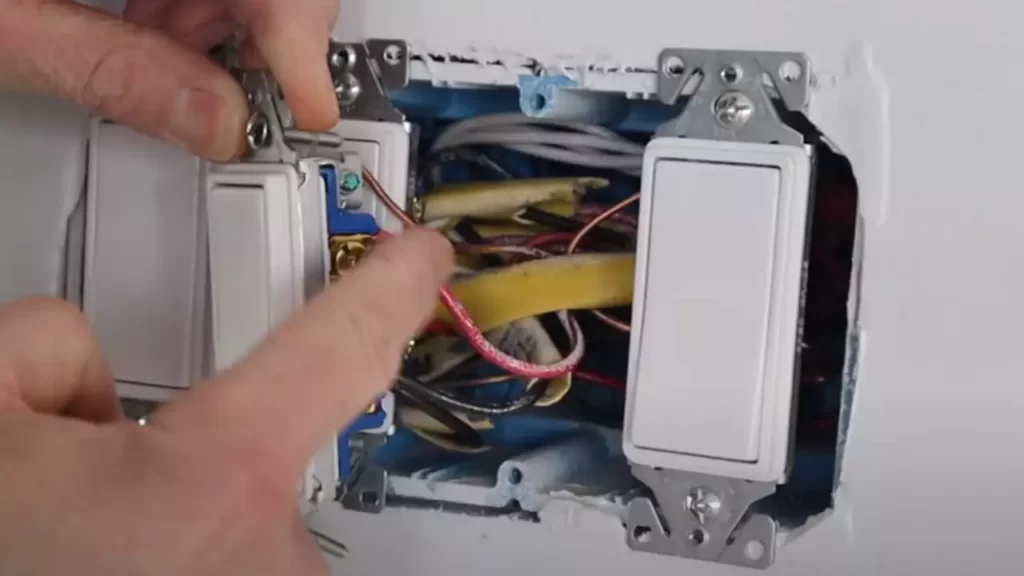
- Gently pull the switches out of the wall box, exposing the wiring connections.
- Using a screwdriver or pliers, carefully disconnect the wires from the switches, making sure not to damage them.
- If necessary, take a picture or make notes to remember the wire connections for future reference.
- Once the wires are disconnected, remove the old switches from the wall box.
By following these steps, you can safely and efficiently remove the old switches, allowing you to proceed with the installation of the new 4-way switch system.
Step 3: Preparing The Wiring For The 4 Way Switch
Now that you have analyzed and understood the wiring diagram for the 4 way switch setup, it’s time to prepare the wiring for the installation. This step is crucial to ensure a smooth and hassle-free installation process. In this section, we will discuss how to establish the necessary connections for the new switch and ensure proper insulation and protection for the wiring.
Analyzing and understanding the wiring diagram for the 4 way switch setup
Analyzing and understanding the wiring diagram is an essential first step before you begin preparing the wiring for the 4 way switch installation. The diagram provides a visual representation of how the electrical wires should be connected and helps you avoid any mistakes during the installation process. Take your time to carefully study the diagram and make sure you understand the logic behind it.
Establishing the necessary connections for the new switch
Once you have a clear understanding of the wiring diagram, it’s time to establish the necessary connections for the new 4 way switch. This involves identifying the incoming power source, connecting the wires according to the diagram, and ensuring a secure and reliable connection. It is crucial to follow the specific instructions provided in the diagram and double-check each connection to avoid any electrical issues in the future.
One method to establish the connections correctly is by using color-coded electrical wires. Each wire color represents a specific function, such as hot, neutral, or ground. By matching the wires’ colors, you can easily determine which wires should be connected together, ensuring a proper and efficient installation.
Ensuring proper insulation and protection for the wiring
Insulation and protection are vital aspects of any electrical installation, and the wiring for the 4 way switch is no exception. It is essential to ensure that each wire is properly insulated to prevent any electrical malfunctions or safety hazards. Insulated electrical tape can be used to wrap the exposed ends of the wires, providing an extra layer of protection.
Moreover, to ensure the longevity and safety of the wiring, it is essential to route and secure the wires properly. Using cable clips or conduit, you can keep the wires neatly organized and protected, minimizing the risk of accidental damage.
Additionally, if there are any exposed connections or junctions, it is crucial to use electrical junction boxes to enclose them. The junction boxes provide a safe and secure enclosure, protecting the wiring and preventing any potential hazards.
By taking the extra time to ensure proper insulation and protection for the wiring, you can rest assured that your 4 way switch installation will be reliable, efficient, and most importantly, safe.
Step 4: Installing The 4 Way Switch
Once you have prepared the electrical box and connected the necessary wires, it’s time to install the 4-way switch. Follow these steps to ensure a proper installation:
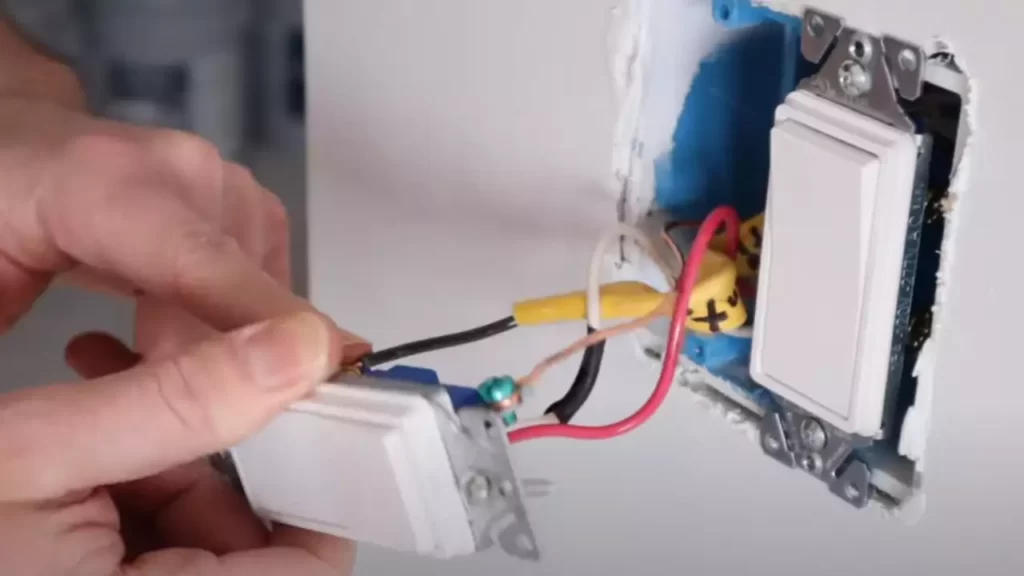
Mounting the new switch into the electrical box
Begin by taking the new 4-way switch and carefully inserting it into the electrical box. Make sure the switch is positioned in a way that allows easy access and operation.
To secure the switch, use the provided screws and attach it to the electrical box. Tighten the screws just enough to hold the switch in place, ensuring it remains stable.
Connecting the wires to the corresponding terminals on the switch
Next, it’s essential to correctly connect the wires to the corresponding terminals on the 4-way switch. This step is crucial for proper functionality and ensuring a safe electrical connection.
Refer to the wiring diagram or instructions provided with the switch to identify the correct terminals. Each terminal is typically labeled, indicating its function or connection.
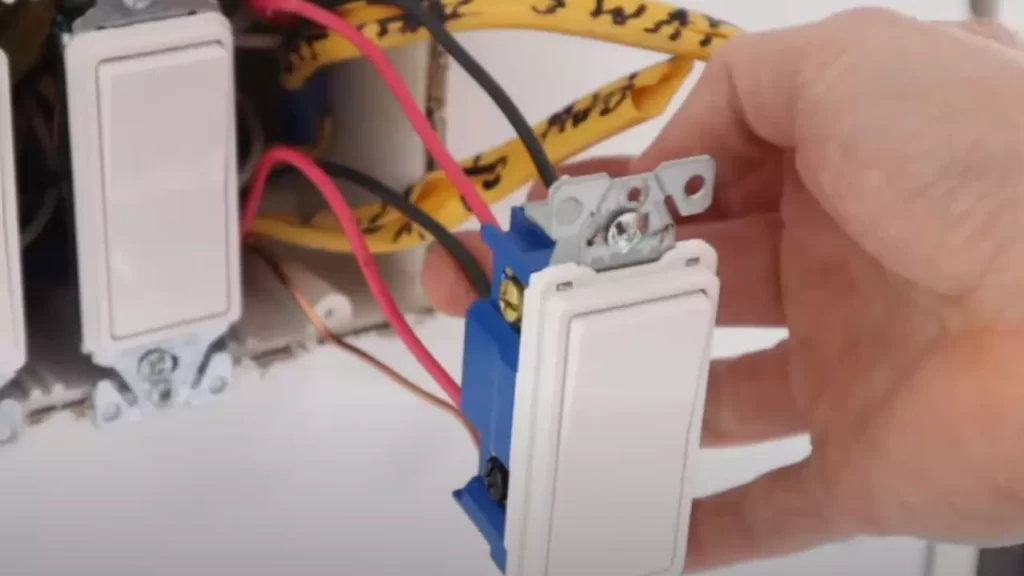
Start by connecting the traveler wires to the appropriate traveler terminals on the switch. These wires are typically the ones that are connected to the other 3-way switches in your circuit.
Then, connect the common wire to the designated common terminal on the switch. This wire is usually coming from the power source or going to the light fixture.
Once the wires are in their corresponding terminals, tighten the screws to secure the connections. Ensure the wires are properly seated and there is no exposed copper.
Properly grounding the switch for safety
To ensure safety and compliance with electrical codes, it is essential to properly ground the 4-way switch. Grounding helps protect against electrical shocks and potential hazards.
Locate the grounding terminal or screw on the switch. This terminal is typically labeled or indicated by a grounding symbol.
Attach a ground wire to this terminal by either wrapping it around the screw or inserting it into the designated slot, depending on the switch design.
Once the ground wire is secure, tighten the screw to establish a solid connection. Confirm the wire is not loose or easily pulled out.
Remember, proper grounding is crucial for the safe operation of the switch and the overall electrical system. It is always recommended to consult a professional electrician if you have any doubts or concerns.
With the 4-way switch mounted, wires connected to the right terminals, and grounding properly established, you are now ready to move on to the next step in the installation process.
Step 5: Testing And Troubleshooting
Now that you have successfully completed the installation of your 4-way switch, it’s time to test its functionality and troubleshoot any potential issues. This step is crucial to ensure that your switch is working properly and that you can enjoy the convenience and flexibility it offers. Follow the instructions below to reconnect the power and test the functionality of your 4-way switch, address common issues, and troubleshoot if necessary.
Reconnecting the Power and Testing the Functionality of the 4-way Switch
Once you have securely connected all the wires and installed the switch into its designated electrical box, it’s time to restore power to the circuit and verify that the switch is functioning as intended. To do this:
- Turn on the power supply by switching the circuit breaker back on. This will restore power to the switch and the connected light fixtures.
- Now, move to each of the other switches connected in the circuit and test the switch’s functionality by flipping it up and down. The light should turn on and off correspondingly as you operate the switches.
- If the switch fails to control the lights properly, double-check the wiring connections to make sure they are secure and accurately connected as per the manufacturer’s instructions.
- If the wiring is correct, it’s possible that the switch itself is faulty. In this case, consider replacing the switch with a new one and repeat the testing process to ensure its functionality.
Common Issues and Troubleshooting Methods for a Successful Installation
During the testing phase, you might encounter some common issues that can hinder the successful installation of your 4-way switch. Here are a few troubleshooting methods to address these issues:
| Issue | Troubleshooting Method |
|---|---|
| The light does not turn on or off when switching the 4-way switch. | If the light doesn’t respond to the switch, check the connections at each intermediate switch. Refer to the manufacturer’s instructions and ensure that all wires are correctly connected. Additionally, ensure that the switch is rated for the appropriate voltage and wattage. |
| The light flickers or behaves erratically. | A flickering light can indicate a loose connection or insufficient grounding. Turn off the power and check all the connections to ensure they are tight. If the issue persists, consult a professional electrician who can identify and resolve the underlying cause. |
| The switch feels hot when in use. | If the switch feels unusually hot, it might indicate an issue with the load or a wiring problem. Turn off the power and inspect the connections, ensuring that the wires are securely fastened and not damaged. If the problem persists, consult an electrician to avoid any potential hazards. |
Seeking Professional Assistance if Necessary
If you encounter persistent issues during the testing and troubleshooting process or if you are unsure about any aspect of the installation, it is recommended to seek professional assistance. An experienced electrician can diagnose and solve complex wiring problems, ensuring the safety and functionality of your 4-way switch system.
By following the steps outlined in this guide and addressing any potential issues that arise during testing, you can successfully install and troubleshoot a 4-way switch. Enjoy the convenience and control of a well-installed 4-way switch in your home with confidence!
Step 6: Finalizing The Installation
After successfully wiring and connecting your 4-way switch, it’s time to finalize the installation and ensure everything is in place for optimum performance. This step is crucial to guarantee the switch functions properly and provides a hassle-free experience in controlling your lights or electrical devices. In this section, we will cover two important aspects: securing the switch in place and tidying up the wiring, and double-checking all connections to ensure they are properly tightened. Let’s dive in!
Securing the switch in place and tidying up the wiring
Securing the 4-way switch is as important as properly wiring it. You want to ensure that the switch stays in place and doesn’t get accidentally dislodged. Follow these steps to securely mount the switch:
- First, position the switch in the electrical box and align it with the screw holes.
- Using the provided screws or the screws that came with the switch, insert them through the screw holes and into the electrical box.
- Tighten the screws using a screwdriver until the switch is firmly secured in place.
- Once the switch is securely mounted, carefully organize and tidy up the wiring inside the electrical box. Neatly arrange the wires to avoid any potential hazards or interference with the switch’s functioning.
Double-checking all connections and ensuring they are properly tightened
To guarantee the longevity and reliability of your 4-way switch, it’s essential to double-check all connections and ensure they are properly tightened. Follow these steps to perform a thorough inspection of the connections:
- Start by examining each wire connection point. Ensure that no wires are loose or showing signs of damage.
- Tighten the terminal screws on the switch, ensuring they are snug but not overly tightened to avoid damaging the wires.
- If you notice any loose connections, gently tighten them using a screwdriver or appropriate tool.
- After double-checking all connections and tightening them if necessary, use your fingers to gently tug on each wire to ensure they are securely attached. If any wire feels loose, tighten the corresponding connection.
Celebrating your successful installation of a 4 way switch
Congratulations! You have successfully installed a 4-way switch, a feat that not only enhances the convenience of controlling your lights or electrical devices but also adds a touch of sophistication to your home’s electrical system. Take a moment to appreciate your accomplishment and celebrate your successful installation.
Remember, if you ever need to troubleshoot or make any changes to your 4-way switch setup, always consult the manufacturer’s instructions or seek the assistance of a qualified electrician.
Your final step is to enjoy the convenience and flexibility that a 4-way switch provides, making your home lighting control a breeze!
Frequently Asked Questions
What Wires Go Where On A 4-Way Switch?
The wires on a 4-way switch are typically connected in a specific way: one wire from the power source goes to the common terminal, and the other wires from each of the three switches are connected to the traveler terminals.
Make sure to consult a professional or refer to the switch’s manual for precise instructions.
How Do You Install A 4-Way Toggle Switch?
To install a 4-way toggle switch, follow these steps: 1. Cut off the power source. 2. Remove the existing switch from the wall. 3. Connect the four wires to the appropriate terminals on the new switch. 4. Secure the switch in place and reattach the cover plate.
5. Restore power and test the switch.
How Many Wires Go To A 4-Way Switch?
A 4-way switch typically requires four wires for proper installation.
Does A 4-Way Switch Have To Be In The Middle?
A 4-way switch can be located in any position within a circuit, not necessarily in the middle. Its purpose is to control a light or set of lights from multiple locations. The position of the 4-way switch depends on the wiring configuration and the desired functionality of the lighting system.
Conclusion
To sum up, installing a 4-way switch may seem daunting at first, but with the right guidance, it can be a simple and rewarding DIY project. By following the step-by-step instructions and understanding the wiring principles, you can easily control your lights or electrical appliances from multiple locations in your home.
So why wait? Take on this electrical challenge and enhance the functionality of your space today. Happy switch installing!