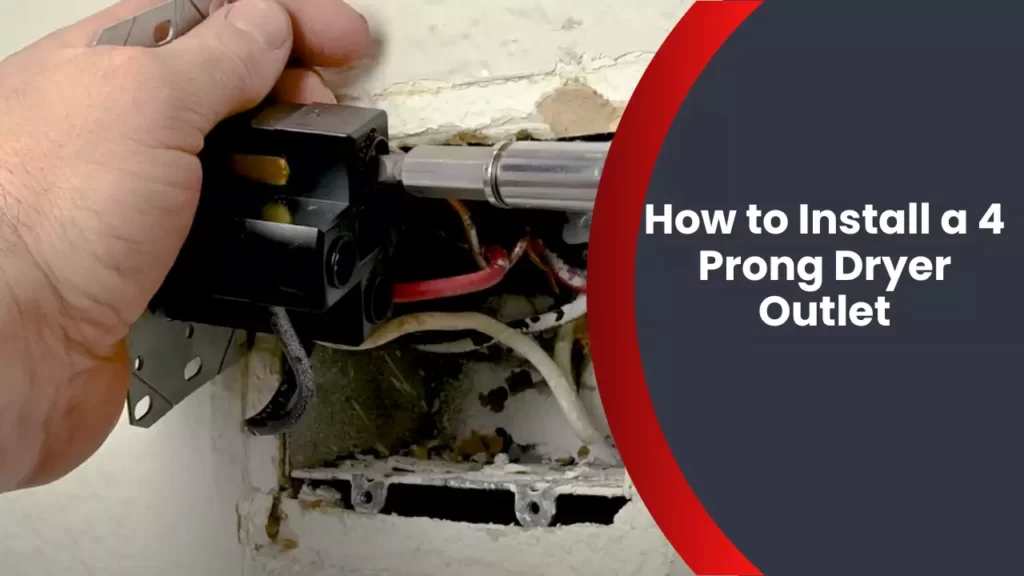
To install a 4 prong dryer outlet, start by turning off the power supply to the circuit. Then, remove the cover plate from the existing outlet and disconnect the wires.
Next, connect the white wire to the center terminal, the black and red wires to the outer terminals, and the green wire to the grounding screw. Finally, secure the outlet in place, replace the cover plate, and restore the power supply.
Understanding The Different Types Of Dryer Outlets
When it comes to installing a 4 prong dryer outlet, it’s important to understand the different types of dryer outlets available in the market. Each type has its own specifications and requirements, so having a clear understanding of these variations will ensure a successful installation. In this article, we will explore the three main types of dryer outlets: NEMA 14-30, NEMA 10-30, and NEMA 6-30.
NEMA 14-30
The NEMA 14-30 dryer outlet is one of the most commonly used types in residential settings. This outlet has four prongs, each with a specific function. The two flat prongs on the top are the hot wires, which carry the electric current from the circuit breaker to the dryer. The L-shaped prong is the grounding wire, which provides a safe path for electrical current in case of a fault. And finally, the round prong at the bottom is the neutral wire, which completes the electrical circuit.
If you have a newer dryer or are updating your electrical system, chances are you’ll need a NEMA 14-30 outlet. It is designed for dryers that require a 240-volt power supply and have a 4-prong plug. Before installing, make sure to check the manufacturer’s specifications and local electrical codes to ensure compliance.
NEMA 10-30
The NEMA 10-30 dryer outlet is an older type that is still found in some older homes. Unlike the NEMA 14-30, it has three prongs instead of four. The two slanted prongs are the hot wires, and the L-shaped prong is the grounding wire. The absence of a neutral wire is one of the key differences between the NEMA 10-30 and the NEMA 14-30.
If your dryer has a 3-prong plug and your home has a NEMA 10-30 outlet, you may need to make some modifications to ensure compatibility. This may involve changing the dryer cord or installing a new outlet. However, it’s important to note that the NEMA 10-30 is no longer compliant with current electrical codes, and it is recommended to update to a NEMA 14-30 outlet for safety reasons.
NEMA 6-30
The NEMA 6-30 dryer outlet is commonly used for commercial or industrial dryers. It also has three prongs like the NEMA 10-30, but with a different configuration. The two slanted prongs are the hot wires, and the round prong is the grounding wire. Similar to the NEMA 10-30, the NEMA 6-30 does not have a neutral wire.
If you have a commercial or industrial dryer that requires a 240-volt power supply and has a 3-prong plug, you’ll need a NEMA 6-30 outlet. It’s important to consult with an electrician or follow local electrical codes for proper installation and safety compliance.
Determining The Compatible Outlet For Your Dryer
Checking the Manufacturer’s Specifications
Before you begin installing a 4 prong dryer outlet, it is crucial to determine the compatible outlet for your dryer. To start, you need to check the manufacturer’s specifications. These specifications, often provided in the user manual or on the manufacturer’s website, will help you identify the specific requirements for your dryer installation.
Keep in mind that different dryer models may have varying electrical requirements, so it’s essential to consult the manufacturer’s documentation specific to your particular make and model. By following the manufacturer’s guidelines, you can ensure a safe and efficient installation process.
Consultation with an Electrician
While reviewing the manufacturer’s specifications is a critical step, it is always recommended to consult with a qualified electrician to ensure proper installation. An electrician possesses the necessary knowledge and expertise to assess your home’s electrical system and guide you in choosing the appropriate outlet for your dryer.
During a consultation with an electrician, they will consider various factors, including your home’s electrical capacity, wire gauge, and circuit breaker requirements. Since electrical systems can differ significantly, an electrician’s expertise will help you avoid potential hazards and ensure compliance with electrical codes.
In addition to providing guidance on the compatible outlet type, an electrician can also assist with the actual installation process, ensuring the connections are made correctly and all safety measures are taken.
Remember, safety should always be a priority when working with electricity. It is crucial to seek professional assistance if you are unsure about any aspect of installing a 4 prong dryer outlet. A licensed electrician will help guarantee a safe and reliable installation, giving you peace of mind when operating your dryer.
Gathering The Necessary Tools And Materials
Tools required
Before you dive into installing a 4 prong dryer outlet, it’s essential to gather all the necessary tools to ensure a smooth and efficient installation process. By having these tools on hand, you’ll be well-prepared to tackle this project with ease.
Here are the tools you’ll need:
- Flathead screwdriver
- Phillips screwdriver
- Wire stripper
- Socket wrench set
- Wire cutter
- Electrical tape
- Utility knife
- Drill with a 1/4-inch drill bit
- Hammer
- Measuring tape
Having these tools readily available will save you time and frustration during the installation process, allowing you to smoothly complete the job.
Materials required
Aside from the necessary tools, it’s important to gather all the required materials to successfully install a 4 prong dryer outlet. These materials are easily obtainable and will ensure the proper functioning of your dryer.
Here are the materials you’ll need:
- 4 prong dryer outlet
- Outlet cover plate
- Electric cable
- Strain relief connector
- Wire connectors
- Wire nuts
- Grounding screw
- Electrical box
- Anchors and screws for mounting the electrical box
By gathering these materials in advance, you’ll be fully prepared to install your 4 prong dryer outlet without any hiccups along the way. It’s always better to have everything you need before starting to avoid unnecessary delays or trips to the hardware store.
Shutting Off Power Supply
Before starting the installation process for your 4 prong dryer outlet, it is crucial to shut off the power supply to ensure your safety. By doing this, you minimize the risk of electrical shock or accidents while working with the circuit breaker panel and electrical connections.
Locate the breaker panel
The first step in shutting off the power supply is to locate the breaker panel. These panels are commonly found in basements, garages, or utility rooms. Once you have identified the breaker panel, make sure it is easily accessible and not obstructed by any objects.
Switch off the circuit breaker for the dryer
Now that you have located the breaker panel, it’s time to switch off the circuit breaker specifically dedicated to your dryer. This breaker will typically be labeled with “dryer”, “laundry”, or something similar. If you’re unsure which breaker controls the dryer, refer to your home’s electrical panel diagram or consult a professional electrician.
To switch off the circuit breaker for the dryer, follow these steps:
- Identify the correct circuit breaker by referring to the labels or using a circuit tester.
- Gently push the circuit breaker switch to the “off” position. You should hear a click and feel a slight resistance.
- To ensure complete safety, double-check that the breaker is in the “off” position by confirming no power is running to the dryer.
Once you have switched off the circuit breaker, the power supply to your dryer is effectively shut off. It’s important to communicate this to the other occupants of your home, so they are aware of the temporary power interruption.
Note: If you live in an apartment or rental property, reach out to your building management or landlord to assist you in shutting off the power supply.
Now that the power supply is safely shut off, you can proceed to the next steps in installing your 4 prong dryer outlet. Stay tuned to our blog for the upcoming sections on preparing the wiring and connecting the outlet.
Establishing A Safe Work Environment
Before you begin installing a 4 prong dryer outlet, it is essential to establish a safe work environment. This will ensure that you can carry out the installation process smoothly and without any risks. By following a few simple steps, you can create an environment that promotes safety and reduces the chances of accidents or mishaps.
Clear the surrounding area
One of the first steps to establishing a safe work environment is to clear the surrounding area where you will be working. Remove any objects or clutter that may obstruct your movement or cause accidents. Ensure that the path to the electrical panel and the location of the dryer outlet is clear and free from any obstacles.
In addition, make sure that there is enough space for you to maneuver around comfortably. This will allow you to work efficiently and reduce the chances of tripping or falling.
Ensure proper ventilation
Proper ventilation is crucial when working with electrical installations, especially when dealing with a dryer outlet. Ensure that the area is well-ventilated to prevent the buildup of harmful gases or fumes. This will help to maintain a safe working environment and protect you from potential health hazards.
If necessary, open windows or doors to allow fresh air to circulate. You can also use fans or exhaust systems to enhance the ventilation in the area. By taking these precautions, you will create a safe and comfortable environment to work in.
Removing The Existing Outlet
Before you can install a 4 prong dryer outlet, you need to remove the existing outlet. This process involves disconnecting the dryer and unscrewing the old outlet from the wall. Follow these step-by-step instructions to safely remove the existing outlet:
Disconnecting the dryer
The first step is to disconnect the dryer from the power supply. This ensures your safety and prevents any electrical accidents. To disconnect the dryer:
- Turn off the power to the dryer by unplugging it from the outlet or switching off the circuit breaker in your electrical panel. It is crucial to ensure that the power is completely off before proceeding.
- Once the power is off, carefully pull the dryer away from the wall. Be cautious not to damage the vent hose or any other connections.
- Locate the dryer cord, which is usually connected to a metal terminal block located at the back of the dryer.
- Using a screwdriver, loosen the screws that secure the wires to the terminal block. Remember to note the color-coded wires for future reference.
- Once the wires are loose, gently remove the dryer cord from the terminal block.
Unscrewing the old outlet
After disconnecting the dryer, the next step is to unscrew the old outlet from the wall. Follow these steps carefully:
- Inspect the existing outlet to identify the screws holding it in place.
- Using a screwdriver, loosen and remove the screws that secure the outlet to the wall box.
- Once the screws are removed, carefully pull the outlet out of the box.
- Take note of the wires attached to the outlet. Ensure you remember which wire connects to each terminal.
- Using a wire stripper or pliers, carefully remove the wires from the terminals. Remember to handle the wires gently to avoid any damage.
With the old outlet removed and the dryer disconnected, you’re ready to proceed to the next step in installing your 4 prong dryer outlet. Stay tuned for our upcoming blog post on how to safely install a 4 prong dryer outlet.
Wiring The New Outlet
Understanding the Wiring Process
When it comes to installing a 4 prong dryer outlet, wiring the new outlet correctly is crucial. Understanding the wiring process is essential for a safe and successful installation. In this section, we will guide you through the step-by-step procedure of wiring the new outlet.
Labeling the Wires
Before you start connecting the wires, it is important to correctly label each wire. This will help you identify the purpose of each wire and ensure they are connected to the right terminals.
To label the wires, follow these steps:
- Identify the different colored wires: In a typical 4 prong dryer outlet, you will find four wires – black (hot), red (hot), white (neutral), and green or bare copper (ground).
- Use masking tape or adhesive labels: Wrap a small piece of masking tape around each wire or use adhesive labels to mark them accordingly. For example, label the black wire as “hot wire 1”, the red wire as “hot wire 2”, the white wire as “neutral wire”, and the green or bare copper wire as “ground wire”.
By labeling the wires clearly, you can minimize any confusion during the installation process and ensure a smooth wiring procedure.
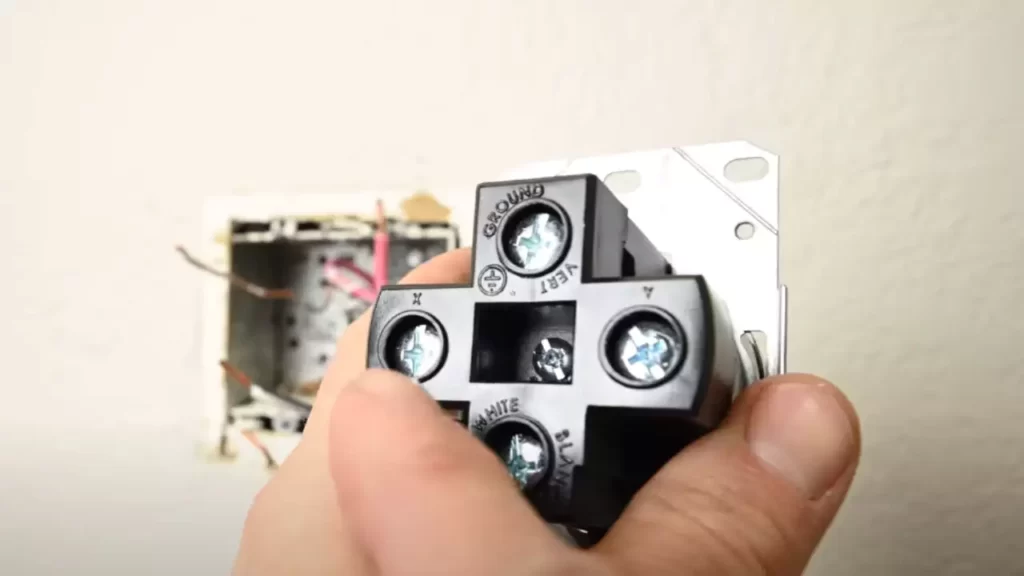
Connecting The Wires To The Outlet Receptacle
Once you have properly wired the circuit and mounted the outlet box, it’s time to connect the wires to the outlet receptacle. This step is crucial for ensuring a secure and functional connection, so make sure to follow the instructions carefully.
Ground Wire Connection
The ground wire is a vital component of the electrical system, as it helps protect against electrical shocks and ensures proper grounding. To connect the ground wire to the outlet receptacle, follow these steps:
- Locate the green screw on the metal frame of the receptacle.
- Strip the end of the ground wire, ensuring there is enough exposed copper to wrap around the screw tightly.
- Wrap the stripped end of the ground wire clockwise around the green screw.
- Tighten the screw securely to ensure a solid connection.
Remember, the ground wire should be connected directly to the metal frame of the receptacle, ensuring proper grounding for your dryer.
Neutral Wire Connection
The neutral wire is responsible for carrying the return current in the circuit and is typically color-coded white or gray. To connect the neutral wire to the outlet receptacle, follow these simple steps:
- Identify the silver-colored terminal screw on the receptacle, typically labeled “neutral” or “N”.
- Strip the end of the neutral wire, leaving enough exposed copper to wrap around the terminal screw tightly.
- Insert the stripped end of the neutral wire into the opening on the terminal screw.
- Tighten the screw securely to ensure a proper connection.
Properly connecting the neutral wire is essential for the safe operation of your dryer.
Hot Wire Connections
The hot wires carry the current from the electrical panel to the outlet receptacle, providing power to your dryer. There are typically two hot wires, each designated by a different color, such as black and red. To connect the hot wires to the outlet receptacle, follow these steps:
- Identify the brass-colored terminal screws on the receptacle, typically labeled “hot” or “H”.
- Strip the end of each hot wire, leaving enough exposed copper to wrap around the terminal screws tightly.
- Insert one hot wire into each opening on the terminal screws.
- Tighten the screws securely to ensure a solid connection.
Make sure to connect each hot wire to the appropriate terminal screw, either black or red, to ensure proper polarity.
By correctly connecting the ground wire, neutral wire, and hot wires to the outlet receptacle, you ensure a safe and reliable power supply for your dryer. Take the time to check each connection and tighten the screws securely to prevent any loose wiring that could lead to electrical hazards.
Mounting The Outlet In The Wall
Selecting an Appropriate Location
Before mounting the 4 prong dryer outlet in the wall, it’s crucial to carefully select a suitable location. To ensure convenience and safety, keep the following considerations in mind:
- Choose a location that provides easy access to the outlet without any obstacles or obstructions.
- The outlet should be positioned within reach of the dryer’s power cord, allowing for a hassle-free connection.
- Ensure the location is away from any water sources or damp areas to prevent electrical hazards.
- Avoid installing the outlet near flammable materials or in tight spaces that could restrict airflow.
By taking these factors into account, you can guarantee a well-placed outlet that promotes functionality and safety.
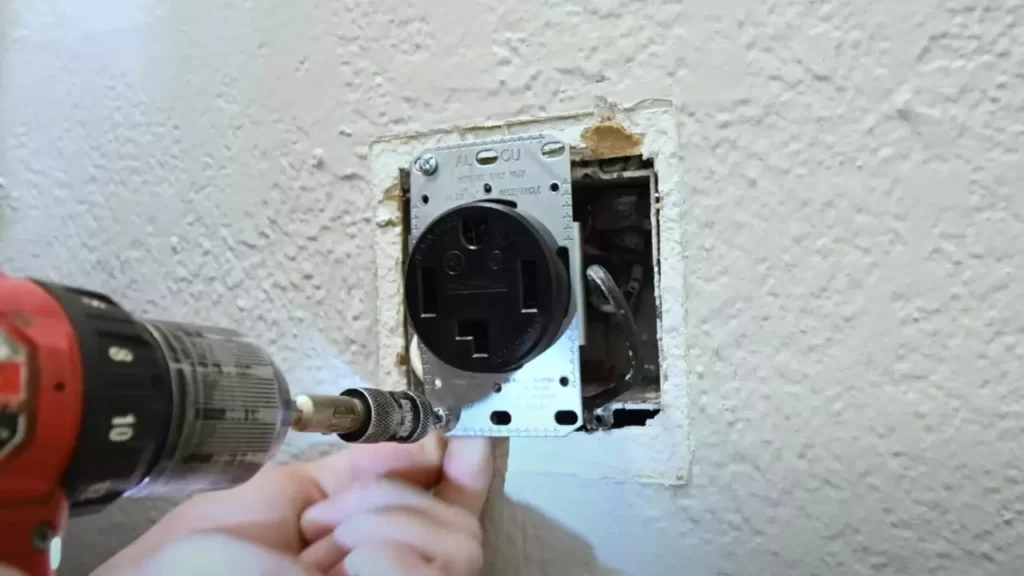
Securing the Outlet in Place
Once you’ve determined the perfect location for the 4 prong dryer outlet, it’s time to secure it in place. Follow these steps to ensure a secure installation:
- Measure the dimensions of the outlet box and mark the corresponding area on the wall using a pencil.
- If the wall has a pre-existing outlet box, align the new outlet box with it. Otherwise, use a stud finder to locate a nearby wall stud.
- Secure the outlet box to the wall stud or directly to the drywall using screws. Make sure the box is level and tightly fastened.
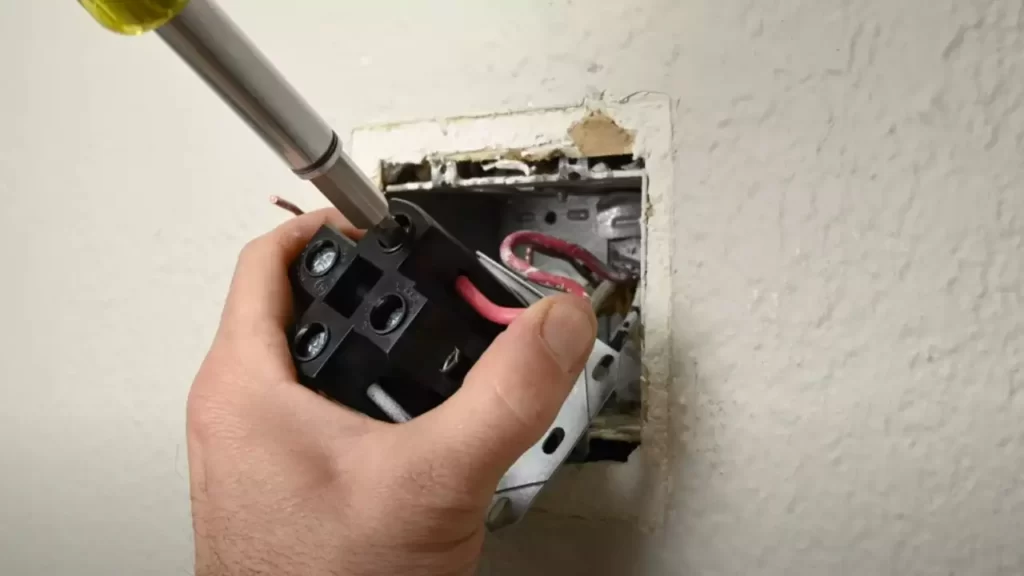
- Carefully thread the electrical wires through the hole in the back of the outlet box, ensuring they are safely contained within the box.
- Connect the wires to the appropriate terminals on the 4 prong dryer outlet. Refer to the manufacturer’s instructions for the specific wiring configuration.
- Tighten the terminal screws securely to create a strong and reliable connection.
- Once the wiring is complete, gently push the outlet into the box and align it with the mounting holes.
- Using the provided screws, secure the outlet to the box, making sure it is firmly in place.
By following these steps, you can confidently mount your 4 prong dryer outlet, knowing that it is securely installed and ready for use.
Double-Checking The Wiring Connections
Double-Checking the Wiring Connections
Once you have inspected the connections and ensured there are no loose wires, it is time to double-check the wiring connections to make sure everything is properly connected. By doing this step, you can ensure the safety and functionality of your newly installed 4 prong dryer outlet. Follow the steps below to double-check the wiring connections:
Inspecting the Connections
Before moving forward with double-checking the wiring connections, it is crucial to inspect the connections initially. This step will help identify any visible issues or irregularities that may affect the installation process. Pay close attention to the following:
- Examine the wires for any signs of damage or fraying. Replace any wires that are worn out or damaged.
- Make sure each wire is securely connected to its corresponding terminal. Loose connections can lead to electrical hazards and improper functioning of the outlet.
- Check the wiring diagram and compare it to the actual connections. Ensure that the wires are connected to the correct terminals as specified in the diagram.
- Inspect the insulation on the wires. It should be intact and free from any cuts or abrasions. Damaged insulation can cause electrical shorts or sparks.
Ensuring no Loose Wires
Loose wires can be a common issue when installing a 4 prong dryer outlet. It is crucial to ensure that all the wires are tightly secured to their respective terminals. Loose connections can cause overheating, electrical shocks, and other safety hazards. Follow these steps to ensure there are no loose wires:
- Tug gently on each wire to check for any movement. If a wire seems loose, remove the wire from the terminal and tighten it securely before reconnecting.
- Inspect the terminal screws and make sure they are tightened properly. Tighten any loose screws to ensure a secure connection.
- Use a screwdriver or a wrench to tighten the terminal screws. Be cautious and do not overtighten, as this can damage the terminal or strip the threads.
Remember, ensuring there are no loose wires is crucial for the proper functioning and safety of your new 4 prong dryer outlet. Take your time to double-check each connection and make any necessary adjustments to guarantee a secure and reliable installation.
Reconnecting The Dryer
Once you have successfully installed the 4-prong dryer outlet, it’s time to reconnect your dryer and ensure it is ready for use. Properly securing the power cord to the dryer and plugging it in are essential steps to ensure the safety and efficiency of your appliance. Follow the steps below to reconnect your dryer without any issues.
Securing the power cord to the dryer
Securing the power cord is a crucial step in reconnection to ensure a safe and reliable power supply to your dryer. By following these simple steps, you can make sure the connection is secure:
- Make sure the dryer is switched off and unplugged from the power outlet. This will eliminate any risk of electric shock.
- Locate the terminal block on the back of the dryer. It is usually located near the bottom and will have three screws labeled with the letters L, N, and G.
- Strip approximately 1 inch of insulation off the ends of the power cord wires. This will expose the copper wires for a proper connection.
- Connect the black wire (hot wire) to the terminal screw labeled L. Loosen the screw, insert the wire, and tighten the screw securely.
- Connect the white wire (neutral wire) to the terminal screw labeled N. Repeat the same process as above.
- Connect the green wire (ground wire) to the terminal screw labeled G. Again, repeat the same process.
- Double-check all connections. Ensure that the wires are securely attached and there are no loose connections.
Plugging in the dryer
Before plugging the dryer into the newly installed 4-prong outlet, make sure to follow these guidelines:
- Position the dryer close to the outlet. Make sure there is enough slack in the power cord to comfortably reach the outlet without strain.
- Align the prongs of the power cord with the corresponding slots on the dryer outlet. This will ensure a proper fit and prevent any damage to the cord.
- Push the power cord plug firmly into the outlet. Ensure it is fully inserted to establish a secure electrical connection.
- Give the dryer a slight tug to confirm the connection is secure. The plug should not easily detach from the outlet.
By following these steps, you have successfully reconnected your dryer to the newly installed 4-prong outlet. It’s important to double-check all connections and ensure the power cord is securely attached to provide a reliable power supply. Once everything is in place, you can now enjoy the smooth operation of your dryer without any concerns.
Restoring Power Supply
Turning on the Circuit Breaker
After successfully replacing the old 3 prong dryer outlet with a new 4 prong one, now it’s time to restore the power supply. The first step in this process is to turn on the circuit breaker. This crucial step ensures that the power is flowing to the outlet and the dryer can receive the electrical current it needs to operate.
Locate the circuit breaker panel in your home, usually found in the basement, utility room, or garage. Open the panel door to reveal the circuit breakers, which are labeled with their corresponding electrical circuits. Scan through the labels until you find the one indicating the dryer’s circuit. It may be labeled as “dryer” or with a similar description.
Next, with caution, flip the circuit breaker switch to the “on” position. You will typically hear a clicking sound, indicating that the power is now flowing once again. Keep in mind that some circuit breakers may have a lever that needs to be moved sideways instead of an up and down switch. Take a moment to verify that the circuit breaker switch stays in the “on” position and did not trip back to the “off” position.
Testing the Outlet with a Voltage Tester
Once you have turned on the circuit breaker, it’s important to test the outlet using a voltage tester. This step ensures that the wiring and connections are secure and functional, allowing you to confidently use the newly installed 4 prong dryer outlet.
Start by selecting a voltage tester suitable for your outlet type. Some voltage testers have different settings for AC and DC currents, so ensure that the setting matches the type of current used in your household.
Before proceeding, make sure the dryer is unplugged from the outlet to avoid any accidents during the testing process. Insert one end of the voltage tester into the left vertical prong of the outlet, commonly known as “hot” or “live.” Then insert the other end of the tester into the right vertical prong, known as “neutral.”
If the voltage tester shows a reading within the expected range, typically 110-120 volts, this indicates that the outlet is properly wired and functioning correctly. You can now proceed to plug in your dryer and enjoy its efficient operation. However, if the voltage tester does not show any reading or indicates a drastically different voltage, it is crucial to consult a professional electrician to resolve any underlying electrical issues before using the outlet.
Identifying Common Problems
Loose Connections
One common problem that may arise when installing a 4 prong dryer outlet is loose connections. These loose connections can lead to various issues such as intermittent power supply or even the complete failure of the outlet. It is important to ensure that all connections are tight and secure to prevent any potential problems.
To identify if there are any loose connections, carefully inspect the wires and terminals for any signs of looseness or disconnection. It is recommended to use a screwdriver to tighten any loose screws or connections. By ensuring that all connections are secure, you can avoid any potential issues and ensure proper functioning of your 4 prong dryer outlet.
Faulty Wiring
Faulty wiring is another common problem that may occur when installing a 4 prong dryer outlet. Faulty wiring can result in various electrical hazards, such as short circuits or electrical fires. It is crucial to identify and address any faulty wiring to ensure the safety of your home. To identify faulty wiring, thoroughly inspect the wires for any signs of damage, such as fraying or melting. Additionally, check if the wiring is properly connected to the outlet terminals and if there are any loose or exposed wires. If you notice any issues with the wiring, it is recommended to seek professional help or consult a licensed electrician to rectify the problem. By addressing faulty wiring, you can ensure the safe and efficient operation of your 4 prong dryer outlet.
Taking Corrective Measures
When it comes to installing a 4-prong dryer outlet, it’s crucial to follow the correct steps to ensure safe and efficient operation. However, even with the best of intentions, mistakes can happen. Don’t worry if you realize you’ve made an error during the installation process. In this section, we will discuss the corrective measures you can take to rectify any issues and get your dryer outlet up and running smoothly.
Rechecking the Connections
One of the first steps you should take when experiencing problems with your newly installed 4-prong dryer outlet is to recheck all the connections. Oftentimes, a loose or improperly connected wire can cause issues such as a lack of power or intermittent failures. To recheck the connections, follow these steps:
- Ensure the power to the outlet is turned off by locating and switching off the corresponding circuit breaker in your electrical panel.
- Using a screwdriver, remove the cover plate of the outlet to access the wiring.
- Inspect each wire connection to ensure they are secure and properly seated. Tighten any loose connections using a screwdriver or pliers, if necessary.
- Check for any signs of damage or wear on the wires. If you notice any, it’s vital to replace the damaged wire with a new one.
- Replace the cover plate and turn on the power to the outlet.
By rechecking the connections and addressing any loose or damaged wires, you can often resolve issues related to faulty installation.
Consulting a Professional if Necessary
If you’ve followed the correct installation steps and rechecked the connections but are still experiencing problems with your 4-prong dryer outlet, it may be time to consult a professional electrician. Electricians possess the knowledge and expertise to diagnose and fix electrical issues that may be beyond the scope of a DIY project. Hiring a professional can ensure that your dryer outlet is correctly installed and meets all safety requirements.
When choosing an electrician, consider their qualifications, experience, and customer reviews. Seeking recommendations from friends, family, or neighbors can also help you find a reliable professional who can address your specific concerns.
In conclusion, taking corrective measures when installing a 4-prong dryer outlet is essential for the safe and reliable operation of your dryer. By rechecking the connections and consulting a professional if necessary, you can address any installation errors and enjoy hassle-free laundry days.
Frequently Asked Questions
How Do You Install A 4-Prong Dryer Plug?
To install a 4-prong dryer plug: 1. Turn off the power supply and unplug the dryer. 2. Remove the old plug by disconnecting the wires. 3. Connect the new 4-prong plug by matching the corresponding wires to their designated terminals. 4.
Tighten the screws to secure the connections. 5. Restore power and test the dryer to ensure it’s functioning properly. Note: If you are unsure of the installation process, consult a professional electrician.
How Much Does It Cost To Install A 4-Prong Dryer Outlet?
Installing a 4-prong dryer outlet typically costs around $150-$300. It’s best to consult a professional electrician for an accurate quote and to ensure compliance with local electrical codes. A qualified electrician will provide a safe and secure installation for your dryer outlet.
What Size Wire Do I Need For Four Pin Dryer Outlet?
For a four pin dryer outlet, you will need to use a wire size of at least 10-gauge. It is important to use the correct wire size to ensure proper electrical connection and avoid any potential safety issues.
Can You Change A Dryer Plug From 3-Prong To 4-Prong?
Yes, it is possible to change a dryer plug from a 3-prong to a 4-prong. However, it is important to follow the manufacturer’s instructions and ensure that the outlet is compatible with the new plug. Seek professional help if you are unsure about the process.
Conclusion
Installing a 4 prong dryer outlet is a crucial step in ensuring the safe and efficient operation of your dryer. By following the steps outlined in this guide, you can confidently complete the installation process. Remember to prioritize safety and consult a professional if needed.
With this new outlet, you’ll be able to enjoy the benefits of a reliable and properly functioning dryer. Happy drying!