To install a 30 amp outlet for an RV, first turn off the power to the area, then mount the box and connect the wires following the manufacturer’s instructions. After that, fit the outlet into the box and secure it with screws, and finally, test the outlet to ensure it’s properly functioning.
Are you planning to install a 30 amp outlet for your RV? Having a dedicated outlet will ensure that your RV receives the power it needs to function properly. However, it’s essential to follow the right steps to ensure a safe and effective installation.
In this guide, we’ll walk you through the process of installing a 30 amp outlet for your RV. By the end, you’ll feel confident in your ability to complete the installation and enjoy worry-free trips in your RV. So let’s get started!
Understanding The Requirements
Before installing a 30 Amp outlet for your RV, it’s vital to understand the specific requirements to ensure a safe and efficient setup. This section will discuss three key factors that need careful consideration: determining the power needs of your RV, identifying the proper electrical circuit, and gathering the necessary tools and materials.
Determining the Power Needs of Your RV
When it comes to installing a 30 Amp outlet for your RV, it’s crucial to determine the power needs of your specific vehicle. Understanding the power requirements will help you choose the right outlet and wiring setup to efficiently meet those needs. Here’s what you need to consider:
- The power rating of your RV: Check the manufacturer’s specifications or the owner’s manual to find the power rating in Amps. While some RVs may require a 30 Amp circuit, others may operate on a 50 Amp circuit.
- The appliances and devices you plan to use: Make a list of all the electrical appliances and devices you commonly use or plan to run simultaneously in your RV. This will give you an estimate of the total power consumption and help determine whether a 30 Amp outlet is suitable.
- Potential future needs: It’s always wise to anticipate any future power requirements you may have. If you’re planning to upgrade your RV or add more power-hungry appliances in the future, it might be worth considering a higher amp circuit to allow for these expansions.
Identifying the Proper Electrical Circuit
Now that you have a clear understanding of your RV’s power needs, it’s time to identify the proper electrical circuit for your 30 Amp outlet installation. This involves a few crucial steps:
- Check your RV’s power cord: Examine the power cord on your RV to verify the type of plug it uses. A 30 Amp RV typically uses a three-prong plug with three rectangular prongs. This will help you determine the proper circuit configuration for your outlet.
- Consult local electrical codes: Ensure compliance with local electrical codes and regulations. It’s important to adhere to these guidelines to ensure the safety and legality of your installation.
- Determine the circuit breaker size: Based on your RV’s power needs, you’ll need to identify the appropriate circuit breaker size. A 30 Amp outlet usually requires a 30 Amp breaker, but it’s worth double-checking to ensure compatibility.
- Evaluate the wiring distance: Consider the distance between your RV and the electrical panel where you plan to install the outlet. This will help determine the correct wire gauge to use for a safe and efficient connection.
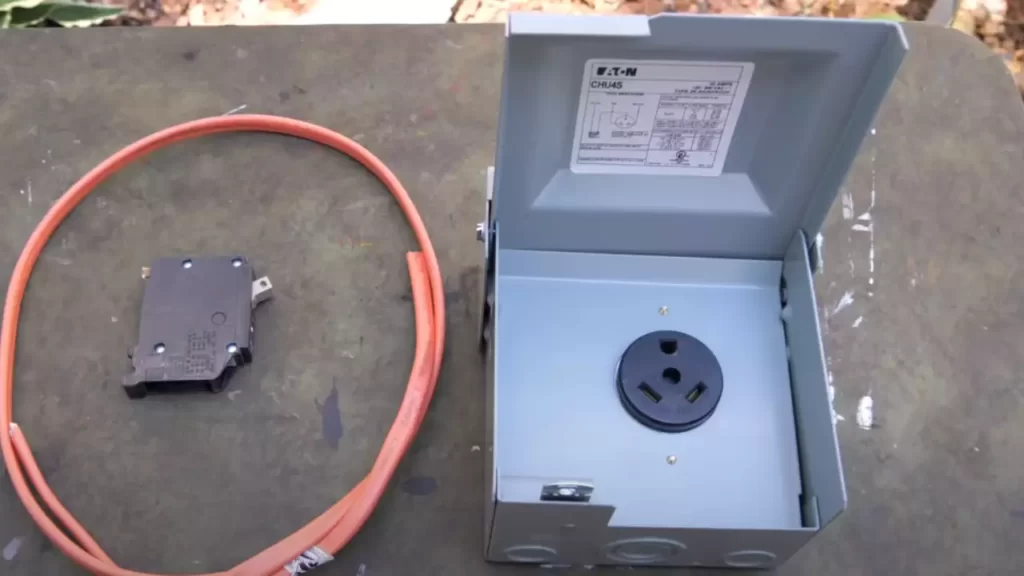
Gathering the Necessary Tools and Materials
With a clear understanding of your RV’s power needs and the proper electrical circuit, it’s time to gather the necessary tools and materials for the installation. Here’s a list of items you should have:
| Tools | Materials |
|---|---|
|
|
Make sure you have all these tools and materials readily available before starting the installation. This will save you time and ensure a smooth process from start to finish.
Preparing For Installation
Before you start installing a 30 Amp outlet for your RV, it is crucial to properly prepare yourself and the installation area. This will ensure a safe and efficient process that adheres to local electrical codes and regulations. In this section, we will discuss the essential steps to take in order to get ready for the installation.
Turning off the Power Supply
Prior to any electrical work, you must turn off the power supply to avoid any accidents or electric shocks. Locate your electrical panel and identify the appropriate circuit breaker that controls the power to the designated outlet location. Switch off the respective breaker as a safety precaution.
Checking Local Electrical Codes and Regulations
Each area may have specific electrical codes and regulations that must be followed when installing a 30 Amp outlet for an RV. It is essential to research and familiarize yourself with the local electrical codes to ensure compliance. This will help prevent any potential safety hazards and ensure that the installation is up to standard.
Planning the Outlet Location and Circuit Route
Choosing the right location for your 30 Amp RV outlet is crucial for convenience and functionality. Consider factors such as proximity to your RV parking space, accessibility, and ensuring the outlet is protected from extreme weather conditions. Additionally, plan the route for the electrical circuit, taking into account the distance, necessary wiring, and any potential obstacles along the way.
It is important to note that when planning the location and circuit route, you should consider the electrical load and capacity of your RV. This will ensure that the circuit can handle the power requirements without overloading, potentially causing damage to your RV’s electrical system.
Once you have completed these essential steps in preparing for the installation, you are now ready to proceed with the actual installation process. In the next sections, we will guide you through the necessary steps to safely and effectively install a 30 Amp outlet for your RV.
Installing The 30 Amp Outlet
Installing the 30 Amp Outlet
Installing a 30 amp outlet for your RV is an essential step in ensuring a smooth and reliable power supply during your travels. Whether you’re setting up a new outlet or upgrading an existing one, this guide will walk you through the process of installing a 30 amp outlet step by step. In this section, we will cover the key steps involved in mounting the outlet box, wiring the outlet with the correct gauge wire, and connecting the outlet to the main electrical panel.
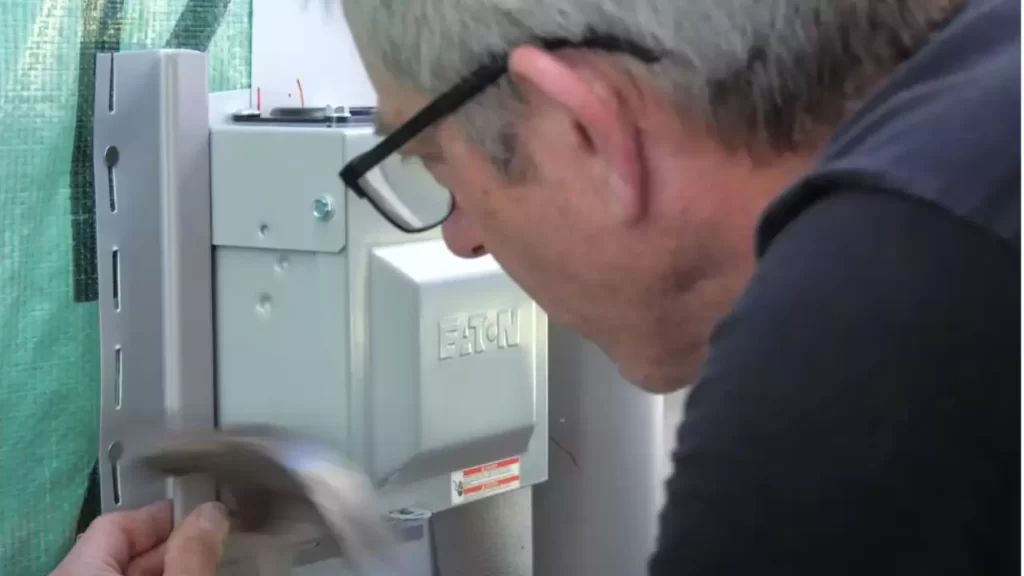
Mounting the Outlet Box
Before you begin installing the 30 amp outlet, it’s important to choose a suitable location for the outlet box. Here’s how you can mount the outlet box:
- Select a location near the main electrical panel or at a convenient point along the exterior wall of your RV. Ensure that the location is easily accessible.
- Using a stud finder, locate the nearest wall stud to the chosen location. Mark the stud’s position.
- Hold the outlet box against the wall at the marked position and align it with the stud.
- Using a pencil or a marker, trace the outline of the outlet box on the wall.
- Drill holes within the outline using a suitable sized drill bit or a hole saw.
- Using a screwdriver or a power drill, secure the outlet box to the wall by driving screws through the mounting holes.
- Ensure that the outlet box is securely fastened and aligned.
Wiring the Outlet with the Correct Gauge Wire
Once the outlet box is properly mounted, the next step is to wire the outlet with the correct gauge wire. Here’s how you can do it:
- Turn off the power supply to the main electrical panel to ensure safety.
- Measure the distance between the outlet box and the main electrical panel.
- Choose the appropriate gauge wire based on the measured distance and the total power requirements of your RV.
- Strip off the insulation from the ends of the wire using wire strippers.
- Connect one end of the wire to the terminals of the 30 amp outlet. Follow the manufacturer’s instructions for proper terminal connections.
- Route the wire from the outlet box to the main electrical panel, ensuring that it is properly secured along the way.
- Attach the other end of the wire to the corresponding terminals in the main electrical panel.
- Double-check all connections to ensure they are secure and properly tightened.
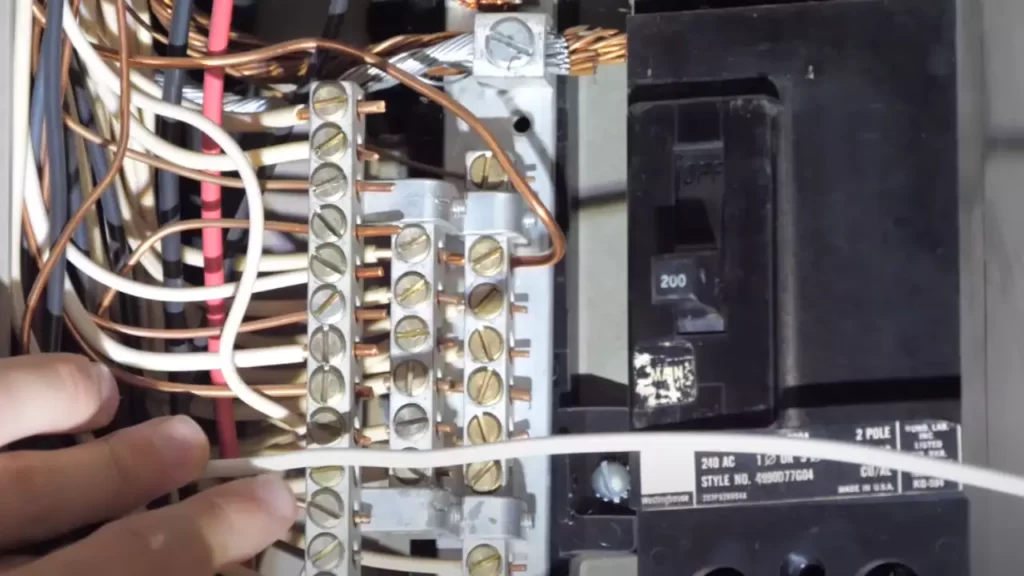
Connecting the Outlet to the Main Electrical Panel
The final step in installing a 30 amp outlet for your RV is connecting the outlet to the main electrical panel. Here’s how you can do it:
- Consult the electrical panel’s user manual or an electrician to identify the appropriate circuit breaker for your outlet.
- Turn off the circuit breaker to the outlet’s designated circuit.
- Remove the cover from the electrical panel and locate the neutral bus bar, grounding bar, and the designated circuit breaker.
- Connect the outlet’s neutral wire to the neutral bus bar and the grounding wire to the grounding bar.
- Using the appropriate size wire connector, connect the outlet’s hot wire to the designated circuit breaker.
- Secure the wire connections to the respective terminals in the electrical panel.
- Reinstall the cover on the electrical panel.
- Turn on the circuit breaker for the outlet’s designated circuit.
With the 30 amp outlet mounted, wired correctly, and connected to the main electrical panel, you can now enjoy a reliable power supply for your RV. It’s important to follow all applicable electrical codes and consult a professional electrician if you have any doubts or concerns during the installation process.
Testing And Safety Measures
When it comes to installing a 30 amp outlet for your RV, testing and implementing proper safety measures are crucial to ensure a safe and efficient electrical setup. By conducting thorough voltage tests, ensuring proper grounding, and conducting post-installation safety checks, you can not only protect your RV and electrical components but also safeguard yourself and your loved ones from potential hazards.
Conducting a Voltage Test
Before proceeding with the installation, it is essential to conduct a voltage test to ensure the outlet is supplying the correct amount of electrical power. Testing the voltage will help you identify and rectify any potential wiring issues or problems with the power supply. To conduct the voltage test, follow these steps:
- Start by turning off the main power source.
- Use a voltmeter to check the voltage levels of the outlet. Insert the red lead of the voltmeter into the hot slot and the black lead into the neutral slot.
- Once you have successfully connected the leads, turn on the main power source to check the voltage reading on the voltmeter.
- If the voltage reading falls within the acceptable range (typically between 110-120 volts), the outlet is functioning correctly. However, if the reading is significantly higher or lower, it is important to address the voltage issue before proceeding with the installation.
Ensuring Proper Grounding
Proper grounding is vital to prevent any electrical surges or shocks. When setting up a 30 amp outlet for your RV, ensure that it is properly grounded using these steps:
- First, turn off the main power source.
- Locate the grounding wire in your electrical panel. It is usually connected to a metal grounding rod or a cold water pipe.
- Attach one end of a grounding wire to the ground terminal of the 30 amp outlet and the other end to the grounding wire in the electrical panel.
- Ensure that all connections are secure and tight.
- Turn on the main power source and test the grounding by using a ground fault circuit interrupter (GFCI) outlet tester. This will help verify if the outlet is properly grounded.
- If the tester confirms proper grounding, you can proceed with confidence to the next step. If not, revisit the connections and ensure proper grounding is established before continuing.
Conducting Post-installation Safety Checks
After completing the installation, it is important to conduct post-installation safety checks to ensure everything is in proper working condition. Follow these steps to ensure the safety of your RV and electrical system:
- Inspect the outlet for any visible signs of damage, such as loose wires or cracks.
- Ensure that all connections are secure and tightly fastened.
- Check the functionality of the outlet by plugging in an RV electrical cord and confirming a secure fit.
- Test the outlet using a voltmeter to verify the voltage levels remain within the acceptable range.
- Regularly inspect the outlet and its surroundings for any potential hazards, such as water leaks or excessive heat.
By following these testing and safety measures, you can install a 30 amp outlet for your RV confidently, knowing that you have taken the necessary precautions to protect your RV’s electrical system and maintain a safe camping experience.
Troubleshooting Common Issues
“Diagnosing Circuit Breaker Trips”
One of the most common issues that RV owners encounter when installing a 30 amp outlet is circuit breaker trips. This can be frustrating, but with a bit of troubleshooting, you can often identify and resolve the problem.
The first step in diagnosing circuit breaker trips is to determine the cause. It could be due to an overloaded circuit, a faulty appliance or device that’s connected to the outlet, or a potential wiring issue. To narrow down the cause, follow these steps:
- Check for overloaded circuits: Start by turning off all appliances and devices that are connected to the 30 amp outlet. Then, gradually turn them back on one by one to see if any specific item causes the circuit breaker to trip. If a particular appliance or device consistently trips the circuit, it may draw too much power and need to be addressed.
- Inspect the wiring: Faulty wiring connections can also cause circuit breaker trips. Inspect the wiring for any visible damage, loose connections, or worn-out insulation. Make sure that all connections are secure and properly tightened.
- Test the circuit breaker: If you’ve ruled out overloaded circuits and faulty wiring, the problem may lie with the circuit breaker itself. Turn off the main power supply and carefully remove the faceplate of the circuit breaker panel. Look for any loose wires or signs of damage. If everything appears to be in order, you can test the circuit breaker with a multimeter to determine if it’s functioning correctly.
By following these steps, you can diagnose and address circuit breaker trips that often occur during the installation of a 30 amp outlet for your RV.
“Resolving Faulty Wiring Connections”
Faulty wiring connections can cause a range of issues, from intermittent power to complete circuit failure. To ensure that your 30 amp RV outlet functions properly, it’s important to resolve any wiring issues that may arise. Here are some steps you can take to tackle faulty wiring connections:
- Inspect all wiring connections: Start by visually inspecting all wiring connections for any signs of damage or loose connections. Tighten any loose wires and replace any damaged wiring.
- Use proper wire connectors: Make sure that you’re using the correct wire connectors for your specific wiring needs. Avoid using electrical tape alone, as it can become loose over time. Instead, consider using wire nuts or crimp connectors to secure and protect your wiring connections.
- Follow wire color coding: RV electrical systems follow a specific color coding system for different wires. Make sure to familiarize yourself with this coding and ensure that you’re connecting the right wires together. This will help prevent any confusion and ensure that your wiring is properly established.
By addressing faulty wiring connections, you can prevent a range of electrical issues and ensure that your 30 amp RV outlet functions reliably.
“Seeking Professional Help when Necessary”
While troubleshooting and resolving common issues during the installation of a 30 amp RV outlet can often be done independently, there are instances where professional assistance may be necessary. Here are some situations where it’s best to seek the help of a professional:
- Complex wiring problems: If you encounter complex wiring problems or are unsure about the correct wiring connections, it’s wise to consult an electrician. They have the expertise to handle intricate wiring systems and can ensure that everything is safely and correctly installed.
- Safety concerns: If you have concerns about your safety or the safety of your RV’s electrical system, it’s essential to contact a professional. They can assess the situation, identify any potential hazards, and provide the appropriate solutions.
- Compliance with local codes: When it comes to electrical installations, it’s crucial to comply with local electrical codes and regulations. If you’re unsure about these requirements or want to ensure that your installation meets the necessary standards, consult a professional electrician who is familiar with the local codes.
Remember, seeking professional help when necessary can save you time, money, and provide peace of mind knowing that your 30 amp RV outlet installation is carried out safely and efficiently.
Frequently Asked Questions
How Do I Add A 30 Amp Rv Outlet To My House?
To add a 30 amp RV outlet to your house, follow these steps: 1. Begin by installing a double pole 30 amp circuit breaker in your main electrical panel. 2. Install a 30 amp RV receptacle outside your home, ensuring it is weatherproof and GFCI protected.
3. Run 10-gauge, three-wire cable from the circuit breaker to the receptacle, connecting each wire correctly. 4. Turn off the main power, connect the wires, and tighten all connections securely. 5. Finally, test the outlet and ensure it is functioning properly before plugging in your RV.
What Size Breaker Do I Need For A 30 Amp Rv Outlet?
For a 30 amp RV outlet, you will need a breaker of the same size, which is 30 amps. This provides the proper power supply for your RV’s electrical needs. Always consult a professional electrician for installation and safety guidelines.
How Is A 30 Amp Rv Wired?
A 30 amp RV is wired with a dedicated power line connected to a 30 amp circuit breaker. This allows the RV to receive electricity from a 30 amp power source, providing enough power for appliances and systems inside the vehicle.
The wiring ensures safe and efficient electrical supply for the RV’s operation.
Is A 30 Amp Camper Plug 220 Or 110?
A 30 amp camper plug can be either 220 or 110 volts.
Conclusion
Installing a 30 amp outlet for an RV is a straightforward process that can greatly enhance your camping experience. By following the steps outlined in this guide, you can ensure a safe and efficient installation. Remember to consult a professional electrician if you are unsure or uncomfortable with any aspect of the process.
Now, you can enjoy the convenience and power of your RV without any hassle or worries.