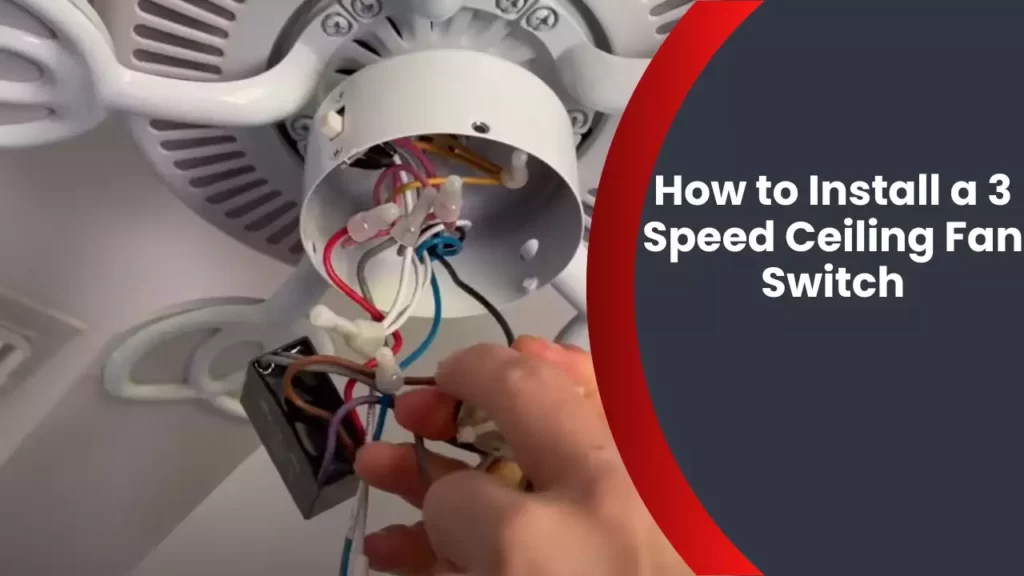
To install a 3-speed ceiling fan switch, turn off the power, remove the fan housing, disconnect the old switch, connect the new switch, and reassemble the fan.
What Is A 3 Speed Ceiling Fan Switch?
Definition and Purpose of a 3 Speed Ceiling Fan Switch
In the world of ceiling fans, a 3 speed ceiling fan switch plays a vital role in controlling the speed and functionality of your fan. This small yet mighty component is responsible for allowing you to adjust the fan’s rotation speed, enabling you to create the perfect airflow in your living space. By toggling between three different speed settings, you can enjoy a gentle breeze on warmer days or a powerful blast of air on those sweltering summer afternoons.
Unlike traditional on/off switches, a 3 speed ceiling fan switch gives you the flexibility to customize your fan’s operation to suit your comfort levels. Whether you want a low, medium, or high-speed setting, this switch empowers you to effortlessly adjust the fan’s performance according to your needs.
Importance of a Functioning Switch for Optimal Fan Performance
A functioning 3 speed ceiling fan switch is essential for achieving optimal fan performance and ensuring that your fan operates smoothly. When the switch starts malfunctioning or becomes faulty, it can significantly hinder the fan’s functionality, making it less effective in cooling your room or providing the desired airflow.
Having a reliable switch allows you to activate the fan’s different speed options, which not only helps maintain a comfortable temperature but also has significant energy-saving advantages. By selecting a lower speed setting during mild weather, you can save energy and reduce your electricity bills. On the other hand, when the temperatures soar, selecting a higher speed setting will provide maximum air circulation and cooling effect.
Without a properly functioning 3 speed ceiling fan switch, you may find yourself stuck with a fan that only operates at one speed or worse, one that doesn’t work at all. This can disrupt the flow of air, decrease the fan’s overall efficiency, and leave you feeling frustrated and uncomfortable. To ensure your ceiling fan continues to deliver its intended benefits, it’s crucial to install and maintain a reliable and functional switch.
Now that you have a clear understanding of what a 3 speed ceiling fan switch is and why it’s important, it’s time to learn how to install one successfully. In the next section, we will guide you through the step-by-step process of installing a 3 speed ceiling fan switch so that you can enjoy the full functionality of your fan.
Tools Required For Installing A 3 Speed Ceiling Fan Switch
List of tools needed for the installation process
Installing a 3-speed ceiling fan switch can be a great way to enhance the functionality of your ceiling fan. However, before you dive into the installation process, it is important to gather all the necessary tools to ensure a smooth and successful installation. Having the right tools not only makes the installation process easier but also ensures that you can complete the task efficiently and safely.
Here is a comprehensive list of tools you will need to install a 3-speed ceiling fan switch:
- Wire cutters
- Wire strippers
- Phillips screwdriver
- Flat-head screwdriver
- Needle-nose pliers
- Voltage tester
- Electrical tape
- Electrical connectors
- Wire nuts
Before you begin the installation process, make sure to have all these tools readily available. This will save you time and ensure that you are fully prepared to tackle the task at hand.
Importance of using the right tools for the job
Using the right tools for any job is crucial, and installing a 3-speed ceiling fan switch is no exception. The importance of using the right tools cannot be stressed enough, as it directly impacts the quality and safety of the installation. Here are a few reasons why using the right tools is essential:
- Efficiency: The right tools make the installation process much faster and more efficient. They are designed to perform specific tasks, allowing you to work with precision and accuracy.
- Safety: Using the correct tools ensures your safety during the installation process. Working with electrical components requires caution, and using the wrong tools can increase the risk of accidents or damage.
- Compatibility: Each tool is designed to work with specific components and materials. Using the wrong tools can result in improper connections and potential malfunctions of the ceiling fan switch.
- Durability: By using the right tools, you avoid unnecessary stress on the components and prevent damage to both the switch and the fan. This ensures that your installation will be long-lasting and reliable.
So, before you start installing a 3-speed ceiling fan switch, make sure you have all the necessary tools in place. Using the right tools will not only make your job easier and more efficient, but it will also contribute to the overall safety and quality of the installation. Invest in the proper tools and enjoy a successful installation process.
Materials Required For Installing A 3 Speed Ceiling Fan Switch
When it comes to installing a 3-speed ceiling fan switch, having the right materials is crucial to ensure a smooth and successful installation process. By gathering all the necessary items beforehand, you can save time and avoid any hiccups along the way. So, let’s take a look at the list of materials you’ll need to get started.
List of materials needed for the installation process
Before getting started, check that you have the following materials on hand:
- A 3-speed ceiling fan switch
- Screwdriver set
- Wire strippers
- Electrical tape
- Wire connectors
- Step ladder
- Non-contact voltage tester
- Owner’s manual or installation instructions provided with the fan
These materials are essential for a successful installation process and will ensure that you have everything you need to complete the task efficiently.
Importance of using high-quality materials for durability and safety
When it comes to electrical installations, safety should always be a top priority. Using high-quality materials not only ensures the longevity and durability of your ceiling fan switch but also helps to minimize any potential safety hazards. Inferior materials can lead to malfunctions, short circuits, or even fires if not handled properly.
Investing in high-quality materials may seem like an additional expense, but it is a wise investment in the long run. By using reliable products, you decrease the chances of encountering problems, reducing the need for constant repairs or replacements. This not only saves you money but also provides you with peace of mind, knowing that your ceiling fan switch is built for safety and longevity.
Furthermore, using high-quality materials also ensures that your ceiling fan switch operates efficiently, offering you optimal comfort in controlling the fan’s speed. It ensures smooth transitions between speeds, reducing any potential jerks or disturbances in operation.
Therefore, when installing a 3-speed ceiling fan switch, make sure to prioritize using high-quality materials. Doing so will not only enhance the durability and longevity of your switch but will also contribute to the safety and functionality of your ceiling fan as a whole.
Safety Precautions Before Starting The Installation
Installing a 3-speed ceiling fan switch can be a simple task if you follow the proper steps. However, before you begin, it is crucial to prioritize safety. By taking a few precautionary measures, you can ensure that the installation process is hazard-free and minimize the risk of accidents. In this section, we will discuss the importance of turning off the power supply before working on the switch and how to avoid accidental electrocution during the installation process.
Importance of Turning Off the Power Supply Before Working on the Switch
Before you even think about installing a 3-speed ceiling fan switch, it is essential to turn off the power supply to the room or area where you will be working. This precautionary measure is non-negotiable, as working with live wires can lead to electrocution or damage to your electrical system. To disconnect the power supply, follow these steps:
- Locate the electrical panel in your home.
- Open the panel door to reveal the breakers.
- Identify the breaker that controls the power to the room or area where you will be installing the switch. Refer to the circuit breaker labeling or consult a professional if you are unsure.
- Flip the corresponding breaker to the “off” position.
By turning off the power supply, you are ensuring that there is no electricity running through the wires you will be working with. This significantly reduces the risk of accidental shocks or electrocution during the installation process.
Avoiding Accidental Electrocution During the Installation Process
While working on the installation of a 3-speed ceiling fan switch, it is crucial to prioritize safety to prevent accidental electrocution. Here are some measures you should take to avoid electrical hazards:
- Double-check that the power supply is turned off before beginning any work.
- Wear protective gloves to insulate yourself from electrical currents.
- Avoid working in wet or damp conditions, as water can conduct electricity.
- Never touch bare wires or exposed electrical components.
- If you are unsure about any aspect of the installation process, consult a professional electrician.
By adhering to these safety precautions, you can complete the installation of a 3-speed ceiling fan switch without any accidents or injuries. Remember, electrical work should only be performed by individuals with the necessary knowledge and experience. If you are uncertain about any step of the process, it is best to seek assistance from a qualified professional.
Identifying The Existing Wiring Configuration
Understanding the different wires involved in the installation process:
If you want to install a 3 speed ceiling fan switch, it’s important to first understand the different wires involved in the process. By familiarizing yourself with the wiring configuration, you can ensure a smooth and successful installation.
When it comes to ceiling fan switches, there are typically four different wires that you’ll encounter:
- Black wire: This wire is known as the “hot” wire and is responsible for carrying the electrical current.
- Blue wire: This wire is commonly found in three-speed fan switches and is used to control the speed of the fan.
- White wire: This wire, also known as the neutral wire, helps to complete the electrical circuit and provides the return path for the current.
- Green or copper wire: This wire is the ground wire and is used for safety purposes. It helps to protect against electrical shocks by providing a direct path to the ground.
To ensure a successful installation, it’s crucial to properly identify each wire and understand its function. This will help you connect the new switch correctly and avoid any potential electrical hazards.
Identifying the correct wires to connect the new switch:
Before you begin connecting the new switch, it’s important to identify the correct wires. The following steps will guide you through the process:
- Turn off the power: Always start by turning off the power to the fan at the circuit breaker.
- Remove the fan canopy: Use a screwdriver to remove the screws holding the fan canopy in place. This will expose the wiring and allow you to easily identify the different wires.
- Locate the existing wiring: Once the fan canopy is removed, you’ll be able to see the existing wiring. Look for the black, blue, white, and green or copper wires.
- Identify the black wire: The black wire is typically the hot wire and is connected to the black or blue wire coming from the fan.
- Identify the white wire: The white wire is the neutral wire and is usually connected to the white wire from the fan.
- Identify the blue wire: The blue wire is the wire responsible for controlling the fan speed. It is connected to the black or blue wire from the fan.
- Identify the ground wire: Look for the green or copper wire, which is the ground wire. It is usually connected to the green or copper wire from the fan.
By carefully identifying each wire and understanding its role, you can connect the new switch properly and ensure a functional and safe ceiling fan.
Removing The Old Switch
Step-by-step process of removing the old switch from the fan
Removing the old switch from your 3-speed ceiling fan is an essential step when installing a new switch. This process involves disconnecting the wires from the old switch safely. By following these steps, you can ensure a smooth and hassle-free switch replacement.
- Step 1: Start by turning off the power to the ceiling fan. Locate the circuit breaker or fuse box in your home and switch off the power supply to the fan. This precautionary measure will protect you from any potential electrical hazards.
- Step 2: Use a ladder or step stool to reach the fan. Position yourself safely and have a flashlight handy for better visibility. Take a moment to familiarize yourself with the existing switch and the wires connected to it.
- Step 3: Remove the switch cover by unscrewing the screws holding it in place. Set aside the screws in a safe location as you will need them later.
- Step 4: Gently pull the switch out of the switch housing, exposing the wiring. Take note of how the wires are connected to the old switch. It may be helpful to take a picture or make a diagram for reference later.
- Step 5: Inspect the wires and connections to ensure they are secure. If there are any loose or damaged wires, take this opportunity to fix them or replace them as necessary.
Tips for safely disconnecting the wires
When disconnecting the wires from the old switch, it is crucial to exercise caution to prevent any accidents or damage. Follow these tips to ensure a safe and smooth disconnection process:
- Tip 1: Before touching any wires, double-check that the power is turned off at the circuit breaker or fuse box. This step cannot be emphasized enough for your safety.
- Tip 2: Use a voltage tester to confirm that the wires are not carrying any electrical current. This device will indicate whether the wires are safe to handle or if there is still power flowing through them.
- Tip 3: Proceed with caution when removing the wire connectors. Use gentle force to pull the connectors apart, ensuring you do not snap or break the wires in the process. If the connectors are stubborn, you can use a pair of pliers or needle-nose pliers for added grip.
- Tip 4: As you disconnect each wire, take note of their locations and colors. This information will be crucial when connecting the wires to the new switch.
- Tip 5: After disconnecting the wires, use electrical tape or wire nuts to cover the exposed ends. This step will prevent any accidental contact and help keep the wires secure until you install the new switch.
By following these step-by-step instructions and safety tips, you can confidently remove the old switch from your 3-speed ceiling fan. Remember to take your time and exercise caution throughout the process. Once the old switch is safely removed, you can proceed to the next steps of installing a new switch and enjoying the improved functionality of your ceiling fan.
Installing The New 3 Speed Ceiling Fan Switch
Step-by-step process of connecting the new switch to the fan
Connecting a new 3-speed ceiling fan switch might seem like a daunting task at first, but with a little guidance, you’ll have your fan up and running smoothly in no time. Follow these simple steps to ensure a successful installation:
- First, turn off the power supply to the fan by flipping the switch at the circuit breaker. It’s crucial to prioritize safety and avoid any potential electrical hazards.
- Locate the fan’s canopy and remove it by unscrewing the screws around its perimeter. This will provide you access to the wiring and the old switch.
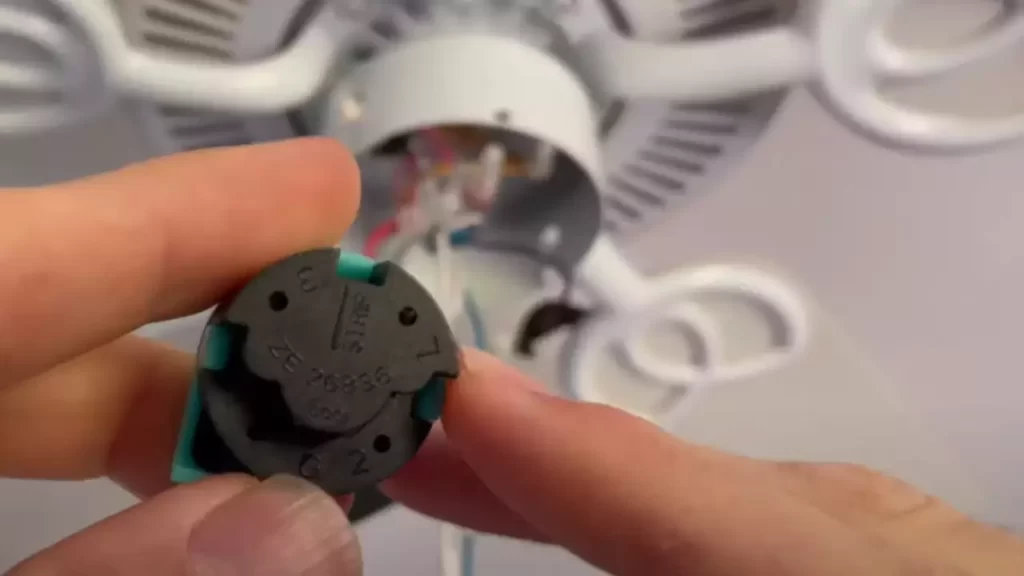
- Take note of the existing switch’s wiring connections. Usually, there are four wires: one black, one purple, and two gray wires. These wires correspond to the different fan speed settings. Make sure to document or take a photo of the wiring configuration to simplify the installation process.
- Once you have a clear understanding of the wiring connections, carefully disconnect the old switch by removing the wire nuts. Be cautious not to damage any wires in the process.
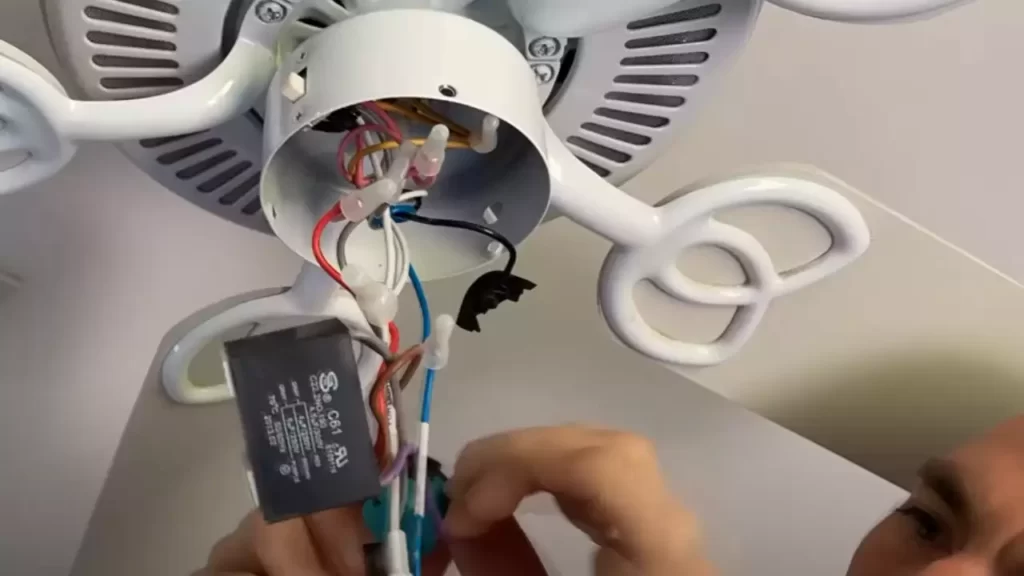
- Now, it’s time to connect the new switch. Begin by connecting the black wire from the switch to the black wire from the fan. Secure the connection using a wire nut. Repeat this process for the purple wire and the two gray wires, ensuring each connection is tightly fastened.
- Next, neatly tuck the connected wires back into the fan’s wiring compartment, making sure they are not pinched or damaged.
- Before reassembling the fan, take a moment to test the switch. Turn on the power supply and check if the different fan speed settings are functioning correctly. If the fan fails to work or operates improperly, double-check the wiring connections.
Congratulations! You have successfully connected your new 3-speed ceiling fan switch. Now, you can proceed with securing the switch in place to ensure long-lasting stability.
Proper techniques for securing the switch in place
Securing the switch properly is vital to prevent it from coming loose over time. Follow these techniques to ensure that the switch remains securely fastened:
- After connecting the switch, carefully slide it into the switch housing, aligning the screw holes with the pre-drilled holes in the housing. This will serve as the base for securing the switch.
- Using the screws provided with the new switch, firmly tighten them into the pre-drilled holes. Make sure not to overtighten, as this can damage the switch or the fan housing.
- Once the switch is securely in place, attach the fan’s canopy back onto the mounting bracket. Align the screw holes and tighten the screws to hold the canopy firmly.
By following these proper techniques for securing the switch, you can ensure that your ceiling fan operates smoothly and without any unnecessary movement or wobbling.
Testing And Troubleshooting The New Switch
Testing and troubleshooting the new switch is an essential step to ensure that your ceiling fan functions correctly. In this section, we will discuss the guidelines for testing the functionality of the newly installed switch, as well as common issues that may arise during the troubleshooting process.
Guidelines for testing the functionality of the newly installed switch
Once you have installed the 3-speed ceiling fan switch, it is crucial to test its functionality to ensure smooth operation. Here are some guidelines to help you:
- Start by turning off the power to the fan at the circuit breaker. This step is crucial for your safety.
- Next, turn the fan switch to the highest speed and turn on the power at the breaker. Observe if the fan starts running at the highest speed setting. If it does, the switch is functioning properly.
- To test the other speed settings, turn off the power at the breaker again. Then, change the switch to the next speed setting and restore power. Repeat this process for each speed setting to ensure they all work correctly.
- If the fan does not operate at any speed setting, double-check the wiring connections. Make sure all the wires are securely connected and in the correct positions according to the wiring diagram provided with the switch.
By following these guidelines, you can ensure that your newly installed 3-speed ceiling fan switch is working as intended.
Common issues and their solutions during the troubleshooting process
During the troubleshooting process, you may encounter a few common issues with your newly installed switch. Here are some solutions to help you resolve these problems:
| Issue | Solution |
|---|---|
| The fan does not turn on at any speed setting. | Check the power supply by testing the voltage at the switch using a multimeter. If there is no voltage, the problem may lie in the wiring or the power source. If there is voltage, ensure that the connections are properly secured and inspect the switch for any signs of damage. |
| The fan only operates at one speed. | Verify that the switch is wired correctly according to the provided diagram. If the wiring is correct, the issue might be a faulty switch. In this case, consider replacing it with a new one. |
| The fan operates erratically or intermittently. | Inspect the wiring connections for any loose or damaged wires. Ensure that all connections are secure. Additionally, check the capacitor, as a faulty capacitor can cause erratic fan operation. If needed, replace the capacitor following the manufacturer’s instructions. |
By referring to these common issues and their solutions, you can troubleshoot any problems that may arise during the installation of a 3-speed ceiling fan switch. Remember to always prioritize safety and consult a professional if you encounter any difficulties.
Regular Cleaning And Maintenance
Importance of cleaning the switch to prevent dust accumulation
Regularly cleaning your 3-speed ceiling fan switch is essential to prevent dust accumulation and maintain its optimal performance. Over time, dust and dirt can accumulate on the switch, affecting its functionality. Dust build-up can cause the switch to become sticky or difficult to operate, leading to poor fan speed control and potential damage. By keeping the switch clean, you can ensure smooth and effortless operation for years to come.
Recommended maintenance schedule to ensure optimal performance
To ensure your 3-speed ceiling fan switch continues to function smoothly, it is important to follow a recommended maintenance schedule. By adhering to the following maintenance routine, you can enjoy optimal performance and extend the lifespan of your switch.
- Dust the switch regularly using a soft cloth or a microfiber duster. This will help remove any loose particles that may have accumulated on the surface.
- Use a mild cleaning solution, specifically designed for electrical components, to wipe the switch clean. Avoid using harsh chemicals or abrasive cleaners that can damage the switch.
- Inspect the switch for any signs of wear and tear, such as loose connections or damaged wires. If you notice any issues, it is important to address them promptly to prevent further damage.
- Ensure that the switch is properly aligned and securely attached to the fan housing. Loose connections can lead to improper functioning of the switch.
- If you live in an area with high humidity or dusty conditions, consider cleaning the switch more frequently to prevent dust buildup.
Following these simple maintenance steps on a regular basis will help ensure that your 3-speed ceiling fan switch operates smoothly and efficiently. Taking care of your switch will not only enhance its performance but also prolong its lifespan, saving you from the hassle and expense of frequent replacements. Remember, a clean and well-maintained switch is the key to enjoying optimal comfort and convenience in your living spaces. So, make it a part of your regular cleaning routine and reap the benefits in the long run.
Addressing Common Problems And Repairs
Troubleshooting common issues with the switch
If you’re experiencing problems with your 3-speed ceiling fan switch, it can be frustrating. However, many common issues can be resolved with a little troubleshooting. Identifying the problem is the first step towards fixing it. Here are some common problems you may encounter and how to address them:
1. The fan doesn’t turn on/off
If your ceiling fan doesn’t respond when you try to turn it on or off, there may be an issue with the switch mechanism. Start by checking the wires connected to the switch to ensure they are properly secured. If the wires are loose, tighten them using a screwdriver. If the wires are intact, the switch itself may be faulty and in need of replacement.
2. The fan only operates at one speed
If your fan is stuck on a single speed, it could indicate a problem with the switch’s internal wiring. Carefully examine the wires connected to the switch and make sure they are securely fastened. If the wiring seems fine, the switch itself may need to be replaced.
3. The switch is making a buzzing sound
A buzzing sound coming from the switch can be an indication of a loose connection or faulty wiring. Check the wiring to ensure it’s properly secured and there are no exposed or damaged wires. If the buzzing persists, it’s advisable to replace the switch to avoid any potential electrical hazards.
DIY repairs for minor problems and when to seek professional help
While some problems with your 3-speed ceiling fan switch can be easily fixed with DIY repairs, others may require the expertise of a professional electrician. Let’s explore when you can take matters into your own hands and when it’s best to call for help:
1. DIY repairs for minor problems
If the issue seems minor and you have some electrical knowledge, you may be able to fix it yourself. Start by turning off the power to the fan at the circuit breaker. Then, take a close look at the switch’s wiring to check for loose connections or damaged wires. Tighten loose connections and replace any damaged wires. If necessary, replace the switch with a new one that matches the old switch’s specifications. Remember to follow safety precautions and consult online resources or electrical manuals for guidance.
2. When to seek professional help
If you encounter more complex issues or if you’re unsure about how to proceed, it’s crucial to seek the assistance of a professional electrician. Electrical systems can be dangerous, and improper repairs can lead to serious consequences. Whether it’s a persistent problem that DIY repairs couldn’t solve or if you lack the necessary expertise, contacting a professional ensures a safe and effective solution. Professional electricians have the knowledge, skills, and tools required to diagnose and fix intricate electrical issues with your ceiling fan switch.
In conclusion, addressing common problems with your 3-speed ceiling fan switch can be done through troubleshooting and DIY repairs for minor issues. However, if you’re uncertain or facing more complex problems, it’s always best to seek the assistance of a professional electrician to ensure your safety and the proper functioning of your ceiling fan.
Upgrading To A Smart Ceiling Fan Switch
If you’re tired of fumbling with a traditional ceiling fan switch or wish to enhance the convenience and energy efficiency of your ceiling fan, upgrading to a smart switch is the way to go. Smart ceiling fan switches offer a plethora of benefits, including increased control over fan speed, customizable schedules, and compatibility with voice assistants for hands-free operation. In this section, we’ll explore the benefits of upgrading to a smart switch and provide a step-by-step process for replacing your traditional switch with a smart switch.
Benefits of Upgrading to a Smart Switch for Added Convenience and Energy Efficiency
Upgrading to a smart ceiling fan switch offers several benefits that go beyond traditional switches. Here are some significant advantages:
- Increased Control: With a smart switch, you can easily adjust the fan speed, turn it on/off, and even reverse the fan direction with just a few taps on your smartphone or using voice commands.
- Customizable Schedules: Smart switches allow you to set schedules for your ceiling fan, so it automatically turns on or off at specific times. This feature is particularly useful for simulating occupancy when you’re away from home.
- Energy Efficiency: Most smart switches come with energy-saving features that help reduce electricity consumption. You can set timers or use motion sensors to ensure the fan is only operating when needed, saving both energy and money.
- Compatibility with Voice Assistants: Smart switches are often compatible with popular voice assistants such as Amazon Alexa or Google Assistant. This means you can effortlessly control your ceiling fan with simple voice commands.
Step-by-Step Process of Replacing a Traditional Switch with a Smart Switch
Now that you’re aware of the benefits, let’s walk through the step-by-step process of replacing your traditional ceiling fan switch with a smart switch:
- Step 1: Before you begin, ensure the power to the ceiling fan is turned off. This can be done by switching off the circuit breaker or removing the fuse that controls the fan’s electrical supply.
- Step 2: Once the power is disconnected, remove the faceplate of the existing switch by unscrewing the mounting screws. Carefully pull the switch out of the electrical box.
- Step 3: Take note of the wire connections on the existing switch. There are typically three wires: a live wire (black or red), a neutral wire (white), and a ground wire (green or copper).
- Step 4: Disconnect the wires from the traditional switch by loosening the terminal screws holding them in place. It’s crucial to label the wires or take a picture for reference during installation.
- Step 5: Install the smart ceiling fan switch by connecting the live, neutral, and ground wires to their respective terminals. Follow the manufacturer’s instructions for proper wiring.
- Step 6: Once the wires are securely connected, carefully push the smart switch back into the electrical box. Screw the mounting screws to secure it in place and attach the faceplate.
- Step 7: Restore power to the ceiling fan by turning the circuit breaker back on or reinstalling the fuse. Test the smart switch by using the mobile app or voice commands to control the fan.
That’s it! You have successfully upgraded your ceiling fan to a smart switch, gaining enhanced convenience and energy efficiency in the process. Enjoy the effortless control and smart features that come with your new smart ceiling fan switch!
Recap Of The Steps To Install A 3 Speed Ceiling Fan Switch
Summary of the Installation Process Covered in the Article
Installing a 3 speed ceiling fan switch is a manageable DIY project that can enhance your comfort and convenience. In this article, we have discussed the step-by-step process to successfully install a 3-speed ceiling fan switch. Before diving into the recap, it’s important to note that this tutorial assumes you have already turned off the power supply to the fan and have the necessary tools on hand, such as a screwdriver, wire stripper, and voltage tester. With that in mind, let’s recap the installation steps:
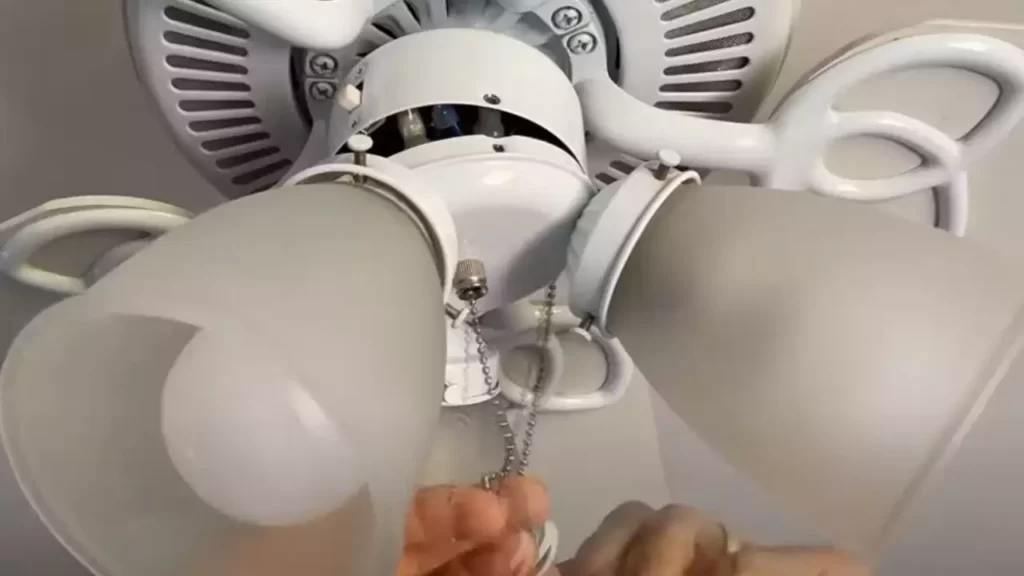
- Begin by removing the fan’s light kit or blades, depending on your specific fan model, to gain access to the switch housing.
- Use a voltage tester to ensure that no power is flowing to the fan. Safety is paramount, so be cautious throughout the installation process.
- Disconnect the wires connected to the existing switch, taking note of their positions.
- Unscrew and remove the old switch from the housing.
- Take your new 3-speed ceiling fan switch and insert it into the switch housing, aligning it correctly.
- Reconnect the wires according to their original positions, using wire nuts to secure the connections.
- Secure the switch into place with screws.
- If you had removed the fan blades or light kit initially, reattach them now.
- Turn the power supply back on and test your new 3-speed ceiling fan switch to ensure it’s working correctly. Adjust the speed settings as desired.
Importance of Following Safety Guidelines and Consulting a Professional If Needed
When it comes to any electrical work, safety should always be the top priority. It is crucial to follow the necessary safety guidelines to protect yourself and your property from any potential mishaps. While the process of installing a 3-speed ceiling fan switch may seem straightforward, if you are unsure about any steps or lack experience with electrical work, it is highly recommended to consult a professional electrician. They have the expertise to handle the installation properly and ensure your safety. Don’t hesitate to seek professional help if you have any doubts or concerns.
Frequently Asked Questions
How Does A 3 Speed Ceiling Fan Wall Switch Work?
A 3-speed ceiling fan wall switch works by allowing you to easily control the speed of your ceiling fan. With three different settings, you can choose the level of airflow that suits your needs. Simply flip the switch to select between low, medium, or high speeds for optimal comfort.
How Do You Replace A 3 Way Switch On A Ceiling Fan?
To replace a 3-way switch on a ceiling fan, turn off power to the fan. Remove the switch cover plate and screws. Remove the old switch by disconnecting the wires. Connect the new switch wires to the corresponding ceiling fan wires.
Securely screw in the new switch. Test the fan to ensure it’s working properly.
Can You Control 3 Ceiling Fans With One Switch?
Yes, you can control 3 ceiling fans with one switch. By installing a three-way fan switch, you can operate multiple fans using a single switch on your wall. This allows you to conveniently control all the fans in a room at the same time.
How Does A Ceiling Fan Have 3 Speeds?
A ceiling fan has 3 speeds due to its motor design. The fan motor contains windings, and by changing the current supply, the speed can be adjusted. The windings are configured to provide low, medium, and high speeds, allowing users to control the airflow according to their preference.
Conclusion
To sum it up, installing a 3-speed ceiling fan switch is a simple task that can greatly enhance the functionality of your fan. By following the step-by-step guide provided in this blog post, you can easily replace the old switch and enjoy the convenience of adjusting the fan’s speed according to your preference.
Remember to prioritize safety by turning off the power before starting the installation process. So go ahead, give your ceiling fan a fresh new switch and enjoy a comfortable and customized airflow in your space.