To install a 3 prong dryer outlet, follow these steps: turn off the power, remove the old outlet, connect the wires, attach the outlet to the wall, and restore power. Installing a 3 prong dryer outlet is a simple process that can be done with basic tools and electrical knowledge.
It requires disconnecting the power, removing the old outlet, connecting the wires correctly, attaching the new outlet to the wall, and restoring power. By following these steps carefully, you can ensure a safe and effective installation. This guide will walk you through the process and provide helpful tips to simplify the task.
The Importance Of Proper Electrical Setup For Dryers
Proper electrical setup for dryers is crucial for both your safety and the efficient functioning of the appliance. Whether you’re installing a brand new dryer or replacing an old one, ensuring a correct electrical connection is paramount. In this section, we will explore two key aspects of a proper electrical setup for dryers: ensuring safety and preventing electrical hazards, and complying with current electrical codes.
Ensuring Safety and Preventing Electrical Hazards
When it comes to the electrical setup of your dryer, safety should be your utmost priority. Improper wiring can lead to electrical hazards such as shocks, short circuits, or even fires. To prevent these potential disasters, follow these essential guidelines:
- Make sure the dryer outlet is grounded properly, using a grounding wire connected to the outlet box and the ground lug on the dryer cord.
- Verify that the circuit breaker or fuse for the dryer outlet is of the correct amperage. Using an inappropriate amperage can overload the circuit, resulting in tripped breakers or blown fuses.
- Inspect the power cord for any damages before plugging it into the outlet. Any frayed or damaged cords should be replaced immediately.
- Keep the area around the outlet free of clutter or flammable materials to minimize the risk of fire.
Complying with Current Electrical Codes
Electrical codes are in place to ensure the safety and proper functioning of electrical installations. When installing a 3 prong dryer outlet, it is essential to adhere to the current electrical codes. Failure to comply may not only result in potential hazards but may also lead to penalties or failed inspections.
Follow these steps to ensure compliance with electrical codes:
- Obtain a permit from your local building department before starting the installation.
- Consult the National Electrical Code (NEC) to ensure you understand the requirements for dryer outlets.
- Use appropriately sized wires and connectors that meet the specifications outlined in the NEC.
- Install a 3 prong dryer outlet that complies with the current electrical code regulations.
- Double-check the wiring and connections to ensure proper grounding and to avoid any potential code violations.
By adhering to these electrical codes, you not only guarantee your safety but also increase the efficiency and longevity of your dryer.
Remember, a proper electrical setup for your dryer is vital for your safety as well as the performance of the appliance. Take the necessary precautions, comply with electrical codes, and enjoy peace of mind knowing that your dryer will function safely and efficiently for years to come.
Tools And Materials Needed
Before you begin the installation process for a 3 Prong Dryer Outlet, it’s important to gather all the necessary tools and materials. Having everything on hand will make the process smoother and ensure a successful installation. Here’s a comprehensive list of what you’ll need:
Tools
| Tool | Quantity |
|---|---|
| Flat-head screwdriver | 1 |
| Phillips-head screwdriver | 1 |
| Wire stripper | 1 |
| Needle-nose pliers | 1 |
| Pliers | 1 |
| Electrical tape | 1 roll |
| Wire cutter | 1 |
| Hammer | 1 |
| Measuring tape | 1 |
| Wire nuts | 3 |
Materials
- New 3 prong dryer outlet
- Electrical wires (10/3 gauge)
- Outlet box
- Outlet cover plate
- Screws
- Wire connectors
- Grounding strap
Once you have gathered all the necessary tools and materials, you’ll be ready to proceed with the step-by-step guide for a successful installation. It’s important to follow each step carefully to ensure a safe and efficient installation process.
Understanding The Wiring Configuration
When it comes to installing a 3 prong dryer outlet, it’s essential to understand the wiring configuration to ensure a safe and proper installation. Differentiating between 3 prong and 4 prong dryer outlets and explaining the purpose of each wire and its connection are important steps. Let’s dive into the details!
Differentiating between 3 prong and 4 prong dryer outlets
In order to understand the wiring configuration of a 3 prong dryer outlet, it’s vital to first differentiate between 3 prong and 4 prong dryer outlets. The main difference lies in the number of grounding conductors. A 3 prong dryer outlet has three wires, including two “hot” wires and one neutral wire. On the other hand, a 4 prong dryer outlet consists of four wires – two “hot” wires, one neutral wire, and one grounding wire.
Explaining the purpose of each wire and its connection
Now, let’s take a closer look at the purpose of each wire and its connection in a 3 prong dryer outlet.
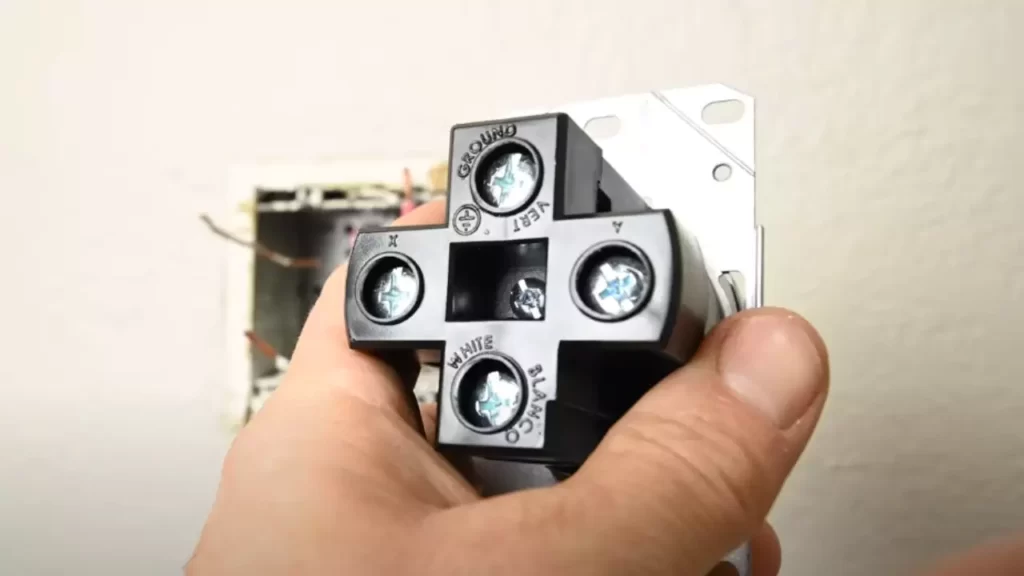
| Wire | Purpose | Connection |
|---|---|---|
| Hot Wire 1 | Carries current from the breaker box | Connected to one of the outer terminal connectors |
| Hot Wire 2 | Carries current from the breaker box | Connected to the other outer terminal connector |
| Neutral Wire | Returns current to the breaker box | Connected to the center terminal connector |
Now that you understand the purpose of each wire, it’s critical to ensure proper connections. To make the connections, start by removing the outlet cover plate. Next, connect the hot wires to the outer terminal connectors and the neutral wire to the center terminal connector. Double-check that all connections are secure before replacing the cover plate.
With this understanding of the wiring configuration, you are now ready to safely install a 3 prong dryer outlet. Remember to always consult a professional or refer to the manufacturer’s instructions if you have any doubts or concerns. Happy DIY-ing!
Turning Off The Power
Before installing a 3 prong dryer outlet, it is crucial to turn off the power to ensure your safety. You don’t want to risk any electrical accidents or injuries during the installation process.
Locating and switching off the correct circuit breaker
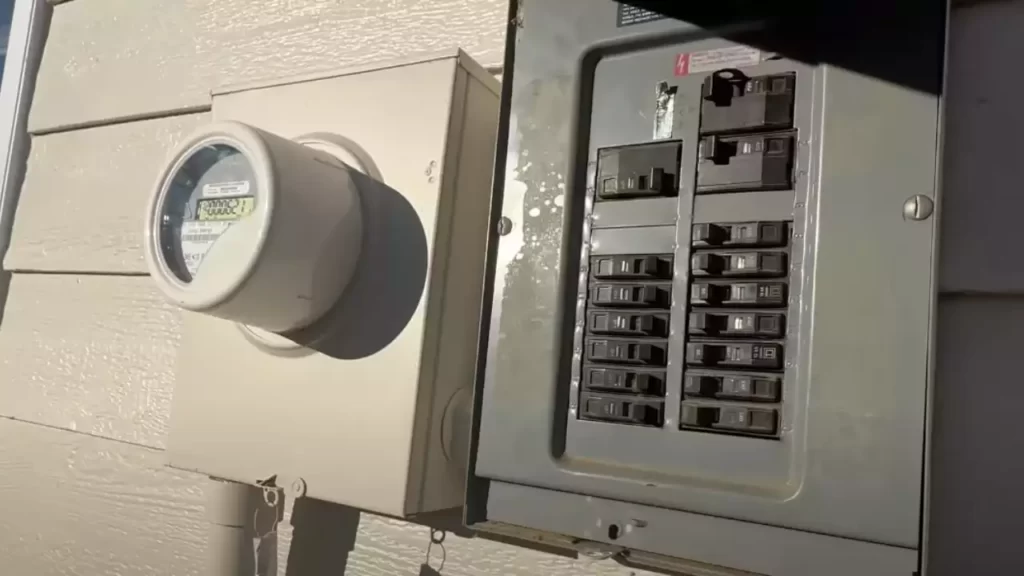
The first step is to locate the correct circuit breaker that controls the power supply for your dryer. In order to do this, you need to have a good understanding of your electrical panel, also known as the circuit breaker box.
Your electrical panel will typically have several switches or breakers, each controlling a specific area or appliance in your home. To find the breaker for your dryer, look for labels or markings inside the panel that indicate which breaker corresponds to the dryer circuit. If there are no labels, you may need to do some trial and error by flipping each breaker one by one until the power to your dryer is cut off.
Once you have identified the correct breaker, switch it to the “off” position. This will completely shut off the power supply to your dryer and ensure that there is no electrical current running through the outlet.
Ensuring Safety
It is essential to take certain precautions while working with electrical components. Here are a few safety tips to keep in mind:
- Wear rubber gloves to protect yourself from electrical shocks.
- Avoid wearing any loose clothing or jewelry that might get caught on something.
- Use insulated tools to minimize the risk of electrical contact.
- Double-check that the power is truly off by using a voltage tester on the outlet before proceeding with the installation.
By adhering to these safety measures, you can minimize the risk of accidents and work with confidence as you install your 3 prong dryer outlet.
Remove Old Outlet And Disconnect Wires
Removing the old outlet and disconnecting the wires is a crucial step when installing a 3 prong dryer outlet. It’s important to follow proper procedures and take necessary precautions to ensure your safety during the process. This section will guide you through the steps of taking safety precautions and disconnecting the wires from the old outlet.
Taking Safety Precautions
Before starting any electrical work, it’s essential to prioritize your safety. Here are a few precautions you should take:
1. Turn off the power: Begin by switching off the power supply to the old outlet. Locate the circuit breaker panel and identify the breaker that controls the dryer circuit. Turn off the breaker to cut off the electricity flow.
2. Test the power supply: To confirm that the power is off, use a voltage tester. Insert the probes into the old outlet’s slots and check if the tester indicates no voltage. Safety first!
3. Wear protective gear: Always wear safety goggles and gloves to protect yourself from potential hazards. Additionally, it’s a good idea to have a fire extinguisher in close proximity, just to be safe.
Disconnecting the Wires from the Old Outlet
Now that you’ve taken the necessary safety precautions, it’s time to disconnect the wires from the old outlet. Follow these steps carefully:
1. Remove the outlet cover: Use a screwdriver to remove the screws holding the outlet cover in place. Keep the screws safely aside, as you’ll need them later.
2. Pull out the old outlet: Carefully pull the old outlet out of the electrical box, exposing the wires connected to it. Make sure you have enough space to work comfortably.
3. Identify the wires: Take a close look at the wires connected to the old outlet. You’ll typically find three wires: a black (hot) wire, a white (neutral) wire, and a green or bare copper (ground) wire.
4. Unscrew the terminal screws: Using a screwdriver, loosen the terminal screws holding the wires in place. Rotate the screws counterclockwise until they’re loose enough to release the wires.
5. Disconnect the wires: Once the terminal screws are loose, gently pull the wires out of the old outlet. Take note of which wire corresponds to each terminal (black to hot, white to neutral, and green/bare copper to ground).
Remember, proper labeling and organization of the wires will make it easier for you to connect them to the new 3 prong dryer outlet.
By following these steps, you have successfully removed the old outlet and disconnected the wires. You’re now ready to move on to the next step of installing the 3 prong dryer outlet. Stay tuned!
Preparing The New Outlet
Installing a 3 prong dryer outlet is a relatively simple task that any handy homeowner can tackle. One of the key steps in this process is preparing the new outlet. By following a few steps and using the appropriate materials, you can ensure that the installation goes smoothly and safely. In this section, we will cover the important aspects of preparing the outlet, including choosing the appropriate 3 prong outlet and getting the outlet box ready for installation.
Choosing the appropriate 3 prong outlet
Before you start preparing the outlet, it’s crucial to choose the right 3 prong outlet for your dryer. There are different types of outlets available, so it’s important to check the requirements of your dryer manufacturer and obtain the appropriate outlet.
When choosing the outlet, make sure it is compatible with the electrical supply in your home. The outlet should match the voltage and amperage requirements of your dryer. Refer to the manufacturer’s manual or consult a professional electrician if you’re unsure about the specifications.
Preparing the outlet box for installation
Once you’ve obtained the right 3 prong outlet, it’s time to prepare the outlet box for installation. Follow these steps:
- Start by turning off the power to the circuit that supplies electricity to the outlet. This can be done by flipping the corresponding circuit breaker in your electrical panel.
- Using a voltage tester, double-check that the power has been cut off before proceeding with any work.
- Remove the cover plate from the outlet box by unscrewing the screws that hold it in place. Be careful not to touch any exposed wires.
- Inspect the outlet box to ensure there are no visible signs of damage. If you notice any issues, such as cracks or loose wiring, it’s best to consult a professional electrician for repairs.
- Carefully remove the wires from the existing outlet, noting which wires are connected to which terminals. Take a picture or label the wires if necessary to avoid confusion during reinstallation.
- Using a wire stripper, remove about half an inch of insulation from the ends of the incoming wires.
- Attach the wires to the corresponding terminals on the new 3 prong outlet. The black wire connects to the brass terminal, the white wire connects to the silver terminal, and the green wire connects to the green grounding screw.
- Gently push the wires back into the outlet box, making sure they are not pinched or touching any sharp edges.
- Secure the new 3 prong outlet to the outlet box using the provided screws, making sure it is flush with the box.
- Finally, replace the cover plate and securely tighten the screws to complete the preparation of the outlet.
With the new outlet box prepared, you’re one step closer to installing your 3 prong dryer outlet. Make sure to double-check your work and follow all safety guidelines before proceeding with the installation.
Wiring The New Outlet
Wiring the new outlet is a crucial step in the process of installing a 3 prong dryer outlet. It involves connecting the wires to the corresponding terminals and securing the connections properly. By following the correct steps, you can ensure that your dryer outlet functions safely and efficiently. In this section, we will guide you through the process, highlighting the importance of each step along the way.
Connecting the wires to the corresponding terminals
Once you have identified the wiring, it’s time to connect the wires to the corresponding terminals of the new dryer outlet. To do this, follow these simple steps:
- Strip the insulation off the ends of the wires: Before connecting the wires, strip approximately 1 inch of insulation off the ends using a wire stripper. This will expose the bare copper wires, allowing for a proper connection.
- Identify the terminal colors: Each terminal on the dryer outlet will have a specific color code indicating where the wires need to be connected. Typically, the left terminal is brass and labeled “hot,” the center terminal is silver and labeled “neutral,” and the right terminal is green and labeled “ground.”
- Connect the wires to the terminals: Using a screwdriver, loosen each terminal screw. Insert the bare copper wire into the corresponding terminal slot and tighten the screw to secure the connection. Repeat this step for each wire, ensuring they are tightly secured.
Securing the connections properly
Ensuring that the connections are properly secured is crucial for the safe and efficient operation of your dryer outlet. Here are some important tips to follow:
- Tug test: After connecting the wires, gently tug on each wire to check if the connection is secure. If any wires come loose, tighten the terminal screws further to ensure a tight connection.
- Avoid loose or exposed wires: Make sure there are no loose or exposed wires outside the terminal slots. This can lead to electrical shock or damage to your dryer. If you notice any loose wires, tuck them securely into the terminal slots.
- Inspect for any damage: Before proceeding, carefully inspect the connections for any signs of damage, such as frayed wires or loose screws. If you notice any issues, make the necessary repairs or replacements before proceeding.
By following these steps and properly securing the connections, you can ensure that your new 3 prong dryer outlet is installed correctly and ready for use. Take the time to double-check your work and make any necessary adjustments to ensure the safety and efficiency of your dryer.
Mounting The Outlet
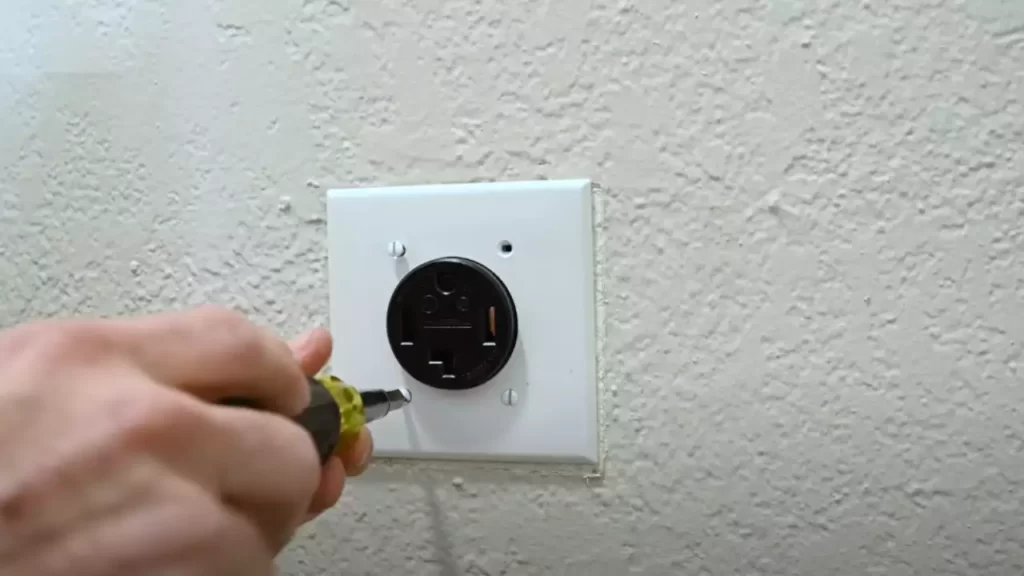
Attaching the Outlet to the Wall or Panel
Once you have determined the ideal location for your 3 prong dryer outlet, it’s time to mount it onto the wall or panel. Attaching the outlet securely is crucial to ensure a stable and safe electrical connection.
Here is a step-by-step guide to help you mount the outlet:
- Start by locating the studs or support beams on the wall or panel where the outlet will be mounted. Use a stud finder or tap the wall gently to find any solid areas.
- Once you have located the studs, mark the position where you will be mounting the outlet. Make sure it is at the correct height and aligned with any nearby power sources or appliances.
- Using a drill, create pilot holes in the marked positions. These holes will act as guides when screwing in the outlet.
- Place the outlet against the wall or panel, aligning the screw holes with the pilot holes.
- Insert screws into the pilot holes and tighten them, ensuring that the outlet is securely attached to the wall or panel. Be mindful not to overtighten the screws, as it may damage the outlet or strip the holes.
Ensuring Stability and Proper Positioning
To ensure stability and proper positioning of the outlet, follow these additional steps:
- Check that the outlet is level by using a spirit level. Adjust as necessary.
- Make sure all the connections are tight and secure, providing a solid electrical connection.
- Double-check the positioning of the outlet to avoid any interference with nearby objects or appliances.
- If the outlet needs to be mounted on a panel, make sure the panel is stable and reinforced to support the weight of the outlet.
By properly mounting the 3 prong dryer outlet, you can ensure a safe and efficient electrical connection for your dryer. Follow these steps diligently and exercise caution to prevent any accidents or electrical hazards.
Testing And Verifying The Installation
Using a Multimeter to Check for Proper Voltage
To ensure that your 3 prong dryer outlet installation is successful and operating effectively, it’s crucial to test and verify the voltage. One of the most reliable methods to accomplish this is by using a multimeter. This handy device allows you to measure the voltage and ensure that it falls within the specified range.
Here’s how you can utilize a multimeter to check for proper voltage in your 3 prong dryer outlet installation:
- Prepare the multimeter: Begin by setting your multimeter to the appropriate voltage range. For a 220-240-volt outlet, select the corresponding setting on your device.
- Verify the power supply: Before proceeding, make sure the power supply to the outlet is turned off, and the circuit breaker is in the “OFF” position. Safety is paramount!
- Examine the outlet terminals: Take a closer look at the outlet terminals. You should see three prongs or terminals: a neutral terminal, a hot terminal, and a ground terminal. These are usually color-coded for easy identification.
- Measure the voltage: With the multimeter leads, touch the neutral terminal with the black lead and the hot terminal with the red lead. Ensure there is no contact with the ground terminal. Once in position, read and record the voltage displayed on the multimeter screen.
- Verify the voltage range: Compare the voltage reading with the specified voltage range for your dryer model. If the reading matches the required voltage, you can move forward with confidence in the success of your installation. However, if the voltage is outside the accepted range, consult a professional electrician to address any potential wiring issues.
Verifying That the Dryer Is Functioning Correctly
After confirming that your 3 prong dryer outlet is correctly installed and providing the appropriate voltage, the next step is to verify that your dryer is functioning correctly. Follow these steps to ensure everything is in good working order:
- Connect the dryer: Start by connecting the dryer to the newly installed outlet using the appropriate plug. Make sure it fits securely and is inserted completely into the outlet.
- Power on the dryer: Turn on the power supply for the dryer by switching the circuit breaker to the “ON” position.
- Select a test cycle: Set the dryer to a test cycle, such as “Air Dry” or “No Heat,” to avoid potential damage to clothes during this verification process.
- Run the test cycle: Start the dryer and allow it to run through the selected test cycle for a few minutes. Listen for any unusual noises and observe the operation of the drum and controls.
- Check for heat: After a few minutes, open the dryer door and carefully assess whether heat is being generated. You can simply place your hand near the drum or use a thermometer to check the temperature within the dryer. If heat is not present or the temperature is significantly lower than expected, there may be an issue with the heating element or thermostat.
- Ensure proper airflow: Another important aspect to verify is the airflow. Check if the air is flowing adequately through the exhaust vent. A lack of airflow can indicate a clogged vent, which can negatively impact dryer performance and efficiency.
- Make necessary adjustments: If you encounter any problems or inconsistencies during the verification process, make note of them. Troubleshoot potential issues or consult a professional technician to address and resolve any problems before regular use.
By thoroughly testing and verifying both the voltage and functionality of your newly installed 3 prong dryer outlet, you can ensure safe and efficient operation for your dryer. Don’t overlook these critical steps in the installation process.
Grounding Requirements
Understanding the Importance of Grounding for Safety
When it comes to installing a 3 prong dryer outlet, it is crucial to understand the importance of grounding for safety. Grounding is an essential electrical safety measure that protects both you and your appliances from potential hazards. Without proper grounding, electrical currents can flow through unintended paths, leading to electric shock or fire hazards.
Ensuring All Necessary Grounding Connections Are in Place
When installing a 3 prong dryer outlet, it is imperative to ensure that all necessary grounding connections are properly installed. This will help to establish a safe electrical pathway and minimize the risk of electrical mishaps. Here are the necessary steps to ensure proper grounding:
- Inspect the existing electrical system: Before installing the 3 prong dryer outlet, inspect the electrical system to locate the main service panel. Ensure that the panel is properly grounded and connected to a grounding electrode system.
- Install a grounding wire: A grounding wire, also known as a “grounding conductor,” should be connected to the grounding terminal of the dryer outlet. This wire will provide a direct path for electrical currents to flow into the earth, safely dissipating any potential electrical charges.
- Use proper grounding screws: It is important to use the right screws when securing the grounding wire to the grounding terminal. These screws are specifically designed to maintain a secure and reliable connection.
- Verify continuity of grounding connections: After completing the installation, it is crucial to verify the continuity of the grounding connections. This can be done using a multimeter to ensure that there is a reliable electrical pathway from the outlet to the grounding system of your home.
By following these steps and ensuring that all necessary grounding connections are in place, you can provide a safe and secure electrical environment for your 3 prong dryer outlet installation.
Avoiding Common Mistakes
When it comes to installing a 3 prong dryer outlet, there are a few common mistakes that many people make. These mistakes can not only cause inconvenience but also pose a potential risk to your electrical system. In this section, we will highlight some of these common errors and provide you with tips for troubleshooting and correcting them, ensuring a safe and efficient installation process.
Common Errors to Watch Out for During Installation
During the installation process, it is important to be aware of some common errors that can occur. By avoiding these mistakes, you can save yourself time, money, and the hassle of having to correct them later. Here are a few things to watch out for:
- Incorrect Wiring: One of the most common mistakes is wiring the outlet incorrectly. It is crucial to follow the electrical code and ensure that the wires are connected properly. Failure to do so can result in a malfunctioning outlet or, in worse cases, electrical hazards.
- Failure to Ground: Another important aspect to consider when installing a 3 prong dryer outlet is grounding. Make sure that the outlet is properly grounded to avoid electrical shocks or damages to your appliances.
- Improper Wire Stripping: When stripping the wires, it is essential to do it correctly. Improper wire stripping can lead to loose connections or even exposed wires, increasing the risk of electrical hazards.
- Lack of Proper Ventilation: Allowing sufficient airflow around the outlet is important for preventing overheating. Make sure not to place the outlet in an enclosed space with limited ventilation.
- Inadequate Wire Length: Ensure that you have enough wire length to connect the outlet without straining or stretching the wires. Insufficient wire length can result in poor connections or even electrical fires.
Tips for Troubleshooting and Correcting Mistakes
If you encounter any issues during or after the installation process, it is vital to troubleshoot and correct the mistakes promptly. Here are a few tips to help you rectify common errors:
- Double-Check Wiring: If you suspect a wiring error, carefully inspect the connections and make sure they are correctly aligned with the electrical code.
- Test Grounding: Use a multimeter to test the grounding of the outlet. Ensure that there is continuity between the ground terminal and the grounding wire.
- Properly Strip and Connect Wires: If you notice loose or exposed wires, safely strip away the damaged portion and reconnect them securely.
- Improve Ventilation: If the outlet is located in an enclosed area, consider adding ventilation to prevent overheating. This could involve installing a fan or relocating the outlet to a more suitable location.
- Extend Wires if Needed: If you find that the wires are too short, it may be necessary to extend them. Ensure that you use correctly sized wire connectors and follow proper electrical wiring practices.
By being aware of common mistakes and having the knowledge to troubleshoot and correct them, you can ensure a successful and safe installation of your 3 prong dryer outlet. Taking the time to double-check your work can save you from potential hazards and provide you with a reliable and efficient electrical connection for your dryer.
Hiring A Professional Electrician
When to Consider Hiring a Professional
Installing a 3 prong dryer outlet may seem like a simple task, but it’s important to know when it’s best to leave it to the professionals. If you’re unsure or inexperienced in electrical wiring, it’s highly recommended to hire an electrician for this job. Safety should always be the top priority when working with electrical systems, and a professional electrician has the expertise and knowledge to ensure a safe and efficient installation. Additionally, if your home’s electrical system is outdated or if you’re making significant changes to the wiring, it’s best to consult with a professional.
The Benefits of Hiring an Experienced Electrician
When it comes to installing a 3 prong dryer outlet, it’s crucial to hire an experienced electrician to reap a myriad of benefits:
- Expertise: An experienced electrician has the necessary knowledge and expertise to handle electrical installations safely and efficiently. They are familiar with electrical codes and regulations, ensuring that the installation is done correctly and up to code.
- Efficiency: Hiring a professional electrician ensures that the job is completed quickly and accurately. They have the necessary tools and equipment, which makes the installation process smoother and more efficient.
- Safe Installation: Electrical work can be dangerous if not done properly. A professional electrician follows industry safety standards and protocols, minimizing the risk of electrical hazards such as shocks and fires. They know how to handle wiring, circuits, and connections safely.
- Troubleshooting: If any issues arise during the installation process, an experienced electrician can quickly identify and resolve them. They have troubleshooting skills and can avoid potential complications that a novice might encounter.
- Peace of Mind: Hiring a professional electrician gives you peace of mind knowing that the job is being handled by a qualified expert. You can trust their workmanship and have confidence in the safety and functionality of your 3 prong dryer outlet.
Hiring a professional electrician may require an investment, but it guarantees a safe and efficient installation of your 3 prong dryer outlet. Don’t compromise your safety or that of your home by attempting the installation yourself if you lack the knowledge and experience in electrical work. Contact a trusted electrician today and enjoy the benefits of a professionally installed dryer outlet.
Frequently Asked Questions
Does A 3 Prong Dryer Cord Need A Ground?
Yes, a 3 prong dryer cord requires a ground. The ground wire ensures safety by providing a path for excess electrical current to go in case of a fault, preventing electrical shocks and potential fire hazards. Make sure to always use the correct cord and have it installed by a professional electrician.
How Do You Wire A 3 Prong Dryer Plug?
To wire a 3 prong dryer plug, follow these steps: 1) Turn off the power to the dryer circuit. 2) Remove the old cord by unscrewing the terminal screws. 3) Connect the new cord, matching wire colors to the corresponding terminals.
4) Tighten the terminal screws securely. 5) Reconnect the power and test the dryer.
What Size Wire Do I Need For A 3 Prong Dryer Outlet?
For a 3 prong dryer outlet, you’ll need a wire size of 10 or 8 AWG (American Wire Gauge). This wire size is capable of handling the current required by most dryers. Make sure to consult a professional electrician for specific guidance based on your dryer’s power requirements.
Can I Change A 4 Prong Dryer Outlet To A 3 Prong?
Yes, it is possible to change a 4 prong dryer outlet to a 3 prong. However, it is advised to hire a qualified electrician to ensure proper installation and safety compliance.
Conclusion
To sum up, installing a 3 prong dryer outlet is a simple process that can be done by following a few steps. By ensuring that you have the necessary tools and following safety precautions, you can successfully complete the installation.
Remember to turn off the power, connect the wires correctly, and secure the outlet in place. With proper attention and care, you’ll have a functioning dryer outlet ready to use in no time. Begin your journey to hassle-free laundry today!