To install a 20 Amp outlet, first, turn off the power supply from the main breaker panel. Then, remove the cover plate from the existing outlet and disconnect the wires.
Finally, connect the wires to the new 20 Amp outlet and secure it in place before turning on the power again. This ensures a safe and secure installation process for the 20 Amp outlet. Having a dedicated 20 Amp outlet in your home or workspace can be incredibly useful.
It allows you to power higher voltage appliances and devices that require a significant amount of electricity, such as power tools or large kitchen appliances. By following a few simple steps, you can easily install a 20 Amp outlet and enjoy the convenience and functionality it offers. We will guide you through the process of installing a 20 Amp outlet efficiently and safely. So, let’s get started!
Choosing The Right Location For Your 20 Amp Outlet
When it comes to installing a new 20 amp outlet, one of the most important considerations is choosing the right location. The location of your outlet will determine its accessibility and safety, so it’s crucial to take some factors into account before deciding on the perfect spot.
Considerations for optimal placement
When selecting the optimal location for your 20 amp outlet, there are a few key considerations to keep in mind:
- Proximity to electrical panel: It’s essential to place your new outlet as close as possible to your electrical panel. This helps to minimize the length of the wiring required, reducing the risk of power loss and optimizing the efficiency of your electrical system.
- Work area requirements: Assessing the intended use of the outlet is essential in determining its placement. Identify the specific work area where you will frequently need access to power. This could be near a workstation, workbench, or any other area where you’ll be using power tools or equipment regularly.
- Environmental factors: Take into account the environmental conditions of the proposed location. Avoid areas that are prone to moisture or extreme temperatures, as these can pose potential electrical hazards. Additionally, consider the convenience of the outlet placement in relation to potential obstructions, such as furniture, doors, or windows.
- Accessibility: Ensure that the outlet is easily accessible and within reach. Placing it too high or too low could lead to inconvenience and safety hazards. The standard height for an outlet is around 12-16 inches above the floor, but this may vary depending on your needs and local building codes.
Ensuring accessibility and safety
When it comes to electrical outlets, safety should always be a top priority. Ensuring proper accessibility and safety measures are in place is crucial when selecting the location for your 20 amp outlet. Here are some key steps to follow:
- Turn off the power: Before starting any installation, turn off the power to the area where you plan to install the outlet. This will help prevent any accidents or injuries during the process.
- Install a dedicated circuit: For optimal safety, consider installing a dedicated circuit for your 20 amp outlet. This ensures that your outlet will not overload and cause any electrical hazards.
- Follow local electrical codes: Be sure to adhere to your local electrical codes and regulations when installing the outlet. These codes are in place to ensure the safety of yourself and others, so it’s essential to follow them carefully.
- Use appropriate wiring: Always use wiring that is suitable for a 20 amp outlet. This will ensure that the outlet can handle the load safely without overheating or causing any electrical issues.
By considering these factors and following the necessary precautions, you can choose the ideal location for your 20 amp outlet, ensuring both accessibility and safety.
Gathering The Necessary Tools And Materials
Before you begin installing a 20 Amp outlet, it’s important to gather all the necessary tools and materials to ensure a smooth and successful installation process. Having the right tools and materials on hand will not only save you time but also help you complete the task efficiently. Below, we’ve listed the essential tools and materials you’ll need for the installation.
List of tools needed for installation
To install a 20 Amp outlet, you will need the following tools:
| Tools |
|---|
| Screwdriver |
| Tape measure |
| Wire stripper |
| Needle-nose pliers |
| Wire cutters |
| Drill |
| Level |
| Wire connectors |
| Outlet tester |
| GFCI outlet (if required) |
Materials required for a successful outlet installation
In addition to the tools, you’ll also need the following materials:
- 20 Amp outlet
- Electrical box
- Wire (14-gauge for a 15 Amp circuit or 12-gauge for a 20 Amp circuit)
- Wire nuts
- Electrical tape
- Outlet cover plate
- Mounting screws
- Electrical staples (if required)
Make sure to double-check the specifications of the outlet and wire you choose, as they should match the requirements of your electrical circuit. Additionally, if you are installing a GFCI outlet, ensure that it meets the necessary safety standards.
By gathering all the tools and materials beforehand, you’ll be well-prepared to move on to the next steps of installing a 20 Amp outlet with confidence and ease.
Preparing For Installation
Before you begin the installation of a 20 amp outlet, it is crucial to properly prepare for the task at hand. This involves checking the electrical panel capacity, turning off power to the designated circuit, and gathering necessary safety equipment.
Checking Electrical Panel Capacity
When installing a 20 amp outlet, it is essential to ensure that your electrical panel has sufficient capacity to accommodate the additional load. This step is crucial as exceeding the panel’s capacity can lead to electrical issues and potential hazards. Follow these steps to check the electrical panel capacity:
- Locate your electrical panel, usually found in the basement or utility room.
- Open the panel cover using a screwdriver or any suitable tool, taking caution not to touch any live wires.
- Inspect the labels on the circuit breakers to identify the one corresponding to the circuit you plan to install the 20 amp outlet.
- Check the amperage rating of the circuit breaker. Ensure it is rated for at least 20 amps to support the outlet properly.
- If the circuit breaker is already rated at 20 amps or higher, you can proceed to the next step. If not, consult a qualified electrician to upgrade the breaker or consider an alternative solution.
Turning off Power to the Designated Circuit
Before you start any electrical work, you must turn off the power to the designated circuit. This precautionary measure ensures your safety and prevents any electrical accidents during installation. Follow these steps to turn off power:
- Locate the main electrical panel if you haven’t already.
- Identify the circuit breaker that corresponds to the designated circuit.
- Switch the breaker handle to the “Off” position, ensuring it locks in place.
- Use a non-contact voltage tester to confirm that the power is indeed off before proceeding with any work.
Gathering Necessary Safety Equipment
Prior to installation, it is imperative to gather the necessary safety equipment to protect yourself from potential hazards. Here are some essential safety equipment you should have:
- Insulated gloves to keep your hands protected from electrical shocks.
- Safety glasses to shield your eyes from any debris or harmful substances.
- A non-contact voltage tester to ensure that the power is off before starting any work.
- Quality wire strippers to properly strip and prepare the electrical wires.
- A screwdriver set with insulated handles for handling electrical components.
- Electrical tape to securely connect and insulate the wires.
Once you have checked the electrical panel capacity, turned off the power to the designated circuit, and gathered the necessary safety equipment, you are well-prepared to proceed with the installation of a 20 amp outlet. Remember to follow the manufacturer’s instructions and local electrical codes for a safe and successful installation.
Running The Wiring To The Outlet Location
Mapping out the path for the wiring
Before starting the installation process, it is crucial to map out the path for the wiring, ensuring that you have a clear understanding of where the wiring will run. This will help you determine the tools required and estimate the length of the wire needed. It is essential to plan the path well in advance to prevent any damage to existing walls, floors, or ceilings.
Start by identifying the most direct route from your electrical panel to the location where you want to install the 20 amp outlet. Take into account any obstacles such as cabinets, pipes, or other obstructions that might hinder the installation process. It’s also important to consider electrical code requirements and regulations to ensure compliance and maintain safety standards.
Running the wires through walls and ceilings
Once you have mapped out the path for the wiring, it’s time to run the wires through walls and ceilings. Before starting, turn off the power at the main circuit breaker to avoid any potential electrocution.
When running wires through walls, you should aim to minimize any disruption to the existing structure. Locate the studs and use a stud finder to identify their position accurately. This will help you determine where to make the openings for the wire. Use a keyhole saw or an appropriate cutting tool to create the openings in a neat and precise manner.
To run wires through ceilings, identify the joists to locate the best route for the wires. You may need to create access points by cutting small holes in the ceiling. Make sure to take necessary precautions while cutting to avoid damaging any electrical, plumbing, or structural components.
Properly securing and protecting the wiring
After running the wires through walls and ceilings, it is crucial to properly secure and protect them. This will prevent any accidental damage and ensure the safety and longevity of the electrical installation. Here are a few key steps to follow:
- Use cable staples or straps to secure the wire along its path. Make sure to space the staples or straps at appropriate intervals, as specified in the electrical code.
- Keep wires at least 1¼ inches away from the outside edge of a wooden stud or joist. This will prevent any potential damage when installing drywall or other wall/ceiling coverings.
- Use electrical tape or wire nuts to properly connect wires together. Make sure all connections are tight and secure to avoid any loose or exposed wiring.
- If necessary, use conduit to protect the wiring in areas where it may be susceptible to damage, such as basements or unfinished areas.
By adhering to these steps, you can ensure that the wiring is safely and securely installed, ready for the next stage of the installation process.
Installing The Electrical Box And Outlet
Installing a 20 amp outlet requires carefully following the necessary steps to ensure safety and functionality. One crucial aspect of the installation process is correctly installing the electrical box and outlet. In this section, we will cover the key elements of this process, including choosing the right electrical box size, mounting the box securely, and wiring the outlet correctly.
Choosing the right electrical box size
Before starting the installation, it is essential to choose the appropriate electrical box size to accommodate the 20 amp outlet. The size of the electrical box depends on factors such as the number of wires, wire gauge, and the size of the outlet. A larger box is generally recommended to allow space for the wires and provide easier access during installation and future maintenance.
When selecting the electrical box, ensure that it meets the National Electrical Code (NEC) requirements for box size. The NEC specifies the minimum cubic inch capacity of the box, which is calculated based on the number and size of the conductors. Insufficient box size can lead to overcrowding, which poses safety risks, makes wiring more challenging, and may not meet code regulations.
Mounting the box securely
Once you have chosen the appropriate size electrical box, it is crucial to mount it securely. The mounting process ensures that the box remains stable, providing a safe and reliable base for the 20 amp outlet.
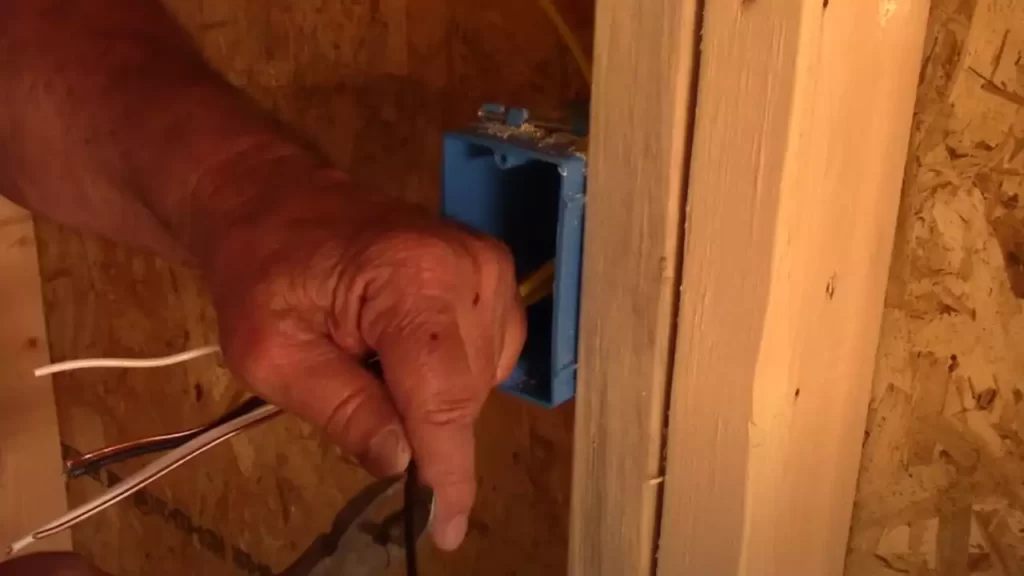
- Identify a suitable location for the electrical box that is easily accessible and meets the NEC requirements for box placement.
- Hold the electrical box against the wall and align it with the desired location. Mark the positions for the mounting screws on the wall.
- Using a suitable drill bit, create pilot holes for the screws. Ensure the pilot holes are the correct size for the screws, preventing any damage to the wall or box.
- Securely attach the electrical box to the wall by driving the screws through the pilot holes. Take care to fasten the box firmly, but not overly tight, to avoid damaging the box or wall.
Wiring the outlet correctly
After mounting the electrical box securely, the next step is wiring the 20 amp outlet correctly. Proper wiring ensures a safe and functioning electrical connection for your outlet.
To wire the outlet correctly, follow these steps:
- Turn off the power supply to the circuit where you are installing the 20 amp outlet. This is crucial to prevent electrical shocks or accidents.
- Carefully remove the electrical box cover using a screwdriver or the appropriate tool.
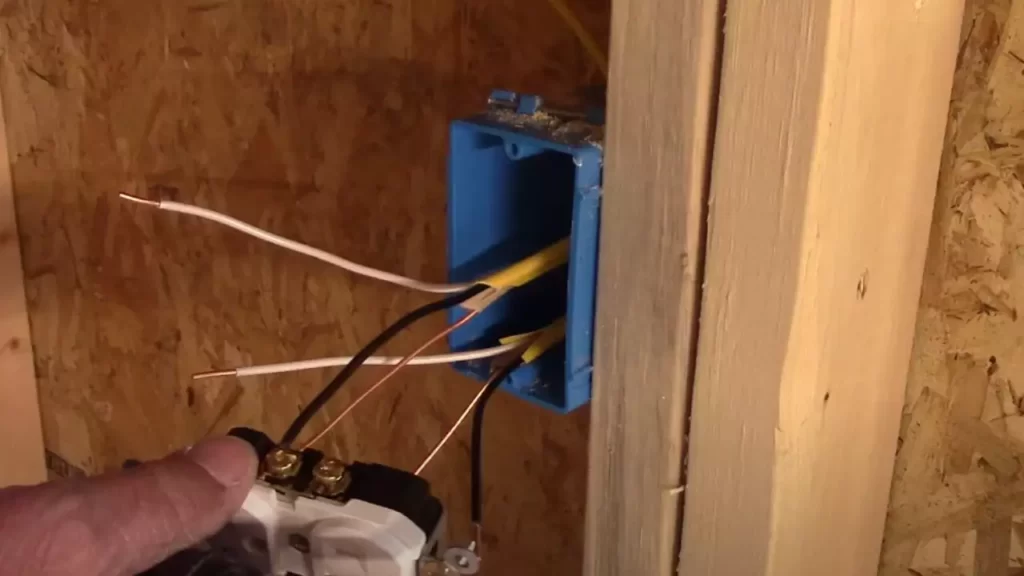
- Plan and organize the wires inside the box, ensuring they are neatly arranged and not overcrowded. Use wire connectors to secure and join the wires together.
- Connect the wires to the corresponding terminals on the 20 amp outlet. The hot wire connects to the brass or gold screw terminal, the neutral wire to the silver screw terminal, and the ground wire to the green screw terminal.
- Tighten the terminal screws securely, but be cautious not to over-tighten them, as this can damage the wires or the outlet.
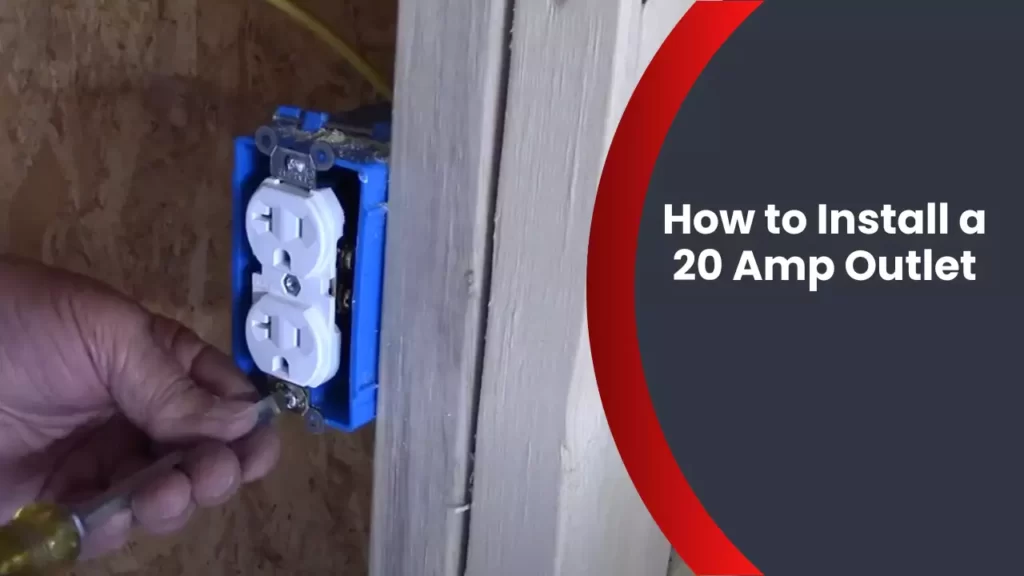
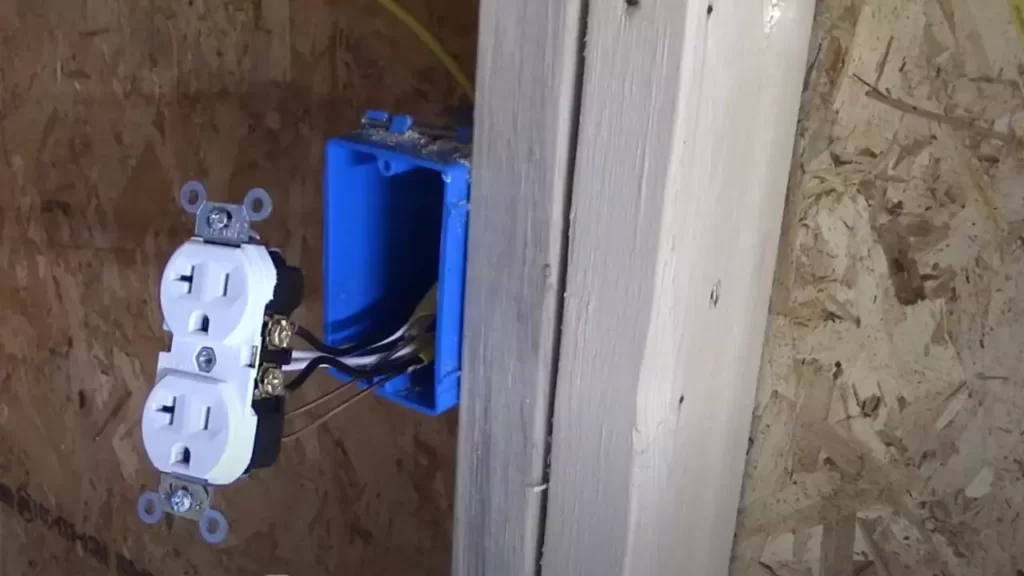
- After wiring the outlet correctly, carefully insert it into the electrical box, ensuring it aligns properly with the box opening. Secure the outlet in place by tightening the screws on the outlet’s mounting strap.
- Finally, replace the electrical box cover and turn on the power supply at the main breaker. Test the outlet with a voltage tester to ensure it is working correctly.
By following these steps and adhering to the appropriate safety precautions, you can successfully install a 20 amp outlet by installing the electrical box correctly and securely wiring the outlet.
Connecting The Outlet To The Power Supply
Once you have ensured proper grounding for your 20 Amp outlet, it’s time to connect the wires to the outlet terminals. This step is crucial to ensure a secure and safe electrical connection. Here’s how you can do it:
Ensuring proper grounding
Before connecting the wires to the outlet terminals, it’s important to ensure proper grounding. Grounding provides a safe path for electrical currents and helps prevent electrical shock and damage to appliances and devices. To ensure proper grounding, follow these steps:
- Turn off the power supply to the outlet by switching off the circuit breaker.
- Use a voltage tester to confirm that there is no electrical current flowing through the wires.
- Locate the grounding wire, typically green or bare copper, and connect it to the grounding terminal on the outlet. This can usually be done by wrapping the wire around the terminal screw and tightening it with a screwdriver. Ensure that the connection is tight to ensure proper grounding.
- Once the grounding wire is securely connected, double-check the connection to ensure there are no loose or exposed wires. This will help prevent any accidental electrical contact.
Connecting the wires to the outlet terminals
With proper grounding in place, it’s time to connect the wires to the outlet terminals. Follow these steps:
- Identify the hot wire, typically black or red, and connect it to the brass or darker-colored terminal on the outlet. This is the wire that carries the electrical current to the outlet.
- Identify the neutral wire, typically white, and connect it to the silver or lighter-colored terminal on the outlet. This wire completes the electrical circuit.
- If you have a 20 Amp outlet, there may also be a separate terminal for the ground wire. Connect the grounding wire to this terminal, if applicable.
- Tighten the terminal screws securely using a screwdriver to ensure a solid connection.
Testing the outlet for functionality
After connecting the wires to the outlet terminals, it’s important to test the outlet for functionality. Follow these steps to ensure that everything is working correctly:
- Turn on the power supply to the outlet by switching on the circuit breaker.
- Use a voltage tester to confirm that there is electrical current flowing through the wires and the outlet.
- Plug in a device or appliance to the outlet and check if it powers on and functions properly.
- If the outlet and device are working correctly, you have successfully installed a 20 Amp outlet. Congratulations!
Remember, if you encounter any problems during the installation process or are unsure about any step, it is always recommended to consult a qualified electrician or professional for assistance. Safety should always be the top priority when working with electrical systems.
Finishing The Installation
Now that you have successfully wired your 20 amp outlet and connected it to the circuit breaker, it’s time to finish the installation process. In this section, we will discuss how to secure the outlet in the electrical box, install a protective cover, and restore power while ensuring the outlet is functioning correctly.
Securing the outlet in the electrical box
One of the crucial steps in the installation process is to securely fasten the outlet inside the electrical box. This not only ensures proper functionality but also enhances safety. To secure the outlet, follow these simple steps:
- Align the outlet with the opening in the electrical box and gently slide it in.
- Using a screwdriver, tighten the mounting screws on the top and bottom of the outlet. Make sure they are snug, but be careful not to over-tighten them, as it could damage the outlet.
By securing the outlet firmly in the electrical box, you are ensuring that it stays in place even if any pressure or movement is applied.
Installing a protective cover
Now that the outlet is securely placed in the electrical box, it’s time to install a protective cover. The cover not only adds an additional layer of safety but also keeps debris and dust away from the outlet. Follow these steps to install the cover:
- Choose a protective cover that matches the style and size of your outlet.
- Align the cover with the outlet and make sure it fits securely.
- Using a screwdriver, tighten the screws on the cover to secure it in place.
With the protective cover installed, you can rest assured that your 20 amp outlet is well-protected against accidental contact and damage.
Restoring power and testing the outlet again
Now that the outlet is securely in place and the protective cover is installed, it’s time to restore power and give it a final test. Follow these steps to ensure that the outlet is functioning correctly:
- Return to the electrical panel and flip the breaker switch for the outlet back to the “on” position.
- Use a voltage tester to check if there is power flowing to the outlet. Simply place the voltage tester against the outlet’s terminals and see if it indicates a live connection. If it does, it means the outlet is receiving power.
- Plug in a device or appliance to test the functionality of the outlet. Ensure that it is working properly and providing the necessary power.
By restoring power and testing the outlet, you are confirming that the installation was successful and that the 20 amp outlet is fully operational.
Ensuring Safety And Compliance
When it comes to installing a 20 Amp outlet, ensuring safety and compliance is of utmost importance. This not only protects your home and its occupants, but also ensures adherence to local electrical codes and regulations. There are three key steps that you need to follow in order to ensure safety and compliance: Properly grounding the outlet, following local electrical codes and regulations, and conducting a final inspection and testing.
Properly grounding the outlet
One of the most critical aspects of installing a 20 Amp outlet is ensuring proper grounding. Grounding not only protects against electrical shock, but also safeguards your electrical devices and prevents electrical fires. To properly ground the outlet, you will need to:
- Shut off power to the circuit at the breaker box to prevent any accidents.
- Remove the faceplate and unscrew the old outlet from the electrical box.
- Inspect the grounding wire and make sure it is intact and properly connected.
- If there is no grounding wire, you will need to install one by connecting it to a grounding screw or the metal box.
- Securely wire the new 20 Amp outlet and screw it back into place.
- Replace the faceplate and turn the power back on to test the outlet.
Following local electrical codes and regulations
Each locality has specific electrical codes and regulations that must be followed when installing a 20 Amp outlet. These codes are in place to ensure the safety and standardization of electrical systems. Failure to comply with these regulations can result in fines and potential hazards. To adhere to local electrical codes and regulations, take the following into consideration:
- Research and familiarize yourself with the electrical codes in your area.
- Ensure that the outlet is positioned at the correct height and distance from any water sources.
- Use appropriate electrical wiring and materials that meet the standards set by your locality.
- Secure all electrical connections properly and ensure they are well insulated.
- Label the circuit appropriately to indicate that it is a 20 Amp outlet.
Conducting a final inspection and testing
Before considering the installation of a 20 Amp outlet complete, it is crucial to conduct a final inspection and testing. This step ensures that everything is properly installed, functions correctly, and meets the necessary safety standards. Here’s what you need to do:
1. Visual Inspection: Check if the wires are properly connected and secured, ensuring there are no loose connections or exposed wiring that could potentially cause accidents.
2. Testing the Outlet: Use a voltage tester to ensure that the outlet is receiving proper power and functioning as expected. Plug in a lamp or other electrical device to test its functionality.
3. Testing the Ground: Use a multimeter to test the grounding and ensure it provides a stable electrical path to the ground.
If any issues or irregularities are detected during the final inspection and testing, take the necessary steps to address them before considering the installation complete.
By carefully following the steps involved in properly grounding the outlet, adhering to local electrical codes and regulations, and conducting a final inspection and testing, you can ensure the safety and compliance of your 20 Amp outlet installation. This will give you peace of mind knowing that your electrical system is not only efficient, but also up to the required safety standards.
Frequently Asked Questions
How Much Does It Cost To Install A 20 Amp Outlet?
The cost to install a 20 amp outlet varies, but it typically ranges from $100 to $200.
What Size Breaker Do I Need For A 20 Amp Outlet?
For a 20 amp outlet, you will need a breaker of the same size.
How Do I Change My 15 Amp Outlet To 20 Amp?
To change a 15 amp outlet to 20 amp, follow these steps: 1. Check if your wiring is compatible with a 20 amp circuit. 2. Turn off the power supply to the outlet. 3. Remove the old outlet and disconnect the wires.
4. Install a 20 amp outlet and connect the wires based on the color coding. 5. Test the outlet to ensure it is working correctly.
Where Do You Put A 20 Amp Outlet?
A 20 amp outlet should be placed in areas where high-powered tools or appliances are used, such as workshops, garages, and kitchens. These outlets can handle larger electrical loads and provide a safe and efficient power supply.
Conclusion
Installing a 20 amp outlet is a straightforward process that can greatly enhance your electrical capabilities. By following the steps outlined in this guide, you can ensure a safe and efficient installation. Remember to consult with a professional electrician if you are unsure about any aspect of the process.
With the right tools and knowledge, you’ll be able to enjoy the benefits of a higher power outlet in no time. So don’t hesitate, take charge of your electrical needs today!