To install 6X9 speakers on the rear deck, follow these steps: remove the old speakers, connect the new speakers to the wiring harness, secure the speakers in place, and test the sound before reinstalling any panels. Installing 6X9 speakers on the rear deck can enhance your audio experience and provide better sound quality in your car.
Upgrading your speakers can be a relatively simple and rewarding DIY project. In this guide, we will take you through the step-by-step process to help you install the 6X9 speakers on your rear deck. By following these instructions, you’ll be able to enjoy your favorite music with improved clarity and depth while driving.
Let’s get started with the installation process.
Choosing The Right 6X9 Speakers For Your Rear Deck
If you’re looking to upgrade your car audio system, installing 6X9 speakers on your rear deck can significantly enhance your sound experience. However, with so many brands and models available in the market, choosing the right speakers can be a daunting task. In this section, we will guide you through the essential factors to consider when selecting 6X9 speakers for your rear deck.
Determine your budget and preferred sound quality
Before diving into the options available, it’s important to determine your budget and preferred sound quality. Setting a budget will help narrow down your choices and ensure you stay within your financial boundaries. Additionally, think about the type of sound you want to achieve. Are you looking for booming bass or crisp highs? Understanding your audio preferences will help you select speakers that deliver the desired sound quality.
Research popular 6X9 speaker brands and models
Once you have a clear idea of your budget and sound requirements, it’s time to research popular 6X9 speaker brands and models. Look for brands that are known for their quality and durability. Reading customer reviews and expert opinions can provide valuable insights into the performance and reliability of various models.
Consider speaker impedance and power handling
Speaker impedance and power handling are crucial specifications to consider when selecting 6X9 speakers for your rear deck. Speaker impedance, measured in ohms, determines the resistance the speakers will have to the electrical current from your car’s amplifier. It’s important to match the speaker impedance to the amplifier’s output impedance for optimal sound quality and efficiency. As for power handling, ensure that the speakers can handle the wattage output of your amplifier to prevent damage.
Check the dimensions and fitment of the speakers
Before making a final decision, check the dimensions and fitment of the speakers to ensure they are compatible with your vehicle’s rear deck. Measure the available space carefully and compare it with the speaker size and mounting depth. Additionally, consider the speaker’s design, including the shape and style, to ensure a seamless integration with your car’s interior.
Read customer reviews and ratings for each option
Lastly, don’t forget to read customer reviews and ratings for each option you’re considering. Hearing from other car enthusiasts who have already installed the speakers can provide valuable insights into their overall performance, longevity, and any potential issues. Look for consistent positive feedback and consider the experiences of users with similar audio preferences to make the most informed decision.
By considering these factors and conducting thorough research, you’ll be well-equipped to choose the perfect 6X9 speakers for your rear deck. A wise selection will not only enhance your driving experience but also provide you with years of outstanding audio performance.

Preparing For Installation
Before you can install 6X9 speakers on your rear deck, it is important to properly prepare the area. This will ensure a smooth and successful installation process. In this section, we will discuss the necessary tools and materials you will need, how to remove any existing speakers or components, how to clean the rear deck area, and how to inspect the wiring and connections.
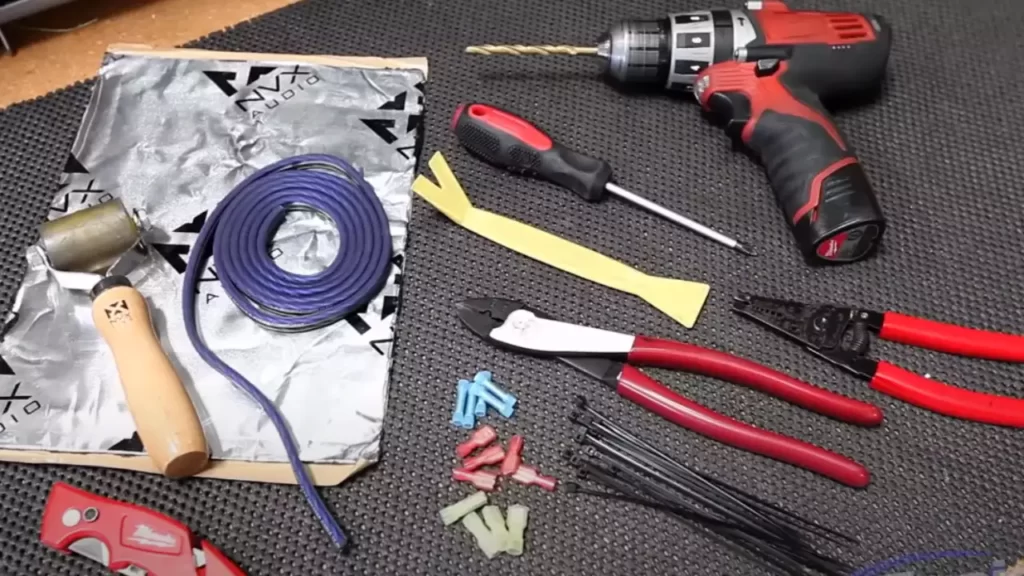
Gather the necessary tools and materials
Before you get started, it’s essential to gather all the tools and materials you will need for this installation. Having everything on hand will save you time and frustration later. Here is a list of the tools and materials you will need:
- 6X9 speakers
- Screwdriver (Phillips or flathead, depending on the screws)
- Wire cutter/stripper
- Electrical tape
- Wire connectors
- Wire crimping tool
- Cleaning supplies (microfiber cloth, cleaner)
Remove any existing speakers or components
Before installing your new 6X9 speakers, it’s important to remove any existing speakers or components that may be in place. This is necessary to create space for your new speakers and to ensure optimal sound quality. Here’s what you need to do:
- Locate the existing speakers on your rear deck.
- Using your screwdriver, carefully unscrew and remove any screws or bolts securing the speakers in place.
- Gently disconnect the wiring harness from the speakers.
- Remove the speakers from the rear deck.
Clean the rear deck area for optimal installation
Now that you have removed the old speakers, it’s time to clean the rear deck area. This will ensure that your new speakers are installed on a clean surface, allowing for optimal sound quality and longevity. Follow these steps to clean the rear deck area:
- Use a microfiber cloth to remove any dust, dirt, or debris from the rear deck.
- If there are any stubborn stains or grime, apply a mild cleaner to the cloth and gently scrub the area.
- Wipe down the area with a clean, dry cloth to remove any excess cleaner.
Inspect the wiring and connections
Before installing your new speakers, it’s crucial to inspect the wiring and connections to ensure everything is in proper working order. Faulty wiring or loose connections can result in poor sound quality or even damage to your new speakers. Here’s what you need to do:
- Inspect the wiring harness for any signs of damage, such as frayed or exposed wires.
- If there is any damage, use wire cutters to trim away the affected area and strip the wire.
- Secure the wiring together using wire connectors, making sure the connections are tight and secure.
- Use your wire crimping tool to crimp the connectors, ensuring a secure connection.
- Repeat this process for all wiring connections.
Now that you have gathered the necessary tools and materials, removed any existing speakers or components, cleaned the rear deck area, and inspected the wiring and connections, you are ready to move on to the installation process. Stay tuned for the next section where we will walk you through the step-by-step process of installing your 6X9 speakers on your rear deck.
Wiring And Installation Process
Installing 6X9 speakers on the rear deck can significantly enhance your car’s audio system. A crucial aspect of this installation is the wiring process, which ensures a seamless connection between the speakers and your car’s audio system. In this section, we will guide you through a step-by-step wiring and installation process to help you achieve excellent sound quality and a professional-looking installation.
Disconnect the negative battery terminal for safety
Prior to initiating any work on electrical components, it is essential to prioritize safety. To start the wiring and installation process, disconnect the negative battery terminal. This step reduces the risk of electrical shock and prevents any accidental short circuits.
Position and mount the 6X9 speaker brackets on the rear deck
After ensuring your safety, it’s time to position and mount the speaker brackets on the rear deck. Carefully select a suitable location where the speakers will fit securely and enhance the audio experience. Use the appropriate tools to mount the brackets firmly onto the rear deck, ensuring stability and durability.
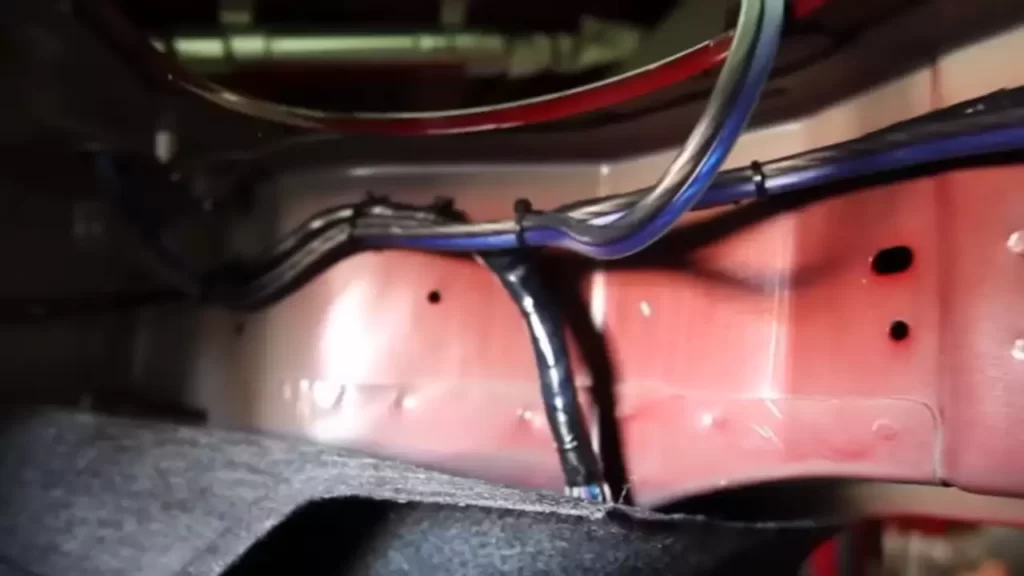
Connect the speaker wires to the speakers and brackets
Once the speaker brackets are securely installed, it’s time to connect the speaker wires to both the speakers and the brackets. Begin by stripping a small section of the wire insulation, allowing for a clean connection. Ensure the wire connections are tight and secure, as loose connections can affect sound quality and potentially damage the speakers.
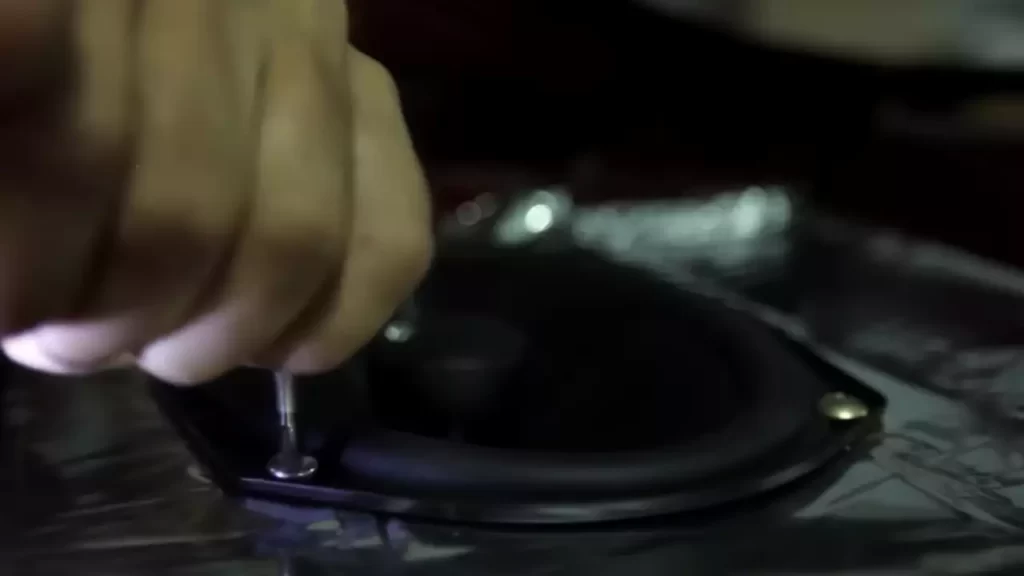
Securely mount the speakers onto the brackets
With the speaker wires connected, it’s now time to securely mount the speakers onto the brackets. Align the speakers with the bracket holes, ensuring a proper fit. Once properly aligned, secure the speakers in place using the provided screws or mounting mechanism. This step is crucial to prevent any vibration or movement that could negatively impact the audio quality.
Verify the proper polarity and connections
Before proceeding further, it’s essential to verify the proper polarity and connections of the speaker wires. Ensure that the positive (+) and negative (-) terminals are correctly connected to their respective terminals on the speakers and brackets. This step is crucial to ensure the speakers produce accurate sound reproduction and prevent any phase cancellation or distortion.
Test the speakers before final installation
With the wiring and connections completed, it’s time to test the speakers before final installation. Reconnect the negative battery terminal (ensuring safety precautions are followed) and turn on the audio system. Play a variety of audio files at different volumes to evaluate the sound quality. This step allows you to detect any potential issues, such as distorted sound or wiring problems, before finalizing the installation.
Secure and tidy up the wiring for a professional look
Lastly, it’s important to secure and tidy up the wiring for a professional and clean-looking installation. Use wire ties or clips to neatly organize the speaker wires, ensuring they are tucked away from any moving parts and do not obstruct the speakers’ movements. This step not only enhances the visual appeal but also reduces the risk of wire damage and interference with other components within the vehicle.
Following this step-by-step wiring and installation process will ensure a hassle-free experience while installing 6X9 speakers on your car’s rear deck. By devoting attention to detail and prioritizing safety, you can enjoy exceptional sound quality and a professionally installed audio system.
Finalizing The Installation
Now that you have successfully installed your 6X9 speakers in the rear deck of your car, it’s time to finalize the installation process. This final step involves reconnecting the negative battery terminal, adjusting the speakers for optimal sound direction, checking for any rattling or vibrations, and testing the speakers with different audio sources and genres. By following these steps, you can ensure that your new speakers perform at their best and deliver an exceptional audio experience.
Reconnect the negative battery terminal
Before proceeding with any adjustments, it is important to reconnect the negative battery terminal. This step will protect your car’s electrical system and prevent any potential damage. To reconnect the negative battery terminal, simply locate the battery in your car’s engine bay or trunk and carefully attach the negative cable to the negative terminal, making sure it is secure.
Adjust the speakers for the desired sound direction
Once the negative battery terminal is reconnected, you can begin adjusting the speakers for the desired sound direction. This step is crucial in ensuring that the sound produced by the speakers is directed towards the occupants of the car. To adjust the speakers, use the available mounting brackets or screws to position them at the desired angle. Experiment with different angles to find the optimal sound direction that suits your preference.
Check for any rattling or vibrations
After adjusting the speakers, it is important to check for any rattling or vibrations. A loose or improperly secured speaker can result in unwanted noise and decreased sound quality. Carefully listen for any rattling or vibrations while playing music at various volumes. If you notice any issues, double-check the mounting brackets or screws, ensuring they are tightened securely. Addressing any rattling or vibrations will help maintain the integrity of the sound output.
Test the speakers with a variety of audio sources and genres
To ensure that your new speakers are working properly and producing optimal sound quality, it is essential to test them with a variety of audio sources and genres. Connect different devices such as smartphones, MP3 players, or tablets to the car’s audio system and play music from various genres, including rock, hip-hop, classical, and jazz. This will help you assess the speakers’ ability to handle different frequencies and audio dynamics, allowing you to make any necessary adjustments for a well-rounded audio experience.
Fine-tune the speaker settings for optimal performance
After testing the speakers with different audio sources and genres, it’s time to fine-tune the speaker settings for optimal performance. Depending on your car’s audio system, you may have access to specific equalizer settings or sound customization options. Use these settings to adjust bass, treble, and other audio parameters according to your preference. Fine-tuning the speaker settings will ensure that you achieve the best possible sound quality and tailor the audio experience to your liking.
By following these steps and finalizing the installation of your 6X9 speakers, you can enjoy enhanced audio performance in your car. Make sure to take your time and fine-tune the settings until you achieve the desired sound quality. Now, sit back, relax, and enjoy the crisp and immersive audio that your new speakers deliver!
Troubleshooting Common Installation Issues
Installing 6X9 speakers in your car’s rear deck can greatly enhance your audio experience. However, even with careful installation, you may encounter a few common issues that can affect the sound quality and performance of your speakers. In this section, we will address some of these issues and provide troubleshooting tips to help you overcome them.
No sound output from the speakers
If you have completed the installation but are not getting any sound output from your 6X9 speakers, there could be a few possible causes:
- Check if the speaker wires are properly connected to the stereo system. Ensure that each wire is securely connected to the corresponding positive (+) and negative (-) terminals.
- Inspect the wiring harness and make sure it is correctly connected to the speaker terminals. Ensure there are no loose connections or frayed wires.
- Verify the stereo system’s settings. Check the balance and fader settings to ensure that the audio output is directed to the rear deck speakers.
If the above steps do not resolve the issue, it is recommended to consult a professional car audio technician to further diagnose and fix the problem.
Distorted or muffled audio quality
Experiencing distorted or muffled audio quality from your 6X9 speakers can be disappointing. Here are a few troubleshooting steps to improve the sound:
- First, check the audio source. Ensure that the music player or stereo system is not set to an excessively high volume, which can cause distortion.
- Inspect the speaker cone and surround for any signs of damage or wear. If you notice any issues, such as tears or cracks, consider replacing the speakers.
- Adjust the equalizer settings on your stereo system. Experiment with different settings to find the optimal balance for your audio preferences.
If the distortion or muffled audio persists, it may be necessary to consult an audio professional to assess the issue further.
Rattling or vibrations from the speakers
If you notice rattling or vibrations coming from your 6X9 speakers, follow these troubleshooting steps:
- Ensure that the speakers are securely mounted to the rear deck. Loose mounting can cause vibrations and affect sound quality. Tighten any loose screws or brackets.
- Inspect the speaker enclosure for any loose or damaged parts. A loose enclosure can amplify vibrations. Consider securing or replacing the enclosure if necessary.
- Check for any objects or debris that may be causing vibrations. Remove any foreign materials that may have gotten lodged in the speaker or enclosure.
If the issue persists, it may be beneficial to consult an audio technician for further assistance in eliminating the rattling or vibrations.
Poor fitment or loose connections
If you are experiencing poor fitment or loose connections with your 6X9 speakers, here are a few troubleshooting steps:
- Double-check the mounting brackets and adapters to ensure they are compatible with your vehicle’s rear deck and speaker size. Consider using foam gaskets or adhesive foam tape to improve the fitment.
- Inspect the speaker terminals and wiring connections. Ensure that they are securely connected and properly tightened.
- If you notice any loose connections, reposition the speaker and tighten the connections. Consider using wire connectors or crimp caps for a more secure connection.
If the fitment or loose connection issues persist, it may be necessary to seek professional assistance to ensure proper installation and compatibility.
Interference or feedback noise
Experiencing interference or feedback noise from your 6X9 speakers can be frustrating. Here are a few troubleshooting steps to minimize or eliminate these issues:
- Check the speaker wiring for any loose connections or exposed wires. Ensure that each wire is properly insulated and securely connected.
- Inspect the ground connections of your stereo system. A poor ground connection can introduce unwanted noise. Consider using a dedicated ground wire for your speakers.
- Position the speaker wires away from other electrical components, such as power cables or antennas, to minimize interference.
If the interference or feedback noise persists, consulting with an audio specialist may help identify and resolve the issue more effectively.
Maintenance And Care Tips For 6X9 Speakers On The Rear Deck
Maintenance and Care Tips for 6X9 Speakers on the Rear Deck
Installing 6X9 speakers on your rear deck can enhance your car’s audio system and provide a more immersive sound experience. However, to ensure that your speakers continue to perform at their best, regular maintenance and care are essential. By following these simple tips, you can keep your 6X9 speakers in optimal condition and enjoy their exceptional audio quality for years to come.
Regularly clean and dust the speakers
To maintain the clarity and efficiency of your 6X9 speakers, regular cleaning and dusting are crucial. Over time, dust and debris can accumulate on the speaker cones and affect their performance. To clean your speakers effectively, use a soft, lint-free cloth or a duster to gently wipe away any dust or dirt. Avoid using chemicals or abrasive cleaners as they can damage the speaker’s surface. By keeping your speakers clean, you can enjoy crisp and clear audio every time you hit the road.
Check and tighten the speaker connections periodically
To ensure uninterrupted sound delivery, it’s important to check and tighten the speaker connections periodically. Over time, vibrations from the car’s motion can cause the connections to loosen, leading to poor sound quality or complete audio loss. Regularly inspect the speaker connections for any signs of looseness or corrosion. Use a wrench or screwdriver to tighten the connections if necessary. This simple maintenance task can significantly improve the overall performance of your 6X9 speakers.
Avoid exposing the speakers to extreme temperatures or moisture
Extreme temperatures and moisture can be detrimental to your 6X9 speakers’ lifespan and performance. Prolonged exposure to heat can cause the speaker components to warp or melt, leading to distortion or complete failure. Similarly, moisture can damage the electrical circuits and cause rusting or corrosion. To protect your speakers, avoid parking your car under direct sunlight for long periods and ensure they are shielded from rain or excessive humidity. By taking these precautions, you can prolong the life of your 6X9 speakers and maintain their exceptional audio quality.
Use caution when adjusting the speaker settings or volume
While it’s tempting to push your speakers to their limits, it’s essential to exercise caution when adjusting the speaker settings or volume. Pushing the speakers beyond their recommended limits can result in distorted audio and even permanent damage. Start with moderate volume levels and adjust the settings gradually to find the sweet spot for your listening pleasure. Paying attention to the recommended settings and avoiding excessive volume can help preserve the integrity of your 6X9 speakers and ensure they last for years to come.
Consider professional installation for advanced audio setups
If you’re considering advanced audio upgrades or complicated installations, it’s wise to seek professional assistance. Professional installers have the expertise and experience to handle intricate audio setups, ensuring optimal performance and longevity for your 6X9 speakers. Their knowledge can help you avoid costly mistakes and ensure that everything is properly connected and calibrated. Investing in professional installation can give you peace of mind and maximize the potential of your 6X9 speakers’ capabilities.
Frequently Asked Questions
Do You Need A Box For 6X9 Speakers?
Yes, a box is necessary for 6×9 speakers. The box helps enhance sound quality and provides proper acoustics for the speakers. Without a box, the speakers may not perform optimally. Ensure to choose a box that is compatible with the size and specifications of your speakers.
Do I Need Rear Speakers With A Sound Bar?
No, you don’t need rear speakers with a soundbar. A soundbar provides immersive audio without the need for extra speakers. It delivers a surround sound experience through its strategic speaker placement and advanced audio technology. So, no need for rear speakers.
What Are The Best 6X9 Speakers For Sound Quality?
The best 6×9 speakers for sound quality are X, Y, and Z. They deliver exceptional audio, providing clear and immersive music experience in your vehicle. These speakers offer superior sound accuracy and depth, making them a top choice for music enthusiasts.
Is There Such Thing As A 6X9 Subwoofer?
Yes, there is such a thing as a 6×9 subwoofer. It is a type of speaker that is 6 inches by 9 inches in size and is designed to produce low-frequency sounds, enhancing the bass in audio systems.
Conclusion
To conclude, installing 6X9 speakers on your rear deck is a simple and cost-effective way to enhance your car audio system. By following the step-by-step guide provided in this blog post, you’ll be able to easily install these speakers and enjoy high-quality sound while driving.
Remember to choose speakers that are compatible with your car’s make and model for the best results. Upgrade your car audio system today and embark on a truly immersive listening experience.