To install a 60 amp sub panel, shut off the main power supply, attach the sub panel to a wall, connect the circuit wires to the panel, and restore power. Are you trying to install a 60 amp sub panel in your electrical system?
This is a common requirement when you need to add more circuits to your home or office. By installing a sub panel, you can distribute electricity more efficiently and safely. In this guide, we will walk you through the step-by-step process of installing a 60 amp sub panel.
Whether you are a DIY enthusiast or a homeowner looking to gain more knowledge, this guide is for you. Let’s get started and make sure to follow all safety precautions during the installation process.
Understanding Electrical Sub Panels
Understanding Electrical Sub Panels
When it comes to setting up a reliable and efficient electrical system, understanding electrical sub panels is crucial. Sub panels are additional panels that are connected to the main electrical panel and provide extra circuits for distributing electricity throughout your home or building. In this section, we will delve deeper into what electrical sub panels are, the reasons why you should consider installing one, and the different types of sub panels available along with their uses.
An electrical sub panel, also known as a subsidiary panel or subdistribution board, works as an extension of the main electrical panel in your home or building. It functions as a smaller circuit breaker panel that receives electricity from the main panel and distributes it to specific areas or appliances in a more organized and controlled manner. Sub panels are commonly installed in situations where additional circuits are needed due to an increase in electrical demand or to accommodate new installations.
Installing a sub panel offers several benefits for homeowners and building owners:
- Expanded electrical capacity: A sub panel provides additional circuits, allowing you to power more appliances, outlets, or lighting fixtures without overloading the main panel.
- Improved safety and convenience: By distributing electricity through separate panels, you can better manage electrical loads and minimize the risk of tripped breakers or electrical fires. This also enables easier access for troubleshooting and maintenance.
- Flexibility for future expansion: Adding a sub panel gives you room to grow and accommodate any future electrical upgrades or renovations. You can install dedicated sub panels for specific purposes, such as a garage, outdoor lighting, or a home office.
There are different types of sub panels available, each designed for specific applications. Here are some common types:
| Panel Type | Uses |
|---|---|
| Main Lug Panels | Used as a secondary panel, typically installed near the main panel. They receive electricity from the main panel and distribute it to specific loads. |
| Main Breaker Panels | These panels have a built-in main circuit breaker, allowing for easy control and shutdown of power to the entire sub panel. They are commonly used for residential applications. |
| Sub Feed Panels | Sub feed panels receive power directly from the main panel through a feeder circuit. They are often used for detached structures like garages or workshops. |
Choosing the right type of sub panel depends on your specific electrical needs and the location where it will be installed. Consulting with a licensed electrician will ensure you select the appropriate sub panel for your requirements.
By understanding electrical sub panels and their various uses, you can make informed decisions when it comes to enhancing your electrical system’s capacity, safety, and flexibility. Whether you need extra circuits for a home renovation project, an outdoor living space, or a new appliance installation, installing a sub panel can provide the necessary power distribution to meet your needs effectively.
Planning And Preparation
When it comes to electrical projects, proper planning and preparation are essential for a successful installation. This is especially true when installing a 60 amp sub panel, which requires careful consideration to ensure safety and efficiency. In this guide, we will walk you through the planning and preparation steps you need to take before embarking on this electrical project.
Assessing Power Needs
Before proceeding with the installation of a 60 amp sub panel, it is crucial to assess your power needs. Determine the total electrical load that will be connected to the sub panel, including appliances, outlets, and lighting fixtures. Make a list of all the intended loads and their corresponding amperage ratings. This assessment will help you determine the appropriate size and capacity of the sub panel.
Determining the Location for the Sub Panel
The location of the sub panel is an important consideration. It should be easily accessible and conveniently located in relation to the equipment it will supply power to. Look for an area with sufficient space, preferably near the main electrical panel. Additionally, ensure there is adequate ventilation and consider any restrictions or guidelines set by local electrical codes.
Acquiring Necessary Permits and Approvals
Before starting any electrical work, it is vital to obtain the necessary permits and approvals from the local building department. This ensures that your installation will meet safety standards and comply with local regulations. Contact your local building department to determine the specific requirements and paperwork needed for the sub panel installation. Keep in mind that failure to comply with these regulations can result in fines or other penalties.
Once you have completed the necessary paperwork and obtained the required permits, you can move forward with the installation process. Proper planning and preparation are the foundation of any successful 60 amp sub panel installation. By assessing your power needs, determining the location, and acquiring the necessary permits, you will be well on your way to a safe and efficient electrical project.
Gather Tools And Materials
Before you begin installing a 60 amp sub-panel, it is crucial to gather all the necessary tools and materials. Having everything prepared in advance will save you time and effort during the installation process. Here’s a comprehensive list of tools and materials you’ll need:
List of tools needed for the installation
Here is a list of tools you should have on hand:
- Safety glasses: To protect your eyes from debris and potential hazards.
- Gloves: To protect your hands while working with electrical components.
- Tape measure: Essential for accurately measuring distances and dimensions.
- Screwdrivers: Both flat-head and Phillips-head screwdrivers will be needed for various parts of the installation.
- Level: Useful for ensuring the sub-panel is installed perfectly straight.
- Hacksaw: Used to cut through metal conduit or wiring if necessary.
- Drill: To create holes for mounting the sub-panel to the wall.
- Wire cutter/stripper: Required for cutting and stripping electrical wires.
- Electrical tape: Helps insulate and secure connections.
- Label maker: Useful for labeling individual circuit breakers.
- Multimeter: Used to test electrical connections and ensure proper voltage.
List of materials needed for the installation
To successfully install a 60 amp sub-panel, you will need the following materials:
- 60 amp sub-panel: Ensure the panel is properly rated for the desired electrical load.
- Mounting brackets: Used to secure the sub-panel to the wall.
- Eaton cutler-hammer type CH circuit breakers: Select the appropriate amperage and number of breakers needed.
- Electrical wires: Make sure to use wires that are compatible with a 60 amp sub-panel.
- Conduit: Necessary for protecting and organizing the electrical wires.
- Wire connectors: Securely join wires together or connect to the sub-panel.
- Grounding rod: Required for proper grounding of the sub-panel.
- Grounding wire: Connects the sub-panel to the grounding rod.
- Wire nuts: Used to securely connect and insulate wires.
- Electrical staples/clamps: Used to secure the conduit and wires to the wall.
- Neutral and grounding bars: Ensure the sub-panel has the necessary bars for connecting neutral and grounding wires.
- Labels: Useful for identifying the different circuits on the sub-panel.
Having these tools and materials ready before you start the installation process will make it much smoother and efficient. Stick to the required safety precautions and follow the manufacturer’s instructions carefully for a successful sub-panel installation.
Shutting Off Power And Safety Precautions
When installing a 60 amp sub panel, it is crucial to follow the necessary safety precautions and ensure the power is shut off properly. This will help prevent electrical hazards and ensure a smooth installation process. In this section, we will discuss the steps to cut off power to the main panel and the safety measures that should be taken during the installation. By following these guidelines, you can proceed with the installation confidently and protect yourself from potential dangers.
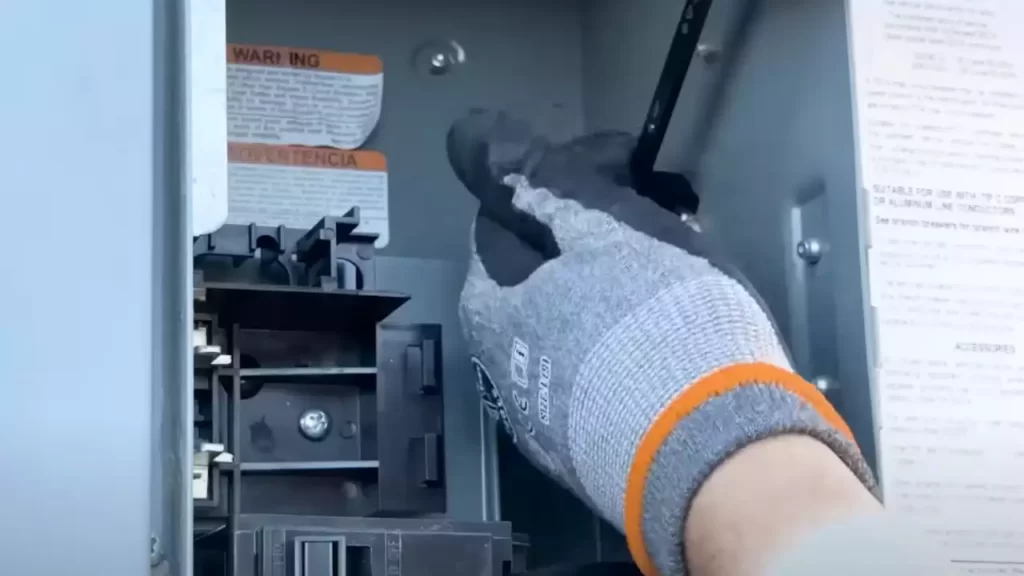
Cutting Power to the Main Panel
The first step in installing a 60 amp sub panel is to cut off power to the main panel. This is done to ensure your safety and prevent any accidents while working with electrical components. To accomplish this, follow these steps:
- Start by locating the main electrical panel in your home.
- Open the panel cover using a screwdriver or an appropriate tool.
- Identify the main circuit breaker, usually located at the top or side of the panel. This circuit breaker controls all the power supply to your home.
- Flip the main circuit breaker to the “Off” position. This will shut off power to the entire panel.
It is important to note that cutting off power to the main panel will also cut off power to your entire home. Therefore, it is advisable to inform other members of your household about the power outage or schedule the installation during a time when it wouldn’t cause disruptions.
Safety Measures to Take During Installation
Installing a 60 amp sub panel involves working with electricity, which can be dangerous if proper precautions are not taken. Here are some essential safety measures you should follow during the installation process:
- Make sure to wear appropriate personal protective equipment (PPE), such as insulated gloves and safety goggles, to protect yourself from electrical shocks and flying debris.
- Before beginning any work, ensure that all the tools and equipment you’ll be using are in good working condition and properly insulated.
- Avoid working in wet or damp conditions as it can increase the risk of electrical accidents. If the installation area is wet, dry it thoroughly before proceeding.
- Keep your work area clean and organized, free from any clutter or obstacles that may impede your movement or cause accidents.
- When working with electrical connections, double-check that all power sources are disconnected and circuits are de-energized before handling any wires or terminals.
- If you are unsure about any step or have limited experience with electrical work, it is always better to consult a qualified electrician for guidance and assistance.
By following these safety measures, you can significantly reduce the risk of accidents and ensure a safe installation process.

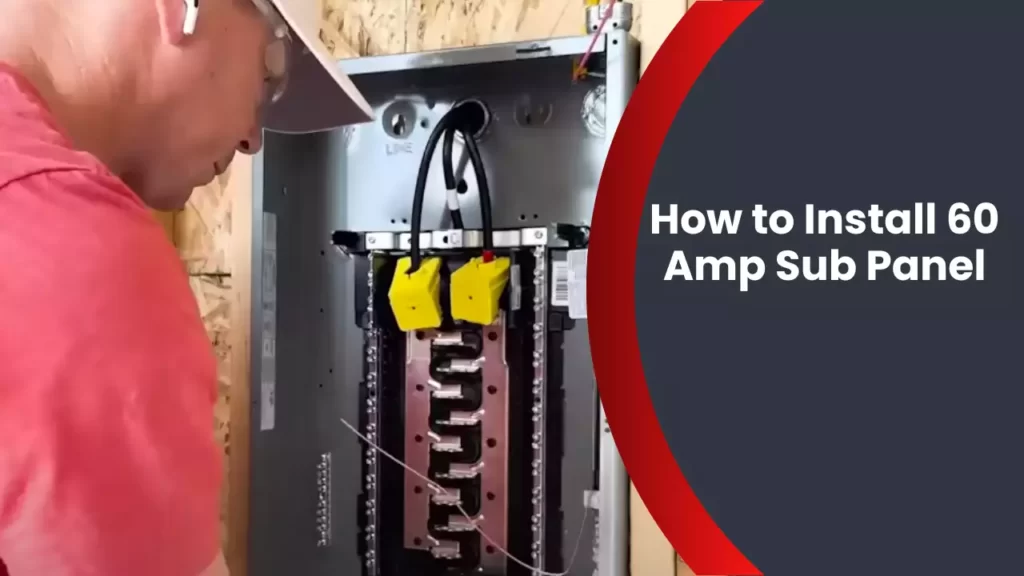
Installing The Sub Panel
Installing a sub panel can help you expand the electrical capacity of your home or workspace, allowing you to safely add more circuits and appliances. In this section, we will guide you through the process of installing a 60 amp sub panel. From mounting the sub panel to grounding it, we’ll cover each step to ensure a successful installation. Let’s get started!
MOUNTING THE SUB PANEL
The first step in installing a 60 amp sub panel is to mount it in a suitable location. Here’s how you can do it:
- Choose a location near the main electrical panel for easy wiring access.
- Ensure the sub panel is mounted securely to a sturdy surface using appropriate screws or mounting brackets.
- Leave enough space around the panel for easy maintenance and future expansions.
WIRING THE SUB PANEL
Once the sub panel is securely mounted, the next step is to wire it. Follow these steps to wire the sub panel correctly:
- Turn off the main power supply at the main panel to ensure your safety during the wiring process.
- Attach the feeder wires coming from the main panel to the main lugs of the sub panel using appropriate wire connectors.
- Connect the circuit wires to their designated positions in the sub panel, ensuring the correct wire gauge for each circuit.
- Label each circuit in the sub panel for easy identification.
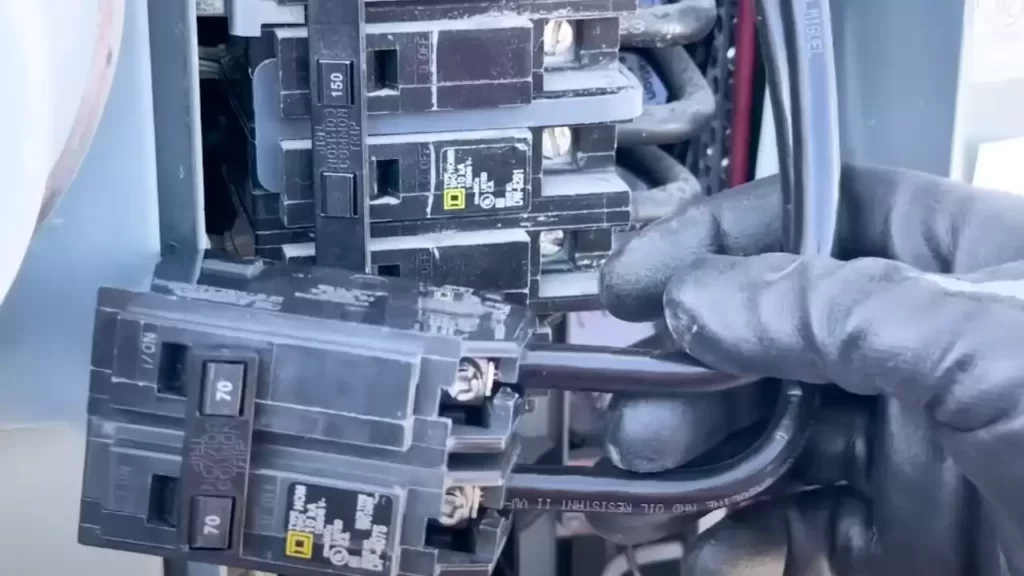
CONNECTING THE SUB PANEL TO THE MAIN PANEL
With the sub panel wired and ready, it’s time to connect it to the main panel:
- Check for suitable knockout openings in the main panel to run the feeder wires.
- Carefully insert and secure the feeder wires into the knockout openings using strain relief connectors.
- Tighten the connectors and ensure the feeder wires are well insulated.
- Connect the feeder wires to the respective bus bars in the main panel.
GROUNDING THE SUB PANEL
Grounding the sub panel is crucial for the safety and proper functioning of the electrical system. Follow these steps to ground the sub panel:
- Install a grounding electrode system, such as a copper grounding rod, near the sub panel location.
- Attach a copper grounding conductor from the sub panel to the grounding electrode system.
- Connect the grounding conductor to the grounding bus bar in the sub panel.
- Ensure all connections are tight and secure.
By following these steps and guidelines, you should be able to successfully install a 60 amp sub panel. However, if you are not confident in your electrical wiring skills, it is always recommended to hire a licensed electrician for the job. Safety should be your top priority when working with electricity.
Testing And Verifying
Once you have successfully installed your 60 Amp sub panel, it is crucial to test and verify that everything is functioning properly. This step is vital to ensure the safety and reliability of your electrical system. In this section, we will discuss how to test the sub panel for proper installation and how to verify that all connections are secure.
Testing the sub panel for proper installation
Testing the sub panel is a critical step to ensure that it is correctly installed and functioning as intended. To do this, you will need a voltage tester. Here’s how you can test the sub panel:
- Turn off the main power supply to the sub panel.
- Using the voltage tester, check the terminals in the sub panel to ensure that there is no voltage present. This will ensure that the power is completely turned off.
- Once you have confirmed that the power is off, turn it back on and carefully check each circuit breaker in the sub panel. The voltage tester should indicate the presence of voltage.
- If the voltage tester shows no voltage, there could be a wiring issue or a problem with the sub panel. In this case, it is best to consult a licensed electrician to diagnose and resolve the problem.
Verifying that all connections are secure
Verifying that all connections in the sub panel are secure is crucial for the safety and efficiency of your electrical system. Here are the steps to follow to ensure that all connections are secure:
- Check each wire connection in the sub panel to ensure that they are tightened properly. Loose connections can cause overheating and potential hazards.
- Inspect the wire insulation to ensure that it is intact and undamaged. Damaged insulation should be repaired or replaced to maintain electrical safety.
- Verify that all breakers are properly seated in the sub panel and make sure they are not loose.
- Inspect the sub panel for any signs of overheating, such as discoloration or an unusual odor. If you notice any of these signs, it could indicate a faulty connection or an overloaded circuit.
By following these testing and verifying steps, you can ensure that your 60 Amp sub panel is properly installed and operating safely. If you encounter any issues or are unsure about any aspect of the installation process, it is always best to seek assistance from a qualified electrician.
Finalizing The Installation
Restoring power to the main panel
After successfully installing your 60 amp sub panel, the next step is to restore power to the main panel. This crucial step ensures that your electrical system is functioning properly and all the circuits are up and running.
To restore power, follow these steps:
1. Turn off all the breakers in the main panel. This is for your safety and to prevent any electrical accidents during the restoration process.
2. Connect the sub panel to the main panel. Use a suitable size electrical wire to connect the main panel to the sub panel. Ensure that the wire is properly secured and there are no loose connections.
3. Switch on the main breaker. This will supply power to the sub panel and all the connected circuits.
4. Turn on the breakers in the sub panel. Gradually turn on the breakers one by one, checking if each circuit is functioning properly. This step ensures that each circuit is receiving power and there are no issues with the installation.
5. Test all the outlets and switches. Plug in a device or turn on a light switch to check if everything is working as expected.
Conducting a final inspection and cleanup
Once the power is restored and all the circuits are checked, it’s important to conduct a final inspection and cleanup to ensure the installation is completed properly.
Here’s what you need to do:
1. Inspect all the connections. Check if all the electrical connections are tight and secure. Look for any loose wires or improper grounding. Tighten any loose connections and fix any issues that you find.
2. Verify proper labeling. Ensure that all the circuits in the sub panel are correctly labeled. Label each circuit according to its intended usage for easy identification in the future. This will help you troubleshoot any issues or make changes to the electrical system if needed.
3. Clean up the work area. Remove any debris or tools from the installation process. Wipe down the sub panel, main panel, and surrounding area to ensure a clean and organized workspace. This will also help prevent any potential hazards caused by leftover materials or tools.
4. Dispose of waste properly. Properly dispose of any packaging materials, wire scraps, or any other waste generated during the installation process. Follow local regulations and guidelines to ensure safe and environmentally friendly disposal.
By following these final steps, you can ensure that your 60 amp sub panel installation is completed professionally and without any issues. Remember to always prioritize safety and consult a professional electrician if you have any concerns or doubts during the installation process.
Frequently Asked Questions
Does A 60 Amp Sub Panel Need A Main Breaker?
Yes, a 60 amp sub panel needs a main breaker. The main breaker acts as a disconnect for the entire sub panel. It ensures safety by shutting off the power supply completely in case of overload or short circuit.
What Size Breaker Do I Need For A 60 Amp Sub Panel?
For a 60 amp sub panel, you need a breaker with a minimum rating of 60 amps. This breaker will provide the necessary protection for the sub panel and its connected circuits. It’s important to choose the right size breaker to ensure safe and efficient electrical distribution.
How Many Circuits Can You Put On A 60 Amp Sub Panel?
A 60 amp sub panel can typically accommodate up to 8 circuits.
Can You Run A 60 Amp Sub Panel Off 100 Amp Main?
Yes, you can run a 60 amp sub panel off a 100 amp main panel. It is important to ensure that the total load on both panels does not exceed the main panel’s capacity. Consider consulting an electrician to ensure proper installation and safety measures.
Conclusion
To sum up, installing a 60 amp sub panel is a crucial step in upgrading your electrical system. It provides additional capacity and flexibility for running new circuits in your home or workspace. Through this blog post, we have guided you step-by-step on how to safely and efficiently install a 60 amp sub panel.
Remember to always follow electrical codes and consult with a professional if needed. Now you can confidently enhance your electrical setup and enjoy a more efficient and reliable power supply.