To install a 50 Amp breaker, turn off the power, connect the wires to the breaker and panel, tighten the connectors, and turn the power back on. Installing a 50 Amp breaker is a relatively simple process that can be done by following a few steps.
This type of breaker is commonly used for appliances or equipment that requires a higher amperage. Before starting the installation, it is crucial to turn off the power to the circuit that will be connected to the breaker. Once the power is off, the wires can be connected to the breaker and panel.
It is essential to ensure that the wires are connected properly and securely tightened to avoid any electrical hazards. After the connections are made, the power can be turned back on, and the breaker should function correctly. By following these steps, installing a 50 Amp breaker can be done efficiently and safely.
Gather The Necessary Tools And Materials
Before you start the installation process, it is essential to gather all the tools and materials you will need. This will ensure a smooth and efficient installation of your 50 Amp breaker. Below is a list of the required tools and materials:
List of required tools
- Flathead screwdriver
- Phillips screwdriver
- Wire strippers
- Wire cutters
- Needle-nose pliers
- Socket wrench
- Electrical tape
- Voltage tester
List of required materials
In addition to the tools, you will also need the following materials:
- 50 Amp breaker
- Electrical wire (appropriate gauge for the breaker)
- Breaker box
- Wire connectors
- Mounting screws
- Ground wire
- Labeling tags
Make sure to gather all these tools and materials before you begin the installation process. Having everything prepared beforehand will save time and ensure a successful installation of your 50 Amp breaker.

Shut Off The Power To The Circuit
In order to install a 50 Amp breaker, one of the most important steps is to shut off the power to the circuit. It is crucial to turn off the breaker that controls the specific circuit you’ll be working on to ensure your safety as you install the new breaker. Follow the steps below to locate the correct circuit breaker and turn it off:
Locate the correct circuit breaker in the electrical panel
Step 1: Start by locating the electrical panel in your home or property. This panel is usually found in a basement, utility room, or garage. It is typically a metal box with a swing-open door containing rows of circuit breakers.
Step 2: Once you’ve located the electrical panel, open the door carefully. Take a moment to familiarize yourself with the layout of the breakers. Each breaker is labeled to indicate the area or appliance it controls. Look for a label that corresponds to the circuit you’ll be working on.
Step 3: If your electrical panel does not have labeled breakers, you’ll need to identify the correct one. To do this, you can perform a simple test by turning off appliances or lights in the area you suspect the circuit serves. Toggle each breaker one at a time while checking if the lights or appliances turn off. When you find the breaker that controls the circuit, make a mental note of its location or mark it for future reference.
Turn off the breaker to cut off power to the circuit
Step 4: Once you’ve located the correct circuit breaker, it’s time to turn it off. Put on safety gloves and stand on a non-conductive surface. Stand clear of any live electrical components or wires.
Step 5: To turn off the breaker, push the switch to the “off” position. You should hear a click, and the switch will be in a downward or middle position, indicating it is off. Double-check that the power is indeed off by confirming that the lights or appliances connected to the circuit no longer function. This step is crucial to ensure your safety as you proceed with the installation process.
Now that you have successfully shut off the power to the circuit, you are ready to install your 50 Amp breaker. Follow the steps provided in the subsequent sections to complete the installation process safely and effectively.
Remove The Existing Breaker
When installing a 50 amp breaker, the first step is to remove the existing breaker that you want to replace. This is an important step to ensure the safe and proper installation of the new breaker. Follow the steps below to remove the existing breaker:
Identify the correct breaker to be replaced
Before you begin removing the breaker, you need to identify the correct one to be replaced. Make sure to consult the circuit breaker panel diagram or label to find the specific breaker that supplies power to the area or appliance you want to install the 50 amp breaker for.
Use a screwdriver to remove the breaker
Once you have identified the correct breaker, it’s time to remove it. You will need a screwdriver with the appropriate size and type of bit to fit the screws on the breaker. Follow these steps to safely remove the breaker:
- Switch off the main power supply to the breaker panel. This will help prevent any electrical accidents while working on the breakers.
- Use the screwdriver to loosen and remove the screws that hold the breaker in place.
- Gently pull the breaker out of its slot in the panel. Take care not to apply excessive force or pull on any wires connected to the breaker.
Remember to keep the screws and any other small parts in a safe place, as you will need them when installing the new 50 amp breaker.
Now that you have successfully removed the existing breaker, you are one step closer to installing the 50 amp breaker. Stay tuned for the next steps to complete the installation process.
Prepare The Electrical Panel
Before installing a 50 Amp breaker, it is crucial to prepare the electrical panel properly. This involves inspecting the panel for any signs of damage or wear and cleaning it if necessary. By taking these steps, you can ensure that your electrical panel is in good condition and ready to accommodate the new breaker.
Inspect the panel for any signs of damage or wear
When preparing an electrical panel for a 50 Amp breaker installation, it is essential to inspect it thoroughly for any signs of damage or wear. This includes checking for cracked or broken components, loose connections, or burnt markings. Such issues can indicate potential hazards and should be addressed promptly.
Clean the panel if necessary
Another important step in preparing the electrical panel is to clean it if necessary. Over time, dust, debris, and corrosion can accumulate in the panel, affecting its functionality. To clean the panel effectively:
- Turn off the power: Before attempting to clean the electrical panel, ensure that the power is turned off to avoid any accidents.
- Remove the panel cover: Carefully remove the cover of the electrical panel using a screwdriver.
- Inspect for loose wires or connections: While the panel cover is off, inspect for any loose wires or connections. If you notice any, tighten them securely.
- Use compressed air or a vacuum: Gently blow compressed air or use a vacuum with a brush attachment to remove any dust or debris from the panel. Be cautious not to touch any live wires.
- Wipe down with a clean cloth: After using compressed air or a vacuum, wipe down the panel with a clean, dry cloth to remove any remaining residue or moisture.
- Replace the panel cover: Once the cleaning is complete, securely place the panel cover back on and fasten it with the screwdriver.
By keeping your electrical panel clean, you can enhance its performance and prevent potential electrical issues. Cleaning the panel also allows for easier installation of a new 50 Amp breaker.
Now that you have prepared the electrical panel, you are ready to proceed with the installation of the 50 Amp breaker. Before doing so, it is advisable to consult a professional electrician or follow the manufacturer’s guidelines for a safe and accurate installation process.
Install The 50 Amp Breaker
Installing a 50 Amp breaker is an important step in upgrading your electrical system to handle higher capacity and meet the demands of modern appliances and equipment. Whether you are installing a new circuit or replacing an old breaker, this guide will walk you through the process of properly installing a 50 Amp breaker in your electrical panel.
Position the new breaker in the electrical panel
To begin the installation process, carefully position the new 50 Amp breaker in the electrical panel. Make sure to turn off the main power supply before working inside the panel for safety reasons.
Here’s a step-by-step process to position the new breaker:
- Identify an available slot in the panel where the 50 Amp breaker can be inserted.
- Ensure that the breaker is designed for use in your specific panel brand and model. Refer to the manufacturer’s instructions for compatibility.
- Hold the breaker so that the mounting clips are facing the panel’s interior.
- Position the breaker’s clips over the metal tabs or slots within the panel, ensuring a secure fit.
When positioning the breaker, take care not to force it into place or bend any of the metal tabs. A proper fit is crucial for safety and optimal performance.
Align the breaker with the panel’s bus bar
Once the new 50 Amp breaker is positioned, align it with the electrical panel’s bus bar. The bus bar is a metal strip that distributes power to the various circuits in your home’s electrical system.
Here’s how to align the breaker with the bus bar:
- Ensure that the breaker’s connecting tab lines up with the corresponding slot on the bus bar.
- Double-check that the breaker is correctly aligned vertically as well, so it fits securely in the panel.
- Gently push the breaker down onto the bus bar until it snaps into place.
Proper alignment with the bus bar is essential to ensure a reliable electrical connection and prevent loose or faulty connections that could lead to electrical fires or other hazards.
Attach the breaker securely
After aligning the breaker with the bus bar, it’s important to secure it properly in the electrical panel. This helps to maintain a stable and safe electrical installation.
Here’s how to attach the breaker securely:
- Check that the breaker is firmly seated in the panel and not loose or wobbly.
- Ensure that the breaker’s mounting clips are engaged with the panel, holding it securely in place.
- Tighten any screws or bolts on the breaker, if required, to ensure a secure attachment.
Take care not to overtighten the screws, as this could damage the breaker or the panel.
Once the breaker is securely attached, you can proceed with connecting the electrical wires to the breaker, following the proper wiring procedures and safety guidelines.
By following the steps outlined above, you can successfully install a 50 Amp breaker in your electrical panel. Remember to always prioritize safety and consult a licensed electrician if you have any doubts or concerns.
Connect The Wiring
Once you have prepared the electrical panel and installed the 50 Amp breaker, the next step is to connect the wiring. This crucial step ensures that the power supply is properly connected to the breaker, allowing electricity to flow safely and efficiently. Follow the instructions below to connect the wiring and complete the installation of your 50 Amp breaker.
Strip the insulation from the wire ends
Before connecting the wires to the breaker terminals, it is important to strip the insulation from the wire ends. This process involves using a wire stripper tool to remove the plastic coating, exposing the copper wire inside. Make sure to strip the appropriate length of insulation according to the manufacturer’s guidelines, typically around 1/2 inch.
Connect the wires to the breaker terminals
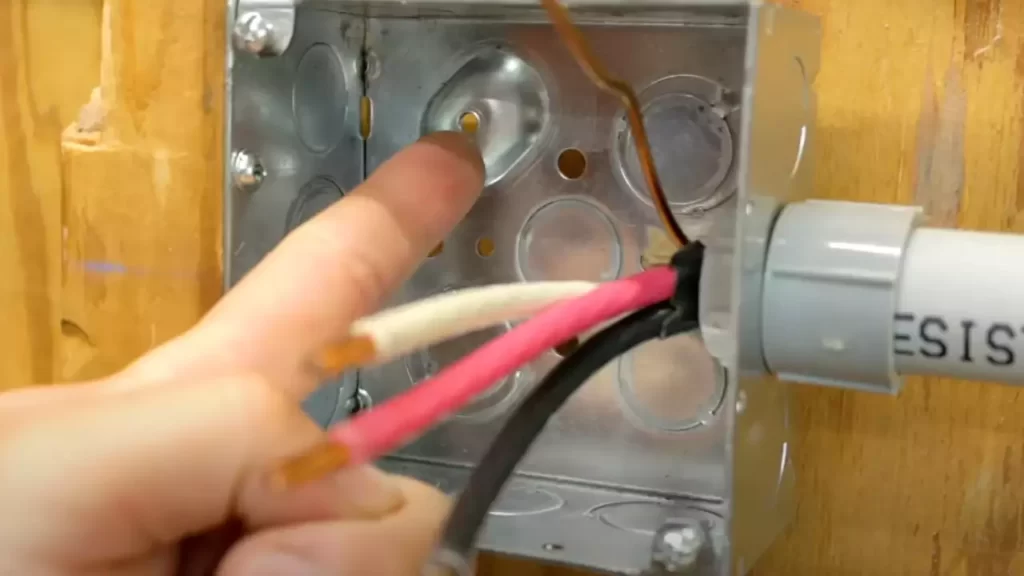
With the insulation stripped, you are now ready to connect the wires to the breaker terminals. Ensure that you have properly identified the line, load, and ground wires before proceeding. Typically, the black wire is the hot line wire, the white wire is the neutral or load wire, and the green or bare copper wire is the ground wire.
To connect the wires, locate the appropriate terminals on the 50 Amp breaker. Insert the stripped end of each wire into the corresponding terminal, making sure they are securely seated. It is important to follow the manufacturer’s instructions and any specific guidelines provided with your breaker to ensure proper connection.
Tighten the terminal screws
After connecting the wires, it is crucial to tighten the terminal screws to ensure a strong and secure connection. Using a screwdriver or appropriate tool, tighten each terminal screw firmly but not excessively. This will help prevent loose connections that can lead to electrical issues or potential hazards.
Once all the terminal screws are tightened, double-check that each wire is securely fastened and ensure there are no loose or exposed wires. Carefully inspect the connections and make any necessary adjustments to guarantee a safe and reliable installation.
With the wiring successfully connected to the 50 Amp breaker terminals and the terminal screws tightened, you have completed the installation process. However, before closing up the electrical panel, it is essential to conduct a final inspection to ensure everything is in order and no errors or loose connections are present. Additionally, it is recommended to consult a licensed electrician or follow local electrical codes to ensure compliance and safety in your specific location.
Test The Circuit
Test the circuit
Once you have successfully installed the 50 amp breaker, it is crucial to test the circuit to ensure everything is functioning properly. This step will help you verify that the installation was done correctly and that there are no issues with the electrical supply.
Turn on the main power supply
The first step in testing the circuit is to turn on the main power supply. Locate the main circuit breaker panel in your home and flip the switch to the “on” position. This will energize the entire electrical system, including the newly installed 50 amp breaker.
Use a multimeter to check the voltage
A multimeter is a versatile tool that measures various electrical parameters, including voltage. To check the voltage of the circuit, set your multimeter to the AC voltage range. Ensure that you are using the correct setting for the voltage level you expect to measure, in this case, 120 or 240 volts, depending on your electrical system.
Next, insert the multimeter probes into the appropriate sockets of the electrical outlet connected to the 50 amp breaker. The black probe should go into the smaller or shorter slot, while the red probe should go into the larger or longer slot. Make sure the probes are firmly inserted and that there is no loose connection.
Once the probes are in place, turn on the multimeter and read the voltage displayed on the screen. It should match the expected voltage of your electrical system. If the reading is significantly lower or higher than expected, there might be an issue with the circuit or electrical wiring that needs further investigation.
Verify that the circuit is functioning properly
After checking the voltage, it is important to verify that the circuit is functioning properly. This involves checking if power is being supplied to the desired outlets or appliances connected to the 50 amp breaker.
You can do this by plugging in a device or turning on a light switch connected to the circuit. If the device powers on or the light turns on, it indicates that the circuit is functioning as intended. However, if there is no power or the device/appliance does not work, there might be a problem with the circuit or the connection.
In such cases, it is recommended to consult a licensed electrician for further inspection and troubleshooting. They will be able to identify and resolve any issues that may be affecting the circuit’s performance.
Secure The Breaker And Tidy Up
Now that you have successfully installed the 50 Amp breaker for your electrical panel, it’s time to secure the breaker and tidy up the surrounding area. This final step is crucial to ensure the safety and efficiency of your electrical system. Follow the steps below to double-check all connections, tighten any loose screws, close the electrical panel cover, and organize any loose wires.
Double-check all connections and tighten any loose screws
Before securing the breaker, it’s essential to ensure that all the connections are tight and secure. Any loose connections can lead to electrical hazards and potential damage to your appliances. Carefully inspect each connection and tighten any loose screws using a screwdriver or appropriate tool. Pay special attention to the connections between the breaker and the wires, as well as the connections within the circuit breaker panel.
Close the electrical panel cover
Once all the connections have been double-checked and tightened, it’s time to close the electrical panel cover. This cover serves as a protective barrier, preventing any accidental contact with live wires and ensuring that the components inside the panel are properly enclosed. Align the cover with the panel and firmly press it into place until you hear a click, indicating that it is securely closed. Take a moment to make sure that the cover is flush with the panel and there are no gaps.
Organize and secure any loose wires
Lastly, it’s important to organize and secure any loose wires within the electrical panel. Loose wires can impede the functionality of the panel and create a messy and chaotic environment. Start by carefully arranging the wires so that they do not impede the movement of the breaker or any other components. Use zip ties or cable organizers to gather and secure the wires, keeping them neat and tidy. This organization will make future maintenance and troubleshooting much easier.
Remember, securing the breaker and tidying up the area is the final step in installing a 50 Amp breaker. By double-checking all connections, tightening any loose screws, closing the electrical panel cover, and organizing loose wires, you are ensuring the safety and efficiency of your electrical system. Take the time to complete this step properly, and you can enjoy peace of mind knowing that your breaker installation is secure and ready to use.
Safety Precautions And Tips
When it comes to installing a 50 amp breaker, safety should always be your number one priority. This powerful electrical component requires careful handling and strict adherence to safety guidelines. In this section, we will discuss important safety precautions and provide you with tips to ensure a successful installation. By following these guidelines, you can safeguard yourself and your property from potential hazards.
Important Safety Guidelines to Follow During the Installation Process
During the installation process, it is crucial to adhere to the following safety guidelines:
- 1. Turn off the power: Before starting any electrical work, it is essential to turn off the power to the area where you will be installing the 50 amp breaker. This can be done by switching off the corresponding circuit breaker in your main electrical panel. Be sure to use a voltage tester to verify that the power is indeed off before proceeding.
- 2. Wear protective gear: Electricity poses potential risks, so it is important to protect yourself. Wear safety goggles, gloves, and non-conductive footwear to minimize the possibility of injury.
- 3. Follow manufacturer’s instructions: Each 50 amp breaker may have specific instructions provided by the manufacturer. Make sure to carefully read and understand these instructions before starting the installation process.
- 4. Avoid overloading the circuit: It is crucial to ensure that the total load on the circuit does not exceed 50 amps. Before proceeding with the installation, calculate the total load that will be connected to the breaker and make sure it is within a safe range.
- 5. Hire a professional if unsure: If you are uncertain about any aspect of the installation process or if you lack the necessary expertise, it is always best to seek the assistance of a qualified electrician. Remember, your safety is paramount.
- 6. Secure all connections: Once the 50 amp breaker is installed, ensure that all electrical connections are properly secured. Loose connections can lead to overheating and potential electrical hazards. Utilize the appropriate tools and techniques to tighten all connections securely.
Tips for a Successful Installation
Consider the following tips to ensure a successful installation:
- Plan ahead: Before beginning the installation, carefully plan out the wiring, ensuring the breaker is in a convenient and appropriate location. This will save you time and effort in the long run.
- Use the correct wire size: The wire size you choose is critical for the safe and efficient operation of the 50 amp breaker. Consult the manufacturer’s guidelines or seek the advice of an electrician to determine the appropriate wire size for your specific installation.
- Label the breaker: To make future maintenance and troubleshooting easier, label the 50 amp breaker in your main electrical panel. This will help you identify it quickly when needed.
- Perform a thorough inspection: After completing the installation, conduct a comprehensive visual inspection to ensure everything is in order. Look for any signs of damage, loose connections, or other potential issues that may need attention.
- Test the breaker: Once the installation and inspection are complete, test the breaker to ensure it is functioning correctly. This can be done by turning on the corresponding circuit and verifying that power is running through the breaker.
By following these important safety guidelines and tips, you can confidently install a 50 amp breaker while minimizing the risk of accidents or electrical hazards. Remember, safety should never be compromised when working with electrical components. Take the necessary precautions, seek professional assistance if needed, and enjoy the benefits of a successful installation.
Troubleshooting Common Issues
During the installation of a 50 Amp breaker, it is not uncommon for various issues to arise. In this section, we will identify and provide solutions for some of the common problems that you may encounter during the installation process. By addressing these issues promptly and effectively, you can ensure a successful installation and avoid any potential safety hazards.
Identification and Solutions for Common Problems That May Arise During Installation
Here are some of the common problems you may come across when installing a 50 Amp breaker:
- Breaker Tripping Frequently
- Incorrect Wiring
- Insufficient Amperage
- Overheating
- Poor Connection
Let’s take a closer look at each of these issues and the solutions:
Breaker Tripping Frequently
If your breaker keeps tripping, it could indicate an overload or a short circuit in the circuit. Here’s what you can do:
- Identify the appliances or devices that are connected to the circuit and causing the overload.
- Unplug or turn off some of the devices to reduce the load on the circuit.
- If the problem persists, you may need to upgrade to a higher amperage breaker or consult a professional electrician for further inspection.
Incorrect Wiring
Incorrect wiring can be a common issue, leading to malfunctioning of the breaker or potential electrical hazards. Follow these steps to troubleshoot and correct any wiring problems:
- Turn off the power supply before inspecting the wiring.
- Check for loose or improperly connected wires.
- Ensure all connections are secure and tightened properly.
- Refer to the manufacturer’s instructions to verify the correct wiring configuration.
Insufficient Amperage
If you find that the breaker frequently trips even when the load is within its amperage rating, it may indicate an inadequate amperage supply. Here’s what you can do:
- Check the amperage rating of the appliances or devices connected to the circuit.
- Confirm that the total amperage load does not exceed the rating of the breaker.
- If necessary, consult an electrician to upgrade your electrical system to accommodate the higher amperage.
Overheating
Overheating can be a serious issue that requires immediate attention. If you notice signs of overheating such as melted insulation or burning smells, take the following steps:
- Turn off the power supply to the circuit immediately.
- Inspect the breaker for any signs of damage or excess heat.
- Replace the breaker if it shows signs of overheating.
- Consider upgrading to a higher amperage breaker if the overheating persists.
Poor Connection
A poor connection can lead to voltage drops, overheating, or even a complete circuit failure. To troubleshoot and rectify poor connections, follow these steps:
- Turn off the power supply before inspecting the connections.
- Tighten any loose screws or terminals.
- Replace any damaged or corroded wires or connectors.
- Verify that all connections are properly secured.
By identifying and resolving these common issues during the installation of a 50 Amp breaker, you can ensure a safe and efficient electrical system. However, if you are unsure or uncomfortable performing any troubleshooting steps, it is always recommended to seek assistance from a qualified electrician.
Frequently Asked Questions
How Do I Install A 50 Amp Breaker In My Electrical Panel?
To install a 50 Amp breaker, follow these steps: 1) Turn off the main power switch. 2) Remove the panel cover. 3) Identify the dedicated slot for the 50 Amp breaker. 4) Attach the hot wire to the breaker terminal.
5) Connect the ground wire. 6) Push the breaker into place. 7) Replace the panel cover. 8) Turn on the main power switch.
What Gauge Wire Is Needed For A 50 Amp Breaker?
To ensure safety, use #6 AWG copper wire for a 50 Amp breaker. This wire gauge is commonly used for 50 Amp circuits as it can handle the required current without overheating. Make sure to consult the National Electrical Code (NEC) and local codes for specific requirements in your area.
Can I Install A 50 Amp Breaker Myself Or Do I Need An Electrician?
Installing a 50 Amp breaker requires knowledge and experience in electrical work. It is highly recommended to hire a professional electrician for this task. They have the expertise to ensure the installation is done correctly, following all safety guidelines and electrical codes, minimizing risks and ensuring your home’s electrical system operates safely and efficiently.
Conclusion
Installing a 50 amp breaker is crucial for upgrading your electrical system to support high-powered appliances. By following the step-by-step guide provided in this blog post, you can ensure a safe and efficient installation process. Remember to consult a professional electrician if you have any doubts or concerns.
Now you can enjoy the benefits of a higher amp capacity, allowing you to power multiple heavy-duty appliances simultaneously. Upgrade your electrical system and enhance your home’s functionality with a 50 amp breaker installation today!