To install a 4 prong dryer outlet, turn off the power, remove the old outlet, connect the wires to the new outlet, and secure it in place. When installing a new dryer or replacing an old one, it is essential to ensure that the electrical outlet is compatible with your specific dryer model.
A 4 prong dryer outlet is typically required for newer dryers, as it provides a safer and more reliable connection. In this guide, we will walk you through the step-by-step process of installing a 4 prong dryer outlet in your home.
Remember to always turn off the power before working on any electrical components and proceed with caution to ensure a successful installation.
Understanding The Electrical Requirements
When it comes to installing a 4 prong dryer outlet, understanding the electrical requirements is crucial. A dryer outlet is not just a regular power outlet, it has specific electrical needs that must be met to ensure safe and efficient operation. In this section, we will go over the importance of a proper dryer outlet, the different types of dryer outlets available, and how a 4 prong dryer outlet is different from others.
Importance of a Proper Dryer Outlet
A proper dryer outlet is essential for the safe and efficient operation of your dryer. Using the wrong type of outlet or wiring your dryer incorrectly can lead to a range of issues, including electrical fires, damage to your dryer, and even personal injury. To avoid these risks, it is vital to understand the electrical requirements for your dryer and install the correct outlet.
Different Types of Dryer Outlets
There are several types of dryer outlets available, each with its own specific electrical configuration. The most common types include:
| Type | Configuration |
|---|---|
| 3 Prong | Hot Wire (Line 1), Hot Wire (Line 2), Ground Wire |
| 4 Prong | Hot Wire (Line 1), Hot Wire (Line 2), Neutral Wire, Ground Wire |
While 3 prong dryer outlets were commonly used in the past, they are now considered outdated and unsafe. This is because they lack a dedicated neutral wire, which can lead to electrical imbalances and potential hazards. As a result, most modern dryers require a 4 prong outlet to meet safety standards and electrical codes.
How a 4 Prong Dryer Outlet is Different
A 4 prong dryer outlet differs from other types in that it includes a dedicated neutral wire in addition to the hot wires and ground wire. The neutral wire acts as a return path for the electrical current, ensuring a balanced flow of electricity and reducing the risk of shocks or electrical problems. This configuration is safer and more efficient than older 3 prong outlets.
Installing a 4 prong dryer outlet requires proper knowledge of electrical wiring, so it is recommended to consult a qualified electrician to ensure the installation is done correctly. Attempting to install a 4 prong outlet without the necessary expertise can lead to costly mistakes and safety hazards.
Preparing For The Installation
Before you can install a 4 prong dryer outlet, it’s crucial to prepare yourself and gather the necessary tools and materials. Taking safety precautions is also vital to ensure a smooth and accident-free installation process. In this section, we’ll walk you through the steps of gathering the necessary tools and materials, as well as the safety measures you should take to prepare for the installation.
Gathering the necessary tools and materials
Before you start the installation process, make sure you have the following tools and materials handy:
| Tools | Materials |
|---|---|
|
|
Having these tools and materials ready will help streamline the installation and ensure you have everything necessary to complete the job.
Safety precautions to take before starting
Prior to beginning the installation process, it’s essential to take the following safety precautions:
- First and foremost, turn off the power supply. This is crucial to prevent any electrical accidents during the installation process.
- Ensure you are wearing appropriate safety gear, such as gloves and safety glasses, to protect yourself from any potential hazards.
- Double-check that all the tools and materials you are using are in good condition. Do not proceed if anything appears damaged or faulty.
- If you are unsure about any aspect of the installation process, consult a professional electrician for guidance and assistance.
Taking these safety precautions will help minimize any risks and ensure a safe and successful installation.
Turning off the power supply
Once you have gathered all the necessary tools and materials and have taken the required safety precautions, it’s time to turn off the power supply. Please follow the steps below:
- Locate your home’s electrical panel or circuit breaker box.
- Look for the circuit breaker that controls the power to the dryer. Typically, it is labeled as “Dryer” or something similar.
- Flip the switch to the “Off” position to cut off the power supply to the dryer outlet.
- For added safety, use a voltage tester to ensure that there is no live electricity flowing to the outlet.
By turning off the power supply, you eliminate the risk of electrical shock while working on the installation process.
Removing The Old Outlet
Safely disconnecting the old outlet
Before installing a new 4 prong dryer outlet, it’s important to safely disconnect the old outlet. This ensures that you won’t get shocked during the process and allows for a smooth installation of the new outlet. Here’s how to go about it:
- Start by turning off the power supply to the dryer at the main circuit breaker. This will prevent any accidents or electrical shocks.
- Use a voltage tester to double-check that the power is indeed off. Simply place the tester against the outlet and make sure it doesn’t indicate any electricity.
- Remove the cover plate of the old outlet by unscrewing the screws that hold it in place. Set the cover plate aside for later use.
- Next, loosen the screws that hold the outlet in place within the electrical box. Carefully pull the outlet out of the box and expose the wiring.
- Now, using a screwdriver, carefully unscrew the screw terminals that secure the wires to the outlet. Take note of which wires are connected to which terminals, as this will be important when installing the new outlet.
- Once all the wires are disconnected, remove the old outlet from the electrical box and set it aside for proper disposal later.
Checking the wiring and inspecting for any damage
After safely disconnecting the old outlet, it’s crucial to check the wiring and inspect for any damage. This will ensure that the new 4 prong dryer outlet can be installed correctly and safely. Here’s what you need to do:
- Carefully examine the wiring connected to the old outlet. Look for any signs of wear, fraying, or damage. If you notice any issues, it’s important to address them before proceeding with the installation.
- Check the wires for correct color coding. In a typical 4 prong dryer outlet, you should have a black, red, white, and green wire. Ensure that the wires are connected correctly and securely.
- If there are any damaged wires or incorrect connections, it’s recommended to consult a qualified electrician for further assistance. They will be able to resolve any wiring issues and ensure a safe installation.
Properly disposing of the old outlet
Once you have safely disconnected the old outlet and checked the wiring, it’s important to properly dispose of the old outlet. This ensures that it doesn’t pose any safety hazards and is handled in an environmentally friendly manner. Follow these steps for proper disposal:
- First, check with your local waste management facility or recycling center to see if they accept electrical outlets. Some places may have special procedures for disposing of electronic waste, so it’s essential to follow their guidelines.
- If your local facility does accept electrical outlets, package the old outlet securely to prevent any damage during transportation. You can use bubble wrap or a sturdy box for this purpose.
- Transport the packaged outlet to the designated waste management facility or recycling center as instructed. Be sure to handle it with care and follow any additional guidelines given by the facility.
- Once you have dropped off the old outlet, double-check with the facility if there are any specific disposal requirements to ensure that it is properly recycled or disposed of.
By safely disconnecting the old outlet, checking the wiring and inspecting for any damage, and properly disposing of the old outlet, you are ready to move on to the next step of installing the new 4 prong dryer outlet. Make sure to follow the manufacturer’s instructions and consult a professional if you encounter any difficulties or uncertainties during the installation process.
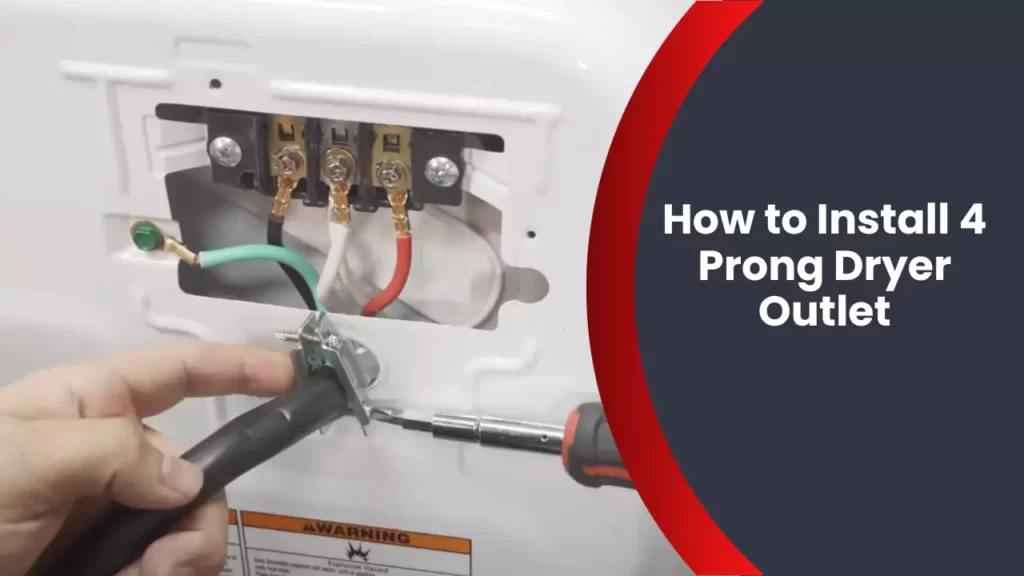
Wiring The New Outlet
Installing a 4 prong dryer outlet involves wiring the new outlet properly to ensure a safe and efficient power supply for your dryer. In this section, we will guide you through the process of identifying the wires and their functions, connecting the wires to the new outlet, and securing the connections while ensuring proper grounding.
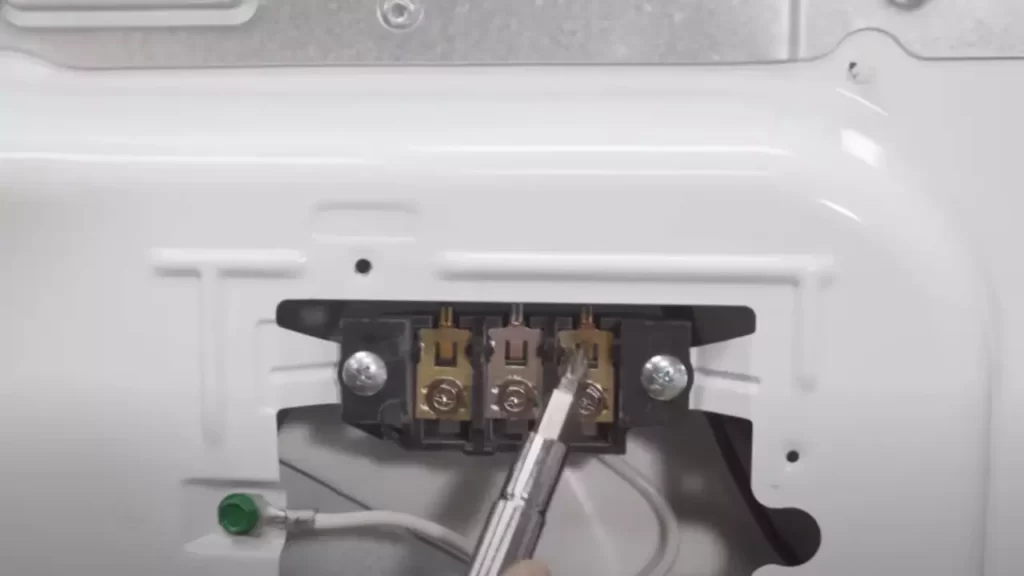
Identifying the wires and their functions
Before you begin wiring the new outlet, it’s crucial to identify the different wires and understand their functions. This will help you connect the wires correctly and avoid any electrical mishaps. Here’s a breakdown of the wires you’ll typically encounter:
| Color | Function |
|---|---|
| Black | Live or hot wire, which carries the current to the appliance. |
| Red | Another hot wire, typically used for dryers that require a 240-volt power supply. |
| White | Neutral wire, which completes the circuit and carries the current back to the electrical panel. |
| Green or Bare Copper | Ground wire, responsible for safely directing electrical currents into the ground. |
Connecting the wires to the new outlet
Now that you are familiar with the wires and their functions, it’s time to connect them to the new outlet. Follow these steps:
- Start by turning off the power supply to the existing dryer outlet from the circuit breaker.
- Remove the cover plate from the existing outlet, exposing the wires.
- Loosen the screws holding the wires in place, keeping track of which wire connects to which terminal.
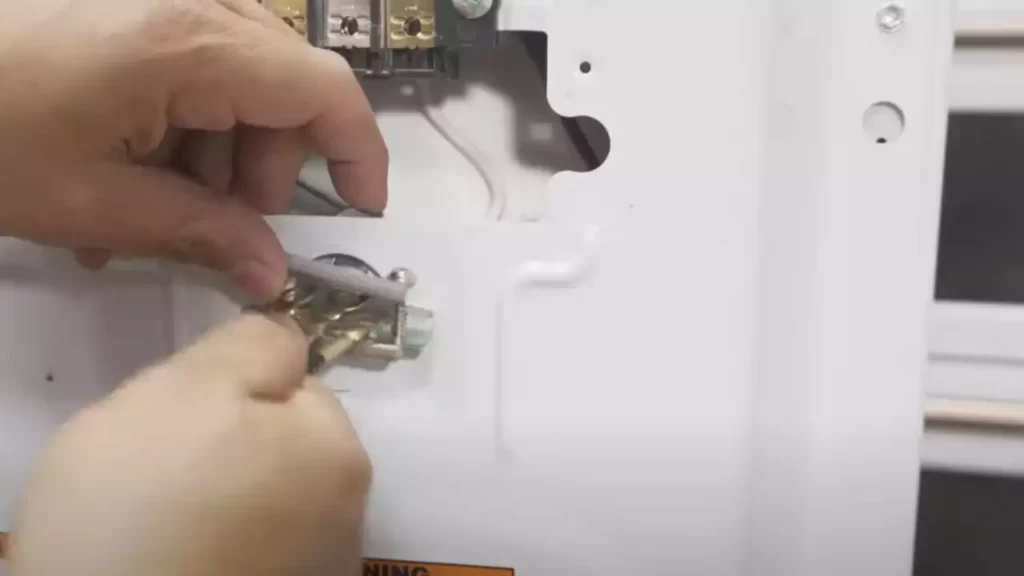
- Attach the black wire to the brass-colored or silver screw on the new outlet, using a screwdriver to secure the connection.
- Connect the red wire to the remaining brass-colored or silver screw on the outlet.
- Attach the white wire to the silver screw labeled “neutral” on the outlet.
- Secure the green or bare copper wire to the green screw labeled “ground” on the outlet.
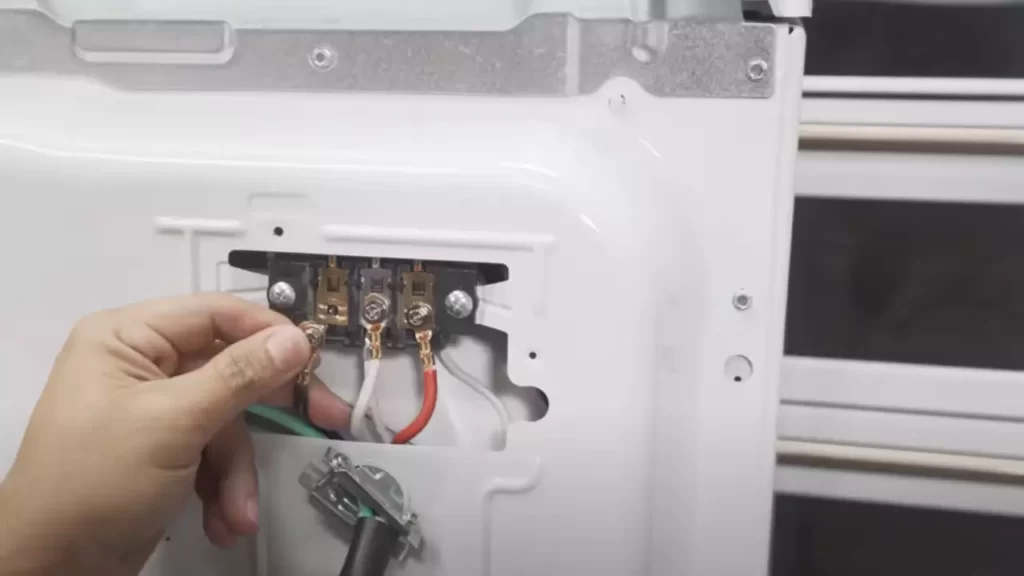
Securing the connections and ensuring proper grounding
After connecting the wires to the new outlet, it’s important to secure the connections and ensure proper grounding. This helps prevent electrical hazards and malfunctions. Here’s what you need to do:
- Tighten the screws that hold the wires in place on the outlet, ensuring a snug fit.
- Double-check all connections to make sure they are secure and properly attached.
- Confirm that the grounding wire is securely attached to the green screw and is not loose or damaged.
- If necessary, use electrical tape or wire nuts to secure any exposed or bare wires.
- Once everything is properly connected and secured, carefully place the cover plate back onto the new outlet.
By following these steps, you can wire a new 4 prong dryer outlet safely and correctly. Remember to test the outlet with a voltage tester before using it to ensure your dryer receives the appropriate power supply. If you are uncertain about any part of the process, consult a licensed electrician for assistance.
Mounting The Outlet
Mounting the outlet is a crucial step in installing a 4 prong dryer outlet. Choosing the optimal location for the new outlet, preparing the wall for installation, and securing the outlet are all essential tasks that need to be completed with precision. Let’s delve into each step in detail.
Choosing the optimal location for the new outlet
When determining the placement of your new 4 prong dryer outlet, it’s important to consider ease of access, safety, and functionality. Here are a few factors to keep in mind during this process:
- Locate the outlet near the dryer’s intended location to minimize the length of the power cord needed.
- Ensure there is at least 2 feet of clearance around the outlet for ventilation and ease of maintenance.
- Avoid installing the outlet near sources of water or excessive moisture to prevent electrical hazards.
- Check the local electrical codes to ensure compliance with placement guidelines.
Preparing the wall for installation
Before installing the new 4 prong dryer outlet, it’s important to properly prepare the wall to ensure a secure and stable installation. Follow these steps to get your wall ready:
- Turn off the power supply to the circuit you’ll be working on.
- Use a voltage tester to verify that the power is completely off.
- Identify the location of the new outlet and mark it on the wall using a pencil or a marker.
- Use a stud finder to locate any wall studs near the marked location.
- If necessary, cut a hole in the drywall to expose the studs and electrical wires.
- Make sure the wall surface is clean and free from any debris or obstacles.
Installing and securing the new outlet
Now that you have chosen the optimal location and prepared the wall, it’s time to install and secure the new 4 prong dryer outlet. Follow these steps for a successful installation:
- Position the outlet box against the wall, aligning it with the marked location.
- Use a level to ensure the outlet box is straight and level.
- Secure the outlet box to the wall studs, using screws or other appropriate fasteners.
- Connect the wiring to the outlet, following the manufacturer’s instructions.
- Ensure all connections are tight and properly insulated.
- Place the outlet cover on the outlet box and screw it into place.
With the new 4 prong dryer outlet installed and securely mounted, you’re one step closer to enjoying the convenience and efficiency of your dryer. Make sure to turn on the power supply to the circuit and test the outlet before connecting your dryer. If you’re not confident with electrical work, it’s always advisable to consult a licensed electrician for installation assistance.
Testing And Finalizing The Installation
Turning on the power supply
Once you have successfully replaced your old 3-prong dryer outlet with a new 4-prong one, it’s time to test the installation to ensure everything is working properly. One of the first steps is turning on the power supply. This will make sure that electricity is flowing to the outlet and the dryer can receive power.
Using a multimeter to check for proper voltage
Before connecting your dryer to the new outlet, it’s crucial to check if the outlet is delivering the correct voltage. To do this, you will need a multimeter, a device that measures electrical voltage, current, and resistance.
To check for proper voltage, follow these steps:
- Set your multimeter to the AC voltage mode.
- Insert the red probe into the larger prong hole on the outlet and the black probe into the smaller prong hole.
- Read the voltage displayed on the multimeter. The reading should be approximately 240 volts, indicating that the outlet is supplying the correct amount of power for your dryer.
Testing the outlet with a dryer, ensuring each H3 heading adheres to HTML syntax
After confirming that the voltage is correct, it’s time to test the outlet with your dryer. This step will verify if the installation was successful and that the dryer can properly receive power.
To test the outlet with your dryer, follow these steps:
- Make sure that the dryer is disconnected from the power supply to avoid any accidents.
- Plug in the dryer into the new 4-prong outlet.
- Turn on the dryer and set it to a drying cycle.
- Observe if the dryer starts running and if heat is being produced.
If the dryer functions correctly and heats up as expected, then congratulations! You have successfully installed the 4-prong dryer outlet and can confidently start using your dryer. However, if the dryer doesn’t start or doesn’t produce heat, double-check the connections and consider calling a professional electrician to ensure everything is properly installed.
Troubleshooting And Common Issues
When it comes to installing a 4 prong dryer outlet, it’s important to ensure that everything is done correctly to avoid any potential problems in the future. However, even with careful installation, troubleshooting may still be necessary to identify and rectify any issues that may arise. In this section, we will explore some common problems that you may encounter during the installation process and provide solutions to address them effectively.
Identifying and Fixing Wiring Mistakes
One of the most common problems when installing a 4 prong dryer outlet is wiring mistakes. These mistakes can lead to improper voltage readings or even electrical shorts, resulting in an inefficient or unsafe dryer connection. To prevent these issues, it’s important to identify and fix any wiring mistakes promptly. Here are some common wiring mistakes and how to fix them:
| Mistake | Solution |
|---|---|
| Reversed polarity | Swap the hot wires (black and red) with each other |
| Missing ground connection | Ensure the ground wire is securely connected to the dryer outlet and grounded properly |
| Loose or disconnected wires | Tighten any loose connections and reattach any disconnected wires |
Dealing with Loose Connections
Loose connections can be a common problem when installing a 4 prong dryer outlet. These connections can cause intermittent power supply, leading to issues with your dryer’s performance. To address loose connections effectively, follow these steps:
- Disconnect the power supply to the outlet.
- Inspect all connections for any signs of looseness or corrosion.
- If there are any loose connections, tighten them using a screwdriver or pliers.
- Ensure that all connections are secure and free from any debris.
- Reconnect the power supply and test the dryer to ensure it’s functioning properly.
Addressing Other Common Installation Problems
Aside from wiring mistakes and loose connections, there are other common problems that may arise during the installation of a 4 prong dryer outlet. Here are a few additional issues you may encounter and their respective solutions:
- No power to the outlet: Check the circuit breaker and ensure it’s in the “on” position. If necessary, reset the breaker and test the outlet again.
- Incompatible outlet: Ensure you have the correct type of 4 prong dryer outlet that matches your dryer’s requirements. If it’s incompatible, replace it with the appropriate outlet.
- Overheating: If the outlet becomes hot during use, it may indicate a problem with the wiring or the connections. In this case, it’s recommended to consult a qualified electrician to address the issue and prevent potential hazards.
By identifying and addressing these common installation problems, you can ensure that your 4 prong dryer outlet is properly installed and functioning efficiently. Remember to always prioritize safety and consult a professional if you’re unsure about any aspect of the installation.
Frequently Asked Questions
How Do You Install A 4-Prong Dryer Plug?
To install a 4-prong dryer plug, follow these steps: 1. Turn off the power supply 2. Remove the old plug’s cover plate 3. Disconnect the three-wire cord 4. Connect the new four-prong plug, matching the wire colors to the terminals 5.
Tighten the screws and replace the cover plate.
How Much Does It Cost To Install A 4-Prong Dryer Outlet?
The cost of installing a 4-prong dryer outlet usually ranges from $150 to $300. It depends on factors such as the location, electrical wiring required, and the complexity of the installation. It is recommended to hire a licensed electrician for safe and professional installation.
What Size Wire Do I Need For Four Pin Dryer Outlet?
For a four-pin dryer outlet, you will need a wire size of 10 AWG (American Wire Gauge). It is crucial to use the correct wire gauge to ensure safe and efficient operation of the dryer. Check the manufacturer’s specifications and consult a professional electrician if unsure.
Should I Change Dryer Outlet To 4-Prong?
Yes, you should change your dryer outlet to a 4-prong. This is necessary for increased safety and compliance with current electrical codes. A 4-prong outlet provides a grounded connection, reducing the risk of electrical shocks and ensuring proper functioning of your dryer.
Conclusion
Installing a 4 prong dryer outlet is a straightforward process that will ensure your dryer operates safely and efficiently. By following the steps outlined in this guide, you can easily complete the installation yourself. Remember to always prioritize safety and consult a professional if you are unsure of any electrical work.
With the right tools and proper knowledge, you’ll have your dryer up and running in no time. Happy DIY-ing!