To install a 4 prong dryer cord, follow the specific instructions provided by the manufacturer. Now, let’s explore the steps involved in installing a 4 prong dryer cord.
Updating your dryer’s power cord to a 4 prong version is essential if you’re moving into a new home or as a safety precaution. A 4 prong dryer cord includes four individual wires and a ground wire that connects directly to the dryer’s chassis.
This setup ensures proper grounding, reducing the risk of electrical shock. By following a few simple steps, you can easily install a 4 prong dryer cord and ensure your dryer functions safely and efficiently.
Gather The Necessary Tools And Materials
Before you begin the installation process for your 4 prong dryer cord, it is important to gather all the necessary tools and materials. This will ensure that you have everything you need at hand, making the installation process smooth and efficient. In this section, we will discuss the tools and materials required for the installation.
Check if you have the required tools and materials for the installation process
First and foremost, it is essential to check if you have all the required tools and materials for the installation process. This will save you time and frustration later on. Take a quick inventory of your toolbox and make sure you have the following items:
List of tools and materials needed for the installation process:
Here is a comprehensive list of all the tools and materials you will need for installing a 4 prong dryer cord:
| Tools | Materials |
|---|---|
| Screwdriver | 4 prong dryer cord |
| Wire cutters/strippers | Electrical tape |
| Needle-nose pliers | Wire nuts |
| Socket wrench | Outlet cover plate |
| Level | |
| Measuring tape |
Make sure you have all the tools and materials from the list above before you begin the installation process. This will help you avoid any unnecessary delays or interruptions. It is always better to have everything you need on hand rather than scrambling to find something in the middle of the installation.
Now that you have gathered all the necessary tools and materials, you are ready to move on to the next step of the installation process. In the next section, we will discuss how to prepare for the installation of the 4 prong dryer cord.
Turn Off Power And Disconnect The Dryer
Before you begin installing a 4 prong dryer cord, it is crucial to ensure your safety by turning off the power and disconnecting the dryer from the power outlet. This step will help prevent electrical accidents and guarantee a smooth installation process. Follow these steps to safely turn off the power and disconnect your dryer.
Find the main power supply and turn off the electricity
To begin, locate the main power supply for your dryer. This is usually a circuit breaker or fuse box. Depending on your house’s wiring, this power supply may be inside your laundry room, basement, or utility room. Once you find the power supply, follow these steps to turn off the electricity:
- Open the circuit breaker or fuse box panel.
- Locate the breaker or fuse that controls the dryer’s power.
- Switch off the breaker or remove the fuse to cut off electricity to the dryer.
- Ensure that the breaker is fully flipped to the off position or the fuse is completely removed.
By turning off the electricity at the main power supply, you are eliminating any potential electric shock hazards during the installation process.
Unplug the dryer from the power outlet
After turning off the electricity, it is essential to unplug the dryer from the power outlet to completely disconnect it from the power source. Follow these steps to safely unplug the dryer:
- Locate the power outlet behind or near the dryer.
- Carefully pull the dryer away from the wall to access the power cord and outlet.
- Gently remove the plug from the power outlet.
- Ensure that the power cord is fully disconnected from the outlet and that there is no electrical contact.
By unplugging the dryer, you are eliminating any residual electrical charge and ensuring a safe and secure installation process.
Now that you have turned off the power and properly disconnected the dryer, you are ready to proceed to the next step of installing the 4 prong dryer cord. Stay tuned for our next blog post, where we will guide you through the remaining installation steps.
Remove The Old Cord
Before you can install a 4 prong dryer cord, you’ll need to remove the old cord from your dryer. This is a crucial step to ensure a safe and proper installation. Follow these easy steps to remove the old cord:
Locate the terminal block at the back of the dryer
To start, you need to locate the terminal block at the back of your dryer. This is where the power cord connects to the dryer. It’s usually located near the bottom of the dryer, but the exact placement may vary depending on the make and model of your dryer. Take a closer look and find the terminal block before proceeding to the next step.
Disconnect the old dryer cord from the terminal block
Once you’ve located the terminal block, it’s time to disconnect the old dryer cord. The terminal block will have three or four screws or bolts holding the wires in place. Use a screwdriver or wrench to loosen these screws and remove the old cord from the terminal block. Make sure to keep track of which wire is connected to each terminal.
Properly dispose of the old cord
Now that you’ve successfully detached the old dryer cord from the terminal block, it’s important to dispose of it properly. Simply throwing it away with your regular trash is not recommended, as the cord may contain recyclable materials or potentially harmful substances. To ensure responsible disposal, check with your local recycling center or electronic waste facility for the best disposal options in your area.
By following these steps, you’ll be able to remove the old dryer cord safely and efficiently, making way for the installation of your new 4 prong dryer cord. Remember to take extra caution during this process and always prioritize your safety.
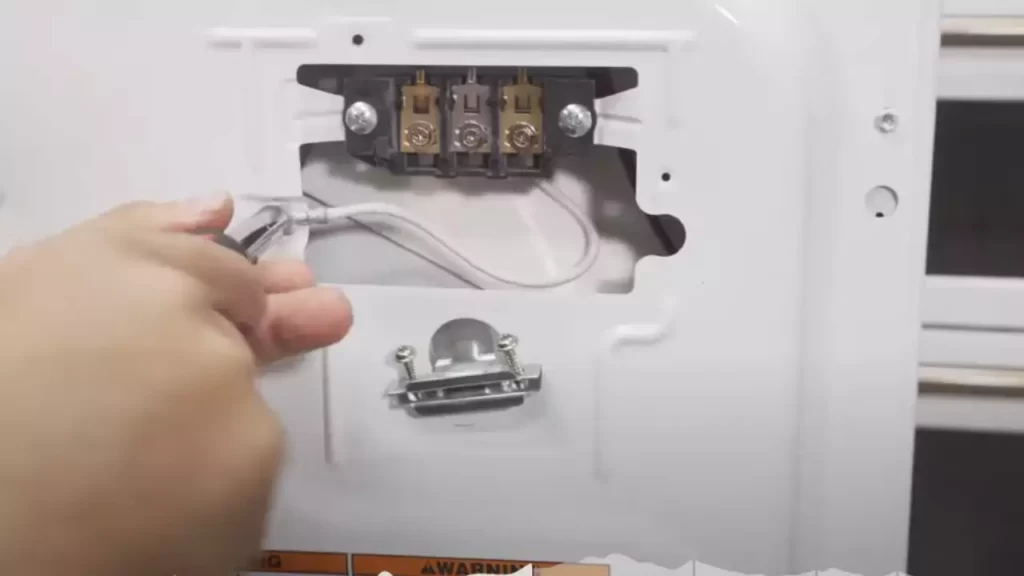
Attach The Strain Relief
Install the strain relief to prevent the power cord from being pulled out
When installing a 4 prong dryer cord, it is crucial to attach the strain relief properly to ensure the power cord stays securely in place. The strain relief serves as a protective device that prevents the cord from being accidentally pulled or tugged, which can lead to electrical hazards or damage to the cord.
The process of attaching the strain relief is simple, but it requires attention to detail. Below, we have provided a step-by-step guide on how to secure the strain relief using the provided screws:
- Start by inserting the power cord through the hole located at the back of the dryer. Make sure you have enough slack to work with, allowing for easy installation.
- Take the strain relief and position it over the hole, aligning the metal tabs with the outer edges of the hole.
- Once in position, hold the strain relief firmly to ensure it doesn’t move while you work on securing it.
- Take one of the provided screws and insert it into one of the holes on the strain relief, ensuring it goes through both the metal tabs and the dryer’s back panel.
- Tighten the screw using a screwdriver until it is snug. Avoid over-tightening, as it may strip the screw or damage the panel.
- Repeat steps 4 and 5 for the remaining screws, making sure to evenly distribute them around the strain relief. This ensures a secure and balanced attachment.
Once you have securely attached the strain relief using the provided screws, you can now have peace of mind knowing that your power cord is properly protected against accidental disconnections. This step is essential to maintain the safety and functionality of your dryer.
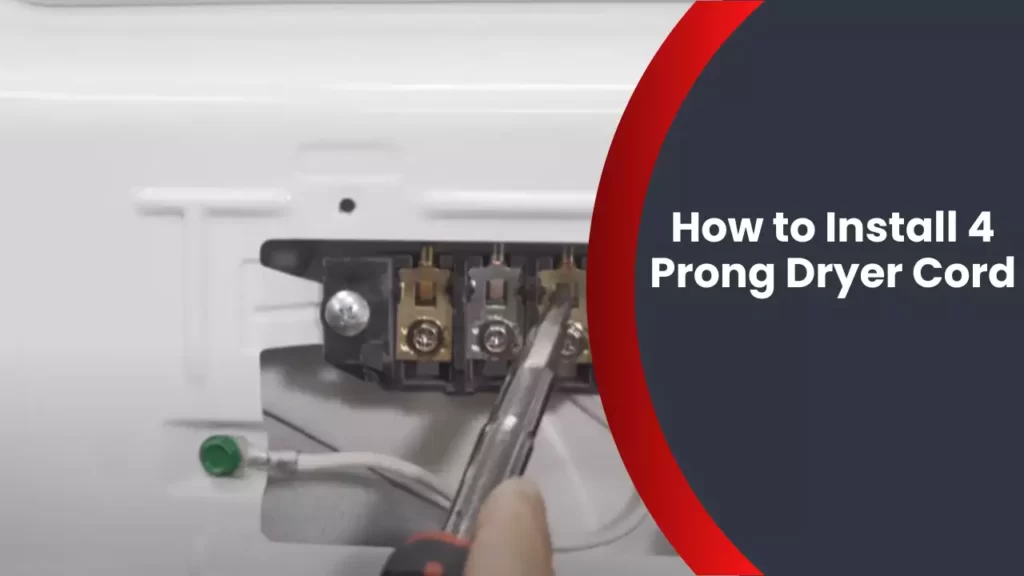
Connect The Wires To The Terminal Block
Once you have identified the different wire colors and their corresponding terminal connections, it’s time to connect the wires to the respective terminals on the terminal block. This is a crucial step in installing a 4 prong dryer cord, as it ensures that the electrical connections are secure and properly established. Follow the steps below to complete this process:
Identify the different wire colors and their corresponding terminal connections
Before connecting the wires to the terminal block, it’s important to understand the different wire colors and their corresponding terminal connections. This will help you ensure that you connect the wires correctly and prevent any electrical mishaps. Here’s a quick guide:
| Wire Color | Terminal Connection |
|---|---|
| Green or Bare Copper | Ground Terminal |
| White or Gray | Neutral Terminal |
| Red or Black | Hot Terminal |
Connect the wires to the respective terminals on the terminal block
Once you have identified the wire colors and their corresponding terminal connections, it’s time to connect the wires to the respective terminals on the terminal block. Follow these steps:
- Strip the insulation off the end of each wire, exposing about half an inch of bare wire.
- Insert the stripped end of the green or bare copper wire into the ground terminal on the terminal block and tighten the screw securely.
- Insert the stripped end of the white or gray wire into the neutral terminal on the terminal block and tighten the screw securely.
- Insert the stripped end of the red or black wire into one of the hot terminals on the terminal block and tighten the screw securely.
- Repeat step 4 for the other red or black wire.
Ensure that each wire is securely fastened to their respective terminals. A loose connection can lead to electrical issues and potential hazards. Take a moment to double-check that all the wires are properly connected and tightened before proceeding to the next step.
Tighten the terminal screws to ensure a secure connection
Once all the wires are connected to their respective terminals, it’s important to tighten the terminal screws to ensure a secure connection. Use a screwdriver or an appropriate tool to tighten the screws on the terminal block. This will prevent any loose connections and reduce the risk of electrical problems in the future.
By properly connecting the wires to the terminal block and ensuring a secure connection, you have successfully installed the 4 prong dryer cord. With the electrical connections established, you can now safely proceed with the final steps of setting up your dryer.
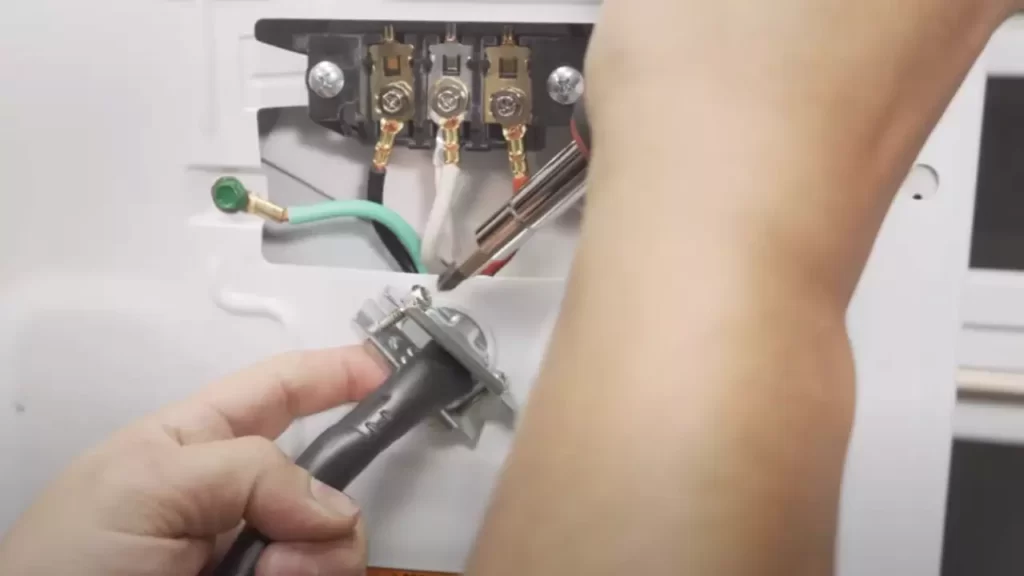
Attach The Grounding Wire
When it comes to installing a 4 prong dryer cord, one crucial step is attaching the grounding wire. This is an essential safety measure that ensures proper electrical grounding and protects you and your appliances from potential hazards. In this guide, we will walk you through the process of attaching the grounding wire to your dryer following the correct methods and safety guidelines.
Locate the grounding screw or wire on the dryer
To begin, you should first locate the grounding screw or wire on your dryer. This grounding point is usually located near the terminal block or on the metal chassis of the dryer. Refer to your dryer’s manual or manufacturer’s instructions to precisely identify the grounding point. Once you have found it, you are ready to move on to the next step.
Connect the grounding wire to the screw or wire
With the grounding point identified, it’s time to connect the grounding wire. The grounding wire typically comes with the 4 prong dryer cord and will have a green or bare copper insulation. Ensure that the wire is in good condition without any cuts or fraying before proceeding.
To connect the grounding wire, you will need a suitable screwdriver or pliers to secure the wire to the grounding point. Carefully wrap the grounding wire around the grounding screw or attach it securely to the grounding wire using a wire nut or other approved electrical connectors. Make sure to create a tight, secure connection to ensure proper grounding.
Securely tighten the grounding connection
After attaching the grounding wire, it is crucial to securely tighten the grounding connection. Use a screwdriver or pliers to tighten the grounding screw, ensuring that it is firmly held in place. This will prevent any loose connections that can disrupt the electrical grounding and compromise the safety of your dryer.
Remember, when working with electrical connections, safety should always be your top priority. Before starting the installation process, make sure to disconnect the power to your dryer by unplugging it or turning off the circuit breaker. Only proceed with the installation when you are confident in your understanding of the process and have taken necessary precautions to ensure your safety.
In conclusion, attaching the grounding wire is a critical step when installing a 4 prong dryer cord. By following the correct methods and safety guidelines, you can ensure proper grounding and enhance the safety of your dryer and electrical system.
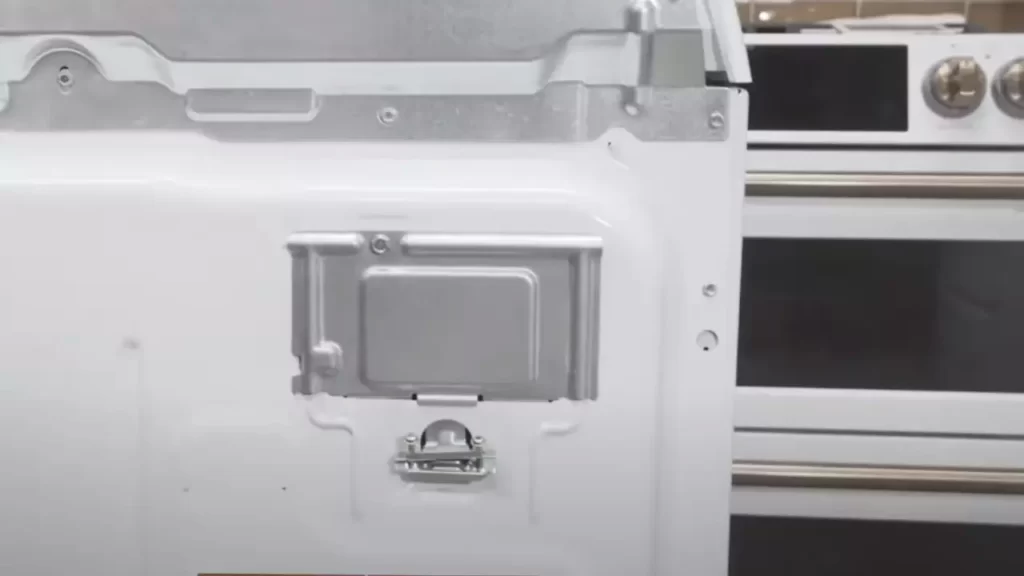
Reattach The Dryer Cover Or Access Panel
Place the dryer cover or access panel back in place
Now that you have successfully installed the 4 prong dryer cord and connected it to your dryer, the next step is to reattach the dryer cover or access panel. This step is important as it not only protects the internal components of the dryer but also gives it a finished and clean look.
Align the screw holes and secure the cover using the provided screws
To reattach the dryer cover or access panel, start by aligning the screw holes on the cover with the corresponding holes on the dryer. This ensures a proper fit and prevents any gaps or loose connections. You may need to hold the cover or panel in place while aligning the holes.
Once the holes are aligned, take the provided screws and insert them into the holes. Use a screwdriver or a drill, if necessary, to tighten the screws securely. Make sure to tighten each screw evenly to ensure a secure and balanced attachment.
It’s important to note that different dryers may have variations in their cover or panel attachment methods. Some dryers may require additional steps or have different types of fasteners. Therefore, it’s always recommended to refer to the manufacturer’s instructions specific to your dryer model.
By reattaching the dryer cover or access panel properly, you can ensure that your dryer operates safely and efficiently. It also helps in preventing any dust or debris from entering the dryer and affecting its performance.
Plug The Dryer Back In And Test The Connection
After successfully installing the 4 prong dryer cord and ensuring everything is properly connected, it’s time to plug the dryer back into the power outlet and perform a final test to ensure the connection is secure and the dryer is functioning as expected. This step is crucial in finalizing the installation process and ensuring that your dryer is ready for use.
Plug the dryer back into the power outlet
Begin by taking the 4 prong dryer cord and carefully inserting the plug into the corresponding power outlet on the back of the dryer. Ensure that the plug fits securely and snugly into the outlet. Take note of any resistance or difficulty during the insertion process, as this could indicate an issue with the connection.
Turn on the electricity and ensure that the dryer is functioning properly
Once the dryer is plugged back in, it’s time to turn on the electricity and test the connection. Locate the circuit breaker or fuse box and switch on the corresponding breaker for the dryer. This will restore power to the appliance. Keep in mind that it’s important to have a properly functioning circuit breaker specifically designed for a dryer with a 4 prong cord.
Once the electricity is restored, head over to the control panel on the dryer and select a suitable drying cycle. It’s recommended to start with a short cycle to ensure that everything is working correctly. Press the start button and listen for the familiar hum of the dryer indicating that it is functioning properly. If you notice any unusual sounds or the dryer does not start, immediately switch off the power and reassess the connection.
While the dryer is running, pay attention to the heating element. Ensure that it is producing the desired amount of heat necessary for effective drying. Monitor the temperature and take note if the dryer is heating excessively or not enough. Proper heating is essential for efficient drying and preventing damage to your clothes.
Additionally, check the airflow. Stand near the exhaust vent and feel for a steady flow of air. Proper ventilation is crucial for the drying process and helps prevent overheating. Insufficient airflow may be indicative of a blockage or a problem with the installation, which should be addressed before continued use of the dryer.
Finally, monitor the dryer for any signs of electrical issues, such as flickering lights or tripped circuit breakers. These can be indicators of a faulty connection or an overloaded circuit. If you notice any of these signs, it’s recommended to consult a professional electrician to ensure the safety and proper functioning of your dryer.
By following these steps and thoroughly testing the connection, you can rest assured that your newly installed 4 prong dryer cord is secure and functioning effectively. Regularly inspect the connection and perform maintenance checks to ensure continued safe and efficient operation of your dryer.
Safety Precautions
Installing a 4-prong dryer cord can be a straightforward process, but it’s essential to prioritize safety at all times. Working with electricity can be dangerous if not approached with caution. To ensure a safe installation, there are a few key safety precautions you should keep in mind. In this section, we will provide you with some valuable tips and important reminders to guarantee your safety during the installation process.
Tips on ensuring safety during the installation process
When it comes to working with electricity, safety should always be your top priority. Follow these valuable tips to prevent accidents and ensure a successful installation:
- Before you begin, make sure to unplug the dryer from the power source. This will eliminate the risk of electric shock.
- Always wear protective gear such as gloves, goggles, and non-conductive footwear when dealing with electrical connections.
- Ensure that the circuit breaker for the dryer is switched off to cut off the power supply effectively. Test the circuit with a voltage tester to confirm that no electricity is flowing.
- Read the manufacturer’s installation instructions carefully to understand the specific requirements for your dryer model. Each dryer may have slightly different wiring configurations.
- Use only high-quality cords and connectors that are specifically designed for your dryer. These components are engineered to handle the electrical load and minimize the risk of fire hazards.
- If you’re unsure or uncomfortable with the installation process, seek the help of a professional electrician. It’s better to be safe than sorry.
Important safety reminders to follow when working with electricity
Working with electricity demands extra caution to minimize the risk of accidents and potential harm. Keep these important safety reminders in mind while installing a 4-prong dryer cord:
- Always assume that wires are live unless verified otherwise. Treat all electrical connections with utmost care and respect.
- Avoid working on electrical installations in wet or damp conditions. Moisture increases the risk of electric shock and can damage the wiring components.
- Ensure that the power cord is not tangled or in contact with hot surfaces. Excessive heat can cause the insulation to melt and create a fire hazard.
- Double-check your work before turning the power back on. Verify that all wires are securely connected and there are no loose ends.
- Regularly inspect the dryer cord for any signs of wear or damage. Replace the cord immediately if you notice any cracks, frays, or exposed wires.
Remember, safety should always be your priority when working with electricity. By following these tips and reminders, you can complete the installation process with confidence and peace of mind. Don’t take shortcuts or compromise on safety measures – it’s worth the extra effort to safeguard yourself and your home.
Frequently Asked Questions
How Do You Hook Up A 4 Prong Dryer Cord?
To hook up a 4-prong dryer cord, follow these steps: 1. Make sure the dryer is unplugged. 2. Remove the old cord by unscrewing the terminal block screws. 3. Connect the 4 prong dryer cord wires to the corresponding terminals.
4. Tighten the screws to secure the wires. 5. Plug in the dryer and test it to ensure it’s working properly.
Can You Plug A 4 Prong Dryer Into A 3 Prong Outlet?
Yes, you can plug a 4 prong dryer into a 3 prong outlet with an adapter. However, it’s important to note that this is not recommended as it may not meet current electrical safety codes. It’s best to consult a licensed electrician to ensure proper installation and safety precautions are taken.
What Is The Color Code For The 4 Prong Dryer Cord?
The color code for a 4 prong dryer cord can vary depending on the manufacturer. However, the most common color code is: green wire for ground, black wire for hot, red wire for hot, and white wire for neutral. Always refer to the manufacturer’s instructions for your specific model to ensure proper installation.
What Wire Do I Need For A 4 Prong Dryer Outlet?
The wire you need for a 4 prong dryer outlet is a 10-gauge copper wire. This wire is commonly used for residential dryer connections as it can handle the higher voltage and current required. Make sure to consult a professional electrician to ensure proper installation.
Conclusion
By following the simple steps outlined in this guide, you can easily install a 4 prong dryer cord. Remember to always prioritize safety by turning off the power before starting any electrical work. Take your time and carefully connect the wires to ensure a secure and reliable connection.
With this knowledge, you’ll be able to confidently install your new dryer cord and enjoy the convenience it brings to your home. Get started today and put these DIY skills to good use!