To install a 240V outlet for a Tesla, follow these steps: hire a qualified electrician to assess panel capacity, select a suitable circuit breaker, install the outlet near the charging location, and connect the wiring securely. Introducing an electric vehicle into your life can be an exciting and sustainable choice.
One of the key considerations for electric car owners is installing a 240V outlet, which provides a faster and more efficient charging option for vehicles like Teslas. We will guide you through the process of installing a 240V outlet for your Tesla, allowing you to fully enjoy the benefits of electric transportation.
By following these steps, you can ensure a safe and reliable charging setup that meets your needs. Let’s get started!
Understanding The Importance Of A 240V Outlet For Tesla
When it comes to charging your Tesla vehicle, having the right outlet is crucial. While a standard 120V outlet might be suitable for some electric cars, a Tesla requires a 240V outlet for optimal charging performance. Understanding the importance of a 240V outlet for your Tesla is essential to ensure efficient charging and maximize convenience. In this article, we will explore the benefits of using a 240V outlet, why a standard 120V outlet may not be sufficient, and how a 240V outlet can help reduce charging time and enhance the overall charging experience.
Exploring the Benefits of Using a 240V Outlet for Your Tesla Vehicle
Using a 240V outlet for charging your Tesla vehicle offers several advantages over a standard 120V outlet. These benefits include:
- Faster Charging: With a 240V outlet, your Tesla can charge at a much faster rate compared to a standard 120V outlet. This means you can spend less time waiting for your vehicle to charge and more time on the road.
- Extended Range: The faster charging speed provided by a 240V outlet allows you to maximize the range of your Tesla. With a fully charged battery, you can enjoy longer trips without worrying about running out of power.
- Convenience: A 240V outlet enables you to charge your Tesla at home overnight or during the day, depending on your preference. This eliminates the need to rely solely on public charging stations, providing you with added convenience and flexibility.
- Versatility: In addition to charging your Tesla, a 240V outlet can also power other high-energy-consuming devices in your home, such as electric dryers or ovens, making it a multi-purpose outlet for your household.
Why a Standard 120V Outlet May Not Be Sufficient for Charging Your Tesla Efficiently
While a standard 120V outlet can technically charge your Tesla, it may not be the most efficient option. Here’s why:
- Slower Charging: A standard 120V outlet provides lower voltage and current compared to a 240V outlet. This results in slower charging times, which can be inconvenient when you need to quickly top up your Tesla’s battery.
- Limited Range: The slower charging speed of a standard outlet can limit the range of your Tesla. You may find yourself needing to charge more frequently, especially during long trips or when your battery is running low.
- Time Constraints: Charging your Tesla with a standard 120V outlet can be time-consuming. Depending on the battery capacity and the level of charge, it may take several hours or even overnight to reach a full charge.
How a 240V Outlet Can Help Reduce Charging Time and Maximize Convenience
Upgrading to a 240V outlet for your Tesla can significantly improve your charging experience. Here’s how:
- Reduced Charging Time: The higher voltage and current provided by a 240V outlet allow your Tesla to charge at a faster rate. You can significantly reduce the time spent waiting for your vehicle to charge, making it more convenient for your day-to-day routines.
- Flexibility: With a 240V outlet at home, you have the flexibility to charge your Tesla whenever it’s convenient for you. Whether it’s overnight or throughout the day, you can easily maintain your vehicle’s battery level without relying on public charging stations.
- Optimal Performance: A 240V outlet ensures that your Tesla is receiving the necessary power for efficient charging. This promotes battery longevity and overall performance, helping you get the most out of your electric vehicle.
Assessing Your Electrical Setup
Evaluating your current electrical system to determine if it can support a 240V outlet
Assessing your electrical setup is a crucial first step before installing a 240V outlet for your Tesla. This process involves evaluating your current electrical system to ensure it can handle the additional load and meet the necessary requirements. Here are some key aspects to consider during your assessment:
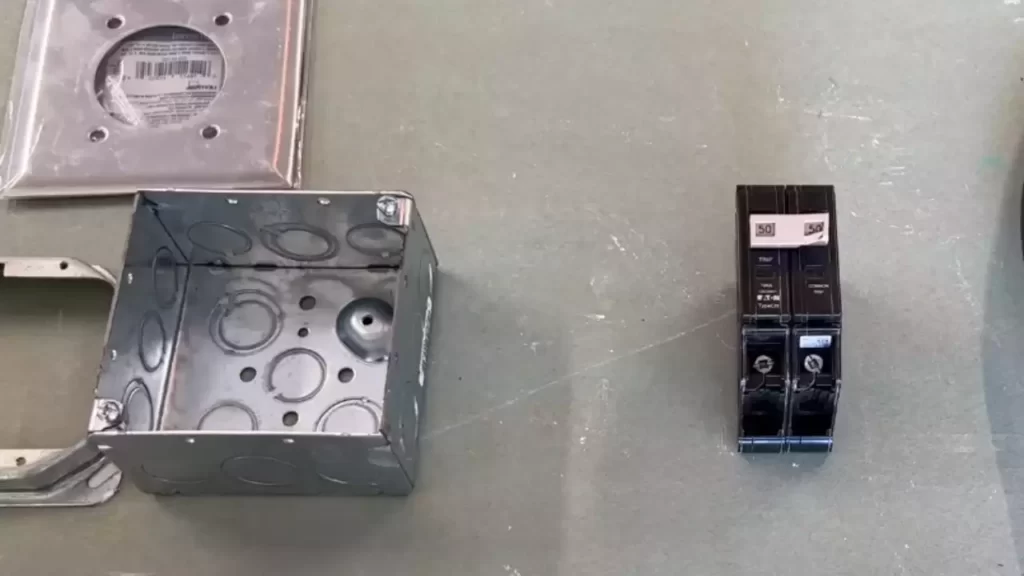
- Check the main service panel capacity: Ensure that your main service panel has an adequate capacity to support the installation of a 240V outlet. This can be determined by examining the current load and available amperage.
- Inspect the existing wiring: Assess the condition of the existing wiring in your home. Make sure it is in good shape and meets the necessary standards. If the wiring is old or faulty, it may need to be upgraded before installing the 240V outlet.
- Consider available space: Determine if you have enough space in your electrical panel to accommodate an additional circuit breaker for the 240V outlet. This is important as it ensures safe and proper installation.
- Consult an electrician: If you’re unsure about any aspect of your electrical setup or lack the expertise, it’s wise to consult a professional electrician. They can assess your system, identify any potential issues, and provide guidance on the installation process.
Understanding the electrical requirements for installing a 240V outlet for your Tesla
Understanding the electrical requirements for your Tesla is essential to ensure a successful installation of a 240V outlet. The following are key points to consider:
- Refer to the Tesla owner’s manual: Review the owner’s manual or specifications provided by Tesla to gather information about the electrical requirements. It will outline the voltage and amperage needed for charging your vehicle.
- Confirm the NEMA configuration: Determine the specific NEMA configuration required for your Tesla model. This will help you select the appropriate outlet type and ensure compatibility.
- Select the suitable wire gauge: Based on the amperage requirement of your Tesla, choose the appropriate wire gauge. This will ensure the safe and efficient transmission of electricity to your vehicle.
Determining the necessary amperage and circuit breaker size for your specific Tesla model
To determine the necessary amperage and circuit breaker size for your Tesla model, follow these steps:
- Identify the maximum charging rate: Check the specifications provided by Tesla to determine the maximum charging rate supported by your vehicle. This will help in determining the amperage required for the 240V outlet.
- Calculate the amperage and circuit breaker size: Divide the maximum charging rate by the voltage (240V) to calculate the required amperage. Remember to account for any additional charging equipment or accessories. Consult an electrician if you are unsure about performing this calculation.
- Choose the appropriate circuit breaker: Select a circuit breaker size that matches or exceeds the calculated amperage. This will help protect your electrical system and prevent overload.
By assessing your electrical setup, understanding the electrical requirements, and determining the necessary amperage and circuit breaker size for your Tesla model, you can ensure a safe and reliable installation of a 240V outlet. Remember, it’s always recommended to consult an electrician to ensure compliance with local electrical codes and regulations.

Gathering The Required Tools And Materials
Before embarking on the installation process of a 240V outlet for your Tesla, it is crucial to gather all the necessary tools and materials. By having everything prepared in advance, you can ensure a smooth and hassle-free installation experience. Let’s take a look at what you will need:
Creating a checklist of tools and materials needed for the installation process
When it comes to installing a 240V outlet for your Tesla, having the right tools is essential. To make things easier, here is a checklist of tools you should have:
- Wire strippers
- Screwdriver (flathead and Phillips)
- Needle-nose pliers
- Wire cutters
- Drill
- Electrical tape
- Voltage tester
- Socket set
- Measuring tape
- Level
Making sure you have all these tools readily available will save you time and frustration during the installation process.
Exploring the different types of outlets and connectors available for Tesla charging
When it comes to charging your Tesla, it’s important to choose the right outlet and connector for your needs. Tesla offers a few options to consider:
- The NEMA 14-50 outlet: This is the most common outlet for Tesla charging and provides a powerful 240V charging solution.
- The Tesla Wall Connector: This is a dedicated charging solution provided by Tesla and is capable of delivering faster charging speeds than standard outlets.
- The Mobile Connector: This is the charging accessory that comes with your Tesla and allows you to plug into different types of outlets using various adapters.
Exploring these options will help you choose the right outlet and connector for your specific charging requirements.
Tips for purchasing quality electrical components and ensuring compatibility with your Tesla
When purchasing electrical components for your Tesla charging setup, it’s important to prioritize quality and compatibility. Here are a few tips to keep in mind:
- Choose reputable brands: Opt for trusted manufacturers when purchasing electrical components to ensure reliability and safety.
- Research compatibility: Make sure the outlet, connector, and other electrical components you choose are compatible with your Tesla model. Refer to Tesla’s official documentation or consult with a certified electrician if needed.
- Consider future-proofing: If you plan to upgrade your Tesla model or add more charging capacity in the future, consider installing a higher-amperage outlet and connector to accommodate your future needs.
- Consult a professional: If you are unsure about the compatibility or installation process, it’s always recommended to consult a certified electrician who is familiar with Tesla charging setups.
Following these tips will help you make the right choices when purchasing electrical components and ensure a seamless integration with your Tesla.
Planning The Installation Process
Planning the installation process for a 240V outlet in your home or garage is a crucial step in ensuring a smooth and efficient installation for your Tesla electric vehicle. Proper planning will help you choose the ideal location for the outlet, determine the best route for running the electrical wiring, and ensure compliance with local building codes and safety regulations.
1. Choosing the ideal location for installing the 240V outlet in your home or garage:
When selecting the location for your 240V outlet, there are several factors to consider. You want to choose a spot that is convenient for charging your Tesla and accessible to your vehicle. Generally, the location should be close to where you park your car, preferably within a reasonable distance to minimize the length of the charging cable required.
Additionally, consider the proximity of the electrical panel to the installation area. The outlet should be located near the electrical panel to minimize the distance and cost of running electrical wiring.
Furthermore, consider the available space and potential obstacles. Ensure that the chosen location does not hinder the movement of your vehicle and allows for proper ventilation to dissipate heat generated during charging.
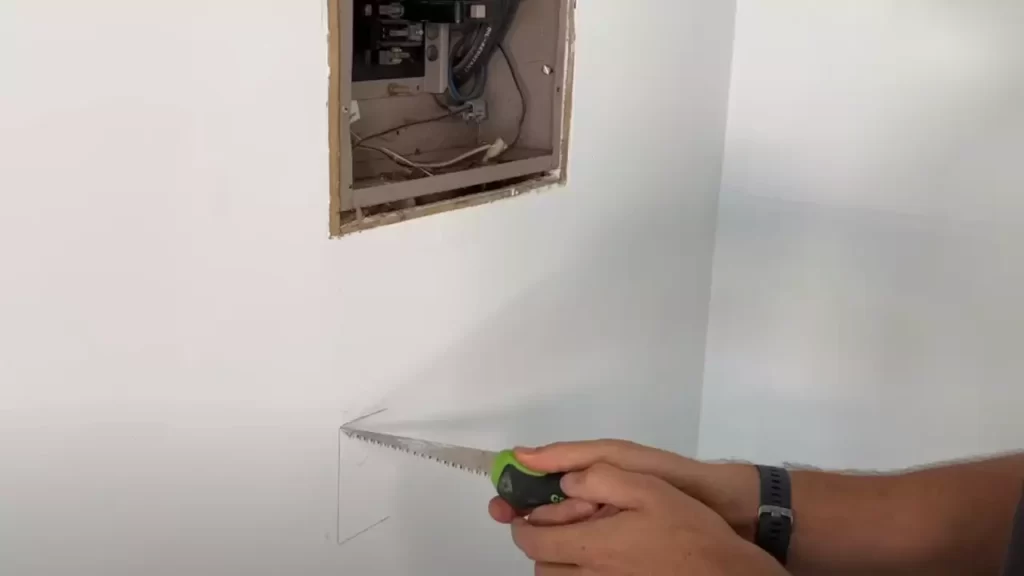
2. Determining the best route for running the electrical wiring to the installation area:
Once you have chosen the ideal location for the 240V outlet, the next step is to determine the best route for running the electrical wiring. This requires careful planning to ensure a neat and safe installation.
Start by assessing the existing electrical infrastructure in your home or garage. Identify the most direct and efficient path from the electrical panel to the installation area. In some cases, you may need to route the wiring through walls or conduit to ensure a clean and professional-looking installation.
Keep in mind that the electrical wiring must be protected and not exposed to potential damage or hazards. If you are unsure about the best route or if you have limited electrical knowledge, it is recommended to consult with a licensed electrician for guidance and assistance.
3. Ensuring compliance with local building codes and safety regulations:
Before proceeding with the installation, it is crucial to ensure compliance with local building codes and safety regulations. These regulations are put in place to ensure the safety of both the occupants of the building and the electrical system itself.
Take the time to research and understand the specific requirements in your area. These may include specifications regarding the size and type of wiring, the proper grounding of the system, and the installation of appropriate circuit breakers or fuses.
To ensure compliance with these regulations, it is highly recommended to engage the services of a licensed electrician. They possess the necessary expertise and knowledge and will ensure that the installation is up to code and in compliance with all safety regulations.
By carefully planning the installation process for your 240V outlet, you can ensure a seamless and efficient charging experience for your Tesla. Choosing the ideal location, determining the best route for running the electrical wiring, and complying with local building codes and safety regulations will not only provide convenience but also peace of mind.
Performing The Electrical Wiring
Performing the Electrical Wiring
When installing a 240V outlet for your Tesla, proper electrical wiring is essential to ensure safe and efficient charging. This step-by-step guide will walk you through the process of wiring the outlet, grounding the electrical system, and securing the wiring for a clean and professional installation.
Step-by-step instructions for safely wiring the 240V outlet for Tesla charging
To wire the 240V outlet for your Tesla, follow these step-by-step instructions:
1. Determine the location: Choose a suitable location for your 240V outlet, keeping in mind factors such as proximity to the electrical panel and convenient access for charging your Tesla.
2. Turn off the power: Before beginning any electrical work, turn off the power to the designated circuit at the electrical panel. This will ensure your safety during the installation process.
3. Run the electrical wire: Depending on the location of the outlet, you may need to run electrical wire through walls or conduit. Be sure to use the appropriate wire size and type for the amperage required by your Tesla’s charging equipment.
4. Connect the wires: Strip the insulation from the ends of the wires and connect them to the appropriate terminals of the 240V outlet. It’s crucial to follow the wiring diagram provided by the outlet manufacturer and secure the connections tightly to prevent any loose connections that may lead to electrical hazards.
Properly grounding the electrical system to ensure safety and prevent electrical hazards
Proper grounding is crucial to ensure the safety of your electrical system. When installing a 240V outlet for your Tesla, follow these guidelines for proper grounding:
1. Install a grounding rod: Drive a grounding rod into the ground near your electrical panel. This rod should be connected to the grounding bus bar in the panel, providing a path for electrical surges and preventing hazards such as electrical shock.
2. Connect the grounding wire: Connect a grounding wire from the 240V outlet to the grounding bus bar in the electrical panel. Ensure this connection is secure and proper electrical codes and regulations are adhered to.
Tips for securing and organizing the electrical wiring to maintain a clean and professional installation
To ensure a neat and professional installation of your 240V outlet for Tesla charging, consider the following tips for securing and organizing the electrical wiring:
1. Use cable clips or straps: Secure the electrical wire to walls or other surfaces using cable clips or straps. This will prevent the wire from dangling or becoming a tripping hazard.
2. Label the wires: Use labeled wire markers or masking tape to label each wire at both ends. This will make future maintenance or troubleshooting easier, ensuring you can identify the correct wires quickly and efficiently.
3. Organize the wiring: Bundle the wires together using zip ties or electrical tape to create a neat and organized appearance. Avoid excessive bending or twisting of the wire to prevent damage to the insulation.
With these step-by-step instructions for wiring your 240V outlet, proper grounding techniques, and tips for securing and organizing the electrical wiring, you can confidently install a clean and professional charging solution for your Tesla. Remember to always consult local electrical codes and regulations and, if needed, seek the assistance of a qualified electrician to ensure a safe and reliable installation. Now, you’re one step closer to enjoying eco-friendly, efficient charging for your Tesla!
Installing The Outlet And Connector
Mounting the 240V Outlet to the Designated Location and Connecting it to the Electrical Wiring
Mounting the 240V outlet is the first step towards installing a charging solution for your Tesla. It allows you to provide the necessary power for efficient charging. Before you start, make sure to identify the ideal location for the outlet.
Ensure that the location you choose is easily accessible and in close proximity to your Tesla’s parking spot. It should also meet the electrical code requirements.
Once you have determined the location, you can begin the installation process:
- Turn off the electricity supply to the designated area at the main electrical panel. This step is crucial to prevent any accidents or electrical hazards during the installation process. Safety should always be a priority.
- Carefully mount the 240V outlet to the chosen location, following the manufacturer’s instructions. Make sure to securely attach the outlet to the wall or mounting box, ensuring proper stability.
- Once the outlet is mounted, it’s time to connect it to the electrical wiring. Remove the outlet cover and expose the wiring connections.
- Identify the hot, neutral, and ground wires within the electrical box.
- Attach the respective wires to their corresponding terminals on the outlet. The hot wire typically connects to the brass terminal, the neutral wire connects to the silver terminal, and the ground wire connects to the green terminal.
- Tighten the terminal screws securely using a screwdriver to ensure a reliable and safe connection.
- Replace the outlet cover and ensure it is properly secured.
With the outlet mounted and connected, you are now one step closer to enjoying hassle-free charging for your Tesla.
Installing the Tesla-specific Connector or Adapter for Seamless Charging Compatibility
Now that you have installed the 240V outlet, the next crucial step is to install a Tesla-specific connector or adapter. This ensures seamless compatibility with your Tesla’s charging port. The Tesla connector allows for faster charging speeds and convenient usage.
Keep in mind that Tesla provides various connector options for charging, depending on your vehicle model. Check your Tesla’s user manual or contact Tesla support to identify the compatible connector for your specific model.
Once you have acquired the appropriate connector, follow these steps to install it:
- Ensure the power supply to the designated area is turned off to prevent any electrical accidents.
- Carefully insert the Tesla-specific connector or adapter into the 240V outlet.
- Make sure the connection is secure and properly aligned with the outlet. Check for any loose or faulty connections, as these can hinder the charging process and pose safety risks.
- Activate the locking mechanism on the connector to ensure it stays securely in place during charging.
By installing a Tesla-specific connector or adapter, you ensure a seamless charging experience for your Tesla, optimizing both convenience and efficiency.
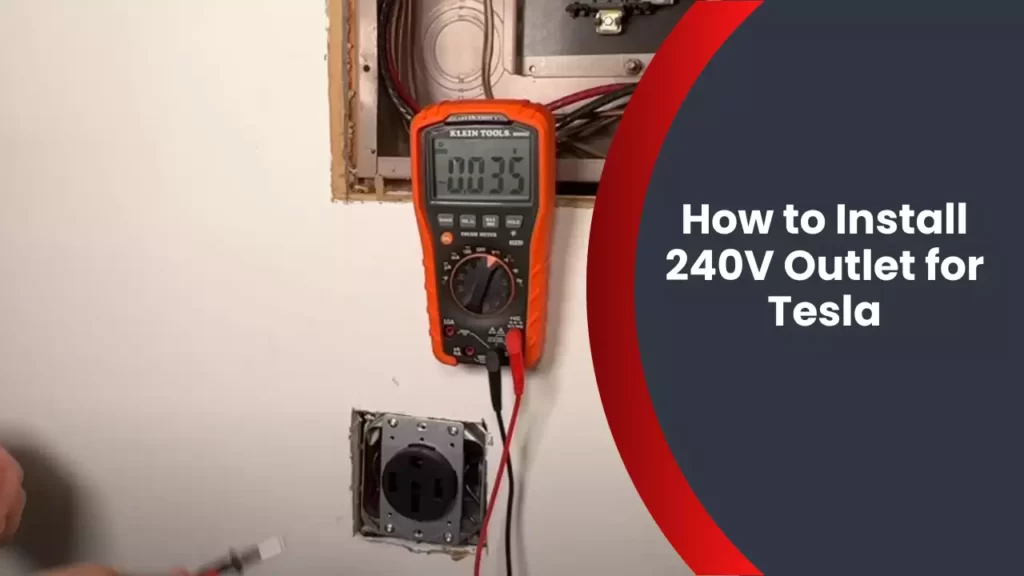
Testing the Outlet and Connector to Ensure Proper Functionality and Safety
After completing the installation process, it is essential to test the outlet and connector to ensure their proper functionality and safety. This testing phase helps identify any potential issues or faults before you start charging your Tesla.
To test the outlet and connector, follow these steps:
- Ensure the power supply to the designated area is turned off before proceeding.
- Perform a visual inspection of the outlet and connector, checking for any signs of damage, loose connections, or burn marks.
- Carefully examine the electrical wiring connections to verify they are secure and properly attached.
- Turn on the electricity supply to the designated area at the main electrical panel.
- Plug the Tesla charging cable into the installed connector.
- Verify that the Tesla charger displays the appropriate charging status, indicating a successful connection.
- Monitor the charging process for a brief period to ensure it functions properly without any abnormalities or issues.
If any problems or irregularities occur during the testing phase, it is highly recommended to consult a certified electrician to address the issues and ensure the safety of your Tesla charging setup.
Safety Precautions And Best Practices
Important safety considerations to follow when working with electrical systems
When it comes to installing a 240V outlet for your Tesla, one of the most crucial aspects to keep in mind is safety. Working with electrical systems can be hazardous if not handled properly. To ensure the safety of yourself and your property, follow these important safety considerations:
- Turn off the power: Before starting any electrical work, ensure that the power to the area where you will be working is turned off. This can be done by switching off the circuit breaker or removing the relevant fuse. It is vital to take this step to avoid any accidental electric shocks.
- Wear protective gear: When working with electrical systems, always wear appropriate protective gear. This includes safety glasses, gloves, and non-conductive footwear. These measures help protect you from potential electrocution and any flying debris that may occur during the installation process.
- Use the right tools: Ensure that you have the correct tools for the job and that they are in good working condition. Using faulty or inadequate tools can increase the risk of accidents. Insulated tools specifically designed for electrical work are highly recommended.
- Secure permits and follow codes: Electrical work typically requires permits, especially for major installations like a 240V outlet. Check your local building codes and regulations to make sure you are in compliance. Following these codes ensures the safety of your electrical system and protects against potential hazards such as overloading circuits.
- Keep water away: Water and electricity do not mix, and it’s crucial to keep water away from the installation area. This means avoiding working on electrical systems in wet or damp conditions, and ensuring your hands are dry before handling electrical components. Water can significantly increase the risk of electrocution or electrical fires.
Fire prevention measures and guidelines for avoiding electrical hazards during the installation
When dealing with electrical systems, fire prevention is paramount. Follow these guidelines to avoid electrical hazards and prevent fires during the installation process:
- Inspect the wiring: Before proceeding with the installation, carefully inspect all wiring connections. Check for any signs of wear, fraying, or damage. Faulty wiring can lead to electrical malfunctions and potential fires.
- Properly handle circuits and breakers: Take care when handling circuits and breakers. Overloading circuits or using incorrect breakers can lead to overheating and subsequent fires. Make sure you understand the electrical requirements of your Tesla and ensure that the circuit and breaker ratings are appropriate.
- Secure wiring and cables: Properly secure all wiring and cables to avoid any potential hazards. Loose or hanging wires can come into contact with flammable materials and cause fires. Using conduit and cable supports can help keep everything organized and safe.
- Install smoke detectors: It is always a good idea to have smoke detectors installed near your electrical systems. These detectors serve as early warning systems and can quickly alert you to any potential fires. Ensure that they are in proper working condition and test them regularly.
- Know the emergency procedures: In the event of a fire, it is crucial to have a clear understanding of the emergency procedures. Make sure you have a fire extinguisher on hand and know how to use it. Also, have a well-planned evacuation route to ensure the safety of yourself and others in your household.
Tips for engaging the services of a professional electrician if you are unsure or uncomfortable with DIY installation
If you lack experience or feel uncomfortable with DIY electrical work, it is always advisable to hire a professional electrician. Here are some tips for engaging their services:
- Research and choose a licensed electrician: Look for electricians who are licensed and experienced in handling electrical installations. Conduct thorough research, read reviews, and ask for recommendations to find a reputable electrician in your area.
- Ask for insurance and permits: Before hiring an electrician, ensure they have liability insurance and the necessary permits. This protects you from any potential damages or accidents that may occur during the installation process.
- Get multiple quotes: Obtain quotes from different electricians and compare their prices. Be cautious of significantly low prices as it may indicate lower quality of work. Strive to find a balance between affordability and quality.
- Check for warranties and guarantees: Inquire about any warranties or guarantees that the electrician provides for their work. A professional electrician who is confident in their craftsmanship will often offer warranties to provide you with peace of mind.
- Communicate your requirements clearly: Clearly communicate your installation requirements and expectations to the electrician. This ensures that both parties are on the same page and helps avoid any misunderstandings or mistakes during the installation process.
Remember, the safety of your electrical system and yourself should always be the top priority. By following safety precautions and best practices, you can ensure a smooth and secure installation process for your 240V outlet for your Tesla.
Troubleshooting And Maintenance
Common issues that may arise during or after the installation process and how to address them
While installing a 240V outlet for your Tesla can offer convenience and faster charging, there might be certain issues that can arise during or after the installation process. It’s important to be aware of these common problems and know how to address them promptly to ensure a seamless charging experience.
- Tripped circuit breaker: One common issue you may encounter after installing a 240V outlet is a tripped circuit breaker. This can happen if there is an overload or a short circuit. To resolve this, first, turn off the charging equipment and unplug your Tesla from the outlet. Then, locate your home’s circuit breaker panel and check if any breakers have tripped. If so, reset the tripped breaker by flipping it off and then back on. Once the breaker is back in the “on” position, you can plug in your Tesla and resume charging.
- Faulty electrical connections: Another potential issue is faulty electrical connections, which can lead to charging disruptions or even damage to your electrical system. It’s crucial to ensure all electrical connections are secure and properly tightened during the installation process. If you suspect a faulty connection, turn off the charging equipment and unplug your Tesla. Carefully inspect the connections, looking for any loose wires or signs of damage. If you find any issues, consult a qualified electrician to rectify the problem.
- Inadequate power supply: Some homeowners may encounter problems with an inadequate power supply, especially if their electrical system is not equipped to handle the demands of a 240V outlet. Signs of an inadequate power supply may include frequent circuit breaker trips or slow charging speeds. In such cases, it’s advisable to consult an electrician to assess your home’s electrical capacity and make any necessary upgrades to support the 240V outlet for your Tesla.
Tips for regular maintenance and inspection of the 240V outlet to ensure optimal performance
Maintaining and inspecting your 240V outlet on a regular basis is crucial to ensure optimal charging performance and prevent potential issues. Follow these tips to keep your outlet in excellent condition:
- Cleanliness: Keep the outlet and surrounding area clean and free from dust or debris. This will prevent any potential obstructions that could affect the connection or cause overheating.
- Visual inspection: Periodically inspect the outlet for any signs of wear, damage, or discoloration. Look for loose wires, exposed contacts, or burn marks, as these could indicate potential problems. If you notice any issues, contact a qualified electrician to address them promptly.
- Regular tightening: Check the electrical connections of the outlet to ensure they are tight and secure. Over time, vibrations and usage can cause connections to loosen. Use the appropriate tools to tighten any loose connections gently.
- Protection: Consider installing a surge protector or a dedicated electrical circuit for your 240V outlet. This can provide an extra layer of protection against power surges and potential damage to your charging equipment.
Troubleshooting charging problems and resolving minor electrical issues
Occasionally, you may encounter charging problems or minor electrical issues with your 240V outlet. These can usually be resolved with some troubleshooting steps or minor adjustments. Here’s what you can do:
- No charging activity: If your Tesla doesn’t start charging when connected to the 240V outlet, first, ensure that the outlet is receiving power by checking the circuit breaker. If the circuit breaker is functioning correctly, check the connection between the outlet and your Tesla’s charging cable. Make sure it is secure and snugly plugged in. Also, check the charging settings on your Tesla’s touchscreen to ensure it is set to the correct charging mode.
- Slow charging speed: If you notice that your Tesla is charging at a slower rate than usual, it could be due to several factors. Start by checking the charging cable for any signs of damage or wear. If the cable appears to be in good condition, ensure that there are no loose electrical connections at the outlet or within your Tesla. In some cases, charging speed may vary based on external factors such as temperature or battery level, so keep those in mind as well.
- Intermittent charging: If your Tesla’s charging starts and stops intermittently, it might indicate an issue with the electrical connection. Make sure the connections are secure and that there are no loose wires or damaged components. Additionally, try using a different charging cable or adapter to eliminate the possibility of a faulty cable causing the intermittent charging.
By following these troubleshooting steps and ensuring regular maintenance and inspection of your 240V outlet, you can maximize the performance and reliability of your Tesla’s charging system.
Frequently Asked Questions
How Much Does It Cost To Install A 240V Outlet For A Tesla?
Installing a 240V outlet for a Tesla typically costs around $200 to $1,200, depending on factors like the location, existing electrical setup, and labor charges. It is recommended to consult with a licensed electrician for an accurate cost estimate for your specific situation.
Can I Plug My Tesla Into A 240 Outlet?
Yes, you can plug your Tesla into a 240 outlet. It provides the necessary power for charging your electric vehicle.
Can You Charge A Tesla With 240V Dryer Outlet?
Yes, you can charge a Tesla using a 240V dryer outlet. You will need an adapter to convert the outlet’s plug to fit your Tesla’s charging port.
How Much Does It Cost To Install A 240V Outlet In A Garage?
The cost of installing a 240V outlet in a garage varies depending on factors like the location and complexity of the job. On average, homeowners can expect to spend around $200 to $500 for the installation. It’s best to consult with a professional electrician for an accurate estimate for your specific project.
Conclusion
Installing a 240V outlet for your Tesla is a crucial step to ensure efficient charging at home. By following the step-by-step instructions provided, you can easily set up the outlet without any hassle. Remember, safety should always be your top priority, so consult with a professional electrician if you have any doubts.
With this installation, you’ll be able to enjoy convenient and quick charging for your Tesla, making your driving experience even more enjoyable. Start powering up your electric vehicle today!